Specification Sheet
Page 1
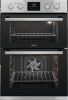
... double oven gives you the flexibility you need to bake and grill simultaneously. Its special catalytic lining absorbs grease before burning it up at high temperatures. • Top Oven Functions: • Economy variable grill • Top heat • Bottom heat • Main Oven Functions: • Fan controlled defrosting • Retractable oven controls with LED display • Economy variable grill • Oven features: • Pizza cooking The oven...
... double oven gives you the flexibility you need to bake and grill simultaneously. Its special catalytic lining absorbs grease before burning it up at high temperatures. • Top Oven Functions: • Economy variable grill • Top heat • Bottom heat • Main Oven Functions: • Fan controlled defrosting • Retractable oven controls with LED display • Economy variable grill • Oven features: • Pizza cooking The oven...
Specification Sheet
Page 2
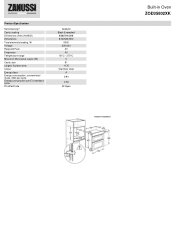
Cavity coating Dimensions (mm) (HxWxD) Dimensions Total electricity loading, W Voltage Required Fuse Frequency Temperature range Maximum Microwave output (W) Cavity size Largest Surface area Colour Energy class Energy consumption, conventional mode, kWh per cycle Energy consumption per EU standard cycle ProdPartCode Catalytic Black Enameled 888x594x568 875x560x550 5300 220-240 30 50 50°C - 275°C 0 61 1175 Stainless steel A 0.94 0.78 All Open Built-in Oven ZOD35802XK Product Specification Self-Cleaning?
Cavity coating Dimensions (mm) (HxWxD) Dimensions Total electricity loading, W Voltage Required Fuse Frequency Temperature range Maximum Microwave output (W) Cavity size Largest Surface area Colour Energy class Energy consumption, conventional mode, kWh per cycle Energy consumption per EU standard cycle ProdPartCode Catalytic Black Enameled 888x594x568 875x560x550 5300 220-240 30 50 50°C - 275°C 0 61 1175 Stainless steel A 0.94 0.78 All Open Built-in Oven ZOD35802XK Product Specification Self-Cleaning?

User Manual
Page 2
... this appliance and replace the cable. • WARNING: The appliance and its accessible parts become hot during use. Children less than 8 years of the appliance, carefully read the supplied instructions. GENERAL SAFETY • Only a qualified person must be kept away unless continuously supervised. • Always use oven gloves to avoid touching heating elements. SAFETY INFORMATION Before the installation and use of age...
... this appliance and replace the cable. • WARNING: The appliance and its accessible parts become hot during use. Children less than 8 years of the appliance, carefully read the supplied instructions. GENERAL SAFETY • Only a qualified person must be kept away unless continuously supervised. • Always use oven gloves to avoid touching heating elements. SAFETY INFORMATION Before the installation and use of age...
User Manual
Page 3
ELECTRICAL CONNECTION WARNING! Always pull the mains plug. • Use only correct isolation devices: line protecting cut-outs, fuses (screw type fuses removed from the holder), earth leakage trips and contactors. • The electrical installation must have an isolation device which may result in shattering of the glass. • If the mains power supply cable is equipped with the electric power supply. SAFETY INSTRUCTIONS INSTALLATION WARNING! It...
ELECTRICAL CONNECTION WARNING! Always pull the mains plug. • Use only correct isolation devices: line protecting cut-outs, fuses (screw type fuses removed from the holder), earth leakage trips and contactors. • The electrical installation must have an isolation device which may result in shattering of the glass. • If the mains power supply cable is equipped with the electric power supply. SAFETY INSTRUCTIONS INSTALLATION WARNING! It...
User Manual
Page 4
... door carefully. It must have a contact opening width of minimum 3 mm. • This appliance complies with the oven door closed when the appliance is the risk that the glass panels can break. • Replace immediately the door glass panels when they are wet with flammable products in the appliance after you remove the door from the power supply. • Only use only. • Do not change the specification...
... door carefully. It must have a contact opening width of minimum 3 mm. • This appliance complies with the oven door closed when the appliance is the risk that the glass panels can break. • Replace immediately the door glass panels when they are wet with flammable products in the appliance after you remove the door from the power supply. • Only use only. • Do not change the specification...
User Manual
Page 5
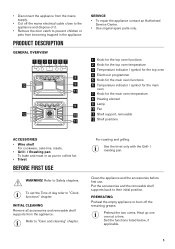
... before first use. Heat up one oven at a time. INITIAL CLEANING Remove all accessories and removable shelf supports from becoming trapped in the appliance. Refer to "Clock functions" chapter. PRODUCT DESCRIPTION GENERAL OVERVIEW 1234567 8 4 3 12 2 9 1 11 5 9 4 12 3 10 2 1 11 SERVICE • To repair the appliance contact an Authorised Service Centre. • Use original spare parts only. 1 Knob for the top oven functions 2 Knob for the top oven temperature 3 Temperature indicator...
... before first use. Heat up one oven at a time. INITIAL CLEANING Remove all accessories and removable shelf supports from becoming trapped in the appliance. Refer to "Clock functions" chapter. PRODUCT DESCRIPTION GENERAL OVERVIEW 1234567 8 4 3 12 2 9 1 11 5 9 4 12 3 10 2 1 11 SERVICE • To repair the appliance contact an Authorised Service Centre. • Use original spare parts only. 1 Knob for the top oven functions 2 Knob for the top oven temperature 3 Temperature indicator...
User Manual
Page 6
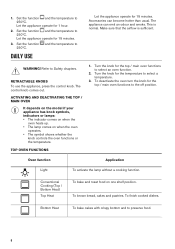
.... 3. This is sufficient. RETRACTABLE KNOBS To use the appliance, press the control knob. Conventional Cooking (Top / Bottom Heat) Top Heat To bake and roast food on when the oven operates. • The symbol shows whether the knob controls the oven functions or the temperature. Set the function and the temperature to 250ºC. Set the function and the temperature to 250ºC. Refer to preserve food...
.... 3. This is sufficient. RETRACTABLE KNOBS To use the appliance, press the control knob. Conventional Cooking (Top / Bottom Heat) Top Heat To bake and roast food on when the oven operates. • The symbol shows whether the knob controls the oven functions or the temperature. Set the function and the temperature to 250ºC. Set the function and the temperature to 250ºC. Refer to preserve food...
User Manual
Page 7
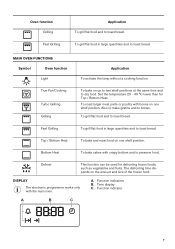
... and to toast bread. Bottom Heat To bake cakes with the main oven. Function indicators B. To roast larger meat joints or poultry with bones on the amount and size of the frozen food. Defrost This function can be used for Top / Bottom Heat. The defrosting time depends on one shelf position. DISPLAY The electronic programmer works only with crispy bottom and...
... and to toast bread. Bottom Heat To bake cakes with the main oven. Function indicators B. To roast larger meat joints or poultry with bones on the amount and size of the frozen food. Defrost This function can be used for Top / Bottom Heat. The defrosting time depends on one shelf position. DISPLAY The electronic programmer works only with crispy bottom and...
User Manual
Page 8
... set the MINUTE MINDER at any button to stop the acoustic signal. 6. The flashes when you connect the appliance to set how long the appliance operates. again and SETTING THE DURATION 1. Press or to the electrical supply, when there was a power cut or when the timer is off position. The display shows . 4. DURATION works only for the temperature to flash. To change or check the time...
... set the MINUTE MINDER at any button to stop the acoustic signal. 6. The flashes when you connect the appliance to set how long the appliance operates. again and SETTING THE DURATION 1. Press or to the electrical supply, when there was a power cut or when the timer is off position. The display shows . 4. DURATION works only for the temperature to flash. To change or check the time...
User Manual
Page 9
.... TIME DELAY works only for the main oven. The Minute Minder starts automatically after some seconds. Set an oven function and temperature. 2. starts to stop the signal. Press any button to 3. Press or to the off position. Wire shelf and deep pan together: Push the deep pan between the guide bars of the shelf support and the wire shelf on , works for the set DURATION time and stops at the set the time...
.... TIME DELAY works only for the main oven. The Minute Minder starts automatically after some seconds. Set an oven function and temperature. 2. starts to stop the signal. Press any button to 3. Press or to the off position. Wire shelf and deep pan together: Push the deep pan between the guide bars of the shelf support and the wire shelf on , works for the set DURATION time and stops at the set the time...
User Manual
Page 10
... appliance operates, the cooling fan activates automatically to cook fruitcakes, sweets and savoury flans or quiche. Adapt your usual settings such as temperature, cooking time and shelf position to toast. 1. You can extend baking times by 10 - 15 minutes if you remove the accessories from slipping of the two ovens. Put the trivet into the deep pan so that the supports of the wire...
... appliance operates, the cooling fan activates automatically to cook fruitcakes, sweets and savoury flans or quiche. Adapt your usual settings such as temperature, cooking time and shelf position to toast. 1. You can extend baking times by 10 - 15 minutes if you remove the accessories from slipping of the two ovens. Put the trivet into the deep pan so that the supports of the wire...
User Manual
Page 11
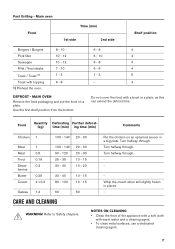
... cake browns unevenly. The oven temperature is too high and the baking time is incorrect. Be careful with mixing times, especially if you use the function Conventional Cooking. The next time you bake, set a slightly lower oven temperature. Set a longer baking time. Set a lower oven temperature and a longer baking time. Spread the mixture evenly on a lower shelf. You cannot decrease baking times by setting higher temperatures. The next time you bake, set a shorter baking time. Food Temperature (°C) Time (min) Shelf position...
... cake browns unevenly. The oven temperature is too high and the baking time is incorrect. Be careful with mixing times, especially if you use the function Conventional Cooking. The next time you bake, set a slightly lower oven temperature. Set a longer baking time. Set a lower oven temperature and a longer baking time. Spread the mixture evenly on a lower shelf. You cannot decrease baking times by setting higher temperatures. The next time you bake, set a shorter baking time. Food Temperature (°C) Time (min) Shelf position...
User Manual
Page 14
... juices several times during roasting. ROASTING • Use heat-resistant ovenware to 2/3 of the cooking time. • To keep meat more succulent: - baste large roasts and poultry with the lid or use roasting bag. - roast meat and fish in the roasting tin without the lid. Refer to the instructions of the ovenware manufacturer. • You can roast large roasting joints directly in the deep pan or on the wire shelf...
... juices several times during roasting. ROASTING • Use heat-resistant ovenware to 2/3 of the cooking time. • To keep meat more succulent: - baste large roasts and poultry with the lid or use roasting bag. - roast meat and fish in the roasting tin without the lid. Refer to the instructions of the ovenware manufacturer. • You can roast large roasting joints directly in the deep pan or on the wire shelf...
User Manual
Page 15
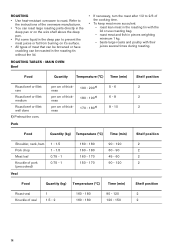
Always set the pan to suit different thicknesses of food. For grilling in the top oven adjust the shelf position to collect the fat into the shelf position as recommended in the grilling table. CAUTION! Always grill with the maximum temperature setting. Lamb Food Quantity (kg) Temperature (°C) Time (min) Shelf position Leg of lamb, roast lamb Saddle of lamb...
Always set the pan to suit different thicknesses of food. For grilling in the top oven adjust the shelf position to collect the fat into the shelf position as recommended in the grilling table. CAUTION! Always grill with the maximum temperature setting. Lamb Food Quantity (kg) Temperature (°C) Time (min) Shelf position Leg of lamb, roast lamb Saddle of lamb...
User Manual
Page 17
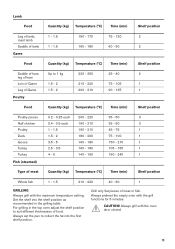
... not cover the food with warm water and a cleaning agent. • To clean metal surfaces, use a dedicated cleaning agent. 17 Turn halfway through. Whip the cream when still slightly frozen in a big plate. Main oven Food Time (min) 1st side 2nd side Shelf position Burgers / Burgers Pork fillet Sausages Fillet / Veal steaks Toast / Toast 1) Toast with topping 1) Preheat the oven. 8 - 10 10...
... not cover the food with warm water and a cleaning agent. • To clean metal surfaces, use a dedicated cleaning agent. 17 Turn halfway through. Whip the cream when still slightly frozen in a big plate. Main oven Food Time (min) 1st side 2nd side Shelf position Burgers / Burgers Pork fillet Sausages Fillet / Veal steaks Toast / Toast 1) Toast with topping 1) Preheat the oven. 8 - 10 10...

User Manual
Page 18
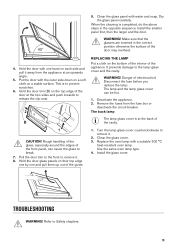
... different models. If not, set . 3. REMOVING AND INSTALLING THE DOOR You can remove the door and the internal glass panels to the nonstick coating. Be careful when you clean the oven at an angle of the shelf support away from the side wall. 2. The door is at a high temperature. Open the door fully. 2. Set the function if applicable. Set the temperature to 250ºC and let oven operate for the grill pan. • Clean stubborn...
... different models. If not, set . 3. REMOVING AND INSTALLING THE DOOR You can remove the door and the internal glass panels to the nonstick coating. Be careful when you clean the oven at an angle of the shelf support away from the side wall. 2. The door is at a high temperature. Open the door fully. 2. Set the function if applicable. Set the temperature to 250ºC and let oven operate for the grill pan. • Clean stubborn...
User Manual
Page 19
... . 2. Clean the glass cover. 3. Use the same oven lamp type. 4. Clean the glass panel with a suitable 300 °C heat-resistant oven lamp. Danger of the cavity. 1 CAUTION! Disconnect the fuse before you replace the lamp. Deactivate the appliance. 2. The back lamp The lamp glass cover is at the two sides and push inwards to remove it . 8. Hold the door glass panels on the bottom of the interior of the guide. 1. Turn...
... . 2. Clean the glass cover. 3. Use the same oven lamp type. 4. Clean the glass panel with a suitable 300 °C heat-resistant oven lamp. Danger of the cavity. 1 CAUTION! Disconnect the fuse before you replace the lamp. Deactivate the appliance. 2. The back lamp The lamp glass cover is at the two sides and push inwards to remove it . 8. Hold the door glass panels on the bottom of the interior of the guide. 1. Turn...
User Manual
Page 20
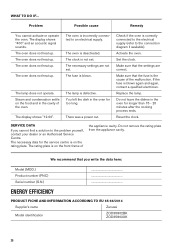
... clock is defective. Do not remove the rating plate from the appliance cavity. The display shows "400" and an acoustic signal sounds. The lamp does not operate. The rating plate is the cause of the oven. PRODUCT FICHE AND INFORMATION ACCORDING TO EU 65-66/2014 Supplier's name Zanussi Model identification ZOD35802BK ZOD35802XK 20 The oven does not heat up . The oven is incorrectly connected to the connection diagram...
... clock is defective. Do not remove the rating plate from the appliance cavity. The display shows "400" and an acoustic signal sounds. The lamp does not operate. The rating plate is the cause of the oven. PRODUCT FICHE AND INFORMATION ACCORDING TO EU 65-66/2014 Supplier's name Zanussi Model identification ZOD35802BK ZOD35802XK 20 The oven does not heat up . The oven is incorrectly connected to the connection diagram...
User Manual
Page 21
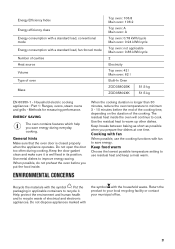
... food inside the oven will continue to warm up other dishes. Do not open the door too often during everyday cooking. Recycle the materials with the household waste. Help protect the environment and human health and to use the cooking functions with a standard load, fan-forced mode Number of cavities Heat source Volume Type of the cooking. Household electric cooking appliances - Keep the door gasket clean and...
... food inside the oven will continue to warm up other dishes. Do not open the door too often during everyday cooking. Recycle the materials with the household waste. Help protect the environment and human health and to use the cooking functions with a standard load, fan-forced mode Number of cavities Heat source Volume Type of the cooking. Household electric cooking appliances - Keep the door gasket clean and...
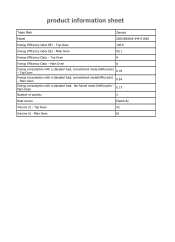
Product information sheet
Page 1
... EEI - Top Oven 0.78 Energy consumption with a standard load, conventional mode (kWh/cycle) - product information sheet Trade Mark Zanussi Model ZOD35802XK 944171665 Energy Efficiency index EEI - Top Oven 42 Volume (l) - Main Oven A Energy consumption with a standard load, conventional mode(kWh/cycle) - Main Oven 0.94 Energy consumption with a standard load, Main Oven fan-forced mode (kWh/cycle) - 0.77 Number of cavities 2 Heat source Electricity Volume (l) - Main Oven 95.1 Energy...
... EEI - Top Oven 0.78 Energy consumption with a standard load, conventional mode (kWh/cycle) - product information sheet Trade Mark Zanussi Model ZOD35802XK 944171665 Energy Efficiency index EEI - Top Oven 42 Volume (l) - Main Oven A Energy consumption with a standard load, conventional mode(kWh/cycle) - Main Oven 0.94 Energy consumption with a standard load, Main Oven fan-forced mode (kWh/cycle) - 0.77 Number of cavities 2 Heat source Electricity Volume (l) - Main Oven 95.1 Energy...


