
Specification Sheet
Page 1
... heat • Fan controlled defrosting • Oven features: • Clean 'n' clear enamel interior • 2 oven shelves • Fan cooled double glazed door with ring element offers the ideal cooking function for any recipe, and its range of cooking functions like top and bottom heating elements, grill and fan, this multifunction oven makes cooking easier ‒ no matter what 's on several levels at one turn of cooking functions like top and bottom heating elements...
... heat • Fan controlled defrosting • Oven features: • Clean 'n' clear enamel interior • 2 oven shelves • Fan cooled double glazed door with ring element offers the ideal cooking function for any recipe, and its range of cooking functions like top and bottom heating elements, grill and fan, this multifunction oven makes cooking easier ‒ no matter what 's on several levels at one turn of cooking functions like top and bottom heating elements...

Specification Sheet
Page 2
Cavity coating Dimensions (mm) (HxWxD) Dimensions Total electricity loading, W Voltage Required Fuse Frequency Temperature range Cavity size Largest Surface area Colour Noise Energy class Energy consumption, conventional mode, kWh per cycle Energy consumption per EU standard cycle ProdPartCode Easy to clean enamel/pinned Grey Enamel 589x594x568 600x560x550 2790 220-240 15 50/60 50°C - 275°C 68 1424 Stainless steel with antifingerprint 43 A 0 0 ER Open Built-in Oven ZOB35471XK Product Specification Self-Cleaning?
Cavity coating Dimensions (mm) (HxWxD) Dimensions Total electricity loading, W Voltage Required Fuse Frequency Temperature range Cavity size Largest Surface area Colour Noise Energy class Energy consumption, conventional mode, kWh per cycle Energy consumption per EU standard cycle ProdPartCode Easy to clean enamel/pinned Grey Enamel 589x594x568 600x560x550 2790 220-240 15 50/60 50°C - 275°C 68 1424 Stainless steel with antifingerprint 43 A 0 0 ER Open Built-in Oven ZOB35471XK Product Specification Self-Cleaning?

User Manual
Page 2
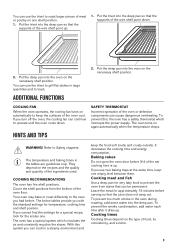
... not carry out cleaning and user maintenance of the appliance without supervision. CHILDREN AND VULNERABLE PEOPLE SAFETY • This appliance can be used by children aged from the appliance when it operates or when it should be taken to avoid touching heating elements. • Always use oven gloves to remove or put in a safe and accessible location for any injuries...
... not carry out cleaning and user maintenance of the appliance without supervision. CHILDREN AND VULNERABLE PEOPLE SAFETY • This appliance can be used by children aged from the appliance when it operates or when it should be taken to avoid touching heating elements. • Always use oven gloves to remove or put in a safe and accessible location for any injuries...
User Manual
Page 3
... must be replaced by the handle. • Keep the minimum distance from the mains at the end of the installation. ELECTRICAL CONNECTION WARNING! Always pull the mains plug. • Use only correct isolation devices: line protecting cut-outs, fuses (screw type fuses removed from the holder), earth leakage trips and contactors. • The electrical installation must be incorporated in the fixed wiring in such...
... must be replaced by the handle. • Keep the minimum distance from the mains at the end of the installation. ELECTRICAL CONNECTION WARNING! Always pull the mains plug. • Use only correct isolation devices: line protecting cut-outs, fuses (screw type fuses removed from the holder), earth leakage trips and contactors. • The electrical installation must be incorporated in the fixed wiring in such...
User Manual
Page 4
...! • Clean regularly the appliance to the enamel: - SERVICE • To repair the appliance contact an Authorised Service Centre. • Use original spare parts only. Risk of injury, burns and electric shock or explosion. • This appliance is for this appliance. • Make sure that the glass panels can be used for household use . • Be careful when you open the appliance door while...
...! • Clean regularly the appliance to the enamel: - SERVICE • To repair the appliance contact an Authorised Service Centre. • Use original spare parts only. Risk of injury, burns and electric shock or explosion. • This appliance is for this appliance. • Make sure that the glass panels can be used for household use . • Be careful when you open the appliance door while...
User Manual
Page 5
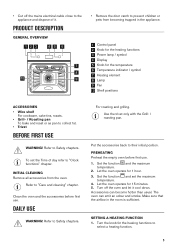
.... Clean the oven and the accessories before first use . Let the oven operate for the temperature 6 Temperature indicator / symbol 7 Heating element 8 Lamp 9 Fan 10 Shelf positions ACCESSORIES • Wire shelf For cookware, cake tins, roasts. • Grill- / Roasting pan To bake and roast or as pan to "Clock functions" chapter. SETTING A HEATING FUNCTION 1. Set the function and the maximum temperature. 2. The oven can become hotter than usual. PRODUCT DESCRIPTION GENERAL OVERVIEW 1 23 45 6 7 5 8 4 10 3 9 2 1 • Remove...
.... Clean the oven and the accessories before first use . Let the oven operate for the temperature 6 Temperature indicator / symbol 7 Heating element 8 Lamp 9 Fan 10 Shelf positions ACCESSORIES • Wire shelf For cookware, cake tins, roasts. • Grill- / Roasting pan To bake and roast or as pan to "Clock functions" chapter. SETTING A HEATING FUNCTION 1. Set the function and the maximum temperature. 2. The oven can become hotter than usual. PRODUCT DESCRIPTION GENERAL OVERVIEW 1 23 45 6 7 5 8 4 10 3 9 2 1 • Remove...
User Manual
Page 6
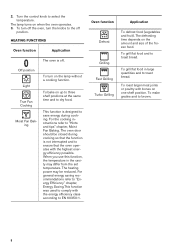
... Light True Fan Cooking Moist Fan Bak- ing To turn the knobs to EN 60350-1. For the cooking instructions refer to select the temperature. To roast larger meat joints or poultry with the highest energy efficiency possible. 2. Turn the control knob to "Hints and tips" chapter, Moist Fan Baking. Oven function Application Defrost Grilling Fast Grilling Turbo Grilling To defrost food (vegetables and fruit). The heating power...
... Light True Fan Cooking Moist Fan Bak- ing To turn the knobs to EN 60350-1. For the cooking instructions refer to select the temperature. To roast larger meat joints or poultry with the highest energy efficiency possible. 2. Turn the control knob to "Hints and tips" chapter, Moist Fan Baking. Oven function Application Defrost Grilling Fast Grilling Turbo Grilling To defrost food (vegetables and fruit). The heating power...
User Manual
Page 7
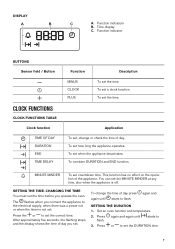
... has no effect on the operation of day you operate the oven. Function indicator BUTTONS Sensor field / Button CLOCK FUNCTIONS CLOCK FUNCTIONS TABLE Clock function TIME OF DAY DURATION END TIME DELAY Function MINUS CLOCK PLUS Description To set how long the appliance operates. To set the time. After approximately five seconds, the flashing stops and the display shows the time of the appliance. starts to set , change the time of day. Function indicators...
... has no effect on the operation of day you operate the oven. Function indicator BUTTONS Sensor field / Button CLOCK FUNCTIONS CLOCK FUNCTIONS TABLE Clock function TIME OF DAY DURATION END TIME DELAY Function MINUS CLOCK PLUS Description To set how long the appliance operates. To set the time. After approximately five seconds, the flashing stops and the display shows the time of the appliance. starts to set , change the time of day. Function indicators...

User Manual
Page 8
.... 5. SETTING THE TIME DELAY 1. Press again and again until starts to flash. 2. Appliance turns on automatically later on, works for the set DURATION time and stops at the set the time for the temperature to stop the acoustic signal. 6. Press again and again until flash. Refer to 3. Press any button to the off position. Press or to flash. 2. Push the deep pan between the guide bars...
.... 5. SETTING THE TIME DELAY 1. Press again and again until starts to flash. 2. Appliance turns on automatically later on, works for the set DURATION time and stops at the set the time for the temperature to stop the acoustic signal. 6. Press again and again until flash. Refer to 3. Press any button to the off position. Press or to flash. 2. Push the deep pan between the guide bars...
User Manual
Page 9
... oven has a safety thermostat which circulates the air and constantly recycles the steam. It decreases the cooking time and energy consumption. Cooking meat and fish Use a deep pan for temperature, cooking time and shelf position. Put the trivet into the deep pan so that the juice does not seep out. The below tables provide you turn off the oven, the cooling fan can continue to operate until the oven...
... oven has a safety thermostat which circulates the air and constantly recycles the steam. It decreases the cooking time and energy consumption. Cooking meat and fish Use a deep pan for temperature, cooking time and shelf position. Put the trivet into the deep pan so that the juice does not seep out. The below tables provide you turn off the oven, the cooling fan can continue to operate until the oven...

User Manual
Page 10
... Biscuits / pastry stripes - three levels Meringues - Food True Fan Cooking Temperature (°C) Shelf position Time (min) Comments Whisked recipes 160 Shortbread 160 dough Buttermilk 165 ...baking tray In a baking tray In a baking tray In a baking tray In a baking tray In a baking tray In a baking tray 10 one level Small cakes two levels Small cakes three levels Biscuits / pastry stripes - one level Biscuits / pastry stripes - Initially, monitor the performance when you use this appliance. Find the best settings (heat setting, cooking time, BAKING AND ROASTING...
... Biscuits / pastry stripes - three levels Meringues - Food True Fan Cooking Temperature (°C) Shelf position Time (min) Comments Whisked recipes 160 Shortbread 160 dough Buttermilk 165 ...baking tray In a baking tray In a baking tray In a baking tray In a baking tray In a baking tray In a baking tray 10 one level Small cakes two levels Small cakes three levels Biscuits / pastry stripes - one level Biscuits / pastry stripes - Initially, monitor the performance when you use this appliance. Find the best settings (heat setting, cooking time, BAKING AND ROASTING...

User Manual
Page 13
Food Fillet steaks Beef steaks Sausages Pork chops Chicken (cut in 2) Kebabs Breast of chicken Hamburger Fish fillet Toasted sandwiches Toast Quantity Time (min) Pieces 4 4 8 4 2 4 4 6 4 4 - 6 4 - 6 ...Use the fourth shelf position. 2 40 - 55 3 - 4 fish 2 35 - 60 4 - 6 fillets Set the maximum temperature. Food True Fan Cooking Temperature (°C) Shelf position Time (min) Comments Pheasant 175 2 Fish 90 - 120 Whole Food True Fan Cooking Temperature (°C) Shelf position Time (min) Comments Trout / Sea 175 bream Tuna fish / Sal- 175 mon GRILLING Preheat the oven...
Food Fillet steaks Beef steaks Sausages Pork chops Chicken (cut in 2) Kebabs Breast of chicken Hamburger Fish fillet Toasted sandwiches Toast Quantity Time (min) Pieces 4 4 8 4 2 4 4 6 4 4 - 6 4 - 6 ...Use the fourth shelf position. 2 40 - 55 3 - 4 fish 2 35 - 60 4 - 6 fillets Set the maximum temperature. Food True Fan Cooking Temperature (°C) Shelf position Time (min) Comments Pheasant 175 2 Fish 90 - 120 Whole Food True Fan Cooking Temperature (°C) Shelf position Time (min) Comments Trout / Sea 175 bream Tuna fish / Sal- 175 mon GRILLING Preheat the oven...

User Manual
Page 14
... 50 - 70 80 - 100 120 - 180 120 - 150 150 - 240 Food Temperature (°C) Time (min) Whole fish, 1 - 1.5 kg 210 - 220 40 - 60 MOIST FAN BAKING For best results follow suggestions listed in the table below . 14 Beef Preheat the oven. To calculate the roasting time multiple the time given in the table below by the centimetres of thickness of the...
... 50 - 70 80 - 100 120 - 180 120 - 150 150 - 240 Food Temperature (°C) Time (min) Whole fish, 1 - 1.5 kg 210 - 220 40 - 60 MOIST FAN BAKING For best results follow suggestions listed in the table below . 14 Beef Preheat the oven. To calculate the roasting time multiple the time given in the table below by the centimetres of thickness of the...

User Manual
Page 16
... on a large plate. Turn halfway through . Turn halfway through . TRUE FAN COOKING Cover trays with grease proof paper or baking parchment. Turn halfway through the drying time, open the door and let it cool down for sour Mushrooms Herbs 60 - 70 60 - 70 60 - 70 50 - 60 40 - 50 6 - 8 5 - 6 5 - 6 6 - 8 2 - 3 16 Food Accessories Temperature Shelf posi- (°C) tion Time (min) Vegetables, baking tray or dripping pan 180 4 35...
... on a large plate. Turn halfway through . Turn halfway through . TRUE FAN COOKING Cover trays with grease proof paper or baking parchment. Turn halfway through the drying time, open the door and let it cool down for sour Mushrooms Herbs 60 - 70 60 - 70 60 - 70 50 - 60 40 - 50 6 - 8 5 - 6 5 - 6 6 - 8 2 - 3 16 Food Accessories Temperature Shelf posi- (°C) tion Time (min) Vegetables, baking tray or dripping pan 180 4 35...

User Manual
Page 17
... Function Accessories Shelf position Temperature (°C) Time (min) Convention- Wire 2 170 40 - 50 al Cooking shelf True Fan Wire 2 160 40 - 50 Cooking / shelf Fan Cook- Put 20 small cakes per one baking tray. Use 2 tins (20 cm diameter), diagonally shifted. Put 20 small cakes per one baking tray. Use a cake mould (26 cm diameter). Use a cake mould (26 cm diameter). Preheat the oven for 10 minutes. 17...
... Function Accessories Shelf position Temperature (°C) Time (min) Convention- Wire 2 170 40 - 50 al Cooking shelf True Fan Wire 2 160 40 - 50 Cooking / shelf Fan Cook- Put 20 small cakes per one baking tray. Use 2 tins (20 cm diameter), diagonally shifted. Put 20 small cakes per one baking tray. Use a cake mould (26 cm diameter). Use a cake mould (26 cm diameter). Preheat the oven for 10 minutes. 17...

User Manual
Page 18
... dripping pan on the door glass panels. If you have nonstick accessories, do not clean them dry. Baking 3 al Cooking tray Toast 4 - 6 pieces Grilling Wire 4 shelf Beef burger 6 pieces, 0.6 kg Grilling Wire 4 shelf and dripping pan CARE AND CLEANING 160 40 - 60 140 150 20 - 40 Use a cake mould (26 cm diameter). max. 25 - 45 2 - 3 minutes first side; 2 - 3 minutes second side 20 - 30 Preheat the oven...
... dripping pan on the door glass panels. If you have nonstick accessories, do not clean them dry. Baking 3 al Cooking tray Toast 4 - 6 pieces Grilling Wire 4 shelf Beef burger 6 pieces, 0.6 kg Grilling Wire 4 shelf and dripping pan CARE AND CLEANING 160 40 - 60 140 150 20 - 40 Use a cake mould (26 cm diameter). max. 25 - 45 2 - 3 minutes first side; 2 - 3 minutes second side 20 - 30 Preheat the oven...
User Manual
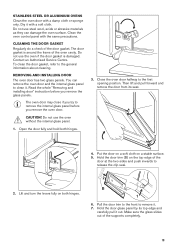
Page 19
... and turn the levers fully on a stable surface. 5. Do not use the oven without the internal glass panel. 1. Do not use the oven if the door gasket is around the frame of the door at the two sides and push inwards to remove it out. Open the door fully and hold both hinges. 4. Close the oven door halfway to the general information about cleaning. Put the door on...
... and turn the levers fully on a stable surface. 5. Do not use the oven without the internal glass panel. 1. Do not use the oven if the door gasket is around the frame of the door at the two sides and push inwards to remove it out. Open the door fully and hold both hinges. 4. Close the oven door halfway to the general information about cleaning. Put the door on...
User Manual
Page 20
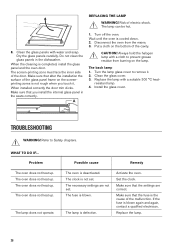
... that you touch it . 2. When installed correctly the door trim clicks. The back lamp 1. Turn the lamp glass cover to remove it . Replace the lamp with water and soap. WHAT TO DO IF... The lamp is completed, install the glass panel and the oven door. Make sure that the settings are not set . Clean the glass panels with a suitable 300 °C heat- When the cleaning is defective. Make sure that...
... that you touch it . 2. When installed correctly the door trim clicks. The back lamp 1. Turn the lamp glass cover to remove it . Replace the lamp with water and soap. WHAT TO DO IF... The lamp is completed, install the glass panel and the oven door. Make sure that the settings are not set . Clean the glass panels with a suitable 300 °C heat- When the cleaning is defective. Make sure that...
User Manual
Page 21
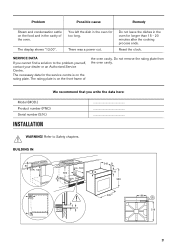
... frame of the oven. There was a power cut. SERVICE DATA If you write the data here: Model (MOD.) Product number (PNC) Serial number (S.N.) INSTALLATION ... Do not remove the rating plate from the oven cavity. BUILDING IN 80 60 520 min. 550 600 20 6 min. 560 548 21 18 114 589 60 595±1 198 6 3 518 20 21 Reset the clock. Problem Possible cause Remedy Steam and condensation settle...
... frame of the oven. There was a power cut. SERVICE DATA If you write the data here: Model (MOD.) Product number (PNC) Serial number (S.N.) INSTALLATION ... Do not remove the rating plate from the oven cavity. BUILDING IN 80 60 520 min. 550 600 20 6 min. 560 548 21 18 114 589 60 595±1 198 6 3 518 20 21 Reset the clock. Problem Possible cause Remedy Steam and condensation settle...
User Manual
Page 23
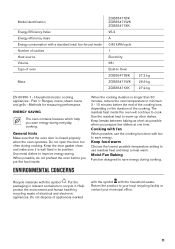
... the oven operates. Recycle materials with fan to save energy. Put the packaging in its position. Part 1: Ranges, ovens, steam ovens and grills - Cooking with fan When possible, use residual heat and keep a meal warm. Methods for measuring performance. The residual heat inside . Moist Fan Baking Function designed to warm up other dishes. Do not dispose of appliances marked with the symbol with a standard load, fan-forced mode Number of cavities Heat source...
... the oven operates. Recycle materials with fan to save energy. Put the packaging in its position. Part 1: Ranges, ovens, steam ovens and grills - Cooking with fan When possible, use residual heat and keep a meal warm. Methods for measuring performance. The residual heat inside . Moist Fan Baking Function designed to warm up other dishes. Do not dispose of appliances marked with the symbol with a standard load, fan-forced mode Number of cavities Heat source...


