Product Manaul
Page 2
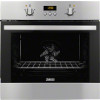
... not responsible if an incorrect installation and use 6 Clock functions 7 Using the accessories 8 Safety information Additional functions 8 Helpful hints and tips 9 Care and cleaning 13 What to do if 15 Installation 15 Environment concerns 17 Subject to remove or put in operation. General Safety • Internally the appliance becomes hot when in accessories or ovenware. 2 www.zanussi.com The manufacturer is...
... not responsible if an incorrect installation and use 6 Clock functions 7 Using the accessories 8 Safety information Additional functions 8 Helpful hints and tips 9 Care and cleaning 13 What to do if 15 Installation 15 Environment concerns 17 Subject to remove or put in operation. General Safety • Internally the appliance becomes hot when in accessories or ovenware. 2 www.zanussi.com The manufacturer is...
Product Manaul
Page 3
... the electrical information on the rating plate agrees with the appliance. • Always be fastened in touch with the same height. • Do not use a steam cleaner to clean the appliance. • Before maintenance cut -outs, fuses (screw type fuses removed from the holder), earth leakage trips and contactors. • The electrical installation must have a contact opening width of minimum 3 mm. Use Warning! www.zanussi.com...
... the electrical information on the rating plate agrees with the appliance. • Always be fastened in touch with the same height. • Do not use a steam cleaner to clean the appliance. • Before maintenance cut -outs, fuses (screw type fuses removed from the holder), earth leakage trips and contactors. • The electrical installation must have a contact opening width of minimum 3 mm. Use Warning! www.zanussi.com...

Product Manaul
Page 4
...power supply. • Only use an oven spray, obey the safety instructions on the bottom of the appliance. Internal light • The type of electrical shock. • Before replacing the lamp, disconnect the appliance from the mains supply. • Cut off the mains cable and discard it. • Remove the door...the mains plug from the appliance. There is in operation. • Open the appliance door carefully. Risk of light bulb or halogen lamp used for this appliance, is in operation. Warning! do not put aluminium foil directly on the packaging. • Do not clean the ...
...power supply. • Only use an oven spray, obey the safety instructions on the bottom of the appliance. Internal light • The type of electrical shock. • Before replacing the lamp, disconnect the appliance from the mains supply. • Cut off the mains cable and discard it. • Remove the door...the mains plug from the appliance. There is in operation. • Open the appliance door carefully. Risk of light bulb or halogen lamp used for this appliance, is in operation. Warning! do not put aluminium foil directly on the packaging. • Do not clean the ...
Product Manaul
Page 5
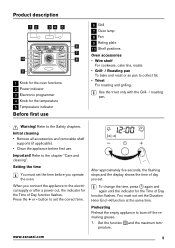
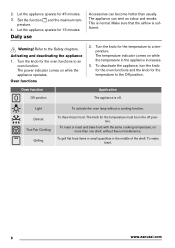
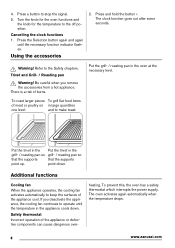
... For roasting and grilling. Warning! After approximately five seconds, the flashing stops and the display shows the time of Day function flashes. Press the + or - Important! button to set the time before first use 6 Grill 7 Oven lamp 8 Fan 9 Rating plate 10 Shelf positions Oven accessories • Wire shelf For cookware, cake tins, roasts. • Grill- / Roasting pan To bake and roast or as pan to the chapter "Care and cleaning". www.zanussi.com...
... For roasting and grilling. Warning! After approximately five seconds, the flashing stops and the display shows the time of Day function flashes. Press the + or - Important! button to set the time before first use 6 Grill 7 Oven lamp 8 Fan 9 Rating plate 10 Shelf positions Oven accessories • Wire shelf For cookware, cake tins, roasts. • Grill- / Roasting pan To bake and roast or as pan to the chapter "Care and cleaning". www.zanussi.com...
Product Manaul
Page 6
.... Defrost True Fan Cooking Grilling To thaw frozen food. To roast or roast and bake food with the same cooking temperature, on while the appliance operates. Let the appliance operate for 45 minutes. 3. Turn the knob for the temperature to the Off position. The power indicator comes on more than usually. The knob for the temperature to a temperature. To make toast. 6 www.zanussi.com perature...
.... Defrost True Fan Cooking Grilling To thaw frozen food. To roast or roast and bake food with the same cooking temperature, on while the appliance operates. Let the appliance operate for 45 minutes. 3. Turn the knob for the temperature to the Off position. The power indicator comes on more than usually. The knob for the temperature to a temperature. To make toast. 6 www.zanussi.com perature...
Product Manaul
Page 7
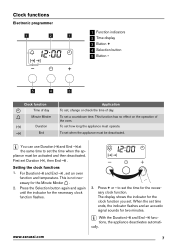
... 2 Time display 3 Button + 4 Selection button 5 Button - 5 4 3 Clock function Time of day Minute Minder Duration End Application To set an oven function and temperature. To set time ends, the indicator flashes and an acoustic signal sounds for the necessary clock function flashes. 3. Press the Selection button again and again until the indicator for two minutes. www.zanussi.com 7 For Duration and End , set , change or check the time of...
... 2 Time display 3 Button + 4 Selection button 5 Button - 5 4 3 Clock function Time of day Minute Minder Duration End Application To set an oven function and temperature. To set time ends, the indicator flashes and an acoustic signal sounds for the necessary clock function flashes. 3. Press the Selection button again and again until the indicator for two minutes. www.zanussi.com 7 For Duration and End , set , change or check the time of...
Product Manaul
Page 8
....zanussi.com Be careful when you deactivate the appliance, the cooling fan continues to stop the signal. 5. Turn the knob for the oven functions and the knob for the temperature to the Safety chapters. The clock function goes out after some seconds. 4. Press the Selection button again and again until the temperature in the appliance cools down . If you remove the...
....zanussi.com Be careful when you deactivate the appliance, the cooling fan continues to stop the signal. 5. Turn the knob for the oven functions and the knob for the temperature to the Safety chapters. The clock function goes out after some seconds. 4. Press the Selection button again and again until the temperature in the appliance cools down . If you remove the...
Product Manaul
Page 9
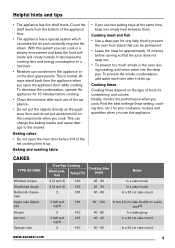
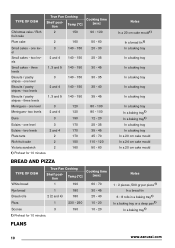
... the steam. To prevent the smoke condensation, add water each time after each use this system you open the oven door before cooking. • Clean the moisture after it dries up . Baking cakes • Do not open the appliance door while cooking. Always stand back from the bottom of food, its consistency, and volume. This is up . Cooking times Cooking times depend on a wire shelf1) In a baking tray In...
... the steam. To prevent the smoke condensation, add water each time after each use this system you open the oven door before cooking. • Clean the moisture after it dries up . Baking cakes • Do not open the appliance door while cooking. Always stand back from the bottom of food, its consistency, and volume. This is up . Cooking times Cooking times depend on a wire shelf1) In a baking tray In...
Product Manaul
Page 10
... a baking tray In a baking tray In a baking tray In a baking tray1) In a baking tray1) In a baking tray In a baking tray In a 20 cm cake mould In a 24 cm cake mould In a 20 cm cake mould Notes 1 - 2 pieces, 500 gr per piece1) In a bread tin 6 - 8 rolls in a baking tray1) In a baking tray or a deep pan1) In a baking tray1) 10 www.zanussi.com TYPE OF DISH True Fan Cooking Cooking time Shelf position Temp...
... a baking tray In a baking tray In a baking tray In a baking tray1) In a baking tray1) In a baking tray In a baking tray In a 20 cm cake mould In a 24 cm cake mould In a 20 cm cake mould Notes 1 - 2 pieces, 500 gr per piece1) In a bread tin 6 - 8 rolls in a baking tray1) In a baking tray or a deep pan1) In a baking tray1) 10 www.zanussi.com TYPE OF DISH True Fan Cooking Cooking time Shelf position Temp...
Product Manaul
Page 11
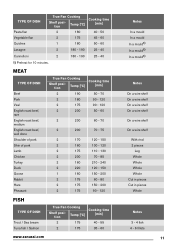
... / Salmon True Fan Cooking Cooking time Shelf position Temp [°C] [min] 2 175 40 - 55 2 175 35 - 60 www.zanussi.com Notes In a mould In a mould In a mould1) In a mould1) In a mould1) Notes On a wire shelf On a wire shelf On a wire shelf On a wire shelf On a wire shelf On a wire shelf With rind 2 pieces Leg Whole Whole Whole Whole Cut in pieces Cut in pieces...
... / Salmon True Fan Cooking Cooking time Shelf position Temp [°C] [min] 2 175 40 - 55 2 175 35 - 60 www.zanussi.com Notes In a mould In a mould In a mould1) In a mould1) In a mould1) Notes On a wire shelf On a wire shelf On a wire shelf On a wire shelf On a wire shelf On a wire shelf With rind 2 pieces Leg Whole Whole Whole Whole Cut in pieces Cut in pieces...
Product Manaul
Page 12
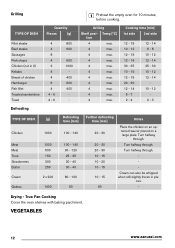
...Turn halfway through . True Fan Cooking Cover the oven shelves with baking parchment. Grilling Preheat the empty oven for 10 minutes, before cooking. TYPE OF DISH Quantity Pieces [g] Fillet steaks Beef steaks Sausages Pork chops Chicken (cut in places. - Drying - VEGETABLES 12 www.zanussi.com Temp... - 3 Defrosting TYPE OF DISH [g] Chicken Meat Meat Trout Strawberries Butter Cream Gateau 1000 1000 500 150 300 250 2 x 200 1400 Defrosting time [min] 100 - 140 100 - 140 90... - 120 25 - 35 30 - 40 30 - 40 80 - 100 60 Further defrosting time ...
...Turn halfway through . True Fan Cooking Cover the oven shelves with baking parchment. Grilling Preheat the empty oven for 10 minutes, before cooking. TYPE OF DISH Quantity Pieces [g] Fillet steaks Beef steaks Sausages Pork chops Chicken (cut in places. - Drying - VEGETABLES 12 www.zanussi.com Temp... - 3 Defrosting TYPE OF DISH [g] Chicken Meat Meat Trout Strawberries Butter Cream Gateau 1000 1000 500 150 300 250 2 x 200 1400 Defrosting time [min] 100 - 140 100 - 140 90... - 120 25 - 35 30 - 40 30 - 40 80 - 100 60 Further defrosting time ...
Product Manaul
Page 13
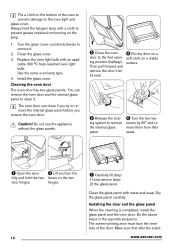
... agents, sharpedged objects or a dishwasher. There is damaged. Contact the Service Centre. • To clean the door gasket, refer to the oven sur- Before you change the oven lamp: • Deactivate the oven. • Remove the fuses in the fuse box or deactivate the circuit breaker. 13 Use a soft cloth with a soft cloth. Clean the oven control panel with a wet sponge only. Refer to the Safety chapters. •...
... agents, sharpedged objects or a dishwasher. There is damaged. Contact the Service Centre. • To clean the door gasket, refer to the oven sur- Before you change the oven lamp: • Deactivate the oven. • Remove the fuses in the fuse box or deactivate the circuit breaker. 13 Use a soft cloth with a soft cloth. Clean the oven control panel with a wet sponge only. Refer to the Safety chapters. •...
Product Manaul
Page 14
... the oven light and glass cover. Do not use the appliance without the glass panels. 3 Close the oven 4 Put the door on the two door hinges. Dry the glass panel carefully. Installing the door and the glass panel When the cleaning is completed, install the glass panel and the oven door. Replace the oven light bulb with water and soap. Always hold the halogen lamp with a cloth to prevent grease residue from their seats. 1 Open the door 2 Lift and turn the...
... the oven light and glass cover. Do not use the appliance without the glass panels. 3 Close the oven 4 Put the door on the two door hinges. Dry the glass panel carefully. Installing the door and the glass panel When the cleaning is completed, install the glass panel and the oven door. Replace the oven light bulb with water and soap. Always hold the halogen lamp with a cloth to prevent grease residue from their seats. 1 Open the door 2 Lift and turn the...
Product Manaul
Page 15
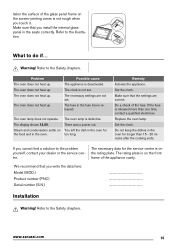
... a power cut. Set the clock. lation the surface of the glass panel frame on the front frame of the fuse. Refer to do if... Do a check of the appliance cavity. www.zanussi.com 15 What to the illustration. Replace the oven lamp. If you write the data here: Model (MOD.) Product number (PNC) Serial number (S.N.) ... The clock is released more than 15 - 20 minutes after the cooking...
... a power cut. Set the clock. lation the surface of the glass panel frame on the front frame of the fuse. Refer to do if... Do a check of the appliance cavity. www.zanussi.com 15 What to the illustration. Replace the oven lamp. If you write the data here: Model (MOD.) Product number (PNC) Serial number (S.N.) ... The clock is released more than 15 - 20 minutes after the cooking...
Product Manaul
Page 16
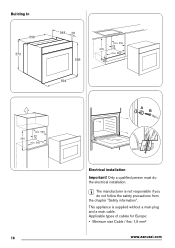
Applicable types of cables for Europe: • Minimum size Cable / flex: 1,5 mm² 16 www.zanussi.com Only a qualified person must do not follow the safety precautions from the chapter "Safety information". The manufacturer is supplied without a main plug and a main cable. This appliance is not responsible if you do the electrical installation. Building In 558 573 548 20 589 594 min. 550 20 600 min. 560 6 min. 550 20 580 min. 560 A B Electrical installation Important!
Applicable types of cables for Europe: • Minimum size Cable / flex: 1,5 mm² 16 www.zanussi.com Only a qualified person must do not follow the safety precautions from the chapter "Safety information". The manufacturer is supplied without a main plug and a main cable. This appliance is not responsible if you do the electrical installation. Building In 558 573 548 20 589 594 min. 550 20 600 min. 560 6 min. 550 20 580 min. 560 A B Electrical installation Important!
Product Manaul
Page 17
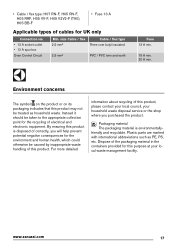
... the appropriate collection point for UK only Connection via • 13 A socket outlet • 13 A spur box Oven Control Circuit Min. Packaging material The packaging material is disposed of correctly, you purchased the product. Plastic parts are marked with international abbreviations such as household waste. Environment concerns The symbol on the product or on its packaging indicates that...
... the appropriate collection point for UK only Connection via • 13 A socket outlet • 13 A spur box Oven Control Circuit Min. Packaging material The packaging material is disposed of correctly, you purchased the product. Plastic parts are marked with international abbreviations such as household waste. Environment concerns The symbol on the product or on its packaging indicates that...


