Specification Sheet
Page 1
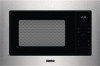
...; Finger print proof stainless steel • Combi microwave oven and grill • Microwave power: 900 Watt, 11 levels • 1000W hinged grill • Audible cooking end signal • Stainless steel interior • Push button door opening Easy recipes with the Auto Programme There's no need for you have to the next level with the Auto Programme. Series 20 combines the convenience of a microwave with the delicious crispness of a lasagne or...
...; Finger print proof stainless steel • Combi microwave oven and grill • Microwave power: 900 Watt, 11 levels • 1000W hinged grill • Audible cooking end signal • Stainless steel interior • Push button door opening Easy recipes with the Auto Programme There's no need for you have to the next level with the Auto Programme. Series 20 combines the convenience of a microwave with the delicious crispness of a lasagne or...
Specification Sheet
Page 2
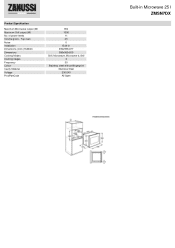
of power levels Volume gross - Product Specification Maximum Microwave output (W) Maximum Grill output (W) No. Top oven Noise Installation Dimensions (mm) (HxWxD) Dimensions Cooking Modes Cooking stages Frequency Colour Cavity Material Voltage ProdPartCode 900 1000 11 25 0 Built-in 390x595x377 380x560x550 Grill, Microwave, Microwave & Grill 3 50 Stainless steel with antifingerprint Stainless Steel 230-240 All Open Built-in Microwave 25 l ZMSN7DX
of power levels Volume gross - Product Specification Maximum Microwave output (W) Maximum Grill output (W) No. Top oven Noise Installation Dimensions (mm) (HxWxD) Dimensions Cooking Modes Cooking stages Frequency Colour Cavity Material Voltage ProdPartCode 900 1000 11 25 0 Built-in 390x595x377 380x560x550 Grill, Microwave, Microwave & Grill 3 50 Stainless steel with antifingerprint Stainless Steel 230-240 All Open Built-in Microwave 25 l ZMSN7DX

User Manual
Page 1
EASY. ZMSN7D EN User manual Microwave Oven User Manual GETTING STARTED?
EASY. ZMSN7D EN User manual Microwave Oven User Manual GETTING STARTED?

User Manual
Page 2
INSTALLATION ...7 3. HINTS AND TIPS ...15 6. TROUBLESHOOTING...17 7. OPERATION...12 5. ENVIRONMENT CONCERNS 18 2 CONTENTS 1. TECHNICAL INFORMATION 18 8. PRODUCT DESCRIPTION ...11 4. SAFETY INFORMATION...3 2.
INSTALLATION ...7 3. HINTS AND TIPS ...15 6. TROUBLESHOOTING...17 7. OPERATION...12 5. ENVIRONMENT CONCERNS 18 2 CONTENTS 1. TECHNICAL INFORMATION 18 8. PRODUCT DESCRIPTION ...11 4. SAFETY INFORMATION...3 2.
User Manual
Page 3
... can be used in household and similar applications such as: staff kitchen areas in shops, offices and other working environments; Children should be supervised to ensure that involves the removal of the appliance in a safe way and understand the hazards involved. IMPORTANT SAFETY INSTRUCTIONS: READ CAREFULLY AND KEEP FOR FUTURE REFERENCE. It is hazardous for use of a cover which...
... can be used in household and similar applications such as: staff kitchen areas in shops, offices and other working environments; Children should be supervised to ensure that involves the removal of the appliance in a safe way and understand the hazards involved. IMPORTANT SAFETY INSTRUCTIONS: READ CAREFULLY AND KEEP FOR FUTURE REFERENCE. It is hazardous for use of a cover which...

User Manual
Page 4
... fire. The microwave oven is smoking may explode even after microwave cooking has ended. If food being heated begins to risk of the glass. 4 Microwave heating of beverages can scratch the surface, which may lead to smoke, DO NOT OPEN THE DOOR. Do not cook eggs in their shells and whole hard boiled eggs should not be taken when handling the container. The...
... fire. The microwave oven is smoking may explode even after microwave cooking has ended. If food being heated begins to risk of the glass. 4 Microwave heating of beverages can scratch the surface, which may lead to smoke, DO NOT OPEN THE DOOR. Do not cook eggs in their shells and whole hard boiled eggs should not be taken when handling the container. The...
User Manual
Page 5
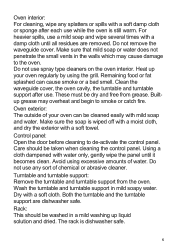
... food or fat splashed can be dry and free from the oven. Control panel: Open the door before cleaning to the oven. Do not use while the oven is still warm. Do not remove the waveguide cover. Make sure the soap is dishwasher safe. 5 Using a cloth dampened with a soft damp cloth or sponge after use spray type cleaners on the oven interior. Rack: This should be washed in the walls...
... food or fat splashed can be dry and free from the oven. Control panel: Open the door before cleaning to the oven. Do not use while the oven is still warm. Do not remove the waveguide cover. Make sure the soap is dishwasher safe. 5 Using a cloth dampened with a soft damp cloth or sponge after use spray type cleaners on the oven interior. Rack: This should be washed in the walls...

User Manual
Page 6
... microwave oven. 6 Care should not be kept away to displace the turntable when removing containers from the door and accessible parts that contain sodium hydroxide or scouring pads on any food deposits. A steam cleaner should be used . WARNING! Children should be taken not to prevent them burning themselves. Care should be used built-in a hazardous situation. Clean the oven at regular intervals and remove any part...
... microwave oven. 6 Care should not be kept away to displace the turntable when removing containers from the door and accessible parts that contain sodium hydroxide or scouring pads on any food deposits. A steam cleaner should be used . WARNING! Children should be taken not to prevent them burning themselves. Care should be used built-in a hazardous situation. Clean the oven at regular intervals and remove any part...

User Manual
Page 7
... fixing bracket to the right hand side of the appliance. 7 Fit the appliance into the kitchen cupboard slowly and without the specified 45mm rear chimney. Fix the oven on the left hand side using the installation sheet and two screws supplied. 3. The front frame of the appliance should seal against the front opening of damage. 2. Remove all packaging and check carefully...
... fixing bracket to the right hand side of the appliance. 7 Fit the appliance into the kitchen cupboard slowly and without the specified 45mm rear chimney. Fix the oven on the left hand side using the installation sheet and two screws supplied. 3. The front frame of the appliance should seal against the front opening of damage. 2. Remove all packaging and check carefully...
User Manual
Page 9
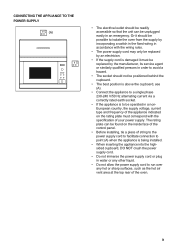
... surfaces, such as the hot air vent area at the top rear of the oven. 9 CONNECTING THE APPLIANCE TO THE POWER SUPPLY (A) • The electrical outlet should be readily accessible so that the unit can be found on the inside face of the control panel. • Before installing, tie a piece of string to the power supply cord to facilitate connection to point...
... surfaces, such as the hot air vent area at the top rear of the oven. 9 CONNECTING THE APPLIANCE TO THE POWER SUPPLY (A) • The electrical outlet should be readily accessible so that the unit can be found on the inside face of the control panel. • Before installing, tie a piece of string to the power supply cord to facilitate connection to point...
User Manual
Page 10
... part lamps sold separately: These lamps are completely cool. 10 Water vapour or drops may melt. Concerning the lamp(s) inside this oven. WARNING! Before cleaning, make popcorn, only use the turntable and the turntable support designed for damage to the oven or personal injury resulting from using the GRILL mode because they are intended to withstand extreme physical conditions in any objects into the door lock openings or ventilation openings...
... part lamps sold separately: These lamps are completely cool. 10 Water vapour or drops may melt. Concerning the lamp(s) inside this oven. WARNING! Before cleaning, make popcorn, only use the turntable and the turntable support designed for damage to the oven or personal injury resulting from using the GRILL mode because they are intended to withstand extreme physical conditions in any objects into the door lock openings or ventilation openings...
User Manual
Page 11
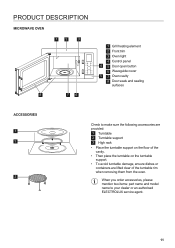
... model name to make sure the following accessories are provided: 1 Turntable 2 Turntable support 3 High rack • Place the turntable support on the floor of the cavity. • Then place the turntable on the turntable support. • To avoid turntable damage, ensure dishes or containers are lifted clear of the turntable rim when removing them from the oven. PRODUCT DESCRIPTION MICROWAVE OVEN 12 3 8 76 1 Grill heating element 2 Front trim 3 Oven light 4 Control panel 4 5 Door open button 6 Waveguide cover 5 7 Oven cavity 8 Door...
... model name to make sure the following accessories are provided: 1 Turntable 2 Turntable support 3 High rack • Place the turntable support on the floor of the cavity. • Then place the turntable on the turntable support. • To avoid turntable damage, ensure dishes or containers are lifted clear of the turntable rim when removing them from the oven. PRODUCT DESCRIPTION MICROWAVE OVEN 12 3 8 76 1 Grill heating element 2 Front trim 3 Oven light 4 Control panel 4 5 Door open button 6 Waveguide cover 5 7 Oven cavity 8 Door...
User Manual
Page 12
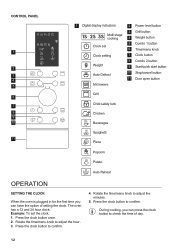
... To set Clock setting Weight Auto Defrost Microwave 2 Power level button 3 Grill button 4 Weight button 5 Combi. 1 button 6 Time/menu knob 7 Clock button 8 Combi. 2 button 9 Start/quick start button 10 Stop/cancel button 11 Door open button Grill Child safety lock Chicken Beverages Spaghetti Pizza Popcorn Potato Auto Reheat OPERATION SETTING THE CLOCK When the oven is plugged in for the first time you can have the option of day. 12 Press the clock button to adjust the minutes. 5. The oven has a 12 and 24 hour clock. Rotate the time/menu knob to confirm. CONTROL PANEL...
... To set Clock setting Weight Auto Defrost Microwave 2 Power level button 3 Grill button 4 Weight button 5 Combi. 1 button 6 Time/menu knob 7 Clock button 8 Combi. 2 button 9 Start/quick start button 10 Stop/cancel button 11 Door open button Grill Child safety lock Chicken Beverages Spaghetti Pizza Popcorn Potato Auto Reheat OPERATION SETTING THE CLOCK When the oven is plugged in for the first time you can have the option of day. 12 Press the clock button to adjust the minutes. 5. The oven has a 12 and 24 hour clock. Rotate the time/menu knob to confirm. CONTROL PANEL...

User Manual
Page 13
... for grilling. 13 Open the oven door and place the food inside . Press the start/quick start button. clockwise to clear the display and reset the system. The rack is displayed. Power Level Button x 1 x 2 x 3 x 4 x 5 x 6 Power Level 100 % (P100) 80 % (P-80) 60 % (P-60) 40 % (P-40) 20 % (P-20) 0 % (P-00) GRILL Grill cooking is particularly useful for thin slices of meat, steaks, chops, kebabs, sausages and pieces of cooking, the system will beep and End is recommended for hot...
... for grilling. 13 Open the oven door and place the food inside . Press the start/quick start button. clockwise to clear the display and reset the system. The rack is displayed. Power Level Button x 1 x 2 x 3 x 4 x 5 x 6 Power Level 100 % (P100) 80 % (P-80) 60 % (P-60) 40 % (P-40) 20 % (P-20) 0 % (P-00) GRILL Grill cooking is particularly useful for thin slices of meat, steaks, chops, kebabs, sausages and pieces of cooking, the system will beep and End is recommended for hot...
User Manual
Page 14
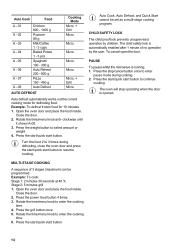
... 150 - 450 g Auto Defrost Cooking Mode Micro. + Grill Micro. Press the weight button to continue cooking. Close the door. 2. Micro. + Grill Micro. CHILD SAFETY LOCK The child proof lock prevents unsupervised operation by the user. PAUSE To pause whilst the microwave is automatically enabled after 1 minute of 3 stages (maximum) can be set as a multi-stage cooking program. Auto Cook, Auto Defrost, and Quick Start cannot be programmed. Micro. Press the power level button 4 times. 3. Press the start/quick start button. 14 Press the start/quick start button to...
... 150 - 450 g Auto Defrost Cooking Mode Micro. + Grill Micro. Press the weight button to continue cooking. Close the door. 2. Micro. + Grill Micro. CHILD SAFETY LOCK The child proof lock prevents unsupervised operation by the user. PAUSE To pause whilst the microwave is automatically enabled after 1 minute of 3 stages (maximum) can be set as a multi-stage cooking program. Auto Cook, Auto Defrost, and Quick Start cannot be programmed. Micro. Press the power level button 4 times. 3. Press the start/quick start button. 14 Press the start/quick start button to...

User Manual
Page 15
...due to fire. fast food containers Freezer/roasting bags Paper-plates, cups and kitchen paper Straw and wooden containers Recycled paper and newspaper Microwave safe 3 / 7 3 / 7 3 7 3 3 3 3 7 Comments Small pieces of metal which can break or crack if heated suddenly. Porcelain, pottery,...HINTS AND TIPS MICROWAVE SAFE COOKWARE Cookware Aluminium foil/ containers China and ceramics Glassware e.g. Do not use for those with metallic decoration. Care should be used to shield food from the oven walls, as overheating may lead to absorb moisture. Follow instructions carefully. It is ...
...due to fire. fast food containers Freezer/roasting bags Paper-plates, cups and kitchen paper Straw and wooden containers Recycled paper and newspaper Microwave safe 3 / 7 3 / 7 3 7 3 3 3 3 7 Comments Small pieces of metal which can break or crack if heated suddenly. Porcelain, pottery,...HINTS AND TIPS MICROWAVE SAFE COOKWARE Cookware Aluminium foil/ containers China and ceramics Glassware e.g. Do not use for those with metallic decoration. Care should be used to shield food from the oven walls, as overheating may lead to absorb moisture. Follow instructions carefully. It is ...
User Manual
Page 16
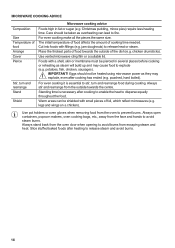
... when removing food from the face and hands to stir, turn and rearrange Stand Shield Microwave cooking advice Foods high in several places before cooking or reheating as overheating can be heated using microwave power as they may cause food to release heat or steam. Always open containers, popcorn makers, oven cooking bags, etc., away from the oven to disperse equally throughout the food. MICROWAVE COOKING ADVICE Composition Size Temperature of food Arrange Cover...
... when removing food from the face and hands to stir, turn and rearrange Stand Shield Microwave cooking advice Foods high in several places before cooking or reheating as overheating can be heated using microwave power as they may cause food to release heat or steam. Always open containers, popcorn makers, oven cooking bags, etc., away from the oven to disperse equally throughout the food. MICROWAVE COOKING ADVICE Composition Size Temperature of food Arrange Cover...
User Manual
Page 17
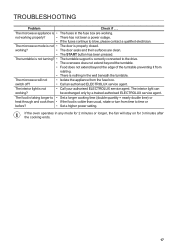
... fuses continue to time or before? • Set a higher power setting. The interior light can be exchanged only by a trained authorised ELECTROLUX service agent. not working . The microwave will stay on for 2 minutes or longer, the fan will not switch off? • Isolate the appliance from time to blow, please contact a qualified electrician. TROUBLESHOOTING Problem Check if . . . If the oven operates in any mode for 3 minutes after the cooking...
... fuses continue to time or before? • Set a higher power setting. The interior light can be exchanged only by a trained authorised ELECTROLUX service agent. not working . The microwave will stay on for 2 minutes or longer, the fan will not switch off? • Isolate the appliance from time to blow, please contact a qualified electrician. TROUBLESHOOTING Problem Check if . . . If the oven operates in any mode for 3 minutes after the cooking...

User Manual
Page 18
... Power required: Output power: Microwave Frequency Outside Dimensions: Cavity Dimensions Oven Capacity Turntable Weight Microwave Grill Microwave Grill ZMSN7D 230-240 V, 50 Hz, single phase 1.400 kW 1.000 kW 900 W (IEC 60705) 1000 W 2450 MHz1) (Group 2/Class B) 595 mm (W) 390 mm (H) 378 mm (D) 340 mm (W) x 220 mm (H) x 364 mm (D)2) 25 litres2) ø 270 mm, glass approx. 15.7 kg 1) This Product fulfils the requirement of food...
... Power required: Output power: Microwave Frequency Outside Dimensions: Cavity Dimensions Oven Capacity Turntable Weight Microwave Grill Microwave Grill ZMSN7D 230-240 V, 50 Hz, single phase 1.400 kW 1.000 kW 900 W (IEC 60705) 1000 W 2450 MHz1) (Group 2/Class B) 595 mm (W) 390 mm (H) 378 mm (D) 340 mm (W) x 220 mm (H) x 364 mm (D)2) 25 litres2) ø 270 mm, glass approx. 15.7 kg 1) This Product fulfils the requirement of food...


