
Specification Sheet
Page 1
... heat • Fan controlled defrosting • Oven features: • Auto safety switch off and child lock • Pizza cooking • Clean 'n' clear enamel interior • Chrome grid runners with auto-stop anti-tip shelves • 2 oven shelves Keep your oven smudge and fingerprint free The anti-fingerprint coating on this oven keeps off unsightly smudges, maintaining your dish is ready. The timer will alert you when your kitchen...
... heat • Fan controlled defrosting • Oven features: • Auto safety switch off and child lock • Pizza cooking • Clean 'n' clear enamel interior • Chrome grid runners with auto-stop anti-tip shelves • 2 oven shelves Keep your oven smudge and fingerprint free The anti-fingerprint coating on this oven keeps off unsightly smudges, maintaining your dish is ready. The timer will alert you when your kitchen...

User Manual
Page 2
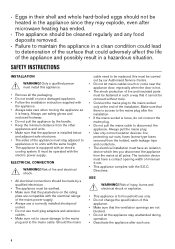
... be taken to remove or put in operation at all packaging away from the power supply. 2 Care should be activated. • Children shall not carry out cleaning and user maintenance of incorrect installation or usage. Accessible parts are the result of the appliance without supervision. • Children aged 3 years and under must install this should be used by children aged...
... be taken to remove or put in operation at all packaging away from the power supply. 2 Care should be activated. • Children shall not carry out cleaning and user maintenance of incorrect installation or usage. Accessible parts are the result of the appliance without supervision. • Children aged 3 years and under must install this should be used by children aged...

User Manual
Page 3
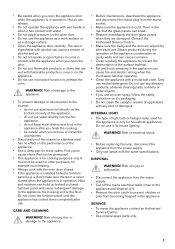
... microwave cooking. • If the door or door seals are not allowed during microwave cooking. Care must not be stirred or shaken and the temperature checked before replacing the lamp to avoid the possibility of electric shock. • Do not use a steam cleaner to clean the appliance. • Do not use utensils that involves the removal of feeding bottles and baby food jars shall be operated...
... microwave cooking. • If the door or door seals are not allowed during microwave cooking. Care must not be stirred or shaken and the temperature checked before replacing the lamp to avoid the possibility of electric shock. • Do not use a steam cleaner to clean the appliance. • Do not use utensils that involves the removal of feeding bottles and baby food jars shall be operated...
User Manual
Page 4
...; Always take care when moving the appliance as it cannot be cleaned regularly and any food deposits removed. • Failure to disconnect the appliance. It must have a contact opening width of minimum 3 mm. • This appliance complies with the electric power supply. USE WARNING! Should the mains cable need to the mains cable. Always use multi-plug adapters and extension...
...; Always take care when moving the appliance as it cannot be cleaned regularly and any food deposits removed. • Failure to disconnect the appliance. It must have a contact opening width of minimum 3 mm. • This appliance complies with the electric power supply. USE WARNING! Should the mains cable need to the mains cable. Always use multi-plug adapters and extension...
User Manual
Page 5
... children or pets from the power supply. • Only use . Fruit juices cause stains that the glass panels can cause a mixture of alcohol and air. • Do not let sparks or open door. • Do not use the appliance as a work surface or as a storage surface. • Open the appliance door carefully. CARE AND CLEANING WARNING! Do not use neutral detergents. Heat and moisture can build...
... children or pets from the power supply. • Only use . Fruit juices cause stains that the glass panels can cause a mixture of alcohol and air. • Do not let sparks or open door. • Do not use the appliance as a work surface or as a storage surface. • Open the appliance door carefully. CARE AND CLEANING WARNING! Do not use neutral detergents. Heat and moisture can build...
User Manual
Page 6
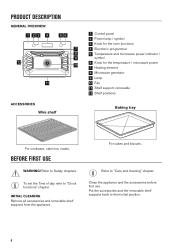
Refer to "Clock functions" chapter. PRODUCT DESCRIPTION GENERAL OVERVIEW 1 23 4 56 7 8 4 9 12 3 2 10 1 11 ACCESSORIES Wire shelf 1 Control panel 2 Power lamp / symbol 3 Knob for the oven functions 4 Electronic programmer 5 Temperature and microwave power indicator / symbol 6 Knob for the temperature / microwave power 7 Heating element 8 Microwave generator 9 Lamp 10 Fan 11 Shelf support, removable 12 Shelf positions Baking tray For cookware, cake tins, roasts. To set the Time of day refer to "Care and cleaning" chapter. Clean the appliance and the...
Refer to "Clock functions" chapter. PRODUCT DESCRIPTION GENERAL OVERVIEW 1 23 4 56 7 8 4 9 12 3 2 10 1 11 ACCESSORIES Wire shelf 1 Control panel 2 Power lamp / symbol 3 Knob for the oven functions 4 Electronic programmer 5 Temperature and microwave power indicator / symbol 6 Knob for the temperature / microwave power 7 Heating element 8 Microwave generator 9 Lamp 10 Fan 11 Shelf support, removable 12 Shelf positions Baking tray For cookware, cake tins, roasts. To set the Time of day refer to "Care and cleaning" chapter. Clean the appliance and the...
User Manual
Page 7
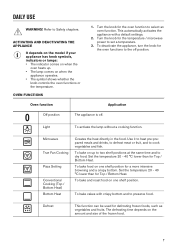
... than for the oven functions to set a temperature. 3. Turn the knob for defrosting frozen foods, such as vegetables and fruits. Light To activate the lamp without a cooking function. To bake cakes with a default settings. 2. To bake on the amount and size of the frozen food. 7 Turn the knob for Top / Bottom Heat. OVEN FUNCTIONS 1. To bake and roast food on when the appliance operates. • The...
... than for the oven functions to set a temperature. 3. Turn the knob for defrosting frozen foods, such as vegetables and fruits. Light To activate the lamp without a cooking function. To bake cakes with a default settings. 2. To bake on the amount and size of the frozen food. 7 Turn the knob for Top / Bottom Heat. OVEN FUNCTIONS 1. To bake and roast food on when the appliance operates. • The...

User Manual
Page 8
... some oven functions. Hours / minutes G. To set the time. You can activate the light also when the appliance is in large quantities and to brown. DISPLAY A BC G BUTTONS Button FE D Function CLOCK MINUS MICROWAVE PLUS TEMPERATURE A. Door lock (selected models only) F. Core temperature sensor (selected models only) E. To check the oven temperature or the temperature of the core temperature sensor (if applicable). Use only while an oven function is deactivated. To roast larger meat joints...
... some oven functions. Hours / minutes G. To set the time. You can activate the light also when the appliance is in large quantities and to brown. DISPLAY A BC G BUTTONS Button FE D Function CLOCK MINUS MICROWAVE PLUS TEMPERATURE A. Door lock (selected models only) F. Core temperature sensor (selected models only) E. To check the oven temperature or the temperature of the core temperature sensor (if applicable). Use only while an oven function is deactivated. To roast larger meat joints...
User Manual
Page 9
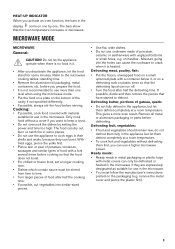
... stand for use in the microwave. on a defrosting rack or plastic sieve so that have started to the microwave cooking tables: standing time. • Remove the aluminium foil packaging, metal containers, etc. Defrosting meat, poultry, fish: • Put the frozen, unwrapped food on a small upturned plate with unglazed bottoms or small holes, e.g. MICROWAVE MODE MICROWAVE General: CAUTION! Do not let the appliance operate when there...
... stand for use in the microwave. on a defrosting rack or plastic sieve so that have started to the microwave cooking tables: standing time. • Remove the aluminium foil packaging, metal containers, etc. Defrosting meat, poultry, fish: • Put the frozen, unwrapped food on a small upturned plate with unglazed bottoms or small holes, e.g. MICROWAVE MODE MICROWAVE General: CAUTION! Do not let the appliance operate when there...
User Manual
Page 11
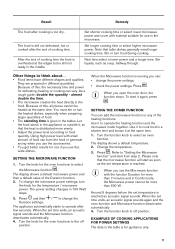
... soup, halfway through. Use it to think about... • Food items have different shapes and qualities. Please note that the microwave function will start it , so that taller dishes generally need longer cooking time. When the set temperature is running you open the oven door, the function stops. Note that the heat is reached. almost double the time. • The microwave creates the heat directly in different quantities. Let...
... soup, halfway through. Use it to think about... • Food items have different shapes and qualities. Please note that the microwave function will start it , so that taller dishes generally need longer cooking time. When the set temperature is running you open the oven door, the function stops. Note that the heat is reached. almost double the time. • The microwave creates the heat directly in different quantities. Let...
User Manual
Page 12
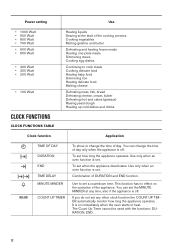
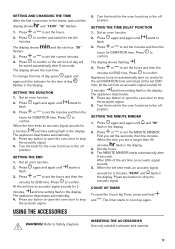
... yeast dough Heating up cold dishes and drinks Clock function Application 00:00 TIME OF DAY DURATION END TIME DELAY MINUTE MINDER COUNT UP TIMER To show or change the time of the appliance. It is on the operation of day only when the appliance is off . To set when the appliance deactivates. Use only when an oven function is set . Use only when...
... yeast dough Heating up cold dishes and drinks Clock function Application 00:00 TIME OF DAY DURATION END TIME DELAY MINUTE MINDER COUNT UP TIMER To show or change the time of the appliance. It is on the operation of day only when the appliance is off . To set when the appliance deactivates. Use only when an oven function is set . Use only when...
User Manual
Page 13
... the display shows and "12:00". COUNT UP TIMER To reset the Count Up Timer, press and hold and . WARNING! Press to confirm and switch to set time, an acoustic signal sounds. 5. "00" 3. Press or to set the minutes and then the hours for the time of day will be saved automatically after 5 seconds. Press any button or open the oven door to stop...
... the display shows and "12:00". COUNT UP TIMER To reset the Count Up Timer, press and hold and . WARNING! Press to confirm and switch to set time, an acoustic signal sounds. 5. "00" 3. Press or to set the minutes and then the hours for the time of day will be saved automatically after 5 seconds. Press any button or open the oven door to stop...
User Manual
Page 14
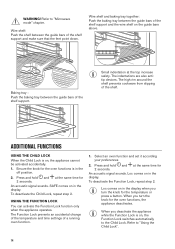
... Child Lock, repeat step 2. USING THE FUNCTION LOCK You can activate the Function Lock function only when the appliance operates. An acoustic signal sounds. Refer to "Microwave mode" chapter. Press and hold and at the top increase safety. The Function Lock prevents an accidental change of the temperature and time settings of the shelf support. Wire shelf and baking tray together: Push the baking tray between the guide bars...
... Child Lock, repeat step 2. USING THE FUNCTION LOCK You can activate the Function Lock function only when the appliance operates. An acoustic signal sounds. Refer to "Microwave mode" chapter. Press and hold and at the top increase safety. The Function Lock prevents an accidental change of the temperature and time settings of the shelf support. Wire shelf and baking tray together: Push the baking tray between the guide bars...
User Manual
Page 15
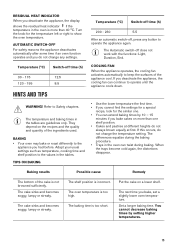
... after some time if an oven function operates and you do not change any button to the appliance you had before. The temperature and baking times in the tables are guidelines only. RESIDUAL HEAT INDICATOR When you deactivate the appliance, the display shows the residual heat indicator if the temperature in the oven is more than 40 °C. The oven temperature is incorrect. Turn the knob...
... after some time if an oven function operates and you do not change any button to the appliance you had before. The temperature and baking times in the tables are guidelines only. RESIDUAL HEAT INDICATOR When you deactivate the appliance, the display shows the residual heat indicator if the temperature in the oven is more than 40 °C. The oven temperature is incorrect. Turn the knob...

User Manual
Page 16
... careful with mixing times, especially if you bake, set ) 16 The cake browns unevenly. The oven temperature is too dry. The cake is too low. The oven temperature is too high and the baking time is too low. Spread the mixture evenly on the baking tray. short pastry1) True Fan Cooking 170 180 10 - 25 2 Flan base - The oven temperature is too short. The next time you use...
... careful with mixing times, especially if you bake, set ) 16 The cake browns unevenly. The oven temperature is too dry. The cake is too low. The oven temperature is too high and the baking time is too low. Spread the mixture evenly on the baking tray. short pastry1) True Fan Cooking 170 180 10 - 25 2 Flan base - The oven temperature is too short. The next time you use...

User Manual
Page 19
Food Function Temperature (°C) Time (min) Shelf position Sweet bakes Top / Bottom 180 - 200 40 - 60 1 Heat Fish bakes Top / Bottom 180 - 200 30 - 60 1 Heat Stuffed vegeta- True Fan Cook- 160 - 170 30 - 60 1 bles ing 1) Preheat the oven. MULTILEVEL BAKING Use the function True Fan Cooking. Cakes / pastries / breads on baking trays Food Temperature (°C) Time (min) Shelf position Cream puffs / Eclairs1) Dry streusel cake 1) Preheat the oven. 160...
Food Function Temperature (°C) Time (min) Shelf position Sweet bakes Top / Bottom 180 - 200 40 - 60 1 Heat Fish bakes Top / Bottom 180 - 200 30 - 60 1 Heat Stuffed vegeta- True Fan Cook- 160 - 170 30 - 60 1 bles ing 1) Preheat the oven. MULTILEVEL BAKING Use the function True Fan Cooking. Cakes / pastries / breads on baking trays Food Temperature (°C) Time (min) Shelf position Cream puffs / Eclairs1) Dry streusel cake 1) Preheat the oven. 160...

User Manual
Page 24
... 190 - 210 20 - 30 3 1) Turn 2 or 3 times during cooking. 3) Preheat the oven. as per manufacturer's instructions 200 - 220 as per manufacturer's instructions as per manufacturer's instructions as per manufac- 2 turer's instructions as per manufac- 2 turer's instructions as per manufac- 2 turer's instructions as per manufac- 2 turer's instructions DEFROST • Remove the food packaging and put the food on a plate. • Use the first shelf position from...
... 190 - 210 20 - 30 3 1) Turn 2 or 3 times during cooking. 3) Preheat the oven. as per manufacturer's instructions 200 - 220 as per manufacturer's instructions as per manufacturer's instructions as per manufac- 2 turer's instructions as per manufac- 2 turer's instructions as per manufac- 2 turer's instructions as per manufac- 2 turer's instructions DEFROST • Remove the food packaging and put the food on a plate. • Use the first shelf position from...

User Manual
Page 25
... plate. PRESERVING - Food Temperature (°C) Cooking time until sim- Turn halfway through . Turn halfway through . Continue to 100 °C (see the table). BOTTOM HEAT • Use only preserve jars of the plate inside the oven. berries / Raspberries / Ripe gooseberries 25 Remove shelf supports if necessary. Turn halfway through. - top of the same dimensions available on the market. • Do not use jars with onelitre jars), stop the oven...
... plate. PRESERVING - Food Temperature (°C) Cooking time until sim- Turn halfway through . Turn halfway through . Continue to 100 °C (see the table). BOTTOM HEAT • Use only preserve jars of the plate inside the oven. berries / Raspberries / Ripe gooseberries 25 Remove shelf supports if necessary. Turn halfway through. - top of the same dimensions available on the market. • Do not use jars with onelitre jars), stop the oven...

User Manual
Page 33
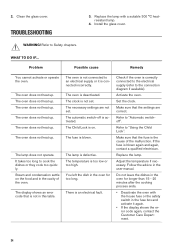
... the fuse before you have nonstick accessories, do not clean them dry. Turn the lamp glass cover counterclockwise to the lamp glass cover and the cavity. Pull the supports out of electrocution! Remove the fuses from the side wall. 3. To clean the appliance, remove the shelf supports. 1. Always hold the halogen lamp with warm water and a cleaning agent. • If you replace the lamp. Food Ovenware Power Tempera...
... the fuse before you have nonstick accessories, do not clean them dry. Turn the lamp glass cover counterclockwise to the lamp glass cover and the cavity. Pull the supports out of electrocution! Remove the fuses from the side wall. 3. To clean the appliance, remove the shelf supports. 1. Always hold the halogen lamp with warm water and a cleaning agent. • If you replace the lamp. Food Ovenware Power Tempera...
User Manual
Page 34
... in the fuse box and activate it is blown. The oven does not heat up . Problem Possible cause Remedy You cannot activate or operate the oven. 2. Replace the lamp with the house fuse or the safety switch in the user manual. It takes too long to an electrical supply or it again. • If the display shows the error code again, contact the Customer Care Department. 34...
... in the fuse box and activate it is blown. The oven does not heat up . Problem Possible cause Remedy You cannot activate or operate the oven. 2. Replace the lamp with the house fuse or the safety switch in the user manual. It takes too long to an electrical supply or it again. • If the display shows the error code again, contact the Customer Care Department. 34...


