User Manual
Page 1
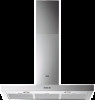
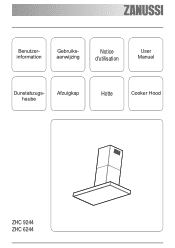
Benutzerinformation Gebruiksaanwijzing Notice d'utilisation User Manual Dunstabzugshaube Afzuigkap Hotte Cooker Hood ZHC 9244 ZHC 6244
Benutzerinformation Gebruiksaanwijzing Notice d'utilisation User Manual Dunstabzugshaube Afzuigkap Hotte Cooker Hood ZHC 9244 ZHC 6244
User Manual
Page 52
We promise that it will provide you with lots of pleasure in this manual so that make your new machine. Good luck! 52 Welcome to the world of Electrolux Thank you for choosing a first class product from Electrolux, which hopefully will provide a superior User Experience delivering Ease-ofMind. You find some examples on the cover in the future. Please take a few minutes to offer a wide variety of quality products that you can take advantage of the benefits of your life more comfortable. The Electrolux ambition is to study this manual.
We promise that it will provide you with lots of pleasure in this manual so that make your new machine. Good luck! 52 Welcome to the world of Electrolux Thank you for choosing a first class product from Electrolux, which hopefully will provide a superior User Experience delivering Ease-ofMind. You find some examples on the cover in the future. Please take a few minutes to offer a wide variety of quality products that you can take advantage of the benefits of your life more comfortable. The Electrolux ambition is to study this manual.

User Manual
Page 53
Contents Safety warnings 54 Description of the Appliance 56 Control Panel 58 Maintenance and Care 59 Cleaning the hood 61 Special accessories 62 Technical Details 62 Electrical connection 63 Installation 65 53
Contents Safety warnings 54 Description of the Appliance 56 Control Panel 58 Maintenance and Care 59 Cleaning the hood 61 Special accessories 62 Technical Details 62 Electrical connection 63 Installation 65 53
User Manual
Page 54
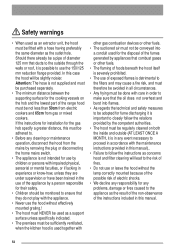
... be purchased separately. • The minimum distance between the supporting surface for the cooking vessels on both the inside and outside through the walls or roof, it is important to closely follow the instructions as concerns hood and filter cleaning will be not less than 50cm from electric cookers and 65cm from gas or mixed cookers. Should there already be a pipe...
... be purchased separately. • The minimum distance between the supporting surface for the cooking vessels on both the inside and outside through the walls or roof, it is important to closely follow the instructions as concerns hood and filter cleaning will be not less than 50cm from electric cookers and 65cm from gas or mixed cookers. Should there already be a pipe...
User Manual
Page 55
... handling of the same size as household waste. hoods and fuel-burning appliances connected to a chimney, such as coal or oil room-heaters and gas fires, in the same room. • Hoods can only be carried out in accordance with appliances connected to a chimney if the room and/or flat (air/environment combination) is ventilated from outside using a suitable ventilation hole approximately 500600...
... handling of the same size as household waste. hoods and fuel-burning appliances connected to a chimney, such as coal or oil room-heaters and gas fires, in the same room. • Hoods can only be carried out in accordance with appliances connected to a chimney if the room and/or flat (air/environment combination) is ventilated from outside using a suitable ventilation hole approximately 500600...

User Manual
Page 56
... equal to extract unpleasant odours from the kitchen, it will need an original charcoal filter for the recirculation mode. (See Special Accessories). Description of the Appliance • The cooker hood is supplied as an extractor unit and can also be used with a recirculation mode by fitting a charcoal filter. • You will not extract steam. • The hood is designed to the outlet hole. 56
... equal to extract unpleasant odours from the kitchen, it will need an original charcoal filter for the recirculation mode. (See Special Accessories). Description of the Appliance • The cooker hood is supplied as an extractor unit and can also be used with a recirculation mode by fitting a charcoal filter. • You will not extract steam. • The hood is designed to the outlet hole. 56
User Manual
Page 57
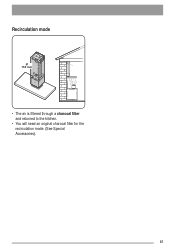
Recirculation mode Ø 150 mm • The air is filtered through a charcoal filter and returned to the kitchen. • You will need an original charcoal filter for the recirculation mode. (See Special Accessories). 57
Recirculation mode Ø 150 mm • The air is filtered through a charcoal filter and returned to the kitchen. • You will need an original charcoal filter for the recirculation mode. (See Special Accessories). 57
User Manual
Page 58
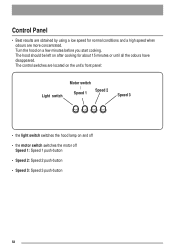
... a high speed when odours are more concentrated. Control Panel • Best results are obtained by using a low speed for about 15 minutes or until all the odours have disappeared. The control switches are located on the unit's front panel: Light switch Motor switch / Speed 1 Speed 2 Speed 3 • the light switch switches the hood lamp on a few minutes before you start cooking. Turn the hood on and off • the motor switch switches the motor off Speed 1: Speed 1 push-button • Speed 2: Speed 2 push-button • Speed 3: Speed 3 push-button...
... a high speed when odours are more concentrated. Control Panel • Best results are obtained by using a low speed for about 15 minutes or until all the odours have disappeared. The control switches are located on the unit's front panel: Light switch Motor switch / Speed 1 Speed 2 Speed 3 • the light switch switches the hood lamp on a few minutes before you start cooking. Turn the hood on and off • the motor switch switches the motor off Speed 1: Speed 1 push-button • Speed 2: Speed 2 push-button • Speed 3: Speed 3 push-button...

User Manual
Page 59
..., at the connector and removing the connector fuse. When washing the metal grease filter in hot water with hot water. Metal grease filter • The purpose of the filter can occur, this does not have any maintenance operation, isolate the hood from the socket. Maintenance and Care • Warning! Before performing any impact on its performance. • Clean the inner housing using a hand hot...
..., at the connector and removing the connector fuse. When washing the metal grease filter in hot water with hot water. Metal grease filter • The purpose of the filter can occur, this does not have any maintenance operation, isolate the hood from the socket. Maintenance and Care • Warning! Before performing any impact on its performance. • Clean the inner housing using a hand hot...
User Manual
Page 60
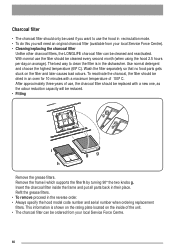
... oven for 10 minutes with a new one, as the odour reduction capacity will need an original charcoal filter (available from your local Service Force Centre). • Cleaning/replacing the charcoal filter Unlike other charcoal filters, the LONGLIFE charcoal filter can be reduced. • Fitting g j g i h gg Remove the grease filters. This information is in the reverse order. • Always specify the hood model code number and serial number when ordering replacement filters. The best way to use...
... oven for 10 minutes with a new one, as the odour reduction capacity will need an original charcoal filter (available from your local Service Force Centre). • Cleaning/replacing the charcoal filter Unlike other charcoal filters, the LONGLIFE charcoal filter can be reduced. • Fitting g j g i h gg Remove the grease filters. This information is in the reverse order. • Always specify the hood model code number and serial number when ordering replacement filters. The best way to use...
User Manual
Page 61
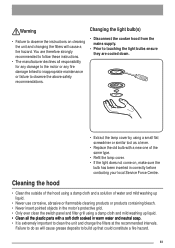
... a fire hazard. Cleaning the hood • Clean the outside of the hood using a damp cloth and a solution of the same type. • Refit the lamp cover. • If the light does not come on cleaning the unit and changing the filters will cause grease deposits to build up liquid. • Never use corrosive, abrasive or flammable cleaning products or products containing bleach. • Never insert pointed objects...
... a fire hazard. Cleaning the hood • Clean the outside of the hood using a damp cloth and a solution of the same type. • Refit the lamp cover. • If the light does not come on cleaning the unit and changing the filters will cause grease deposits to build up liquid. • Never use corrosive, abrasive or flammable cleaning products or products containing bleach. • Never insert pointed objects...
User Manual
Page 62
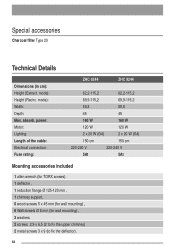
absorb. power: Motor: Lighting: Length of the cable: Electrical connection: Fuse rating: ZHC 6244 ZHC 9244 62,2-115,2 62,2-115,2 69,9-115,2 69,9-115,2 59,8 89,8 45 45 160 W 160 W 120 W 120 W 2 x 20 W (G4) 2 x 20 W (G4) 150 cm 150 cm 220-240 V 220-240 V 5At 5At Mounting accessories included 1 allen wrench (for TORX screws). 1 deflector , 1 reduction flange Ø 125-120 mm , 1 chimney support, 6 wood-screws 5 x 45 mm...
absorb. power: Motor: Lighting: Length of the cable: Electrical connection: Fuse rating: ZHC 6244 ZHC 9244 62,2-115,2 62,2-115,2 69,9-115,2 69,9-115,2 59,8 89,8 45 45 160 W 160 W 120 W 120 W 2 x 20 W (G4) 2 x 20 W (G4) 150 cm 150 cm 220-240 V 220-240 V 5At 5At Mounting accessories included 1 allen wrench (for TORX screws). 1 deflector , 1 reduction flange Ø 125-120 mm , 1 chimney support, 6 wood-screws 5 x 45 mm...
User Manual
Page 63
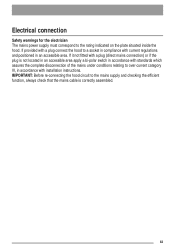
IMPORTANT: Before re-connecting the hood circuit to the mains supply and checking the efficient function, always check that the mains cable is not located in an accessible area apply a bi-polar switch in accordance with standards which ...direct mains connection) or if the plug is correctly assembled. 63 Electrical connection Safety warnings for the electrician The mains power supply must correspond to a socket in compliance with current regulations and positioned in accordance with installation instructions. If provided with a plug connect the hood to the rating indicated on the plate...
IMPORTANT: Before re-connecting the hood circuit to the mains supply and checking the efficient function, always check that the mains cable is not located in an accessible area apply a bi-polar switch in accordance with standards which ...direct mains connection) or if the plug is correctly assembled. 63 Electrical connection Safety warnings for the electrician The mains power supply must correspond to a socket in compliance with current regulations and positioned in accordance with installation instructions. If provided with a plug connect the hood to the rating indicated on the plate...
User Manual
Page 64
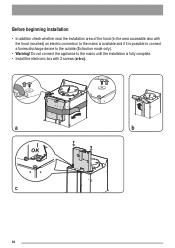
Do not connect the appliance to the outside (Extraction mode only). • Warning! Before beginning installation • In addition check whether near the installation area of the hood (in the area accessible also with the hood mounted) an electric connection to the mains is available and if it is possible to connect a fumes discharge device to the mains until the installation is fully complete. • Install the electronic box with 2 screws (a-b-c). a b OK c 64
Do not connect the appliance to the outside (Extraction mode only). • Warning! Before beginning installation • In addition check whether near the installation area of the hood (in the area accessible also with the hood mounted) an electric connection to the mains is available and if it is possible to connect a fumes discharge device to the mains until the installation is fully complete. • Install the electronic box with 2 screws (a-b-c). a b OK c 64
User Manual
Page 65
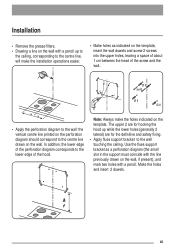
... drawn on the wall. Make the holes and insert 2 dowels. 65 Installation • Remove the grease filters. • Drawing a line on the wall with a pencil. In addition, the lower edge of the hood. The upper 2 are for the definitive and safety fixing. • Apply flues support bracket to the wall touching the ceiling. Note: Always make the installation operations easier. • Make holes as a perforation diagram (the small slot...
... drawn on the wall. Make the holes and insert 2 dowels. 65 Installation • Remove the grease filters. • Drawing a line on the wall with a pencil. In addition, the lower edge of the hood. The upper 2 are for the definitive and safety fixing. • Apply flues support bracket to the wall touching the ceiling. Note: Always make the installation operations easier. • Make holes as a perforation diagram (the small slot...
User Manual
Page 66
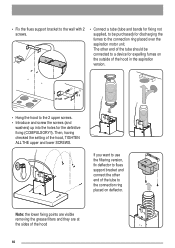
• Fix the flues support bracket to the wall with 2 screws. • Connect a tube (tube and bands for fixing not supplied, to be connected to a device for expelling fumes on deflector. The other end of the hood 66 Then, having checked the setting of the hood in the aspiration version. If you want to use the filtering version, fix deflector to flues support bracket and connect the other end...
• Fix the flues support bracket to the wall with 2 screws. • Connect a tube (tube and bands for fixing not supplied, to be connected to a device for expelling fumes on deflector. The other end of the hood 66 Then, having checked the setting of the hood in the aspiration version. If you want to use the filtering version, fix deflector to flues support bracket and connect the other end...
User Manual
Page 67
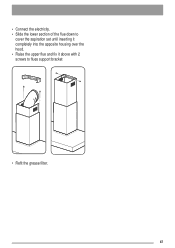
• Connect the electricity. • Slide the lower section of the flue down to cover the aspiration set until inserting it completely into the apposite housing over the hood. • Raise the upper flue and fix it above with 2 screws to flues support bracket • Refit the grease filter. 67
• Connect the electricity. • Slide the lower section of the flue down to cover the aspiration set until inserting it completely into the apposite housing over the hood. • Raise the upper flue and fix it above with 2 screws to flues support bracket • Refit the grease filter. 67
User Manual
Page 76
... is improperly installed or calls to appliances outside the United Kingdom. • Appliances found on the rating plate). 5.The purchase date. The model and Serial number of the appliance (found to be automatically routed to the Service Force Centre covering your local Service Force Centre and further information about Service Force, please visit the website at our option repair or replace the same FREE OF...
... is improperly installed or calls to appliances outside the United Kingdom. • Appliances found on the rating plate). 5.The purchase date. The model and Serial number of the appliance (found to be automatically routed to the Service Force Centre covering your local Service Force Centre and further information about Service Force, please visit the website at our option repair or replace the same FREE OF...
User Manual
Page 77
Customer Care For general enquiries concerning your Electrolux appliance, or for further information on Electrolux products please contact our Customer Care Department by letter or telephone at the address below or visit our website at www.electrolux.co.uk Customer Care Department Electrolux Major Appliances Addington Way Luton Bedfordshire LU4 9QQ Tel: 08705 950 950 (*) (*) Calls may be recorded for training purposes electrolux 77
Customer Care For general enquiries concerning your Electrolux appliance, or for further information on Electrolux products please contact our Customer Care Department by letter or telephone at the address below or visit our website at www.electrolux.co.uk Customer Care Department Electrolux Major Appliances Addington Way Luton Bedfordshire LU4 9QQ Tel: 08705 950 950 (*) (*) Calls may be recorded for training purposes electrolux 77

User Manual
Page 78
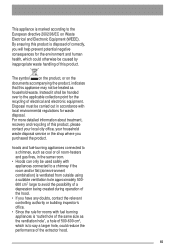
...which will move with you subject to another user. • The appliance is installed and used for commercial purposes. • The appliance is guaranteed by Electrolux in each of the countries listed at the back of this particular model or range of appliances. • The appliance guarantee ... is only used within your new country of residence for this user manual, for labour and parts as exists in your new country of residence. www.electrolux.com is not used in accordance with instructions issued by law. 78 electrolux European Guarantee This appliance is installed in accordance ...
...which will move with you subject to another user. • The appliance is installed and used for commercial purposes. • The appliance is guaranteed by Electrolux in each of the countries listed at the back of this particular model or range of appliances. • The appliance guarantee ... is only used within your new country of residence for this user manual, for labour and parts as exists in your new country of residence. www.electrolux.com is not used in accordance with instructions issued by law. 78 electrolux European Guarantee This appliance is installed in accordance ...

