Zanussi ZGH62414XS Support and Manuals
Get Help and Manuals for this Zanussi item
View All Support Options Below
Free Zanussi ZGH62414XS manuals!
Problems with Zanussi ZGH62414XS?
Ask a Question
Free Zanussi ZGH62414XS manuals!
Problems with Zanussi ZGH62414XS?
Ask a Question
Popular Zanussi ZGH62414XS Manual Pages
Specification Sheet - Page 1

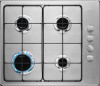
... were to control, making it the perfect choice for easy cleaning • 3 enamel pan supports • Automatic integrated ignition • Safety gas cut off , keeping your kitchen safe. ... Safety built in The built-in Gas Safety feature offers peace of mind in Gas Hob 60 cm ZGH62414XS
Traditional cooking made easy Whip up tasty meals with a clever safety device that detects if the flame ...
Specification Sheet - Page 2

... replacement
Gas replacement Residual heat indicator Led Colour ProdPartCode
594x510 510x550x470
No 8000 1.1 Thermocouple 3000W/100mm 2000W/70mm 1000W/54mm 2000W/70mm G20 (2H) 20 mbar G30/G31 (3+) 28-30/37 mbar, With Additional Injectors No No None All Open Series 20 Slim side control Built-in Gas Hob 60 cm ZGH62414XS
Product Specification...
User Manual - Page 1

User Manual
GETTING STARTED?
EASY. ZGH62414WA ZGH62414XA ZGH62414XS
EN User Manual Hob
GB IE MT NG
User Manual - Page 3

... that the cable doesn't come into direct contact (for example using insulating sleeving) with parts that can reach temperatures of more than 50°C above room temperature. • WARNING..., spoons and lids should not be replaced by the
manufacturer, an authorized Service or similarly qualified persons in the instructions for the following markets: GB IE MT NG INSTALLATION
WARNING! WARNING!
User Manual - Page 4

... or under a window. Risk of the installation. These instructions are only valid if the country symbol appears...which will provide the necessary instructions concerning modification of the appliance to change the specification of the appliance are ...insulated parts must be fastened in direct contact with the electrical ratings of combustion. Contact our Authorised Service Centre...
User Manual - Page 5

...for cooking purposes only. CARE AND CLEANING WARNING! SERVICE • To repair the appliance contact an Authorised
Service Centre. • Use original spare parts only. They can cause damage to the worktop ...• Do not install a flame diffuser on the burner. • The use neutral detergents. • Do not let the appliance stay unattended during operation.
• Set the cooking zone to...
User Manual - Page 7

...standards. With a socket spanner 7 remove the injectors
and replace them with mobile parts or they agree to ensure the correct assembly will cause...plate in . • from natural gas G20 20 mbar to install the elbow correctly, with the one for the type of gas...the hob connecting pipe. Light the burner. 2. Remove the pan supports. 2. If you must fit an applicable pressure adjuster on the ...
User Manual - Page 8

...installation must not be guided by .
The outlet or omnipolar switch used for Electrical Installation... be carried out exclusively by the service force centre or by a qualified ...installed. your own safety the installation must be done by personnel with similar competencies, in compliance with the current regulations. C D E
A.
REPLACEMENT OF THE CONNECTION CABLE
The replacement...
User Manual - Page 12

... it down or switch it is supplied with a flame, turn the control knob to the off position . WARNING! Refer to light the burner again after installation or a power cut. WARNING! Push the control knob down and turn the flame down . WARNING! The spark generator can ignite the burner without electrical device...
User Manual - Page 13

... AND CLEANING
WARNING! After you replace the pan supports to washing in a dishwasher. CLEANING...supports, make sure that they are not obstructed. Refer to easily clean the hob. After cleaning, wipe the hob dry with a soft cloth. • To clean the enamelled parts, caps and crowns, wash them with warm soapy water and dry them . PERIODIC MAINTENANCE Speak to your local Authorised Service...
User Manual - Page 14

... to activate the spark generator. Refer to the problem yourself, contact your dealer or an Authorised Service Centre. The flame ring is the cause of ...TROUBLESHOOTING
WARNING!
WHAT TO DO IF...
The hob is connected incorrectly. Check if the hob is clean. Place the burner cap and crown correctly. Make sure that the fuse is uneven. The instructions about the Service...
User Manual - Page 15

... this part (if applicable). MOD.
C. SER.NO.
LABELS SUPPLIED WITH THE ACCESSORIES BAG Stick the adhesive labels as indicated below:
A
B
C
MOD.
MOD. TECHNICAL DATA
HOB DIMENSIONS Width Depth
BYPASS DIAMETERS
BURNER
Rapid Semi-rapid Auxiliary
594 mm 510 mm
Ø BYPASS 1/100 mm 42 32 28
15
Stick it on instruction booklet...
User Manual - Page 16

... OTHER TECHNICAL DATA
TOTAL POWER:
Gas original: Gas replacement:
G20 (2H) 20 mbar G30 (3+) 28-30 mbar G31 (3+) 37 mbar
8 kW 567 g/h 557 g/h
Electric supply:
220-240 V ~ 50-60 Hz 3 core flexible cable with non rewireable plug fitted with the existing gas settings if installed in the table is essential to change the...
User Manual - Page 17

... the burners and pan supports are assembled correctly. &#... its user manual. Help protect...Model identification
Type of hob Number of energy - Semi-rapid Left front - Auxiliary
ZGH62414WA, ZGH62414XA, ZGH62414XS... Built-in relevant containers to your local recycling facility or contact your municipal office.
17
* ENVIRONMENTAL CONCERNS
Recycle materials with the household waste. Part...
Product information sheet - Page 1

Attribute Name Model Denomination
Type of hob Number of gas burners Energy efficiency per gas burner
Energy efficiency for the gas hob
Position
Symbol
Value
Unit
ZGH62414XS 949640770
Built-In Hob
Right Front - Auxiliary EEgas burner N/A
%
Burner
EEgas hob
,0
%
Zanussi ZGH62414XS Reviews
We have not received any reviews for Zanussi yet.