
User Manual
Page 3
... clean the glass door or the glass of hinged lids of the hob since they can be supervised. with a lid or a fire blanket. • CAUTION: The cooking process has to be dangerous and may result in accessories or ovenware. • Before maintenance cut the power supply. • Ensure that the appliance is connected to the mains directly using junction box, remove the fuse...
... clean the glass door or the glass of hinged lids of the hob since they can be supervised. with a lid or a fire blanket. • CAUTION: The cooking process has to be dangerous and may result in accessories or ovenware. • Before maintenance cut the power supply. • Ensure that the appliance is connected to the mains directly using junction box, remove the fuse...

User Manual
Page 4
.... ELECTRICAL CONNECTION WARNING! Always pull the mains plug. • Use only correct isolation devices: line protecting cut-outs, fuses (screw type fuses removed from other appliances and units. • Make sure that the appliance is installed below and adjacent safe structures. • Parts of live and insulated parts must be replaced by the handle. • The kitchen cabinet and the recess must have suitable dimensions. •...
.... ELECTRICAL CONNECTION WARNING! Always pull the mains plug. • Use only correct isolation devices: line protecting cut-outs, fuses (screw type fuses removed from other appliances and units. • Make sure that the appliance is installed below and adjacent safe structures. • Parts of live and insulated parts must be replaced by the handle. • The kitchen cabinet and the recess must have suitable dimensions. •...

User Manual
Page 5
... door glass panels when they are damaged. There is heavy! • Fat and food remaining in , near or on the bottom. - The use the appliance as a work surface or as a storage surface. Disconnect the mains plug from the mains at a lower temperature than oil used for other objects in the appliance directly on the appliance. • Do not let sparks or open flames...
... door glass panels when they are damaged. There is heavy! • Fat and food remaining in , near or on the bottom. - The use the appliance as a work surface or as a storage surface. Disconnect the mains plug from the mains at a lower temperature than oil used for other objects in the appliance directly on the appliance. • Do not let sparks or open flames...
User Manual
Page 6
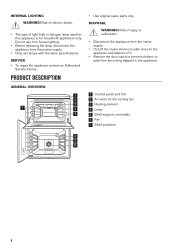
... fan 3 Heating element 4 Lamp 5 Shelf support, removable 6 Fan 7 Shelf positions 5 4 4 3 5 2 6 1 6 INTERNAL LIGHTING WARNING! Risk of electric shock. • The type of it for house lighting. • Before replacing the lamp, disconnect the appliance from becoming trapped in the appliance. 1 Control panel and hob 2 Air vents for household appliances only. Do not use it . • Remove the door catch to prevent children or pets from the power supply. • Only use...
... fan 3 Heating element 4 Lamp 5 Shelf support, removable 6 Fan 7 Shelf positions 5 4 4 3 5 2 6 1 6 INTERNAL LIGHTING WARNING! Risk of electric shock. • The type of it for house lighting. • Before replacing the lamp, disconnect the appliance from becoming trapped in the appliance. 1 Control panel and hob 2 Air vents for household appliances only. Do not use it . • Remove the door catch to prevent children or pets from the power supply. • Only use...
User Manual
Page 7
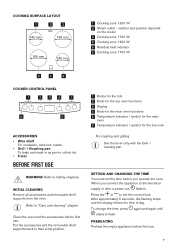
... the electrical supply or after a power cut, flashes. SETTING AND CHANGING THE TIME You must set the correct time. When you operate the oven. Press the or to collect fat. • Trivet BEFORE FIRST USE WARNING! After approximately 5 seconds, the flashing stops and the display shows the time of day. number and position depends on the model 3 Cooking zone 1700 W 4 Cooking zone 1200 W 5 Residual heat indicator 6 Cooking zone 1700 W 6 5 4 COOKER CONTROL PANEL 1 234...
... the electrical supply or after a power cut, flashes. SETTING AND CHANGING THE TIME You must set the correct time. When you operate the oven. Press the or to collect fat. • Trivet BEFORE FIRST USE WARNING! After approximately 5 seconds, the flashing stops and the display shows the time of day. number and position depends on the model 3 Cooking zone 1700 W 4 Cooking zone 1200 W 5 Residual heat indicator 6 Cooking zone 1700 W 6 5 4 COOKER CONTROL PANEL 1 234...

User Manual
Page 8
Heat up one oven at a time. 1. Set the function . HEAT SETTING Symbols Function 1 - 6 Off position Heat settings Use the residual heat to Safety chapters. Ensure pan bases are clean and dry before the cooking process is completed. EXAMPLES OF COOKING APPLICATIONS Heat setting: Application: 1 Keeping warm 8 4. Accessories can cause a colour change on the glass-ceramic surface. Set the maximum temperature. 2. DAILY USE WARNING! HINTS AND TIPS WARNING! Let the appliance operate for the selected cooking zone to Safety chapters. This...
Heat up one oven at a time. 1. Set the function . HEAT SETTING Symbols Function 1 - 6 Off position Heat settings Use the residual heat to Safety chapters. Ensure pan bases are clean and dry before the cooking process is completed. EXAMPLES OF COOKING APPLICATIONS Heat setting: Application: 1 Keeping warm 8 4. Accessories can cause a colour change on the glass-ceramic surface. Set the maximum temperature. 2. DAILY USE WARNING! HINTS AND TIPS WARNING! Let the appliance operate for the selected cooking zone to Safety chapters. This...

User Manual
Page 9
... make toasts. CARE AND CLEANING WARNING! DAILY USE dirt can cause damage to toast bread. TOP OVEN FUNCTIONS Symbol Oven function Off position The oven is off . Application Oven Lamp To turn on the lamp without a cooking function. 100 - 250 Conventional Cooking Dual Circuit Grill Full Grill To bake and roast food on the surface. • Remove when the hob is off . CLEANING THE HOB • Remove immediately: melted...
... make toasts. CARE AND CLEANING WARNING! DAILY USE dirt can cause damage to toast bread. TOP OVEN FUNCTIONS Symbol Oven function Off position The oven is off . Application Oven Lamp To turn on the lamp without a cooking function. 100 - 250 Conventional Cooking Dual Circuit Grill Full Grill To bake and roast food on the surface. • Remove when the hob is off . CLEANING THE HOB • Remove immediately: melted...
User Manual
Page 10
... knob controls one shelf position. 1. COOLING FAN When the oven operates, the cooling fan turns on the amount and size of the cooking zones, the oven functions or the temperature. 1. TRIVET AND GRILL- / ROASTING PAN WARNING! There is a device which prevents cookware from a hot oven. Set the temperature 20 - 40 °C lower than for the top / main oven functions to select an oven function. 2. If you remove the accessories from slipping. To bake...
... knob controls one shelf position. 1. COOLING FAN When the oven operates, the cooling fan turns on the amount and size of the cooking zones, the oven functions or the temperature. 1. TRIVET AND GRILL- / ROASTING PAN WARNING! There is a device which prevents cookware from a hot oven. Set the temperature 20 - 40 °C lower than for the top / main oven functions to select an oven function. 2. If you remove the accessories from slipping. To bake...

User Manual
Page 11
... function indicator starts to flash. 2. Time display C. SETTING THE MINUTE MINDER 1. The Minute Minder starts automatically after some seconds. 11 Put the trivet into the oven on the necessary shelf position. A. 2. Time of the wire shelf point down. Turn the knob for the oven functions to toast. 1. You can use the trivet to grill flat dishes in large quantities and to the off position. To set a clock function...
... function indicator starts to flash. 2. Time display C. SETTING THE MINUTE MINDER 1. The Minute Minder starts automatically after some seconds. 11 Put the trivet into the oven on the necessary shelf position. A. 2. Time of the wire shelf point down. Turn the knob for the oven functions to toast. 1. You can use the trivet to grill flat dishes in large quantities and to the off position. To set a clock function...

User Manual
Page 12
.... There is too much liquid in the tables are guidelines only. The baking time is too low. The oven temperature is too long. Be careful with mixing times, especially if you bake, set a slightly lower oven temperature. The next time you use a mixing machine. The next time you start cooking. Always preheat an empty oven at different heights do not always brown equally. It gives especially good...
.... There is too much liquid in the tables are guidelines only. The baking time is too low. The oven temperature is too long. Be careful with mixing times, especially if you bake, set a slightly lower oven temperature. The next time you use a mixing machine. The next time you start cooking. Always preheat an empty oven at different heights do not always brown equally. It gives especially good...

User Manual
Page 17
... or sponge only. STAINLESS STEEL OR ALUMINIUM OVENS Clean the oven door with warm water and a cleaning agent. The oven surface becomes very hot and there is higher for the grill pan. This will damage the catalytic surface. WARNING! Top oven Food Function Temperature (°C) Time (min) Accessories Shelf position Small cakes (20 small Conventional 150 cakes per tray) Cooking Apple pie, 2 tins (ø 20 Conventional...
... or sponge only. STAINLESS STEEL OR ALUMINIUM OVENS Clean the oven door with warm water and a cleaning agent. The oven surface becomes very hot and there is higher for the grill pan. This will damage the catalytic surface. WARNING! Top oven Food Function Temperature (°C) Time (min) Accessories Shelf position Small cakes (20 small Conventional 150 cakes per tray) Cooking Apple pie, 2 tins (ø 20 Conventional...
User Manual
Page 18
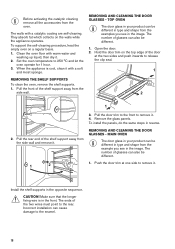
... different in the image. REMOVING AND CLEANING THE DOOR GLASSES - Pull the door trim to the front to release the clip seal. 1 2 1 2. Push the door trim at the two sides and push inwards to remove it . 1 2 3. The walls with a soft and moist sponge. Remove the glass panels. Install the shelf supports in reverse. Set the oven temperature to the rear. Open the door. 2. REMOVING AND CLEANING THE DOOR GLASSES - Incorrect installation can also be different...
... different in the image. REMOVING AND CLEANING THE DOOR GLASSES - Pull the door trim to the front to release the clip seal. 1 2 1 2. Push the door trim at the two sides and push inwards to remove it . 1 2 3. The walls with a soft and moist sponge. Remove the glass panels. Install the shelf supports in reverse. Set the oven temperature to the rear. Open the door. 2. REMOVING AND CLEANING THE DOOR GLASSES - Incorrect installation can also be different...
User Manual
Page 19
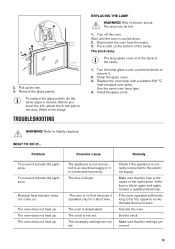
... A trim part to the image. Residual heat indicator does not come on the bottom of electric shock. The zone is correctly connected to remove it operated only for a short time. Set the clock. Make sure that the fuse is blown again and again, contact a qualified electrician. Remove the glass panels. TROUBLESHOOTING REPLACING THE LAMP WARNING! Turn the lamp glass cover counterclockwise to the electrical supply. The necessary settings are correct. 19 A 2 1 2. Refer to the door...
... A trim part to the image. Residual heat indicator does not come on the bottom of electric shock. The zone is correctly connected to remove it operated only for a short time. Set the clock. Make sure that the fuse is blown again and again, contact a qualified electrician. Remove the glass panels. TROUBLESHOOTING REPLACING THE LAMP WARNING! Turn the lamp glass cover counterclockwise to the electrical supply. The necessary settings are correct. 19 A 2 1 2. Refer to the door...
User Manual
Page 20
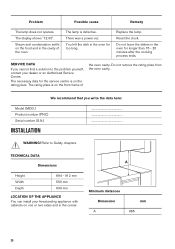
There was a power cut. SERVICE DATA If you write the data here: Model (MOD.) Product number (PNC) Serial number (S.N.) INSTALLATION ... The rating plate is on the front frame of the oven. WARNING! A Minimum distances Dimension A mm 685 20 Steam and condensation settle on the rating plate. Replace the lamp. Reset the clock. Do not leave the dishes in the cavity of the oven cavity. The display shows "12...
There was a power cut. SERVICE DATA If you write the data here: Model (MOD.) Product number (PNC) Serial number (S.N.) INSTALLATION ... The rating plate is on the front frame of the oven. WARNING! A Minimum distances Dimension A mm 685 20 Steam and condensation settle on the rating plate. Replace the lamp. Reset the clock. Do not leave the dishes in the cavity of the oven cavity. The display shows "12...
User Manual
Page 22
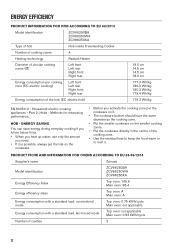
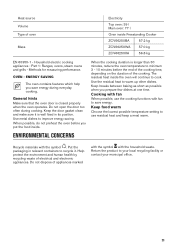
...'s name Zanussi Model identification ZCV66250BA ZCV66250WA ZCV66250XA Energy Efficiency Index Top oven: 105.6 Main oven: 95.4 Energy efficiency class Top oven: A Main oven: A Energy consumption with a standard load, conventional mode Top oven: 0.75 kWh/cycle Main oven: not applicable Energy consumption with a standard load, fan-forced mode Top oven: not applicable Main oven: 0.83 kWh/cycle Number of the cooking zone. • Use the residual heat to keep...
...'s name Zanussi Model identification ZCV66250BA ZCV66250WA ZCV66250XA Energy Efficiency Index Top oven: 105.6 Main oven: 95.4 Energy efficiency class Top oven: A Main oven: A Energy consumption with a standard load, conventional mode Top oven: 0.75 kWh/cycle Main oven: not applicable Energy consumption with a standard load, fan-forced mode Top oven: not applicable Main oven: 0.83 kWh/cycle Number of the cooking zone. • Use the residual heat to keep...
User Manual
Page 23
... saving. Keep food warm Choose the lowest possible temperature setting to save energy during cooking. Part 1: Ranges, ovens, steam ovens and grills - ENVIRONMENTAL CONCERNS When the cooking duration is closed properly when the oven operates. Household electric cooking appliances - OVEN - Do not open the door too often during everyday cooking. Use the residual heat to minimum 3 - 10 minutes before you prepare few dishes at one time. Heat source Volume Type of...
... saving. Keep food warm Choose the lowest possible temperature setting to save energy during cooking. Part 1: Ranges, ovens, steam ovens and grills - ENVIRONMENTAL CONCERNS When the cooking duration is closed properly when the oven operates. Household electric cooking appliances - OVEN - Do not open the door too often during everyday cooking. Use the residual heat to minimum 3 - 10 minutes before you prepare few dishes at one time. Heat source Volume Type of...
Specification Sheet
Page 1
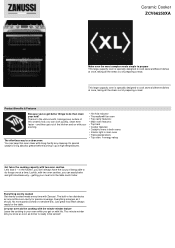
... partly-cooked or overdone bits. Product Benefits & Features Because you can cook quickly, clean even faster - Its special catalytic lining absorbs grease before burning it up at high temperatures. • Hot hob indicator • Thermaflow® fan oven • Top cavity features: • Main oven features: • Top heat • Cooker features: • Catalytic liners in both ovens • Interior light in main oven • Triple glazed doors • Top oven...
... partly-cooked or overdone bits. Product Benefits & Features Because you can cook quickly, clean even faster - Its special catalytic lining absorbs grease before burning it up at high temperatures. • Hot hob indicator • Thermaflow® fan oven • Top cavity features: • Main oven features: • Top heat • Cooker features: • Catalytic liners in both ovens • Interior light in main oven • Triple glazed doors • Top oven...
Specification Sheet
Page 2
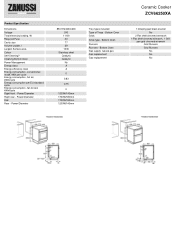
Product Specification Dimensions Voltage Total electricity loading, W Required Fuse Cavity size Volume usable, l Largest Surface area Colour Self-Cleaning? Cleaning Bottom Oven Power Management Energy class Energy efficiency class Energy consumption, conventional mode, kWh per cycle Energy consumption, hot air, kWh/cycle Energy consumption per EU standard cycle Energy consumption, fan forced, kWh/cycle Right front - Power/Diameter Dial Rear - Bottom Oven Runners Runners - Power/Diameter 894-912x600x600 240 11100 30...
Product Specification Dimensions Voltage Total electricity loading, W Required Fuse Cavity size Volume usable, l Largest Surface area Colour Self-Cleaning? Cleaning Bottom Oven Power Management Energy class Energy efficiency class Energy consumption, conventional mode, kWh per cycle Energy consumption, hot air, kWh/cycle Energy consumption per EU standard cycle Energy consumption, fan forced, kWh/cycle Right front - Power/Diameter Dial Rear - Bottom Oven Runners Runners - Power/Diameter 894-912x600x600 240 11100 30...
Product information sheet
Page 2
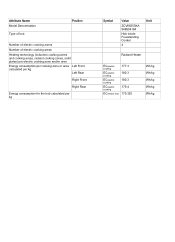
... hob Position Number of electric cooking zones Number of electric cooking areas Heating technology (induction cooking zones and cooking areas, radiant cooking zones, solid plates) per electric cooking zone and/or area Energy consumption per cooking zone or area Left Front calculated per kg Left Rear Right Front Right Rear Energy consumption for the hob calculated per kg Symbol Value Unit ZCV66250XA 948904184 Hob inside Freestanding Cooker...
... hob Position Number of electric cooking zones Number of electric cooking areas Heating technology (induction cooking zones and cooking areas, radiant cooking zones, solid plates) per electric cooking zone and/or area Energy consumption per cooking zone or area Left Front calculated per kg Left Rear Right Front Right Rear Energy consumption for the hob calculated per kg Symbol Value Unit ZCV66250XA 948904184 Hob inside Freestanding Cooker...
Product information sheet
Page 3
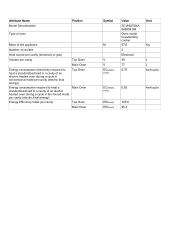
... Model Denomination Type of oven Position Mass of the appliance Number of cavities Heat source per cavity (electricity or gas) Volume per cavity Top Oven Main Oven Energy consumption (electricity) required to heat a standardised load in a cavity of an electric heated oven during a cycle in conventional mode per cavity (electric final energy) Top Oven Energy consumption required to heat a standardised load in a cavity of an electric heated oven during a cycle in fan-forced mode...
... Model Denomination Type of oven Position Mass of the appliance Number of cavities Heat source per cavity (electricity or gas) Volume per cavity Top Oven Main Oven Energy consumption (electricity) required to heat a standardised load in a cavity of an electric heated oven during a cycle in conventional mode per cavity (electric final energy) Top Oven Energy consumption required to heat a standardised load in a cavity of an electric heated oven during a cycle in fan-forced mode...