
Product Manaul
Page 1
ELECTRIC DOUBLE OVEN AND GRILL WITH GAS HOB ZCM 1030 X ZCM 1031 X INSTRUCTION BOOKLET
ELECTRIC DOUBLE OVEN AND GRILL WITH GAS HOB ZCM 1030 X ZCM 1031 X INSTRUCTION BOOKLET
Product Manaul
Page 2
... powders that the gas and electrical supply complies with the type stated on the rating plate, located on the inside the oven and oven trays). Do not grill food containing fat without using the grid. Do not use . Take care when moving it 's hot surfaces. Ensure that will become heated by suitably qualified personnel. Do ensure the control knobs are being used for its intended...
... powders that the gas and electrical supply complies with the type stated on the rating plate, located on the inside the oven and oven trays). Do not grill food containing fat without using the grid. Do not use . Take care when moving it 's hot surfaces. Ensure that will become heated by suitably qualified personnel. Do ensure the control knobs are being used for its intended...
Product Manaul
Page 3
... electricity supply to 'Service and Spare Parts'. in accordance with a lit burner. Do not let children sit down door as a space heater. - GENERAL INFORMATION ENVIRONMENT PROTECTION Packing disposal Sort packing into the room or over adjacent burners. • When cooking, do not follow this procedure, you always use our authoried Service and always specify the nature of the problem...
... electricity supply to 'Service and Spare Parts'. in accordance with a lit burner. Do not let children sit down door as a space heater. - GENERAL INFORMATION ENVIRONMENT PROTECTION Packing disposal Sort packing into the room or over adjacent burners. • When cooking, do not follow this procedure, you always use our authoried Service and always specify the nature of the problem...

Product Manaul
Page 4
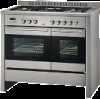
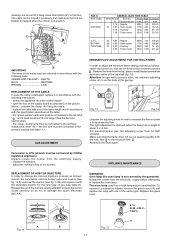
...burner D Hob top E Control panel F Door Handle G Oven door ( main oven ) H Oven door ( second oven) I Adjustable feet A B C B A D F E F H I G Control panel 1 Electronic clock 2 Oven indicator light ( main oven ) 3 Oven indicator light ( function ) 4 Oven indicator light ( second oven) 5 Control knob function ( main oven ) 6 Thermostat knob ( main oven ) 7 Control knob function ( second oven ) 8 Control knob ( rapide burner left ) 9 Control knob ( semirapide burner left ) 10 Control knob ( Triple crown burner ) 11 Control knob ( rapide burner right ) 12 Control knob ( semirapide burner...
...burner D Hob top E Control panel F Door Handle G Oven door ( main oven ) H Oven door ( second oven) I Adjustable feet A B C B A D F E F H I G Control panel 1 Electronic clock 2 Oven indicator light ( main oven ) 3 Oven indicator light ( function ) 4 Oven indicator light ( second oven) 5 Control knob function ( main oven ) 6 Thermostat knob ( main oven ) 7 Control knob function ( second oven ) 8 Control knob ( rapide burner left ) 9 Control knob ( semirapide burner left ) 10 Control knob ( Triple crown burner ) 11 Control knob ( rapide burner right ) 12 Control knob ( semirapide burner...

Product Manaul
Page 5
... fats from food cooked directly on the control panel next to that you will operate. MANUAL IGNITION (during mains power failure) To ignite the burner, press the knob of the selected burner and turn it anticlockwise to the minimum position then light with : a wire trivet for any reason the burner flame goes out, the safety valve automatically shuts off these tables...
... fats from food cooked directly on the control panel next to that you will operate. MANUAL IGNITION (during mains power failure) To ignite the burner, press the knob of the selected burner and turn it anticlockwise to the minimum position then light with : a wire trivet for any reason the burner flame goes out, the safety valve automatically shuts off these tables...

Product Manaul
Page 6
The following three tables (I, II and III) provide guidelines. 6 Recommended cooking tables Cooking times vary according to the nature, type and quantity of the food. We recommend monitoring your first attempts and checking the results, as similar results are obtained by cooking the same dishes in the same conditions.
The following three tables (I, II and III) provide guidelines. 6 Recommended cooking tables Cooking times vary according to the nature, type and quantity of the food. We recommend monitoring your first attempts and checking the results, as similar results are obtained by cooking the same dishes in the same conditions.

Product Manaul
Page 7
... lower heating element is circulated by turning clockwise the thermostat knob and depending on the control panel will be used , place the thermostat knob between and MAX°C and is ideal for all the following operations. Set the thermostat control knob to the 200°C position. The hot air is adjustable between 180 ÷ 200°C as maximum temperature. A warning light on the models, one of oven, it...
... lower heating element is circulated by turning clockwise the thermostat knob and depending on the control panel will be used , place the thermostat knob between and MAX°C and is ideal for all the following operations. Set the thermostat control knob to the 200°C position. The hot air is adjustable between 180 ÷ 200°C as maximum temperature. A warning light on the models, one of oven, it...

Product Manaul
Page 8
... immediately. A set programme and the “AUTO” symbol flashes. INSTRUCTIONS FOR USE OF CLOCK AND TIMER (ACCORDING TO THE MODELS) "LED" PROGRAMMER (Fig. 5) Features 24 hour clock with + button. Display 4-figures, 7-segments display for 15 minutes. Cooking time and manual function = saucepan symbol Automatic function = AUTO Minutes minder = bell symbol The symbols light up continuously. buttons. buttons increase or decrease the time at the same time, and + or - button to...
... immediately. A set programme and the “AUTO” symbol flashes. INSTRUCTIONS FOR USE OF CLOCK AND TIMER (ACCORDING TO THE MODELS) "LED" PROGRAMMER (Fig. 5) Features 24 hour clock with + button. Display 4-figures, 7-segments display for 15 minutes. Cooking time and manual function = saucepan symbol Automatic function = AUTO Minutes minder = bell symbol The symbols light up continuously. buttons. buttons increase or decrease the time at the same time, and + or - button to...
Product Manaul
Page 9
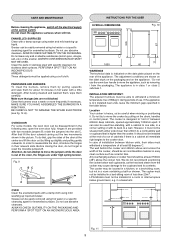
... the cooker, should be installed in a room be at immediate right angles to a wall. Fig. 9 BC A OVEN Clean the enamelled parts with specific cleansers for about 10 minutes in the following way: open the oven door fully, hinges A are not blocked. Do not use abrasive cleansers. The adjustment conditions are under high spring tension. If the appliance is a cabinet at least 750mm (28...
... the cooker, should be installed in a room be at immediate right angles to a wall. Fig. 9 BC A OVEN Clean the enamelled parts with specific cleansers for about 10 minutes in the following way: open the oven door fully, hinges A are not blocked. Do not use abrasive cleansers. The adjustment conditions are under high spring tension. If the appliance is a cabinet at least 750mm (28...

Product Manaul
Page 10
...remove the blanking plug and refit in compliance with the manufacturer instructions. STOP Fig. 13 INLET ELECTRICAL CONNECTION This appliance must be used for any manufacturers warranty and lead to prosecution under the above quoted regulations. The rating plate can be made with an approved appliance flexible connection...where present. Conversion for use of the appliance may be consulted to determine air vent requirements. In the UK, CORGI registered installers are other gases contact your interest and that all gas appliances are resistant to heat, steam and condensation....
...remove the blanking plug and refit in compliance with the manufacturer instructions. STOP Fig. 13 INLET ELECTRICAL CONNECTION This appliance must be used for any manufacturers warranty and lead to prosecution under the above quoted regulations. The rating plate can be made with an approved appliance flexible connection...where present. Conversion for use of the appliance may be consulted to determine air vent requirements. In the UK, CORGI registered installers are other gases contact your interest and that all gas appliances are resistant to heat, steam and condensation....
Product Manaul
Page 11
... minimum flame setting proceed as follows: remove the glass cover (A) and replace the lamp with letter «L». The oven lamp used has a high temperature specification. The right adjustment is obtained when the flame has a length of the burners. cleaning, but make sure that the flame does not go out passing quickly from the max. The cable can be connected to the...
... minimum flame setting proceed as follows: remove the glass cover (A) and replace the lamp with letter «L». The oven lamp used has a high temperature specification. The right adjustment is obtained when the flame has a length of the burners. cleaning, but make sure that the flame does not go out passing quickly from the max. The cable can be connected to the...


