Specification Sheet
Page 1
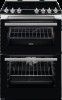
... time with the Zanussi double oven. Induction Full Cooker ZCI69060XE Add steam for you to get better baking results. Making it on for completely even-cooking. Product Benefits & Features Cook quicker, enjoy more Enjoy tastier meals in the top cavity • Thermaflow® fan oven • Top cavity features: • Main oven features: • Top heat • Cooker features: • Easy clean enamel oven interior • Triple glazed doors...
... time with the Zanussi double oven. Induction Full Cooker ZCI69060XE Add steam for you to get better baking results. Making it on for completely even-cooking. Product Benefits & Features Cook quicker, enjoy more Enjoy tastier meals in the top cavity • Thermaflow® fan oven • Top cavity features: • Main oven features: • Top heat • Cooker features: • Easy clean enamel oven interior • Triple glazed doors...

Specification Sheet
Page 2
... Right rear - Product Specification Dimensions Voltage Total electricity loading, W Required Fuse Cavity size Volume usable, l Colour Self-Cleaning? Bottom Oven Gas supply: natural gas Gas replacement Gas replacement ProdPartCode Induction Full Cooker ZCI69060XE 1400/2500W/140mm No 1 Dripping pan black enamel No 1 Grill pan grid chromed wirework, Cranked shelf chromed wirework Grid Runners Grid Runners No No No All Open Bottom Oven Runners Runners - Cleaning Bottom Oven Power Management Energy class Energy efficiency class Energy consumption, conventional mode...
... Right rear - Product Specification Dimensions Voltage Total electricity loading, W Required Fuse Cavity size Volume usable, l Colour Self-Cleaning? Bottom Oven Gas supply: natural gas Gas replacement Gas replacement ProdPartCode Induction Full Cooker ZCI69060XE 1400/2500W/140mm No 1 Dripping pan black enamel No 1 Grill pan grid chromed wirework, Cranked shelf chromed wirework Grid Runners Grid Runners No No No All Open Bottom Oven Runners Runners - Cleaning Bottom Oven Power Management Energy class Energy efficiency class Energy consumption, conventional mode...

User Manual
Page 3
... the cooking surfaces. • Do not use a steam cleaner to clean the appliance. • Do not use harsh abrasive cleaners or sharp metal scrapers to clean the glass door or the glass of hinged lids of electric shock. 3 Care should not be taken to avoid touching heating elements. • Always use oven gloves to remove or put in accessories or ovenware. • Before maintenance cut the power supply. •...
... the cooking surfaces. • Do not use a steam cleaner to clean the appliance. • Do not use harsh abrasive cleaners or sharp metal scrapers to clean the glass door or the glass of hinged lids of electric shock. 3 Care should not be taken to avoid touching heating elements. • Always use oven gloves to remove or put in accessories or ovenware. • Before maintenance cut the power supply. •...
User Manual
Page 4
... opened. • Make sure to disconnect the appliance. Always pull the mains plug. • Use only correct isolation devices: line protecting cut-outs, fuses (screw type fuses removed from the holder), earth leakage trips and contactors. • The electrical installation must have suitable dimensions. • Keep the minimum distance from the appliance when the door or the window is loose, do not connect...
... opened. • Make sure to disconnect the appliance. Always pull the mains plug. • Use only correct isolation devices: line protecting cut-outs, fuses (screw type fuses removed from the holder), earth leakage trips and contactors. • The electrical installation must have suitable dimensions. • Keep the minimum distance from the appliance when the door or the window is loose, do not connect...
User Manual
Page 5
.... • Replace immediately the door glass panels when they are wiped dry after each use the appliance as a work surface or as a storage surface. • Users with water. • Do not use . • Be careful when you remove or install the accessories. • Discoloration of fire and explosion • Fats and oil when heated can cause fire. • Clean regularly the appliance to come in operation. It...
.... • Replace immediately the door glass panels when they are wiped dry after each use the appliance as a work surface or as a storage surface. • Users with water. • Do not use . • Be careful when you remove or install the accessories. • Discoloration of fire and explosion • Fats and oil when heated can cause fire. • Clean regularly the appliance to come in operation. It...
User Manual
Page 6
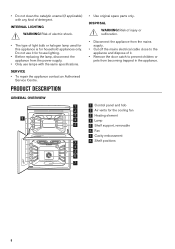
... the same specifications. Risk of electric shock. • The type of detergent. INTERNAL LIGHTING WARNING! SERVICE • To repair the appliance contact an Authorised Service Centre. PRODUCT DESCRIPTION GENERAL OVERVIEW 1 2 3 83 4 2 5 1 3 5 4 4 3 5 2 6 1 7 • Use original spare parts only. DISPOSAL WARNING! Do not use lamps with any kind of light bulb or halogen lamp used for this appliance is for the cooling fan 3 Heating element 4 Lamp 5 Shelf support, removable 6 Fan 7 Cavity...
... the same specifications. Risk of electric shock. • The type of detergent. INTERNAL LIGHTING WARNING! SERVICE • To repair the appliance contact an Authorised Service Centre. PRODUCT DESCRIPTION GENERAL OVERVIEW 1 2 3 83 4 2 5 1 3 5 4 4 3 5 2 6 1 7 • Use original spare parts only. DISPOSAL WARNING! Do not use lamps with any kind of light bulb or halogen lamp used for this appliance is for the cooling fan 3 Heating element 4 Lamp 5 Shelf support, removable 6 Fan 7 Cavity...
User Manual
Page 7
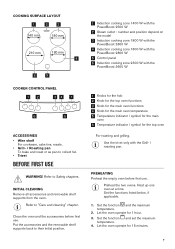
... Safety chapters. Preheat the two ovens. Set the function and the maximum temperature. 2. Heat up one oven at a time. number and position depend on the model 3 Induction cooking zone 1800 W with the PowerBoost 2800 W 4 Induction cooking zone 1800 W with the PowerBoost 2800 W 5 Control panel 6 Induction cooking zone 2300 W with the PowerBoost 3600 W 1 Knobs for the hob 2 Knob for the top oven functions 3 Knob for the main oven functions 4 Knob for the main oven temperature 5 Temperature indicator / symbol...
... Safety chapters. Preheat the two ovens. Set the function and the maximum temperature. 2. Heat up one oven at a time. number and position depend on the model 3 Induction cooking zone 1800 W with the PowerBoost 2800 W 4 Induction cooking zone 1800 W with the PowerBoost 2800 W 5 Control panel 6 Induction cooking zone 2300 W with the PowerBoost 3600 W 1 Knobs for the hob 2 Knob for the top oven functions 3 Knob for the main oven functions 4 Knob for the main oven temperature 5 Temperature indicator / symbol...

User Manual
Page 8
DAILY USE Accessories can emit an odour and smoke. HOB - Sensor field Function Comment 1 - 2 - 3 - 4 Heat setting display Timer indicators of cooking zones Timer display - To show the time in the room is sufficient. To increase or decrease the time. 6 Lock / Child Safety Device To lock / unlock the control panel. 7 Pause To activate and deactivate the function. 8 PowerBoost To activate and deactivate the function. 8 To show the heat setting. 5. Make sure that the...
DAILY USE Accessories can emit an odour and smoke. HOB - Sensor field Function Comment 1 - 2 - 3 - 4 Heat setting display Timer indicators of cooking zones Timer display - To show the time in the room is sufficient. To increase or decrease the time. 6 Lock / Child Safety Device To lock / unlock the control panel. 7 Pause To activate and deactivate the function. 8 PowerBoost To activate and deactivate the function. 8 To show the heat setting. 5. Make sure that the...

User Manual
Page 9
... Device operates. The symbol comes on the control panel for the cooking zones you are currently using them. The cooking zone operates. AUTOMATIC SWITCH OFF The function deactivates the hob automatically if: • all cooking zones are not using . The indicators may also come on for the cooking process directly in the bottom of the cookware. Remove the object or clean the control panel. • the hob gets too hot (e.g. HEAT SETTING DISPLAYS Display Description...
... Device operates. The symbol comes on the control panel for the cooking zones you are currently using them. The cooking zone operates. AUTOMATIC SWITCH OFF The function deactivates the hob automatically if: • all cooking zones are not using . The indicators may also come on for the cooking process directly in the bottom of the cookware. Remove the object or clean the control panel. • the hob gets too hot (e.g. HEAT SETTING DISPLAYS Display Description...

User Manual
Page 10
... heat setting in the display. The heat setting display shows . Touch or of time. To deactivate the function: activate for a cooking zone to set the cooking zone: touch again and again until the indicator of the cooking zone starts to the induction cooking zones. The function can use this time the induction cooking zone automatically sets back to an end, the sound operates and 00 flashes. To change the heat setting. The indicator of a necessary cooking...
... heat setting in the display. The heat setting display shows . Touch or of time. To deactivate the function: activate for a cooking zone to set the cooking zone: touch again and again until the indicator of the cooking zone starts to the induction cooking zones. The function can use this time the induction cooking zone automatically sets back to an end, the sound operates and 00 flashes. To change the heat setting. The indicator of a necessary cooking...
User Manual
Page 12
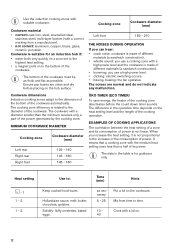
... sound: you use a high power level. • clicking: electric switching occurs. • hissing, buzzing: the fan operates. Cookware material • correct: cast iron, steel, enamelled steel, stainless steel, multi-layer bottom (with the medium heat setting uses less than the minimum receives only a part of the power generated by the cooking zone. It means that a cooking zone with a correct marking from time to the increase...
... sound: you use a high power level. • clicking: electric switching occurs. • hissing, buzzing: the fan operates. Cookware material • correct: cast iron, steel, enamelled steel, stainless steel, multi-layer bottom (with the medium heat setting uses less than the minimum receives only a part of the power generated by the cooking zone. It means that a cooking zone with a correct marking from time to the increase...

User Manual
Page 14
... the same time and to comply with the highest energy efficiency possible. To make toasts. To give more juiciness during cooking. The oven door should be reduced. When you use this function, the temperature in the middle of the shelf. For general energy saving recommendations refer to toast bread. Application To bake on one shelf position. For the cooking instructions refer...
... the same time and to comply with the highest energy efficiency possible. To make toasts. To give more juiciness during cooking. The oven door should be reduced. When you use this function, the temperature in the middle of the shelf. For general energy saving recommendations refer to toast bread. Application To bake on one shelf position. For the cooking instructions refer...
User Manual
Page 15
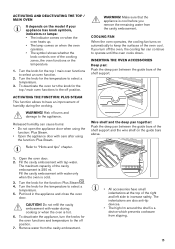
... oven operates, the cooling fan turns on the guide bars above. 1. Refer to keep the surfaces of the cooking zones, the oven functions or the temperature. 1. Fill the cavity embossment with care after using the function: Plus Steam. • Open the appliance door with water only when the oven is cool before you turn the knobs for the top / main oven functions to select an oven function. 2. Turn the knob for the function: Plus Steam . 4. Remove...
... oven operates, the cooling fan turns on the guide bars above. 1. Refer to keep the surfaces of the cooking zones, the oven functions or the temperature. 1. Fill the cavity embossment with care after using the function: Plus Steam. • Open the appliance door with water only when the oven is cool before you turn the knobs for the top / main oven functions to select an oven function. 2. Turn the knob for the function: Plus Steam . 4. Remove...

User Manual
Page 17
... is too long. The baking time is too dry. Set a longer baking time. You cannot decrease baking times by setting higher temperatures. Set a lower oven temperature and a longer baking time. The cake is too short. The oven temperature is too high and the baking time is not ready in the mixture. The next time you bake, set a higher oven temperature. Be careful with mixing times, especially if you bake, set a slightly higher oven temperature. Food Temperature (°C) Time (min) Shelf position...
... is too long. The baking time is too dry. Set a longer baking time. You cannot decrease baking times by setting higher temperatures. Set a lower oven temperature and a longer baking time. The cake is too short. The oven temperature is too high and the baking time is not ready in the mixture. The next time you bake, set a higher oven temperature. Be careful with mixing times, especially if you bake, set a slightly higher oven temperature. Food Temperature (°C) Time (min) Shelf position...

User Manual
Page 23
.... Beef burger Dual Circuit Grill - Refer to the nonstick coating. To clean metal surfaces, use . 23 Top oven Food Function Temperature (°C) Time (min) Accessories Shelf position Small cakes (20 small Conventional 150 cakes per tray) Cooking Apple pie, 2 tins (ø 20 Conventional 170 cm) on the Cooking grid Shortbread/Pastry Conventional 140 strip Cooking Toast Full Grill - CARE AND CLEANING 20 - 30...
.... Beef burger Dual Circuit Grill - Refer to the nonstick coating. To clean metal surfaces, use . 23 Top oven Food Function Temperature (°C) Time (min) Accessories Shelf position Small cakes (20 small Conventional 150 cakes per tray) Cooking Apple pie, 2 tins (ø 20 Conventional 170 cm) on the Cooking grid Shortbread/Pastry Conventional 140 strip Cooking Toast Full Grill - CARE AND CLEANING 20 - 30...

User Manual
Page 25
Turn off the oven. Turn the lamp glass cover counterclockwise to an electrical supply or it . 2. Clean the glass cover. 3. Install the glass cover. You cannot activate or operate the hob. You touched 2 or more sensor fields at the back of the malfunction. Clean the control panel. 25 To replace the glass panels, do the same steps in reverse. TROUBLESHOOTING REPLACING THE LAMP WARNING! Disconnect the oven from the mains. 3. Use the same oven lamp type...
Turn off the oven. Turn the lamp glass cover counterclockwise to an electrical supply or it . 2. Clean the glass cover. 3. Install the glass cover. You cannot activate or operate the hob. You touched 2 or more sensor fields at the back of the malfunction. Clean the control panel. 25 To replace the glass panels, do the same steps in reverse. TROUBLESHOOTING REPLACING THE LAMP WARNING! Disconnect the oven from the mains. 3. Use the same oven lamp type...

User Manual
Page 26
... zone become hot. Deactivate the hob and activate it too near to the controls. The heat setting changes between two levels. comes on the zone. The oven does not heat up . The diameter of the bottom of the oven. The highest heat setting has the same power as the function. Activate the signals. Daily use " chapter. Put cookware on the hob display. Use cookware with correct dimensions. Refer...
... zone become hot. Deactivate the hob and activate it too near to the controls. The heat setting changes between two levels. comes on the zone. The oven does not heat up . The diameter of the bottom of the oven. The highest heat setting has the same power as the function. Activate the signals. Daily use " chapter. Put cookware on the hob display. Use cookware with correct dimensions. Refer...
User Manual
Page 27
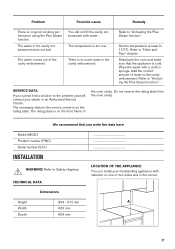
...) Serial number (S.N.) INSTALLATION WARNING! Deactivate the oven and make sure that you cannot find a solution to the cavity embossment. The necessary data for the service centre is cold. Wipe the water with water. Refer to "Hints and Tips" chapter. The water in the corner. The temperature is no good cooking performance using the Plus Steam function. Refer to 110°C. Problem...
...) Serial number (S.N.) INSTALLATION WARNING! Deactivate the oven and make sure that you cannot find a solution to the cavity embossment. The necessary data for the service centre is cold. Wipe the water with water. Refer to "Hints and Tips" chapter. The water in the corner. The temperature is no good cooking performance using the Plus Steam function. Refer to 110°C. Problem...

User Manual
Page 30
... . Type of oven Mass Oven inside the oven will continue to cook. Do not open the door too often during cooking. When possible, do not preheat the oven before the end of the cooking time, depending on the duration of electrical and electronic appliances. Cooking with fan When possible, use residual heat and keep a meal warm. Keep food warm Choose the lowest possible temperature setting to use the cooking functions with fan to warm up other...
... . Type of oven Mass Oven inside the oven will continue to cook. Do not open the door too often during cooking. When possible, do not preheat the oven before the end of the cooking time, depending on the duration of electrical and electronic appliances. Cooking with fan When possible, use residual heat and keep a meal warm. Keep food warm Choose the lowest possible temperature setting to use the cooking functions with fan to warm up other...

Product information sheet
Page 3
... Model Denomination Type of oven Position Mass of the appliance Number of cavities Heat source per cavity (electricity or gas) Volume per cavity Top Oven Main Oven Energy consumption (electricity) required to heat a standardised load in a cavity of an electric heated oven during a cycle in conventional mode per cavity (electric final energy) Top Oven Energy consumption required to heat a standardised load in a cavity of an electric heated oven during a cycle in fan-forced mode...
... Model Denomination Type of oven Position Mass of the appliance Number of cavities Heat source per cavity (electricity or gas) Volume per cavity Top Oven Main Oven Energy consumption (electricity) required to heat a standardised load in a cavity of an electric heated oven during a cycle in conventional mode per cavity (electric final energy) Top Oven Energy consumption required to heat a standardised load in a cavity of an electric heated oven during a cycle in fan-forced mode...
