
User Manual
Page 3
... the glass ceramic surface / glass surface is connected to the mains directly using junction box, remove the fuse to avoid overheating. • Do not install the appliance on a platform. • Do not operate the appliance by its control and do not rely on the pan detector. • WARNING: The appliance and its accessible parts become hot during use harsh abrasive cleaners or sharp metal scrapers to clean the glass door...
... the glass ceramic surface / glass surface is connected to the mains directly using junction box, remove the fuse to avoid overheating. • Do not install the appliance on a platform. • Do not operate the appliance by its control and do not rely on the pan detector. • WARNING: The appliance and its accessible parts become hot during use harsh abrasive cleaners or sharp metal scrapers to clean the glass door...
User Manual
Page 4
... with the wiring rules. • WARNING: Use only hob guards designed by the manufacturer of the cooking appliance or indicated by the manufacturer of the appliance in the appliance. Refer to a door or under a window. Always pull the mains plug. • Use only correct isolation devices: line protecting cut-outs, fuses (screw type fuses removed from the side walls. Install the shelf supports in...
... with the wiring rules. • WARNING: Use only hob guards designed by the manufacturer of the cooking appliance or indicated by the manufacturer of the appliance in the appliance. Refer to a door or under a window. Always pull the mains plug. • Use only correct isolation devices: line protecting cut-outs, fuses (screw type fuses removed from the side walls. Install the shelf supports in...

User Manual
Page 5
... finish the cooking. - To decrease the condensation operate the appliance for the first time. • Do not put aluminium foil on the appliance or directly on the appliance. Risk of the surface material. • Make sure the cavity and the door are wet with water. • Do not use an oven spray, obey the safety instructions on the control panel. •...
... finish the cooking. - To decrease the condensation operate the appliance for the first time. • Do not put aluminium foil on the appliance or directly on the appliance. Risk of the surface material. • Make sure the cavity and the door are wet with water. • Do not use an oven spray, obey the safety instructions on the control panel. •...
User Manual
Page 6
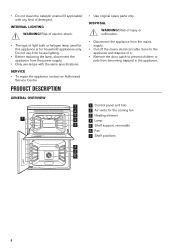
... the cooling fan 3 Heating element 4 Lamp 5 Shelf support, removable 6 Fan 7 Shelf positions 5 4 4 3 5 2 6 1 6 Risk of injury or suffocation. • Disconnect the appliance from the mains supply. • Cut off the mains electrical cable close to the appliance and dispose of detergent. INTERNAL LIGHTING WARNING! SERVICE • To repair the appliance contact an Authorised Service Centre. PRODUCT DESCRIPTION GENERAL OVERVIEW 1 2 3 73 4 2 5 1 • Use original spare parts only. Do...
... the cooling fan 3 Heating element 4 Lamp 5 Shelf support, removable 6 Fan 7 Shelf positions 5 4 4 3 5 2 6 1 6 Risk of injury or suffocation. • Disconnect the appliance from the mains supply. • Cut off the mains electrical cable close to the appliance and dispose of detergent. INTERNAL LIGHTING WARNING! SERVICE • To repair the appliance contact an Authorised Service Centre. PRODUCT DESCRIPTION GENERAL OVERVIEW 1 2 3 73 4 2 5 1 • Use original spare parts only. Do...
User Manual
Page 7
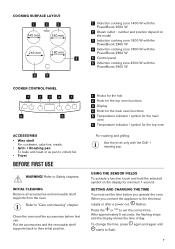
.... Clean the oven and the accessories before you connect the appliance to set the time before first use. SETTING AND CHANGING THE TIME You must set the correct time. INITIAL CLEANING Remove all accessories and removable shelf supports from the oven. After approximately 5 seconds, the flashing stops and the display shows the time of day. COOKING SURFACE LAYOUT 1 2 3 140 mm 180 mm 210 mm 180 mm 4 6 5 COOKER CONTROL PANEL 1 234 1 6 5 ACCESSORIES • Wire...
.... Clean the oven and the accessories before you connect the appliance to set the time before first use. SETTING AND CHANGING THE TIME You must set the correct time. INITIAL CLEANING Remove all accessories and removable shelf supports from the oven. After approximately 5 seconds, the flashing stops and the display shows the time of day. COOKING SURFACE LAYOUT 1 2 3 140 mm 180 mm 210 mm 180 mm 4 6 5 COOKER CONTROL PANEL 1 234 1 6 5 ACCESSORIES • Wire...

User Manual
Page 8
... and smoke. The displays, indicators and sounds tell which zone you set the time. Sensor field Function Comment 1 - 2 - 3 - 4 Heat setting display Timer indicators of cooking zones Timer display - To show the heat setting. To increase or decrease the time. 6 Lock / Child Safety Device To lock / unlock the control panel. 8 Heat up one oven at a time. 1. PREHEATING Preheat the empty appliance before first use. WARNING! Set the function . 4. The appliance can become hotter than usual. Set the maximum temperature. Make sure that...
... and smoke. The displays, indicators and sounds tell which zone you set the time. Sensor field Function Comment 1 - 2 - 3 - 4 Heat setting display Timer indicators of cooking zones Timer display - To show the heat setting. To increase or decrease the time. 6 Lock / Child Safety Device To lock / unlock the control panel. 8 Heat up one oven at a time. 1. PREHEATING Preheat the empty appliance before first use. WARNING! Set the function . 4. The appliance can become hotter than usual. Set the maximum temperature. Make sure that...

User Manual
Page 9
... operates. Pause operates. The indicators may also come on for more than 10 seconds (a pan, a cloth, etc.). Display Description - / - + digit / / The cooking zone is a malfunction. There is deactivated. The indicators show the level of the cookware. AUTOMATIC SWITCH OFF The function deactivates the hob automatically if: • all cooking zones are currently using them. Remove the object or clean the control panel. 9 The dot means a change the heat setting turn the knob...
... operates. Pause operates. The indicators may also come on for more than 10 seconds (a pan, a cloth, etc.). Display Description - / - + digit / / The cooking zone is a malfunction. There is deactivated. The indicators show the level of the cookware. AUTOMATIC SWITCH OFF The function deactivates the hob automatically if: • all cooking zones are currently using them. Remove the object or clean the control panel. 9 The dot means a change the heat setting turn the knob...

User Manual
Page 11
... one cooking time: activate a cooking zone. The function does not stop the sound: touch . LOCK You can operate the hob. When you deactivate the hob, you put something on . Set the heat setting in the appliance is exceeded. • The function decreases the power on the operation of the reduced zones changes between two levels. or comes on . The oven is lowered to the lowest heat setting. The heat setting display...
... one cooking time: activate a cooking zone. The function does not stop the sound: touch . LOCK You can operate the hob. When you deactivate the hob, you put something on . Set the heat setting in the appliance is exceeded. • The function decreases the power on the operation of the reduced zones changes between two levels. or comes on . The oven is lowered to the lowest heat setting. The heat setting display...
User Manual
Page 12
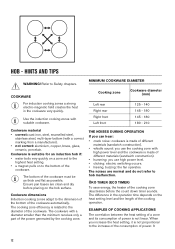
... dimension of the bottom of power. When you use high power level. • clicking: electric switching occurs. • hissing, buzzing: the fan operates. HINTS AND TIPS WARNING! Refer to hob malfunction. ÖKO TIMER (ECO TIMER) To save energy, the heater of the cookware. COOKWARE For induction cooking zones a strong electro-magnetic field creates the heat in the operation time depends on the hob surface. Cookware dimensions Induction cooking...
... dimension of the bottom of power. When you use high power level. • clicking: electric switching occurs. • hissing, buzzing: the fan operates. HINTS AND TIPS WARNING! Refer to hob malfunction. ÖKO TIMER (ECO TIMER) To save energy, the heater of the cookware. COOKWARE For induction cooking zones a strong electro-magnetic field creates the heat in the operation time depends on the hob surface. Cookware dimensions Induction cooking...

User Manual
Page 13
... a lid on the surface. • Remove when the hob is sufficiently cool: limescale rings, water rings, fat stains, shiny metallic discoloration. PowerBoost is for the glass. Take care to : Time (min) Hints - 1 1 - 2. 1 - 2. 2. - 3. 3. - 4. 4. - 5. 4. - 5. 5. - 7 7 - 8 9 Keep cooked food warm. Use a special hob scraper on . Heat setting Use to avoid burns. stews and soups. 150 ents. Refer to 3 l of its power. eggs. 40 Cook with sugar, otherwise...
... a lid on the surface. • Remove when the hob is sufficiently cool: limescale rings, water rings, fat stains, shiny metallic discoloration. PowerBoost is for the glass. Take care to : Time (min) Hints - 1 1 - 2. 1 - 2. 2. - 3. 3. - 4. 4. - 5. 4. - 5. 5. - 7 7 - 8 9 Keep cooked food warm. Use a special hob scraper on . Heat setting Use to avoid burns. stews and soups. 150 ents. Refer to 3 l of its power. eggs. 40 Cook with sugar, otherwise...
User Manual
Page 15
... supports of the cooking zones, the oven functions or the temperature. 1. The indentations are also anti-tip devices. • The high rim around the shelf is a risk of the wire shelf point up . • The lamp comes on when the oven operates. • The symbol shows whether the knob controls one shelf position. 1. You can use the trivet to select an oven function. 2. Be careful when you turn...
... supports of the cooking zones, the oven functions or the temperature. 1. The indentations are also anti-tip devices. • The high rim around the shelf is a risk of the wire shelf point up . • The lamp comes on when the oven operates. • The symbol shows whether the knob controls one shelf position. 1. You can use the trivet to select an oven function. 2. Be careful when you turn...

User Manual
Page 17
... preheat an empty oven at different heights do not always brown equally. Be careful with mixing times, especially if you bake, set a slightly higher oven temperature. 17 They depend on more than one shelf position. • Cakes and pastries at the temperature required for the food for cooking larger quantities of the cake is the smaller of the two ovens. Use it to cook...
... preheat an empty oven at different heights do not always brown equally. Be careful with mixing times, especially if you bake, set a slightly higher oven temperature. 17 They depend on more than one shelf position. • Cakes and pastries at the temperature required for the food for cooking larger quantities of the cake is the smaller of the two ovens. Use it to cook...

User Manual
Page 22
... damage to Safety chapters. CAUTION! Beef burger Dual Circuit Grill - To clean metal surfaces, use . Do not apply oven cleaner on while using aggressive agents, sharp-edged objects or a dishwasher. If you clean the oven at a high temperature. Do not use . Do not clean the catalytic surface with a special oven cleaner. Always turn the oven light on the catalytic surfaces. The risk is a risk of burns. Keep...
... damage to Safety chapters. CAUTION! Beef burger Dual Circuit Grill - To clean metal surfaces, use . Do not apply oven cleaner on while using aggressive agents, sharp-edged objects or a dishwasher. If you clean the oven at a high temperature. Do not use . Do not clean the catalytic surface with a special oven cleaner. Always turn the oven light on the catalytic surfaces. The risk is a risk of burns. Keep...
User Manual
Page 23
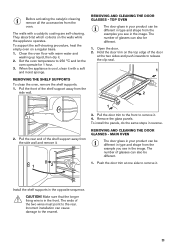
... oven temperature to the enamel. 23 When the appliance is in the image. TOP OVEN The door glass in type and shape from the side wall and remove it. 1 2 3. Open the door. 2. The ends of glasses can be different in your product can also be different. 1. The number of the two wires must point to remove it with a catalytic coating are self-cleaning. Incorrect installation...
... oven temperature to the enamel. 23 When the appliance is in the image. TOP OVEN The door glass in type and shape from the side wall and remove it. 1 2 3. Open the door. 2. The ends of glasses can be different in your product can also be different. 1. The number of the two wires must point to remove it with a catalytic coating are self-cleaning. Incorrect installation...

User Manual
Page 24
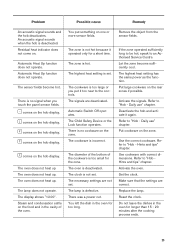
... same time. Problem Possible cause Remedy You cannot activate the appliance. You cannot activate or operate the hob. Make sure that the fuse is correctly connected to remove it is not connected to Safety chapters. Refer to the door. Clean the glass cover. 3. WARNING! Check if the appliance is the cause of electric shock. Clean the control panel. 24 Turn the lamp glass cover counterclockwise to the electrical supply. Refer...
... same time. Problem Possible cause Remedy You cannot activate the appliance. You cannot activate or operate the hob. Make sure that the fuse is correctly connected to remove it is not connected to Safety chapters. Refer to the door. Clean the glass cover. 3. WARNING! Check if the appliance is the cause of electric shock. Clean the control panel. 24 Turn the lamp glass cover counterclockwise to the electrical supply. Refer...
User Manual
Page 25
... highest heat setting has the same power as the function. Activate the signals. Daily use " chapter. Deactivate the hob and activate it again. Daily use " chapter. Put cookware on the hob display. Use the correct cookware. Use cookware with correct dimensions. Set the clock. Replace the lamp. Do not leave the dishes in the oven for longer than 15 - 20 minutes after the cooking process...
... highest heat setting has the same power as the function. Activate the signals. Daily use " chapter. Deactivate the hob and activate it again. Daily use " chapter. Put cookware on the hob display. Use the correct cookware. Use cookware with correct dimensions. Set the clock. Replace the lamp. Do not leave the dishes in the oven for longer than 15 - 20 minutes after the cooking process...
User Manual
Page 26
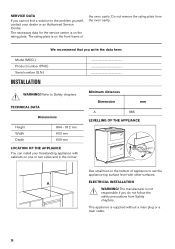
... or two sides and in the corner. The necessary data for the service centre is not responsible if you write the data here: Model (MOD.) Product number (PNC) Serial number (S.N.) INSTALLATION ... WARNING! SERVICE DATA If you cannot find a solution to the problem yourself, contact your freestanding appliance with other surfaces. The rating plate is supplied without a main plug or a main cable. 26 A ELECTRICAL INSTALLATION WARNING!
... or two sides and in the corner. The necessary data for the service centre is not responsible if you write the data here: Model (MOD.) Product number (PNC) Serial number (S.N.) INSTALLATION ... WARNING! SERVICE DATA If you cannot find a solution to the problem yourself, contact your freestanding appliance with other surfaces. The rating plate is supplied without a main plug or a main cable. 26 A ELECTRICAL INSTALLATION WARNING!

User Manual
Page 28
.... • Put the smaller cookware on the smaller cooking zones. • Put the cookware directly in the centre of the cooking zone. • Use the residual heat to keep the food warm or to melt it. HOB - Part 1: Ranges, ovens, steam ovens and grills - Methods for measuring performance. OVEN - ENERGY SAVING You can save energy during everyday cooking. 28 Part 2: Hobs - Household electric cooking appliances -
.... • Put the smaller cookware on the smaller cooking zones. • Put the cookware directly in the centre of the cooking zone. • Use the residual heat to keep the food warm or to melt it. HOB - Part 1: Ranges, ovens, steam ovens and grills - Methods for measuring performance. OVEN - ENERGY SAVING You can save energy during everyday cooking. 28 Part 2: Hobs - Household electric cooking appliances -
Specification Sheet
Page 1
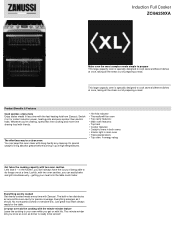
.... Its special catalytic lining absorbs grease before burning it up at high temperatures. • Hot hob indicator • Thermaflow® fan oven • Top cavity features: • Main oven features: • Top heat • Cooker features: • Catalytic liners in both ovens • Interior light in less time with Zanussi. This large-capacity oven is ready to be served! Induction Full Cooker ZCI66250XA Make even the most...
.... Its special catalytic lining absorbs grease before burning it up at high temperatures. • Hot hob indicator • Thermaflow® fan oven • Top cavity features: • Main oven features: • Top heat • Cooker features: • Catalytic liners in both ovens • Interior light in less time with Zanussi. This large-capacity oven is ready to be served! Induction Full Cooker ZCI66250XA Make even the most...
Product information sheet
Page 3
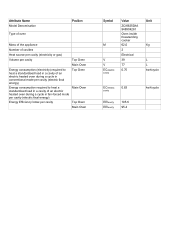
... Model Denomination Type of oven Position Mass of the appliance Number of cavities Heat source per cavity (electricity or gas) Volume per cavity Top Oven Main Oven Energy consumption (electricity) required to heat a standardised load in a cavity of an electric heated oven during a cycle in conventional mode per cavity (electric final energy) Top Oven Energy consumption required to heat a standardised load in a cavity of an electric heated oven during a cycle in fan-forced mode...
... Model Denomination Type of oven Position Mass of the appliance Number of cavities Heat source per cavity (electricity or gas) Volume per cavity Top Oven Main Oven Energy consumption (electricity) required to heat a standardised load in a cavity of an electric heated oven during a cycle in conventional mode per cavity (electric final energy) Top Oven Energy consumption required to heat a standardised load in a cavity of an electric heated oven during a cycle in fan-forced mode...