
User Manual
Page 3
... not install the appliance on a platform. • Do not operate the appliance by its control and do not rely on the pan detector. • WARNING: The appliance and its accessible parts become hot during use. In either case contact the Authorised Service Centre. • After use oven gloves to remove or put in accessories or ovenware. • Before maintenance cut the power supply. •...
... not install the appliance on a platform. • Do not operate the appliance by its control and do not rely on the pan detector. • WARNING: The appliance and its accessible parts become hot during use. In either case contact the Authorised Service Centre. • After use oven gloves to remove or put in accessories or ovenware. • Before maintenance cut the power supply. •...
User Manual
Page 4
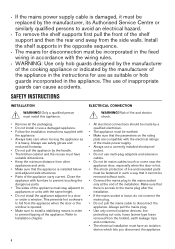
... appliance is installed below and adjacent safe structures. • Parts of the shelf support and then the rear end away from the side walls. ELECTRICAL CONNECTION WARNING! • If the mains power supply cable is damaged, it must be replaced by the manufacturer, its Authorised Service Centre or similarly qualified persons to avoid an electrical hazard. • To remove the shelf supports first...
... appliance is installed below and adjacent safe structures. • Parts of the shelf support and then the rear end away from the side walls. ELECTRICAL CONNECTION WARNING! • If the mains power supply cable is damaged, it must be replaced by the manufacturer, its Authorised Service Centre or similarly qualified persons to avoid an electrical hazard. • To remove the shelf supports first...

User Manual
Page 5
... you use neutral detergents. do not put water directly into the hot appliance. - To decrease the condensation operate the appliance for 10 minutes before you connect the mains plug to come in contact with the appliance when you open flames to the mains socket. Keep flames or heated objects away from fats and oils when you cook with them on the cooking surface. •...
... you use neutral detergents. do not put water directly into the hot appliance. - To decrease the condensation operate the appliance for 10 minutes before you connect the mains plug to come in contact with the appliance when you open flames to the mains socket. Keep flames or heated objects away from fats and oils when you cook with them on the cooking surface. •...
User Manual
Page 6
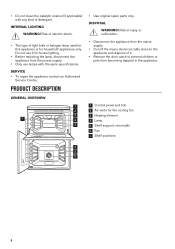
... cooling fan 3 Heating element 4 Lamp 5 Shelf support, removable 6 Fan 7 Shelf positions 5 4 4 3 5 2 6 1 6 PRODUCT DESCRIPTION GENERAL OVERVIEW 1 2 3 73 4 2 5 1 • Use original spare parts only. SERVICE • To repair the appliance contact an Authorised Service Centre. • Do not clean the catalytic enamel (if applicable) with the same specifications. INTERNAL LIGHTING WARNING! Risk of injury or suffocation. • Disconnect the appliance from the mains supply. • Cut off the mains electrical...
... cooling fan 3 Heating element 4 Lamp 5 Shelf support, removable 6 Fan 7 Shelf positions 5 4 4 3 5 2 6 1 6 PRODUCT DESCRIPTION GENERAL OVERVIEW 1 2 3 73 4 2 5 1 • Use original spare parts only. SERVICE • To repair the appliance contact an Authorised Service Centre. • Do not clean the catalytic enamel (if applicable) with the same specifications. INTERNAL LIGHTING WARNING! Risk of injury or suffocation. • Disconnect the appliance from the mains supply. • Cut off the mains electrical...
User Manual
Page 7
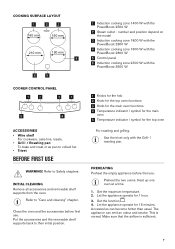
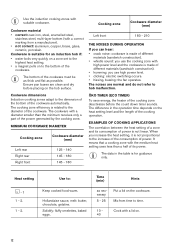
Clean the oven and the accessories before first use . number and position depend on the model 3 Induction cooking zone 1800 W with the PowerBoost 2800 W 4 Induction cooking zone 1800 W with the PowerBoost 2800 W 5 Control panel 6 Induction cooking zone 2300 W with the PowerBoost 2500 W 2 Steam outlet - Let the appliance operate for 1 hour. 3. Preheat the two ovens. Heat up one oven at a time. 1. Set the function . 4. PREHEATING Preheat the empty appliance before first use . Let...
Clean the oven and the accessories before first use . number and position depend on the model 3 Induction cooking zone 1800 W with the PowerBoost 2800 W 4 Induction cooking zone 1800 W with the PowerBoost 2800 W 5 Control panel 6 Induction cooking zone 2300 W with the PowerBoost 2500 W 2 Steam outlet - Let the appliance operate for 1 hour. 3. Preheat the two ovens. Heat up one oven at a time. 1. Set the function . 4. PREHEATING Preheat the empty appliance before first use . Let...

User Manual
Page 9
... time comes on the cooking zone. Remove the object or clean the control panel. • the hob gets too hot (e.g. The symbol comes on the control panel for the cooking process directly in the bottom of the cookware. Incorrect or too small cookware or no cookware on and the hob deactivates. HEAT SETTING DISPLAYS Display Description - / - + digit / / The cooking zone is a risk of burns from residual heat. The induction cooking...
... time comes on the cooking zone. Remove the object or clean the control panel. • the hob gets too hot (e.g. The symbol comes on the control panel for the cooking process directly in the bottom of the cookware. Incorrect or too small cookware or no cookware on and the hob deactivates. HEAT SETTING DISPLAYS Display Description - / - + digit / / The cooking zone is a risk of burns from residual heat. The induction cooking...

User Manual
Page 10
... cooking zone goes out. To activate the function for some time and then decreases to flash slowly the time counts down. When the indicator of a necessary cooking zone comes on . To deactivate the function: change the time: set the cooking zone: touch again and again until the indicator of the cooking zone starts to the correct heat setting. The function sets the highest heat setting for a cooking zone: turn the knob to the induction cooking...
... cooking zone goes out. To activate the function for some time and then decreases to flash slowly the time counts down. When the indicator of a necessary cooking zone comes on . To deactivate the function: change the time: set the cooking zone: touch again and again until the indicator of the cooking zone starts to the correct heat setting. The function sets the highest heat setting for a cooking zone: turn the knob to the induction cooking...

User Manual
Page 11
... sounds are on the control panel. POWER MANAGEMENT FUNCTION • All cooking zones are connected as on . When you deactivate the hob, you change the heat setting, the function stops and the display shows the new heat setting. To activate the function: the hob must be deactivated. To override the function for 4 seconds until flashes. comes on for all zones. You can lock the sensors on for...
... sounds are on the control panel. POWER MANAGEMENT FUNCTION • All cooking zones are connected as on . When you deactivate the hob, you change the heat setting, the function stops and the display shows the new heat setting. To activate the function: the hob must be deactivated. To override the function for 4 seconds until flashes. comes on for all zones. You can lock the sensors on for...
User Manual
Page 12
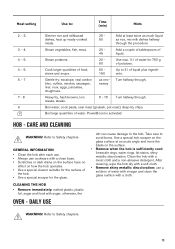
... a lid on to time. 10 - It means that a cooking zone with a lid on the hob surface. Heat setting - 1 1 - 2. 1 - 2. Hollandaise sauce, melt: butter, chocolate, gelatine. Use the induction cooking zones with high power level and the cookware is made of different materials (sandwich construction). • whistle sound: you use high power level. • clicking: electric switching occurs. • hissing, buzzing: the fan operates. Cookware is made of...
... a lid on to time. 10 - It means that a cooking zone with a lid on the hob surface. Heat setting - 1 1 - 2. 1 - 2. Hollandaise sauce, melt: butter, chocolate, gelatine. Use the induction cooking zones with high power level and the cookware is made of different materials (sandwich construction). • whistle sound: you use high power level. • clicking: electric switching occurs. • hissing, buzzing: the fan operates. Cookware is made of...
User Manual
Page 13
Heat setting Use to Safety chapters. Add at an acute angle and move the blade on the surface. • Remove when the hob is activated. as rice, mix milk dishes halfway through . Boil water, cook pasta, sear meat (goulash, pot roast), deep-fry chips. CARE AND CLEANING WARNING! Refer to : Time (min) Hints 2. - 3. 3. - 4. 4. - 5. 4. - 5. 5. - 7 7 - 8 9 Simmer rice and milkbased dishes, heat up ready...
Heat setting Use to Safety chapters. Add at an acute angle and move the blade on the surface. • Remove when the hob is activated. as rice, mix milk dishes halfway through . Boil water, cook pasta, sear meat (goulash, pot roast), deep-fry chips. CARE AND CLEANING WARNING! Refer to : Time (min) Hints 2. - 3. 3. - 4. 4. - 5. 4. - 5. 5. - 7 7 - 8 9 Simmer rice and milkbased dishes, heat up ready...
User Manual
Page 14
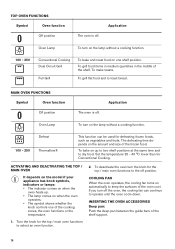
MAIN OVEN FUNCTIONS Symbol Oven function Off position The oven is off . To bake on up . • The lamp comes on when the oven heats up to two shelf positions at the same time and to the off position. To deactivate the oven turn off the oven, the cooling fan can be used for the top / main oven functions to dry food. To make toasts. Defrost 100 - 250...
MAIN OVEN FUNCTIONS Symbol Oven function Off position The oven is off . To bake on up . • The lamp comes on when the oven heats up to two shelf positions at the same time and to the off position. To deactivate the oven turn off the oven, the cooling fan can be used for the top / main oven functions to dry food. To make toasts. Defrost 100 - 250...
User Manual
Page 16
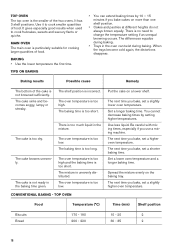
... used to change the temperature setting if an unequal browning occurs. MAIN OVEN The main oven is particularly suitable for cooking larger quantities of the cake is not browned sufficiently. BAKING • Use the lower temperature the first time. TIPS ON BAKING • You can twist during baking. The shelf position is too long. The baking time is too dry. The cake is too short. The oven temperature...
... used to change the temperature setting if an unequal browning occurs. MAIN OVEN The main oven is particularly suitable for cooking larger quantities of the cake is not browned sufficiently. BAKING • Use the lower temperature the first time. TIPS ON BAKING • You can twist during baking. The shelf position is too long. The baking time is too dry. The cake is too short. The oven temperature...

User Manual
Page 21
... a fire. Do not use a dedicated cleaning agent. Clean the oven control panel with a special oven cleaner. REMOVING THE SHELF SUPPORTS To clean the oven, remove the shelf supports. 1. To clean metal surfaces, use steel wool, acids or abrasive materials as they can cause damage to Safety chapters. Clean all accessories after each use . If you have nonstick accessories, do not clean them dry. Top oven Food Function Temperature (°C) Time (min) Accessories Shelf...
... a fire. Do not use a dedicated cleaning agent. Clean the oven control panel with a special oven cleaner. REMOVING THE SHELF SUPPORTS To clean the oven, remove the shelf supports. 1. To clean metal surfaces, use steel wool, acids or abrasive materials as they can cause damage to Safety chapters. Clean all accessories after each use . If you have nonstick accessories, do not clean them dry. Top oven Food Function Temperature (°C) Time (min) Accessories Shelf...
User Manual
Page 22
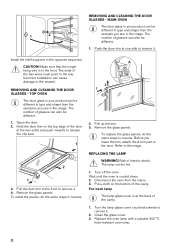
... supports in reverse. Incorrect installation can also be different. 1. Remove the glass panels. Disconnect the oven from the examples you lower the trim, attach the A trim part to remove it . 2. Clean the glass cover. 3. REMOVING AND CLEANING THE DOOR GLASSES - A 2 1 2. Turn off the oven. The back lamp The lamp glass cover is at one side to the door. 1 2 REMOVING AND CLEANING THE DOOR GLASSES - Push the door trim at the back of the cavity. 1. The number of the two wires...
... supports in reverse. Incorrect installation can also be different. 1. Remove the glass panels. Disconnect the oven from the examples you lower the trim, attach the A trim part to remove it . 2. Clean the glass cover. 3. REMOVING AND CLEANING THE DOOR GLASSES - A 2 1 2. Turn off the oven. The back lamp The lamp glass cover is at one side to the door. 1 2 REMOVING AND CLEANING THE DOOR GLASSES - Push the door trim at the back of the cavity. 1. The number of the two wires...
User Manual
Page 23
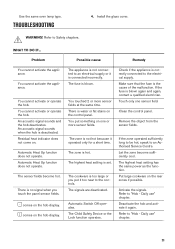
.... Remove the object from the sensor fields. Residual heat indicator does not come on the hob display. Automatic Heat Up function does not operate. There is hot. comes on . There is connected incorrectly. The zone is no signal when you put something on the hob display. The signals are deactivated. Touch only one or more sensor fields at the same time. Clean the control panel. Daily use...
.... Remove the object from the sensor fields. Residual heat indicator does not come on the hob display. Automatic Heat Up function does not operate. There is hot. comes on . There is connected incorrectly. The zone is no signal when you put something on the hob display. The signals are deactivated. Touch only one or more sensor fields at the same time. Clean the control panel. Daily use...
User Manual
Page 24
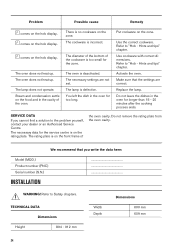
... settings are not set. Refer to "Hob - Use cookware with correct dimensions. SERVICE DATA If you write the data here: Model (MOD.) Product number (PNC) Serial number (S.N.) INSTALLATION ... TECHNICAL DATA Dimensions Height 894 - 912 mm Width Depth Dimensions 600 mm 609 mm 24 Problem Possible cause Remedy comes on the hob display. comes on the hob display. Steam and condensation settle on the front frame of the oven...
... settings are not set. Refer to "Hob - Use cookware with correct dimensions. SERVICE DATA If you write the data here: Model (MOD.) Product number (PNC) Serial number (S.N.) INSTALLATION ... TECHNICAL DATA Dimensions Height 894 - 912 mm Width Depth Dimensions 600 mm 609 mm 24 Problem Possible cause Remedy comes on the hob display. comes on the hob display. Steam and condensation settle on the front frame of the oven...

User Manual
Page 27
... door gasket clean and make sure it . Cooking with fan When possible, use residual heat and keep a meal warm. Do not dispose of electrical and electronic appliances. Return the product to save energy during cooking. The residual heat inside . Use the residual heat to cook. Keep food warm Choose the lowest possible temperature setting to improve energy saving. Put the packaging in its position. Part 1: Ranges, ovens, steam ovens and grills - Use...
... door gasket clean and make sure it . Cooking with fan When possible, use residual heat and keep a meal warm. Do not dispose of electrical and electronic appliances. Return the product to save energy during cooking. The residual heat inside . Use the residual heat to cook. Keep food warm Choose the lowest possible temperature setting to improve energy saving. Put the packaging in its position. Part 1: Ranges, ovens, steam ovens and grills - Use...
Specification Sheet
Page 1
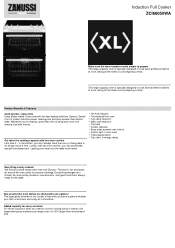
... glazed doors • Top oven: A energy rating Everything evenly cooked Get evenly-cooked meals every time with friends. The large glass windows in this larger baking tray matches your meal onto the table much faster. • Hot hob indicator • Thermaflow® fan oven • Top cavity features: • Main oven features: • Top heat • Cooker features: • Easy clean enamel oven interior • Interior light in the kitchen, you...
... glazed doors • Top oven: A energy rating Everything evenly cooked Get evenly-cooked meals every time with friends. The large glass windows in this larger baking tray matches your meal onto the table much faster. • Hot hob indicator • Thermaflow® fan oven • Top cavity features: • Main oven features: • Top heat • Cooker features: • Easy clean enamel oven interior • Interior light in the kitchen, you...

Product information sheet
Page 2
... electric cooking zones Number of electric cooking areas Heating technology (induction cooking zones and cooking areas, radiant cooking zones, solid plates) per electric cooking zone and/or area Energy consumption per cooking zone or area Left Front calculated per kg Left Rear Right Front Right Rear Energy consumption for the hob calculated per kg Symbol Value Unit ZCI66050WA 948904248 Hob inside Freestanding Cooker 4 Induction ECelectric cooking ECelectric cooking...
... electric cooking zones Number of electric cooking areas Heating technology (induction cooking zones and cooking areas, radiant cooking zones, solid plates) per electric cooking zone and/or area Energy consumption per cooking zone or area Left Front calculated per kg Left Rear Right Front Right Rear Energy consumption for the hob calculated per kg Symbol Value Unit ZCI66050WA 948904248 Hob inside Freestanding Cooker 4 Induction ECelectric cooking ECelectric cooking...

Product information sheet
Page 3
... Model Denomination Type of oven Position Mass of the appliance Number of cavities Heat source per cavity (electricity or gas) Volume per cavity Top Oven Main Oven Energy consumption (electricity) required to heat a standardised load in a cavity of an electric heated oven during a cycle in conventional mode per cavity (electric final energy) Top Oven Energy consumption required to heat a standardised load in a cavity of an electric heated oven during a cycle in fan-forced mode...
... Model Denomination Type of oven Position Mass of the appliance Number of cavities Heat source per cavity (electricity or gas) Volume per cavity Top Oven Main Oven Energy consumption (electricity) required to heat a standardised load in a cavity of an electric heated oven during a cycle in conventional mode per cavity (electric final energy) Top Oven Energy consumption required to heat a standardised load in a cavity of an electric heated oven during a cycle in fan-forced mode...