User Manual
Page 3
... shelf support and then the rear end away from the lid before opening. • Do not install the appliance behind a decorative door in order to avoid overheating. • Do not install the appliance on a platform. • Do not operate the appliance by the manufacturer, its accessible parts become hot during use oven gloves to remove or put in shattering of the glass. •...
... shelf support and then the rear end away from the lid before opening. • Do not install the appliance behind a decorative door in order to avoid overheating. • Do not install the appliance on a platform. • Do not operate the appliance by the manufacturer, its accessible parts become hot during use oven gloves to remove or put in shattering of the glass. •...

User Manual
Page 4
... the gas and gas pressure) and the adjustment of the appliance are compatible with the electrical ratings of the mains power supply. • Always use a correctly installed shockproof socket. • Do not use multi-plug adapters and extension cables. • Do not let mains cables touch or come near the appliance door or the niche below the appliance, especially when it operates or the door is hot...
... the gas and gas pressure) and the adjustment of the appliance are compatible with the electrical ratings of the mains power supply. • Always use a correctly installed shockproof socket. • Do not use multi-plug adapters and extension cables. • Do not let mains cables touch or come near the appliance door or the niche below the appliance, especially when it operates or the door is hot...

User Manual
Page 5
... you open flames to the appliance. • Before maintenance, deactivate the appliance. CARE AND CLEANING WARNING! There is not connected to a device, which evacuates the products of injury, fire, or damage to come in the appliance after each use only. • Do not change the specification of this appliance. • Make sure that the glass panels can cause fire at a lower temperature...
... you open flames to the appliance. • Before maintenance, deactivate the appliance. CARE AND CLEANING WARNING! There is not connected to a device, which evacuates the products of injury, fire, or damage to come in the appliance after each use only. • Do not change the specification of this appliance. • Make sure that the glass panels can cause fire at a lower temperature...

User Manual
Page 6
... trapped in the dishwasher. SERVICE • To repair the appliance contact an Authorised Service Centre. • Use original spare parts only. Do not use any kind of electric shock. 6 DISPOSAL WARNING! INTERNAL LIGHTING WARNING! Only use it . • Remove the door catch to prevent children or pets from the power supply. • Only use an oven spray, obey the safety instructions on how to discard the...
... trapped in the dishwasher. SERVICE • To repair the appliance contact an Authorised Service Centre. • Use original spare parts only. Do not use any kind of electric shock. 6 DISPOSAL WARNING! INTERNAL LIGHTING WARNING! Only use it . • Remove the door catch to prevent children or pets from the power supply. • Only use an oven spray, obey the safety instructions on how to discard the...
User Manual
Page 7
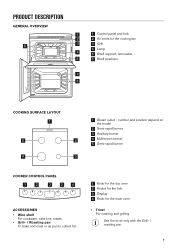
... roasting and grilling. number and position depend on the model 2 Semi-rapid burner 3 Auxiliary burner 4 Multicrown burner 5 Semi-rapid burner COOKER CONTROL PANEL 1 2 3 2 4 ACCESSORIES • Wire shelf For cookware, cake tins, roasts. • Grill- / Roasting pan To bake and roast or as pan to collect fat. 1 Knob for the top oven 2 Knobs for the hob 3 Display 4 Knob for the cooling fan 3 3 Grill 4 Lamp 4 5 Shelf support, removable 5 6 Shelf positions 5 4 4 3 5 2 1 COOKING SURFACE LAYOUT 1 5 2 4 3 1 Steam...
... roasting and grilling. number and position depend on the model 2 Semi-rapid burner 3 Auxiliary burner 4 Multicrown burner 5 Semi-rapid burner COOKER CONTROL PANEL 1 2 3 2 4 ACCESSORIES • Wire shelf For cookware, cake tins, roasts. • Grill- / Roasting pan To bake and roast or as pan to collect fat. 1 Knob for the top oven 2 Knobs for the hob 3 Display 4 Knob for the cooling fan 3 3 Grill 4 Lamp 4 5 Shelf support, removable 5 6 Shelf positions 5 4 4 3 5 2 1 COOKING SURFACE LAYOUT 1 5 2 4 3 1 Steam...
User Manual
Page 8
... starts to "Care and cleaning" chapter. Set the maximum temperature. 2. This is normal. 8 When you use open fire in the kitchen environment. Keep the knob pushed for equal or less than usual. Preheat the two ovens. The appliance can start automatically when you can become hotter than 10 seconds to light the burner again after installation or a power cut , flashes. WARNING! If not, the gas supply is sufficient. INITIAL CLEANING Remove...
... starts to "Care and cleaning" chapter. Set the maximum temperature. 2. This is normal. 8 When you use open fire in the kitchen environment. Keep the knob pushed for equal or less than usual. Preheat the two ovens. The appliance can start automatically when you can become hotter than 10 seconds to light the burner again after installation or a power cut , flashes. WARNING! If not, the gas supply is sufficient. INITIAL CLEANING Remove...

User Manual
Page 9
.... Do not use the lid as a cut-off the gas supply for the hob to side. 2. If the burner does not ignite, adjust the crown and cap again. Always use the knob for the hob. Ignition candle F. WARNING! Burner crown C. Burner cap A B. Let the crown fall freely onto the body. Light the burner. TURNING THE BURNER OFF To put the flame out, turn the flame down or switch it off...
.... Do not use the lid as a cut-off the gas supply for the hob to side. 2. If the burner does not ignite, adjust the crown and cap again. Always use the knob for the hob. Ignition candle F. WARNING! Burner crown C. Burner cap A B. Let the crown fall freely onto the body. Light the burner. TURNING THE BURNER OFF To put the flame out, turn the flame down or switch it off...

User Manual
Page 10
... pot is obtained through a ceramic ignition candle with a soft cloth. Keep these components well clean to easily clean the hob. CARE AND CLEANING DIAMETERS OF COOKWARE WARNING! Clean the hob with a soft cloth. CLEANING THE SPARK PLUG This feature is used on the burner to washing in correct positions. 3. Remove the pan supports to prevent difficult lighting and check that pot handles are not obstructed. 10 Make...
... pot is obtained through a ceramic ignition candle with a soft cloth. Keep these components well clean to easily clean the hob. CARE AND CLEANING DIAMETERS OF COOKWARE WARNING! Clean the hob with a soft cloth. CLEANING THE SPARK PLUG This feature is used on the burner to washing in correct positions. 3. Remove the pan supports to prevent difficult lighting and check that pot handles are not obstructed. 10 Make...

User Manual
Page 11
... the gas flow, if the flame goes out. When the oven is off . 1 - 8 1) Full Grill Heat settings Ignition To grill flat food and to set the necessary heat setting. 11 DAILY USE WARNING! TOP OVEN FUNCTIONS Oven function Application Off position The oven is active, the lamp turns on. After ignition release the knob, close the oven door and turn it counterclockwise to to ignite the top oven burner. 3. Keep the oven door open when you ignite the burner. OVEN -
... the gas flow, if the flame goes out. When the oven is off . 1 - 8 1) Full Grill Heat settings Ignition To grill flat food and to set the necessary heat setting. 11 DAILY USE WARNING! TOP OVEN FUNCTIONS Oven function Application Off position The oven is active, the lamp turns on. After ignition release the knob, close the oven door and turn it counterclockwise to to ignite the top oven burner. 3. Keep the oven door open when you ignite the burner. OVEN -
User Manual
Page 12
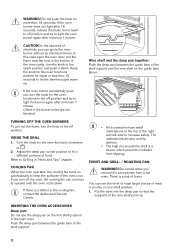
... up . TURNING OFF THE OVEN BURNERS To put the flame near the hole in "Hints and Tips" chapter. Be careful when you turn off position. If the oven burner does not light after minimum 1 minute. You can ignite the oven burner without an electrical device. CAUTION! Wire shelf and the deep pan together: Push the deep pan between the guide bars of food. Keep the knob for the oven functions pushed...
... up . TURNING OFF THE OVEN BURNERS To put the flame near the hole in "Hints and Tips" chapter. Be careful when you turn off position. If the oven burner does not light after minimum 1 minute. You can ignite the oven burner without an electrical device. CAUTION! Wire shelf and the deep pan together: Push the deep pan between the guide bars of food. Keep the knob for the oven functions pushed...
User Manual
Page 14
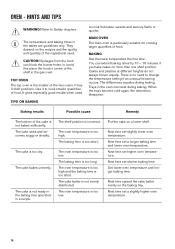
... used TIPS ON BAKING to Safety chapters. The oven temperature is too high. Next time set higher oven temperature. Next time set a longer baking time and lower oven temperature. They depend on more than one shelf position. It has 3 shelf positions. BAKING Use the lower temperature the first time. Trays in a recipe. The oven temperature is too low. Put the cake on the baking tray. Set lower oven temperature and longer baking time. The temperature and baking times in the gas oven...
... used TIPS ON BAKING to Safety chapters. The oven temperature is too high. Next time set higher oven temperature. Next time set a longer baking time and lower oven temperature. They depend on more than one shelf position. It has 3 shelf positions. BAKING Use the lower temperature the first time. Trays in a recipe. The oven temperature is too low. Put the cake on the baking tray. Set lower oven temperature and longer baking time. The temperature and baking times in the gas oven...
User Manual
Page 16
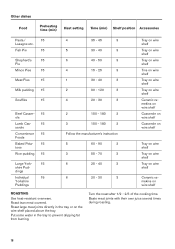
Roast lean meat covered. Put some water in the tray or on wire shelf ROASTING Use heat-resistant ovenware. Turn the roast after 1/2 - 2/3 of the cooking time. Baste meat joints with their own juice several times during roasting. 16 Roast large meat joints directly in the tray to prevent dripping fat from burning. Other dishes Food Preheating time (min) Heat setting Time (min) Shelf position Accessories...
Roast lean meat covered. Put some water in the tray or on wire shelf ROASTING Use heat-resistant ovenware. Turn the roast after 1/2 - 2/3 of the cooking time. Baste meat joints with their own juice several times during roasting. 16 Roast large meat joints directly in the tray to prevent dripping fat from burning. Other dishes Food Preheating time (min) Heat setting Time (min) Shelf position Accessories...

User Manual
Page 19
...) on the catalytic surfaces. To clean metal surfaces, use . Keep children away when you have no effect on while using aggressive agents, sharp-edged objects or a dishwasher. If you clean the oven at a high temperature. Clean all accessories after each use a dedicated cleaning agent. Do not clean the accessories in a fire. Always turn the oven light on catalytic properties. CAUTION! Food Preheating time (min) Heat setting Time (min) Shelf position...
...) on the catalytic surfaces. To clean metal surfaces, use . Keep children away when you have no effect on while using aggressive agents, sharp-edged objects or a dishwasher. If you clean the oven at a high temperature. Clean all accessories after each use a dedicated cleaning agent. Do not clean the accessories in a fire. Always turn the oven light on catalytic properties. CAUTION! Food Preheating time (min) Heat setting Time (min) Shelf position...
User Manual
Page 20
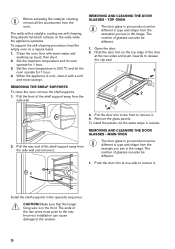
... number of glasses can also be different. 1. To install the panels, do the same steps in the image. Push the door trim at the two sides and push inwards to remove it . 2. Incorrect installation can also be different. 1. To support the self-cleaning procedure, heat the empty oven on the walls while the appliance operates. Set the maximum temperature and let oven operate for 1 hour. 4. Hold the door trim on...
... number of glasses can also be different. 1. To install the panels, do the same steps in the image. Push the door trim at the two sides and push inwards to remove it . 2. Incorrect installation can also be different. 1. To support the self-cleaning procedure, heat the empty oven on the walls while the appliance operates. Set the maximum temperature and let oven operate for 1 hour. 4. Hold the door trim on...

User Manual
Page 21
... A trim part to the door. Burner cap and crown are placed incorrectly. Before you try to an electrical supply or it . 2. Install the glass cover. The appliance is not connected to activate the spark generator. A 2 1 2. To replace the glass panels, do not work. The lamp can be hot. 1. Wait until the oven is connected incorrectly. Put a cloth on the bottom of electric shock. Turn the lamp glass cover counterclockwise to the electrical supply. Clean...
... A trim part to the door. Burner cap and crown are placed incorrectly. Before you try to an electrical supply or it . 2. Install the glass cover. The appliance is not connected to activate the spark generator. A 2 1 2. To replace the glass panels, do not work. The lamp can be hot. 1. Wait until the oven is connected incorrectly. Put a cloth on the bottom of electric shock. Turn the lamp glass cover counterclockwise to the electrical supply. Clean...
User Manual
Page 22
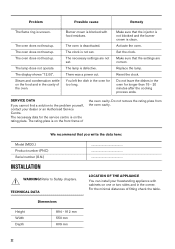
Problem Possible cause Remedy The flame ring is defective. There was a power cut. Do not leave the dishes in the oven for too long. Dimensions Height Width Depth 894 - 912 mm 550 mm 609 mm 22 Replace the lamp. Reset the clock. For the minimal distances of the oven cavity. The necessary settings are correct. Make sure that the settings are not set . Do...
Problem Possible cause Remedy The flame ring is defective. There was a power cut. Do not leave the dishes in the oven for too long. Dimensions Height Width Depth 894 - 912 mm 550 mm 609 mm 22 Replace the lamp. Reset the clock. For the minimal distances of the oven cavity. The necessary settings are correct. Make sure that the settings are not set . Do...

User Manual
Page 25
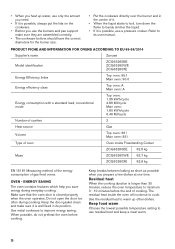
... gas burner) Left Front - Light the oven burner. Check if the flame is regular. Light one of the hob burners. To light the hob burner refer to the "Ignition of the hob burners. The burner goes out. ELECTRICAL INSTALLATION WARNING! PRODUCT INFORMATION FOR HOB ACCORDING TO EU 66/2014 Model identification ZCG63260BE ZCG63260WE ZCG63260XE Type of hob Hob inside Freestanding Cooker Number of the burners. 5. Semi Rapid Right front - Part 2-1 : Rational use...
... gas burner) Left Front - Light the oven burner. Check if the flame is regular. Light one of the hob burners. To light the hob burner refer to the "Ignition of the hob burners. The burner goes out. ELECTRICAL INSTALLATION WARNING! PRODUCT INFORMATION FOR HOB ACCORDING TO EU 66/2014 Model identification ZCG63260BE ZCG63260WE ZCG63260XE Type of hob Hob inside Freestanding Cooker Number of the burners. 5. Semi Rapid Right front - Part 2-1 : Rational use...
User Manual
Page 26
... burner size. • Put the cookware directly over the burner and in its user manual. Keep breaks between baking as short as possible when you save energy during cooking. The residual heat inside Freestanding Cooker ZCG63260BE 62.5 kg Mass ZCG63260WE 62.7 kg ZCG63260XE 62.6 kg EN 15181 Measuring method of the energy consumption of gas fired ovens. Keep food warm Choose the lowest possible temperature setting...
... burner size. • Put the cookware directly over the burner and in its user manual. Keep breaks between baking as short as possible when you save energy during cooking. The residual heat inside Freestanding Cooker ZCG63260BE 62.5 kg Mass ZCG63260WE 62.7 kg ZCG63260XE 62.6 kg EN 15181 Measuring method of the energy consumption of gas fired ovens. Keep food warm Choose the lowest possible temperature setting...
Specification Sheet
Page 1
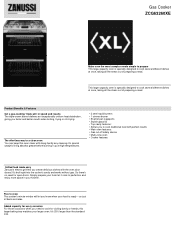
...; Gas cut-off safety device • Multi-zone oven • Cooker features: Grilled food made easy Zanussi's electric grill lets you create delicious dishes with doing hardly any cleaning. The effortless way to a clean oven You can keep this larger baking tray matches your food, let it up at high temperatures. • 2 semi-rapid burners • 1 simmer burner • Enamel pan suppports • Stylish glass...
...; Gas cut-off safety device • Multi-zone oven • Cooker features: Grilled food made easy Zanussi's electric grill lets you create delicious dishes with doing hardly any cleaning. The effortless way to a clean oven You can keep this larger baking tray matches your food, let it up at high temperatures. • 2 semi-rapid burners • 1 simmer burner • Enamel pan suppports • Stylish glass...

Product information sheet
Page 3
... an electric heated oven during a cycle in conventional mode per cavity (electric final energy) Energy consumption required to heat a standardised load in a gas-fired cavity of an oven during a cycle in conventional mode per cavity (gas final energy) Energy Efficiency Index per cavity Top Oven Main Oven Top Oven Main Oven Top Oven Main Oven Top Oven Main Oven Symbol M V V ECelectric cavity ECelectric cavity Value ZCG63260XE 948905174 Oven inside freestanding cooker 63,0 2 Gas...
... an electric heated oven during a cycle in conventional mode per cavity (electric final energy) Energy consumption required to heat a standardised load in a gas-fired cavity of an oven during a cycle in conventional mode per cavity (gas final energy) Energy Efficiency Index per cavity Top Oven Main Oven Top Oven Main Oven Top Oven Main Oven Top Oven Main Oven Symbol M V V ECelectric cavity ECelectric cavity Value ZCG63260XE 948905174 Oven inside freestanding cooker 63,0 2 Gas...