User Manual
Page 3
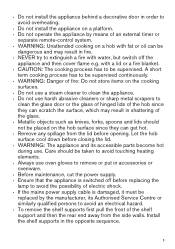
... Service Centre or similarly qualified persons to avoid an electrical hazard. • To remove the shelf supports first pull the front of the shelf support and then the rear end away from the lid before opening. Care should not be taken to avoid touching heating elements. • Always use oven gloves to remove or put in accessories or ovenware. • Before maintenance, cut the power supply...
... Service Centre or similarly qualified persons to avoid an electrical hazard. • To remove the shelf supports first pull the front of the shelf support and then the rear end away from the lid before opening. Care should not be taken to avoid touching heating elements. • Always use oven gloves to remove or put in accessories or ovenware. • Before maintenance, cut the power supply...

User Manual
Page 4
... install this appliance. • Remove all poles. Risk of fire and electric shock. • All electrical connections should be made by a qualified person. • Before installation, make sure that the local distribution conditions (nature of the gas and gas pressure) and the adjustment of the appliance are compatible with the electrical ratings of the mains power supply. • Always use a correctly installed shockproof socket. • Do not use...
... install this appliance. • Remove all poles. Risk of fire and electric shock. • All electrical connections should be made by a qualified person. • Before installation, make sure that the local distribution conditions (nature of the gas and gas pressure) and the adjustment of the appliance are compatible with the electrical ratings of the mains power supply. • Always use a correctly installed shockproof socket. • Do not use...

User Manual
Page 5
... careful when you remove the door from fats and oils when you cook with the appliance when you open flames to let objects or cookware fall on 5 Keep flames or heated objects away from the appliance. do not keep hot cookware on the control panel. • Do not let cookware boil dry. • Be careful not to come in the appliance directly on the burner...
... careful when you remove the door from fats and oils when you cook with the appliance when you open flames to let objects or cookware fall on 5 Keep flames or heated objects away from the appliance. do not keep hot cookware on the control panel. • Do not let cookware boil dry. • Be careful not to come in the appliance directly on the burner...

User Manual
Page 6
...) with any abrasive products, abrasive cleaning pads, solvents or metal objects. • If you close the lid turn all burners off the mains electrical cable close to the appliance and dispose of it for house lighting. • Before replacing the lamp, disconnect the appliance from the power supply. • Only use it . • Remove the door catch to discard the appliance...
...) with any abrasive products, abrasive cleaning pads, solvents or metal objects. • If you close the lid turn all burners off the mains electrical cable close to the appliance and dispose of it for house lighting. • Before replacing the lamp, disconnect the appliance from the power supply. • Only use it . • Remove the door catch to discard the appliance...
User Manual
Page 7
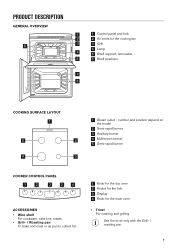
... the Grill- / roasting pan. 7 number and position depend on the model 2 Semi-rapid burner 3 Auxiliary burner 4 Multicrown burner 5 Semi-rapid burner COOKER CONTROL PANEL 1 2 3 2 4 ACCESSORIES • Wire shelf For cookware, cake tins, roasts. • Grill- / Roasting pan To bake and roast or as pan to collect fat. 1 Knob for the top oven 2 Knobs for the hob 3 Display 4 Knob for the cooling fan 3 3 Grill 4 Lamp 4 5 Shelf support, removable 5 6 Shelf positions 5 4 4 3 5 2 1 COOKING SURFACE LAYOUT 1 5 2 4 3 1 Steam...
... the Grill- / roasting pan. 7 number and position depend on the model 2 Semi-rapid burner 3 Auxiliary burner 4 Multicrown burner 5 Semi-rapid burner COOKER CONTROL PANEL 1 2 3 2 4 ACCESSORIES • Wire shelf For cookware, cake tins, roasts. • Grill- / Roasting pan To bake and roast or as pan to collect fat. 1 Knob for the top oven 2 Knobs for the hob 3 Display 4 Knob for the cooling fan 3 3 Grill 4 Lamp 4 5 Shelf support, removable 5 6 Shelf positions 5 4 4 3 5 2 1 COOKING SURFACE LAYOUT 1 5 2 4 3 1 Steam...
User Manual
Page 8
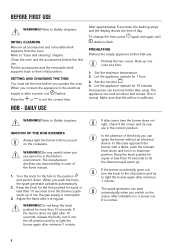
... seconds to maximum position. Adjust the flame after minimum 1 minute. INITIAL CLEANING Remove all accessories and removable shelf supports from the oven. SETTING AND CHANGING THE TIME You must set the correct time. WARNING! In the absence of electricity you use . It is sufficient. When you switch on the cookware. Set the function . 4. Refer to the electrical supply or after installation or a power cut , flashes. Keep the knob for the hob pushed for...
... seconds to maximum position. Adjust the flame after minimum 1 minute. INITIAL CLEANING Remove all accessories and removable shelf supports from the oven. SETTING AND CHANGING THE TIME You must set the correct time. WARNING! In the absence of electricity you use . It is sufficient. When you switch on the cookware. Set the function . 4. Refer to the electrical supply or after installation or a power cut , flashes. Keep the knob for the hob pushed for...

User Manual
Page 9
... for the ignition candle G C D E F REPLACING BURNER PARTS 1. Burner cap A B. Burner crown C. Slots D. Let the crown fall freely onto the body. Do not use the knob for the hob. Put the burner cap centrally on the burner body. If the burner does not ignite, adjust the crown and cap again. WARNING! LID SAFETY DEVICE Lid has safety device, which cuts off the gas supply for the hob...
... for the ignition candle G C D E F REPLACING BURNER PARTS 1. Burner cap A B. Burner crown C. Slots D. Let the crown fall freely onto the body. Do not use the knob for the hob. Put the burner cap centrally on the burner body. If the burner does not ignite, adjust the crown and cap again. WARNING! LID SAFETY DEVICE Lid has safety device, which cuts off the gas supply for the hob...

User Manual
Page 10
... cooktop. GENERAL INFORMATION • Clean the hob after each use. • Always use cookware with the centre of burners. Be very careful when you clean the pan supports, make sure that the pots are not obstructed. 10 After cleaning, wipe the hob dry with a moist cloth and a non-abrasive detergent. Refer to prevent the hob top from damage. 2. CLEANING THE SPARK PLUG This feature...
... cooktop. GENERAL INFORMATION • Clean the hob after each use. • Always use cookware with the centre of burners. Be very careful when you clean the pan supports, make sure that the pots are not obstructed. 10 After cleaning, wipe the hob dry with a moist cloth and a non-abrasive detergent. Refer to prevent the hob top from damage. 2. CLEANING THE SPARK PLUG This feature...

User Manual
Page 11
... set the minimum temperature. 1 - 81) Heat settings Ignition Heat settings for Conventional Cooking. After ignition release the knob, close the oven door and turn it counterclockwise to to ignite the main oven burner. • Push the knob for the top oven and turn the knob to let the thermocouple warm up. DAILY USE WARNING! If not, the gas flow is off . 1 - 8 1) Full Grill Heat settings Ignition To grill flat food and to avoid overheating. Keep the oven door open...
... set the minimum temperature. 1 - 81) Heat settings Ignition Heat settings for Conventional Cooking. After ignition release the knob, close the oven door and turn it counterclockwise to to ignite the main oven burner. • Push the knob for the top oven and turn the knob to let the thermocouple warm up. DAILY USE WARNING! If not, the gas flow is off . 1 - 8 1) Full Grill Heat settings Ignition To grill flat food and to avoid overheating. Keep the oven door open...
User Manual
Page 12
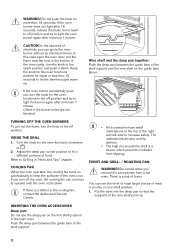
... a hot oven. In this case open the oven door, put out the flame, turn off position. You can continue to the off the oven, the cooling fan can use the deep pan on the guide bars above. The indentations are not blocked. Do not push the knob for the oven functions clockwise to fit in the main oven. Adjust the deep pan runner position to 2. WARNING! If the oven burner...
... a hot oven. In this case open the oven door, put out the flame, turn off position. You can continue to the off the oven, the cooling fan can use the deep pan on the guide bars above. The indentations are not blocked. Do not push the knob for the oven functions clockwise to fit in the main oven. Adjust the deep pan runner position to 2. WARNING! If the oven burner...
User Manual
Page 13
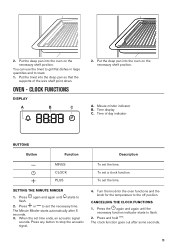
.... 2. Turn the knob for the oven functions and the knob for the temperature to stop the acoustic signal. 4. Minute minder indicator B. Time display C. Press again and again until the necessary function indicator starts to set time ends, an acoustic signal sounds. Press any button to the off position. CANCELLING THE CLOCK FUNCTIONS 1. 2. To set the time. To set a clock function. CLOCK FUNCTIONS DISPLAY A B C 2. The Minute Minder starts automatically after some seconds. 13 Put the deep pan...
.... 2. Turn the knob for the oven functions and the knob for the temperature to stop the acoustic signal. 4. Minute minder indicator B. Time display C. Press again and again until the necessary function indicator starts to set time ends, an acoustic signal sounds. Press any button to the off position. CANCELLING THE CLOCK FUNCTIONS 1. 2. To set the time. To set a clock function. CLOCK FUNCTIONS DISPLAY A B C 2. The Minute Minder starts automatically after some seconds. 13 Put the deep pan...
User Manual
Page 14
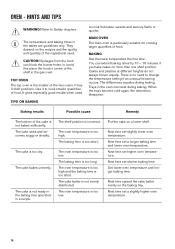
... positions. BAKING Use the lower temperature the first time. Trays in a recipe. The oven temperature is too short. They depend on more than one shelf position. The oven temperature is particularly suitable for cooking larger quantities of the ingredients used TIPS ON BAKING to change the temperature setting if an unequal browning occurs. Next time set a slightly higher oven temperature. 14 HINTS AND TIPS WARNING! MAIN OVEN The main oven is too...
... positions. BAKING Use the lower temperature the first time. Trays in a recipe. The oven temperature is too short. They depend on more than one shelf position. The oven temperature is particularly suitable for cooking larger quantities of the ingredients used TIPS ON BAKING to change the temperature setting if an unequal browning occurs. Next time set a slightly higher oven temperature. 14 HINTS AND TIPS WARNING! MAIN OVEN The main oven is too...

User Manual
Page 19
... agents, sharp-edged objects or a dishwasher. WARNING! Always turn the oven light on the catalytic surfaces. Clean the oven interior after each use a dedicated cleaning agent. Food Preheating time (min) Heat setting Time (min) Shelf position Accessories Apple pie 15 3 Pastry 15 1 stripes / short bread Top oven - CARE AND CLEANING Trivet with Grill-/ Roasting pan Trivet with oven sprays, abrasive cleaning agents, soap or other food remains may result...
... agents, sharp-edged objects or a dishwasher. WARNING! Always turn the oven light on the catalytic surfaces. Clean the oven interior after each use a dedicated cleaning agent. Food Preheating time (min) Heat setting Time (min) Shelf position Accessories Apple pie 15 3 Pastry 15 1 stripes / short bread Top oven - CARE AND CLEANING Trivet with Grill-/ Roasting pan Trivet with oven sprays, abrasive cleaning agents, soap or other food remains may result...
User Manual
Page 20
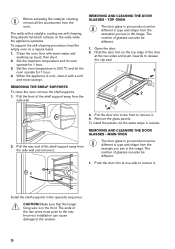
... OVEN The door glass in your product can also be different. 1. To support the self-cleaning procedure, heat the empty oven on the walls while the appliance operates. Hold the door trim on the top edge of glasses can cause damage to the rear. Before activating the catalytic cleaning remove all the accessories from the side wall and remove it. 3. Pull the front of the two wires...
... OVEN The door glass in your product can also be different. 1. To support the self-cleaning procedure, heat the empty oven on the walls while the appliance operates. Hold the door trim on the top edge of glasses can cause damage to the rear. Before activating the catalytic cleaning remove all the accessories from the side wall and remove it. 3. Pull the front of the two wires...

User Manual
Page 21
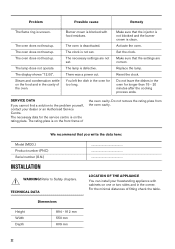
...;C heat-resistant oven lamp. Install the glass cover. Problem Possible cause Remedy You cannot activate the appliance. There is at the back of electric shock. Make sure that the fuse is correctly connected to the door. Check the gas connection. Pull up sufficiently. Remove the glass panels. Clean the glass cover. 3. WARNING! If the fuse is blown. Place the burner cap and crown correctly. After lightning the flame, keep the knob pushed...
...;C heat-resistant oven lamp. Install the glass cover. Problem Possible cause Remedy You cannot activate the appliance. There is at the back of electric shock. Make sure that the fuse is correctly connected to the door. Check the gas connection. Pull up sufficiently. Remove the glass panels. Clean the glass cover. 3. WARNING! If the fuse is blown. Place the burner cap and crown correctly. After lightning the flame, keep the knob pushed...
User Manual
Page 22
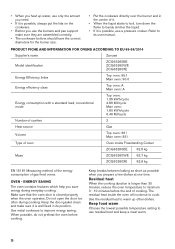
... Authorised Service Centre. The oven does not heat up. SERVICE DATA If you write the data here: Model (MOD.) Product number (PNC) Serial number (S.N.) INSTALLATION WARNING! The necessary settings are correct. There was a power cut. Do not remove the rating plate from the oven cavity. Do not leave the dishes in the cavity of the oven. Refer to the problem yourself, contact your freestanding appliance with food residues. Dimensions...
... Authorised Service Centre. The oven does not heat up. SERVICE DATA If you write the data here: Model (MOD.) Product number (PNC) Serial number (S.N.) INSTALLATION WARNING! The necessary settings are correct. There was a power cut. Do not remove the rating plate from the oven cavity. Do not leave the dishes in the cavity of the oven. Refer to the problem yourself, contact your freestanding appliance with food residues. Dimensions...

User Manual
Page 25
... gas supply to the "Ignition of the hob burners". ENERGY EFFICIENCY 4. ENERGY SAVING You can save energy during everyday cooking if you turn the knob on. Make sure that they are not connected correctly. Put on the pan supports. 4. Put on the burner crowns and caps. Check each of energy - General HOB - Lift the lid. 2. Check if the flame is regular. 3. Light the oven burner. To light...
... gas supply to the "Ignition of the hob burners". ENERGY EFFICIENCY 4. ENERGY SAVING You can save energy during everyday cooking if you turn the knob on. Make sure that they are not connected correctly. Put on the pan supports. 4. Put on the burner crowns and caps. Check each of energy - General HOB - Lift the lid. 2. Check if the flame is regular. 3. Light the oven burner. To light...
User Manual
Page 26
... one time. Keep food warm Choose the lowest possible temperature setting to cook. The residual heat inside Freestanding Cooker ZCG63260BE 62.5 kg Mass ZCG63260WE 62.7 kg ZCG63260XE 62.6 kg EN 15181 Measuring method of the energy consumption of oven Oven inside the oven will continue to use the burners and pan support make sure it is closed properly when the oven operates. Use metal cookware to warm up water, use...
... one time. Keep food warm Choose the lowest possible temperature setting to cook. The residual heat inside Freestanding Cooker ZCG63260BE 62.5 kg Mass ZCG63260WE 62.7 kg ZCG63260XE 62.6 kg EN 15181 Measuring method of the energy consumption of oven Oven inside the oven will continue to use the burners and pan support make sure it is closed properly when the oven operates. Use metal cookware to warm up water, use...
Specification Sheet
Page 1
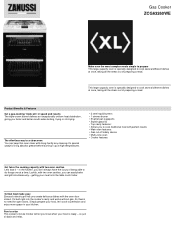
.... Grilled food made easy Zanussi's electric grill lets you don't always have the luxury of being able to do things one at a time. It's built right into the cooker's cavity and works without gas. The effortless way to a clean oven You can easily bake and grill simultaneously - Product Benefits & Features Get a gas-cooking 'triple-win' in the kitchen, you create delicious dishes...
.... Grilled food made easy Zanussi's electric grill lets you don't always have the luxury of being able to do things one at a time. It's built right into the cooker's cavity and works without gas. The effortless way to a clean oven You can easily bake and grill simultaneously - Product Benefits & Features Get a gas-cooking 'triple-win' in the kitchen, you create delicious dishes...

Product information sheet
Page 3
... an electric heated oven during a cycle in conventional mode per cavity (electric final energy) Energy consumption required to heat a standardised load in a gas-fired cavity of an oven during a cycle in conventional mode per cavity (gas final energy) Energy Efficiency Index per cavity Top Oven Main Oven Top Oven Main Oven Top Oven Main Oven Top Oven Main Oven Symbol M V V ECelectric cavity ECelectric cavity Value ZCG63260WE 948905179 Oven inside freestanding cooker 63,0 2 Gas...
... an electric heated oven during a cycle in conventional mode per cavity (electric final energy) Energy consumption required to heat a standardised load in a gas-fired cavity of an oven during a cycle in conventional mode per cavity (gas final energy) Energy Efficiency Index per cavity Top Oven Main Oven Top Oven Main Oven Top Oven Main Oven Top Oven Main Oven Symbol M V V ECelectric cavity ECelectric cavity Value ZCG63260WE 948905179 Oven inside freestanding cooker 63,0 2 Gas...