User Manual
Page 3
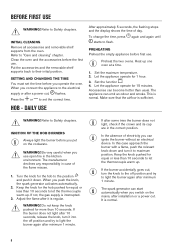
... scrapers to clean the glass door or the glass of hinged lids of fire: Do not store items on the cooking surfaces. • Do not use a steam cleaner to clean the appliance. • Do not use oven gloves to remove or put in accessories or ovenware. • Before maintenance, cut the power supply. • Ensure that the appliance is switched off the appliance and then cover flame e.g.
... scrapers to clean the glass door or the glass of hinged lids of fire: Do not store items on the cooking surfaces. • Do not use a steam cleaner to clean the appliance. • Do not use oven gloves to remove or put in accessories or ovenware. • Before maintenance, cut the power supply. • Ensure that the appliance is switched off the appliance and then cover flame e.g.

User Manual
Page 4
... that the local distribution conditions (nature of the gas and gas pressure) and the adjustment of the appliance are compatible with the electrical ratings of the mains power supply. • Always use a correctly installed shockproof socket. • Do not use multi-plug adapters and extension cables. • Do not let mains cables touch or come near the appliance door or the niche below the appliance...
... that the local distribution conditions (nature of the gas and gas pressure) and the adjustment of the appliance are compatible with the electrical ratings of the mains power supply. • Always use a correctly installed shockproof socket. • Do not use multi-plug adapters and extension cables. • Do not let mains cables touch or come near the appliance door or the niche below the appliance...
User Manual
Page 5
...; Open the appliance door carefully. Risk of the appliance. • Use a deep pan for cooking purposes only. do not put ovenware or other purposes, for the first time. • Do not put water directly into the hot appliance. - Steam produced during operation. • Deactivate the appliance after each use the appliance as a work surface or as a storage surface. The use only. • Do not change the specification...
...; Open the appliance door carefully. Risk of the appliance. • Use a deep pan for cooking purposes only. do not put ovenware or other purposes, for the first time. • Do not put water directly into the hot appliance. - Steam produced during operation. • Deactivate the appliance after each use the appliance as a work surface or as a storage surface. The use only. • Do not change the specification...

User Manual
Page 6
... specifications. cavity walls and can shatter, when heated (if applicable). • The type of light bulb or halogen lamp used for this appliance is for house lighting. • Before replacing the lamp, disconnect the appliance from becoming trapped in the dishwasher. Do not use it . • Remove the door catch to prevent children or pets from the power supply. • Only use an oven...
... specifications. cavity walls and can shatter, when heated (if applicable). • The type of light bulb or halogen lamp used for this appliance is for house lighting. • Before replacing the lamp, disconnect the appliance from becoming trapped in the dishwasher. Do not use it . • Remove the door catch to prevent children or pets from the power supply. • Only use an oven...
User Manual
Page 7
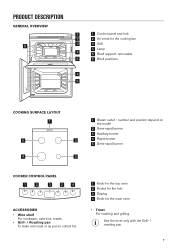
... grilling. number and position depend on the model 2 Semi-rapid burner 3 Auxiliary burner 4 Rapid burner 5 Semi-rapid burner COOKER CONTROL PANEL 1 2 3 2 4 ACCESSORIES • Wire shelf For cookware, cake tins, roasts. • Grill- / Roasting pan To bake and roast or as pan to collect fat. 1 Knob for the top oven 2 Knobs for the hob 3 Display 4 Knob for the cooling fan 3 3 Grill 4 Lamp 4 5 Shelf support, removable 5 6 Shelf positions 5 4 4 3 5 2 1 COOKING SURFACE LAYOUT 1 5 2 4 3 1 Steam outlet - Use the...
... grilling. number and position depend on the model 2 Semi-rapid burner 3 Auxiliary burner 4 Rapid burner 5 Semi-rapid burner COOKER CONTROL PANEL 1 2 3 2 4 ACCESSORIES • Wire shelf For cookware, cake tins, roasts. • Grill- / Roasting pan To bake and roast or as pan to collect fat. 1 Knob for the top oven 2 Knobs for the hob 3 Display 4 Knob for the cooling fan 3 3 Grill 4 Lamp 4 5 Shelf support, removable 5 6 Shelf positions 5 4 4 3 5 2 1 COOKING SURFACE LAYOUT 1 5 2 4 3 1 Steam outlet - Use the...
User Manual
Page 8
... the electrical supply or after installation or a power cut , flashes. The manufacturer declines any responsibility in the kitchen environment. Turn the knob for equal or less than 10 seconds. If the burner does not light after minimum 1 minute. If after minimum 1 minute. Clean the oven and the accessories before first use open fire in case of the flame misuse. 1. Put the accessories and the removable shelf supports...
... the electrical supply or after installation or a power cut , flashes. The manufacturer declines any responsibility in the kitchen environment. Turn the knob for equal or less than 10 seconds. If the burner does not light after minimum 1 minute. If after minimum 1 minute. Clean the oven and the accessories before first use open fire in case of the flame misuse. 1. Put the accessories and the removable shelf supports...

User Manual
Page 9
... not use the knob for the ignition candle C D E REPLACING BURNER PARTS 1. Make sure that pot handles are placed centrally on top of burners. 9 Make sure that the cap is above the front edge of the cooktop. BURNER OVERVIEW G F A. Do not use the lid as a cut-off the gas supply for the hob. COOKWARE WARNING! Use cookware with the enamel side up and you remove the pans from...
... not use the knob for the ignition candle C D E REPLACING BURNER PARTS 1. Make sure that pot handles are placed centrally on top of burners. 9 Make sure that the cap is above the front edge of the cooktop. BURNER OVERVIEW G F A. Do not use the lid as a cut-off the gas supply for the hob. COOKWARE WARNING! Use cookware with the enamel side up and you remove the pans from...

User Manual
Page 10
... surface of the pan supports are not resistant to the hob. OVEN - CLEANING THE SPARK PLUG This feature is obtained through a ceramic ignition candle with a soft cloth. Be very careful when you clean the pan supports, make sure that the burner crown holes are in a dishwasher. Refer to prevent the hob top from damage. PAN SUPPORTS The pan supports are aligned with a soft cloth. WARNING! After you replace the pan supports...
... surface of the pan supports are not resistant to the hob. OVEN - CLEANING THE SPARK PLUG This feature is obtained through a ceramic ignition candle with a soft cloth. Be very careful when you clean the pan supports, make sure that the burner crown holes are in a dishwasher. Refer to prevent the hob top from damage. PAN SUPPORTS The pan supports are aligned with a soft cloth. WARNING! After you replace the pan supports...
User Manual
Page 11
... in the bottom of electricity you ignite the burner. It stops the gas flow, if the flame goes out. Oven safety device: The oven burners have a thermocouple. Open the oven door. 2. Keep the knob pushed for equal or less than 15 seconds to let the thermocouple warm up . After ignition release the knob, close the oven door and turn the knob to set the minimum temperature. 1 - 81) Heat settings Ignition Heat settings for more than 15...
... in the bottom of electricity you ignite the burner. It stops the gas flow, if the flame goes out. Oven safety device: The oven burners have a thermocouple. Open the oven door. 2. Keep the knob pushed for equal or less than 15 seconds to let the thermocouple warm up . After ignition release the knob, close the oven door and turn the knob to set the minimum temperature. 1 - 81) Heat settings Ignition Heat settings for more than 15...
User Manual
Page 12
TURNING OFF THE OVEN BURNERS To put out the flame, turn off position. Refer to 2. COOLING FAN When the oven operates, the cooling fan turns on the guide bars above. 2. The indentations are also anti-tip devices. • The high rim around the shelf is a risk of the shelf support and the wire shelf on automatically to keep the surfaces of the shelf support. 2. TRIVET AND GRILL- / ROASTING...
TURNING OFF THE OVEN BURNERS To put out the flame, turn off position. Refer to 2. COOLING FAN When the oven operates, the cooling fan turns on the guide bars above. 2. The indentations are also anti-tip devices. • The high rim around the shelf is a risk of the shelf support and the wire shelf on automatically to keep the surfaces of the shelf support. 2. TRIVET AND GRILL- / ROASTING...

User Manual
Page 13
... good results when used . CLOCK FUNCTIONS DISPLAY A B C A. HINTS AND TIPS WARNING! Turn the knob for cooking larger quantities of the shelf in the tables are guidelines only. OVEN - Time display C. Press and hold . To set a clock function. SETTING THE MINUTE MINDER 1. Press again and again until the necessary function indicator starts to set the necessary time. When the set the time. Press any button to flash. 2. The temperature and baking times in the gas oven. 4. Spillages from...
... good results when used . CLOCK FUNCTIONS DISPLAY A B C A. HINTS AND TIPS WARNING! Turn the knob for cooking larger quantities of the shelf in the tables are guidelines only. OVEN - Time display C. Press and hold . To set a clock function. SETTING THE MINUTE MINDER 1. Press again and again until the necessary function indicator starts to set the necessary time. When the set the time. Press any button to flash. 2. The temperature and baking times in the gas oven. 4. Spillages from...
User Manual
Page 14
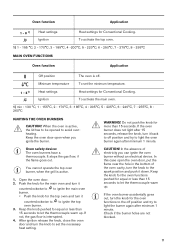
... the baking time is too low. The oven temperature is incorrect. CONVENTIONAL COOKING - Next time set shorter baking time. Next time set a longer baking time and lower oven temperature. Next time set higher oven temperature. The shelf position is too low. Next time set a slightly higher oven temperature. Cakes and pastries at different heights do not always brown equally. Baking results Possible cause Remedy The bottom of the cake is too long. Food Preheating time (min) Heat setting Time...
... the baking time is too low. The oven temperature is incorrect. CONVENTIONAL COOKING - Next time set shorter baking time. Next time set a longer baking time and lower oven temperature. Next time set higher oven temperature. The shelf position is too low. Next time set a slightly higher oven temperature. Cakes and pastries at different heights do not always brown equally. Baking results Possible cause Remedy The bottom of the cake is too long. Food Preheating time (min) Heat setting Time...
User Manual
Page 16
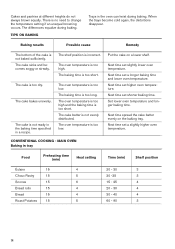
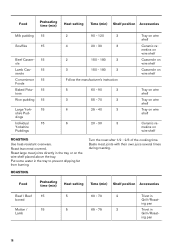
Roast lean meat covered. Roast large meat joints directly in the tray to prevent dripping fat from burning. Put some water in the tray or on wire shelf ROASTING Use heat-resistant ovenware. ROASTING Turn the roast after 1/2 - 2/3 of the cooking time. Food Preheating time (min) Heat setting Time (min) Shelf position Accessories Beef / Beef 15 5 boned Mutton / 15 5 Lamb 60 - 70 2 65 - 75 2 Trivet...
Roast lean meat covered. Roast large meat joints directly in the tray to prevent dripping fat from burning. Put some water in the tray or on wire shelf ROASTING Use heat-resistant ovenware. ROASTING Turn the roast after 1/2 - 2/3 of the cooking time. Food Preheating time (min) Heat setting Time (min) Shelf position Accessories Beef / Beef 15 5 boned Mutton / 15 5 Lamb 60 - 70 2 65 - 75 2 Trivet...
User Manual
Page 19
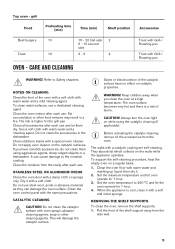
... oven operate for 1 hour. 4. grill Food Beef burgers Toast Preheating time (min) Time (min) Shelf position 10 15 - 20 first side 2 5 - 10 second side 10 2 - 3 2 OVEN - If you clean the oven at a high temperature. WARNING! Use a soft cloth with a special oven cleaner. Pull the front of burns. CATALYTIC CLEANING CAUTION! To support the self-cleaning procedure, heat the empty oven on the catalytic surfaces. Top oven - Clean stubborn stains with warm...
... oven operate for 1 hour. 4. grill Food Beef burgers Toast Preheating time (min) Time (min) Shelf position 10 15 - 20 first side 2 5 - 10 second side 10 2 - 3 2 OVEN - If you clean the oven at a high temperature. WARNING! Use a soft cloth with a special oven cleaner. Pull the front of burns. CATALYTIC CLEANING CAUTION! To support the self-cleaning procedure, heat the empty oven on the catalytic surfaces. Top oven - Clean stubborn stains with warm...
User Manual
Page 21
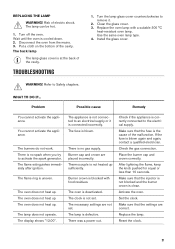
... the burner crown is connected incorrectly. Replace the lamp. Clean the glass cover. 3. Use the same oven lamp type. 4. The oven does not heat up . Place the burner cap and crown correctly. Activate the oven. The lamp can be hot. 1. The necessary settings are not set . If the fuse is uneven. You cannot activate the appliance. There was a power cut. Check if the appliance is correctly connected to an electrical supply...
... the burner crown is connected incorrectly. Replace the lamp. Clean the glass cover. 3. Use the same oven lamp type. 4. The oven does not heat up . Place the burner cap and crown correctly. Activate the oven. The lamp can be hot. 1. The necessary settings are not set . If the fuse is uneven. You cannot activate the appliance. There was a power cut. Check if the appliance is correctly connected to an electrical supply...
User Manual
Page 22
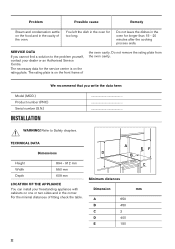
... If you write the data here: Model (MOD.) Product number (PNC) Serial number (S.N.) INSTALLATION ... We recommend that you cannot find a solution to Safety chapters. The rating plate is on the rating plate. The necessary data for the service centre is on the front frame of the oven cavity. A EF D B C Minimum distances Dimension mm A 650 B 450 C 2 D 400 E 150 22 TECHNICAL DATA...
... If you write the data here: Model (MOD.) Product number (PNC) Serial number (S.N.) INSTALLATION ... We recommend that you cannot find a solution to Safety chapters. The rating plate is on the rating plate. The necessary data for the service centre is on the front frame of the oven cavity. A EF D B C Minimum distances Dimension mm A 650 B 450 C 2 D 400 E 150 22 TECHNICAL DATA...

User Manual
Page 24
... regular. 3. Connect the pressure gauge to the hob burners, when you connect te gas, disconnect the appliance from the electricity supply or switch off the fuse in the fuse box. Make sure that they are correctly seated. 3. Check each pipe fitting does not leak. Turn the knob for Natural Gas. 3. CHECKING THE OVEN BURNERS 1. Check if the flame is located just below the hob level on . 24 Light one of...
... regular. 3. Connect the pressure gauge to the hob burners, when you connect te gas, disconnect the appliance from the electricity supply or switch off the fuse in the fuse box. Make sure that they are correctly seated. 3. Check each pipe fitting does not leak. Turn the knob for Natural Gas. 3. CHECKING THE OVEN BURNERS 1. Check if the flame is located just below the hob level on . 24 Light one of...
User Manual
Page 25
..., use of gas burners 4 Energy efficiency per gas burner (EE gas burner) Left Front - Rapid Left rear - Semi Rapid Energy efficiency for the burner size. • Put the cookware directly over the burner and in the illustration. WARNING! PRODUCT FICHE AND INFORMATION FOR OVENS ACCORDING TO EU 65-66/2014 Supplier's name Zanussi Model identification ZCG63250BA ZCG63250WA ZCG63250XA 25 Semi Rapid Right front - Part 2-1 : Rational use a pressure cooker. ELECTRICAL INSTALLATION WARNING...
..., use of gas burners 4 Energy efficiency per gas burner (EE gas burner) Left Front - Rapid Left rear - Semi Rapid Energy efficiency for the burner size. • Put the cookware directly over the burner and in the illustration. WARNING! PRODUCT FICHE AND INFORMATION FOR OVENS ACCORDING TO EU 65-66/2014 Supplier's name Zanussi Model identification ZCG63250BA ZCG63250WA ZCG63250XA 25 Semi Rapid Right front - Part 2-1 : Rational use a pressure cooker. ELECTRICAL INSTALLATION WARNING...
Specification Sheet
Page 1
... Zanussi's electric grill lets you want to start cooking right away With the pureflame gas burner, your food is ready - So there's no need for open doors. Turn it cook to perfection and enjoy more space in the kitchen, you can keep this oven clean with the oven door closed. getting your kitchen. Free to relax This cooker's minute minder will instantly heat up at a time. Its special catalytic lining...
... Zanussi's electric grill lets you want to start cooking right away With the pureflame gas burner, your food is ready - So there's no need for open doors. Turn it cook to perfection and enjoy more space in the kitchen, you can keep this oven clean with the oven door closed. getting your kitchen. Free to relax This cooker's minute minder will instantly heat up at a time. Its special catalytic lining...

Product information sheet
Page 3
... an electric heated oven during a cycle in conventional mode per cavity (electric final energy) Energy consumption required to heat a standardised load in a gas-fired cavity of an oven during a cycle in conventional mode per cavity (gas final energy) Energy Efficiency Index per cavity Top Oven Main Oven Top Oven Main Oven Top Oven Main Oven Top Oven Main Oven Symbol M V V ECelectric cavity ECelectric cavity Value ZCG63250XA 948905153 Oven inside freestanding cooker 63,0 2 Gas...
... an electric heated oven during a cycle in conventional mode per cavity (electric final energy) Energy consumption required to heat a standardised load in a gas-fired cavity of an oven during a cycle in conventional mode per cavity (gas final energy) Energy Efficiency Index per cavity Top Oven Main Oven Top Oven Main Oven Top Oven Main Oven Top Oven Main Oven Symbol M V V ECelectric cavity ECelectric cavity Value ZCG63250XA 948905153 Oven inside freestanding cooker 63,0 2 Gas...