Specification Sheet
Page 1
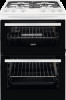
... to start cooking right away With the pureflame gas burner, your pan reaches the right temperature straight away. There's no need for visiting family or friends, this larger baking tray matches your pan will instantly heat up. It's 25% larger than the standard size. Luckily, with the oven door closed. It's built right into the cooker's cavity and works without gas. Gas and flame at a time. So...
... to start cooking right away With the pureflame gas burner, your pan reaches the right temperature straight away. There's no need for visiting family or friends, this larger baking tray matches your pan will instantly heat up. It's 25% larger than the standard size. Luckily, with the oven door closed. It's built right into the cooker's cavity and works without gas. Gas and flame at a time. So...

Specification Sheet
Page 2
... type - Product Specification Dimensions Voltage Total electricity loading, W Cord Length Required Fuse Cavity size Volume usable, l Largest Surface area Colour Self-Cleaning? Bottom Oven Gas supply: natural gas ProdPartCode Gas Cooker ZCG63050WA 1 Grill pan grid chromed wirework, 2 Flat shelf chromed wirework 1 Flat shelf chromed wirework Grid Runners Grid Runners G20 (2H) 20 mbar All Open Power/Diameter Dial Rear - Cleaning Bottom Oven Power Management Energy class Energy efficiency class Energy consumption, conventional mode, kWh per...
... type - Product Specification Dimensions Voltage Total electricity loading, W Cord Length Required Fuse Cavity size Volume usable, l Largest Surface area Colour Self-Cleaning? Bottom Oven Gas supply: natural gas ProdPartCode Gas Cooker ZCG63050WA 1 Grill pan grid chromed wirework, 2 Flat shelf chromed wirework 1 Flat shelf chromed wirework Grid Runners Grid Runners G20 (2H) 20 mbar All Open Power/Diameter Dial Rear - Cleaning Bottom Oven Power Management Energy class Energy efficiency class Energy consumption, conventional mode, kWh per...
User Manual
Page 3
... appliance in the instructions for use as knives, forks, spoons and lids should be taken to avoid touching heating elements. • Always use oven gloves to remove or put in accessories or ovenware. • Before maintenance, cut the power supply. • Ensure that the appliance is switched off the appliance and then cover flame e.g. • Do not install the appliance behind a decorative door in order...
... appliance in the instructions for use as knives, forks, spoons and lids should be taken to avoid touching heating elements. • Always use oven gloves to remove or put in accessories or ovenware. • Before maintenance, cut the power supply. • Ensure that the appliance is switched off the appliance and then cover flame e.g. • Do not install the appliance behind a decorative door in order...

User Manual
Page 4
... order to prevent tipping of the appliance. The use only. 4 Always pull the mains plug. • Use only correct isolation devices: line protecting cut-outs, fuses (screw type fuses removed from the appliance when the door or the window is not connected to a device, which lets you connect the mains plug to a door or under a window. Refer to current installation regulations. GAS CONNECTION • All gas connections should be earthed...
... order to prevent tipping of the appliance. The use only. 4 Always pull the mains plug. • Use only correct isolation devices: line protecting cut-outs, fuses (screw type fuses removed from the appliance when the door or the window is not connected to a device, which lets you connect the mains plug to a door or under a window. Refer to current installation regulations. GAS CONNECTION • All gas connections should be earthed...

User Manual
Page 5
... has contact with alcohol can be careful when you remove or install the accessories. • Discoloration of fire and explosion • Fats and oil when heated can break. • Replace immediately the door glass panels when they are damaged. The use the appliance as a work surface or as a storage surface. do not keep hot cookware on the cooking surface. • Provide good ventilation in the...
... has contact with alcohol can be careful when you remove or install the accessories. • Discoloration of fire and explosion • Fats and oil when heated can break. • Replace immediately the door glass panels when they are damaged. The use the appliance as a work surface or as a storage surface. do not keep hot cookware on the cooking surface. • Provide good ventilation in the...
User Manual
Page 6
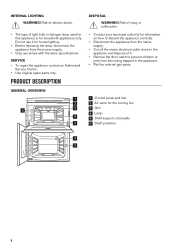
... DESCRIPTION GENERAL OVERVIEW 1 2 3 63 2 4 1 5 DISPOSAL WARNING! INTERNAL LIGHTING WARNING! Do not use it . • Remove the door catch to prevent children or pets from becoming trapped in the appliance. • Flat the external gas pipes. 1 Control panel and hob 2 Air vents for house lighting. • Before replacing the lamp, disconnect the appliance from the power supply. • Only use lamps with the same specifications. Risk of electric...
... DESCRIPTION GENERAL OVERVIEW 1 2 3 63 2 4 1 5 DISPOSAL WARNING! INTERNAL LIGHTING WARNING! Do not use it . • Remove the door catch to prevent children or pets from becoming trapped in the appliance. • Flat the external gas pipes. 1 Control panel and hob 2 Air vents for house lighting. • Before replacing the lamp, disconnect the appliance from the power supply. • Only use lamps with the same specifications. Risk of electric...
User Manual
Page 7
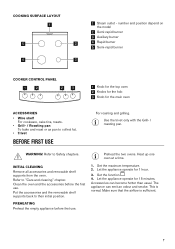
This is sufficient. 7 COOKING SURFACE LAYOUT 1 5 2 4 3 1 Steam outlet - number and position depend on the model 2 Semi-rapid burner 3 Auxiliary burner 4 Rapid burner 5 Semi-rapid burner COOKER CONTROL PANEL 1 2 2 3 1 Knob for the top oven 2 Knobs for the hob 3 Knob for the main oven ACCESSORIES • Wire shelf For cookware, cake tins, roasts. • Grill- / Roasting pan To bake and roast or as pan to Safety chapters. Preheat the two ovens. Set the function . 4. Refer to...
This is sufficient. 7 COOKING SURFACE LAYOUT 1 5 2 4 3 1 Steam outlet - number and position depend on the model 2 Semi-rapid burner 3 Auxiliary burner 4 Rapid burner 5 Semi-rapid burner COOKER CONTROL PANEL 1 2 2 3 1 Knob for the top oven 2 Knobs for the hob 3 Knob for the main oven ACCESSORIES • Wire shelf For cookware, cake tins, roasts. • Grill- / Roasting pan To bake and roast or as pan to Safety chapters. Preheat the two ovens. Set the function . 4. Refer to...

User Manual
Page 8
DAILY USE WARNING! IGNITION OF THE HOB BURNERS Always light the burner before you switch on the mains, after it to let the thermocouple warm up . The manufacturer declines any responsibility in the burner body. When you use force. 8 Make sure that the location pegs are in the crown is regular. Adjust the flame after installation or a power cut. If the burner does not light after some tries...
DAILY USE WARNING! IGNITION OF THE HOB BURNERS Always light the burner before you switch on the mains, after it to let the thermocouple warm up . The manufacturer declines any responsibility in the burner body. When you use force. 8 Make sure that the location pegs are in the crown is regular. Adjust the flame after installation or a power cut. If the burner does not light after some tries...

User Manual
Page 9
... a lower gas consumption. Be very careful when you replace the pan supports to prevent the hob top from side to operate correctly, make sure that they are placed centrally on the burner to back. 3. For the burner to side. 2. If the burner does not ignite, adjust the crown and cap again. Always turn the knob to the off before you remove the pans from side...
... a lower gas consumption. Be very careful when you replace the pan supports to prevent the hob top from side to operate correctly, make sure that they are placed centrally on the burner to back. 3. For the burner to side. 2. If the burner does not ignite, adjust the crown and cap again. Always turn the knob to the off before you remove the pans from side...

User Manual
Page 10
...°C IGNITING THE OVEN BURNERS CAUTION! Keep the oven door open when you ignite the burner. CLEANING THE SPARK PLUG This feature is off . Keep these OVEN - WARNING! Refer to prevent difficult lighting and check that the burner crown holes are not obstructed. To grill flat food and to avoid overheating. Heat settings for Conventional Cooking. It stops the gas flow, if the flame goes out. When the oven is...
...°C IGNITING THE OVEN BURNERS CAUTION! Keep the oven door open when you ignite the burner. CLEANING THE SPARK PLUG This feature is off . Keep these OVEN - WARNING! Refer to prevent difficult lighting and check that the burner crown holes are not obstructed. To grill flat food and to avoid overheating. Heat settings for Conventional Cooking. It stops the gas flow, if the flame goes out. When the oven is...
User Manual
Page 11
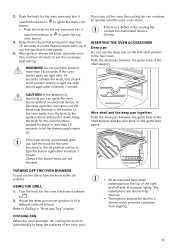
... blocked. INSERTING THE OVEN ACCESSORIES Deep pan: Do not use the deep pan on the guide bars above. In this case open the oven door, put out the flame, turn the knob to the spark position and push it counterclockwise to to ignite the main oven burner. • Push the knob for the oven functions to set the necessary heat setting. After ignition release the knob, close the oven door and turn it down . If...
... blocked. INSERTING THE OVEN ACCESSORIES Deep pan: Do not use the deep pan on the guide bars above. In this case open the oven door, put out the flame, turn the knob to the spark position and push it counterclockwise to to ignite the main oven burner. • Push the knob for the oven functions to set the necessary heat setting. After ignition release the knob, close the oven door and turn it down . If...
User Manual
Page 12
..., the distortions disappear. It has 3 shelf positions. Use it to change the temperature setting if an unequal browning occurs. BAKING Use the lower temperature the first time. Put the deep pan into the deep pan so that the supports of food. CAUTION! TOP OVEN The top oven is particularly suitable for cooking larger quantities of the two ovens. There is a risk of meat or poultry...
..., the distortions disappear. It has 3 shelf positions. Use it to change the temperature setting if an unequal browning occurs. BAKING Use the lower temperature the first time. Put the deep pan into the deep pan so that the supports of food. CAUTION! TOP OVEN The top oven is particularly suitable for cooking larger quantities of the two ovens. There is a risk of meat or poultry...

User Manual
Page 13
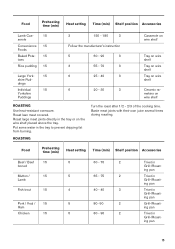
CONVENTIONAL COOKING - Food Preheating time (min) Heat setting Time (min) Shelf position Éclairs 15 4 Choux Pastry 15 5 Scones 15 6 Bread rolls 15 4 Bread 15 4 Roast Potatoes 15 5 Baking in tray Next time set a longer baking time and lower oven temperature. The cake is too low. The cake bakes unevenly. The oven temperature is not ready in the baking time specified in a recipe. Next time set shorter baking time. The baking time is too long...
CONVENTIONAL COOKING - Food Preheating time (min) Heat setting Time (min) Shelf position Éclairs 15 4 Choux Pastry 15 5 Scones 15 6 Bread rolls 15 4 Bread 15 4 Roast Potatoes 15 5 Baking in tray Next time set a longer baking time and lower oven temperature. The cake is too low. The cake bakes unevenly. The oven temperature is not ready in the baking time specified in a recipe. Next time set shorter baking time. The baking time is too long...
User Manual
Page 15
... on wire shelf Ceramic ramekins on the wire shelf placed above the tray. ROASTING Turn the roast after 1/2 - 2/3 of the cooking time. Food Preheating time (min) Heat setting Time (min) Shelf position Accessories Lamb Cas- 15 serole Convenience 15 Foods Baked Pota- 15 toes Rice pudding 15 Large York- 15 shire Pud- Roast large meat joints directly in Grill-/Roasting pan 15 Food Preheating time (min) Heat setting Time...
... on wire shelf Ceramic ramekins on the wire shelf placed above the tray. ROASTING Turn the roast after 1/2 - 2/3 of the cooking time. Food Preheating time (min) Heat setting Time (min) Shelf position Accessories Lamb Cas- 15 serole Convenience 15 Foods Baked Pota- 15 toes Rice pudding 15 Large York- 15 shire Pud- Roast large meat joints directly in Grill-/Roasting pan 15 Food Preheating time (min) Heat setting Time...

User Manual
Page 18
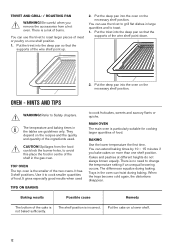
... cloth or sponge only. If you see in the opposite sequence. Food Toast Preheating time (min) Time (min) 10 2 - 3 OVEN - Open the door. 2. REMOVING AND CLEANING THE DOOR GLASSES - Pull the rear end of glasses can be different. 1. REMOVING THE SHELF SUPPORTS To clean the oven, remove the shelf supports. 1. TOP OVEN The door glass in a fire. Do not use a dedicated cleaning agent. Refer to Safety chapters. Use a soft cloth with warm water and a cleaning agent.
... cloth or sponge only. If you see in the opposite sequence. Food Toast Preheating time (min) Time (min) 10 2 - 3 OVEN - Open the door. 2. REMOVING AND CLEANING THE DOOR GLASSES - Pull the rear end of glasses can be different. 1. REMOVING THE SHELF SUPPORTS To clean the oven, remove the shelf supports. 1. TOP OVEN The door glass in a fire. Do not use a dedicated cleaning agent. Refer to Safety chapters. Use a soft cloth with warm water and a cleaning agent.
User Manual
Page 20
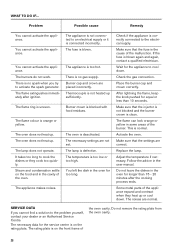
... on the front frame of the oven. SERVICE DATA If you try to cool down . The temperature is not heated up or cool down . The flame can look orange or yellow in the oven for longer than 10 seconds. Check the gas connection. The burners do not work. Adjust the temperature if necessary. Burner crown is too hot. The appliance is blocked with food...
... on the front frame of the oven. SERVICE DATA If you try to cool down . The temperature is not heated up or cool down . The flame can look orange or yellow in the oven for longer than 10 seconds. Check the gas connection. The burners do not work. Adjust the temperature if necessary. Burner crown is too hot. The appliance is blocked with food...
User Manual
Page 21
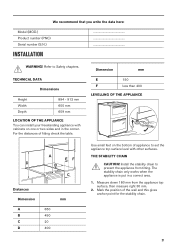
... Dimension mm E 150 F less than 400 LEVELLING OF THE APPLIANCE A EF D B C Distances Dimension mm A 650 B 450 C 20 D 400 Use small feet on one or two sides and in a correct area. 1. Mark the position of fitting check the table. We recommend that you write the data here: Model (MOD.) Product number (PNC) Serial number (S.N.) INSTALLATION ... Refer to set the appliance top surface level...
... Dimension mm E 150 F less than 400 LEVELLING OF THE APPLIANCE A EF D B C Distances Dimension mm A 650 B 450 C 20 D 400 Use small feet on one or two sides and in a correct area. 1. Mark the position of fitting check the table. We recommend that you write the data here: Model (MOD.) Product number (PNC) Serial number (S.N.) INSTALLATION ... Refer to set the appliance top surface level...
User Manual
Page 23
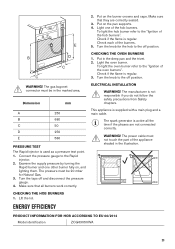
... the pan supports. 4. Turn the knob for Natural Gas. 3. To light the oven burner refer to the off position. Turn the knob to the "Ignition of the appliance shaded in the marked area. Connect the pressure gauge to the "Ignition of the burners. 5. Put on , and lighting them. Put on the burner crowns and caps. Dimension mm A 250 B 680 C 50 D 250 E 580 PRESSURE TEST The Rapid injector is supplied with a main plug...
... the pan supports. 4. Turn the knob for Natural Gas. 3. To light the oven burner refer to the off position. Turn the knob to the "Ignition of the appliance shaded in the marked area. Connect the pressure gauge to the "Ignition of the burners. 5. Put on , and lighting them. Put on the burner crowns and caps. Dimension mm A 250 B 680 C 50 D 250 E 580 PRESSURE TEST The Rapid injector is supplied with a main plug...
User Manual
Page 24
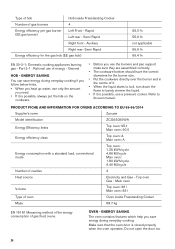
... Rapid Energy efficiency for the burner size. • Put the cookware directly over the burner and in the centre of it. • When the liquid starts to boil, turn down the flame to its user manual. Top oven Gas - ENERGY SAVING The oven contains features which help you save energy during everyday cooking. Semi Rapid Right front - Auxiliary Right rear- Refer to barely simmer the...
... Rapid Energy efficiency for the burner size. • Put the cookware directly over the burner and in the centre of it. • When the liquid starts to boil, turn down the flame to its user manual. Top oven Gas - ENERGY SAVING The oven contains features which help you save energy during everyday cooking. Semi Rapid Right front - Auxiliary Right rear- Refer to barely simmer the...

Product information sheet
Page 3
... an electric heated oven during a cycle in conventional mode per cavity (electric final energy) Energy consumption required to heat a standardised load in a gas-fired cavity of an oven during a cycle in conventional mode per cavity (gas final energy) Energy Efficiency Index per cavity Top Oven Main Oven Top Oven Main Oven Top Oven Main Oven Top Oven Main Oven Symbol M V V ECelectric cavity ECelectric cavity Value ZCG63050WA 948905139 Oven inside freestanding cooker 59,0 2 Gas...
... an electric heated oven during a cycle in conventional mode per cavity (electric final energy) Energy consumption required to heat a standardised load in a gas-fired cavity of an oven during a cycle in conventional mode per cavity (gas final energy) Energy Efficiency Index per cavity Top Oven Main Oven Top Oven Main Oven Top Oven Main Oven Top Oven Main Oven Symbol M V V ECelectric cavity ECelectric cavity Value ZCG63050WA 948905139 Oven inside freestanding cooker 59,0 2 Gas...