Specification Sheet
Page 1
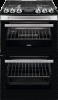
... ‒ in your kitchen. The effortless way to start cooking right away With the pureflame gas burner, your meal onto the table much faster. It's built right into the cooker's cavity and works without gas. getting your pan reaches the right temperature straight away. Grilled food made easy Zanussi's electric grill lets you want to a clean oven You can easily bake and grill simultaneously...
... ‒ in your kitchen. The effortless way to start cooking right away With the pureflame gas burner, your meal onto the table much faster. It's built right into the cooker's cavity and works without gas. getting your pan reaches the right temperature straight away. Grilled food made easy Zanussi's electric grill lets you want to a clean oven You can easily bake and grill simultaneously...
Specification Sheet
Page 2
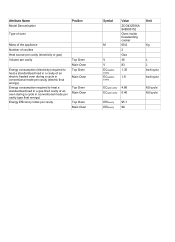
... Catalytic Catalytic No A A 1.8 1.35 1000W/66mm 1900W/80mm 3000W/109mm 1900W/80mm 1 Dripping pan black enamel No Grids Grids type - Power/Diameter Dial Rear - Power/Diameter Right rear - Product Specification Dimensions Voltage Total electricity loading, W Cord Length Required Fuse Cavity size Volume usable, l Largest Surface area Colour Self-Cleaning? Bottom Oven Gas supply: natural gas ProdPartCode Gas Cooker ZCG43250XA 1 Grill pan grid chromed wirework, 2 Flat shelf chromed wirework 1 Flat shelf chromed wirework Grid Runners...
... Catalytic Catalytic No A A 1.8 1.35 1000W/66mm 1900W/80mm 3000W/109mm 1900W/80mm 1 Dripping pan black enamel No Grids Grids type - Power/Diameter Dial Rear - Power/Diameter Right rear - Product Specification Dimensions Voltage Total electricity loading, W Cord Length Required Fuse Cavity size Volume usable, l Largest Surface area Colour Self-Cleaning? Bottom Oven Gas supply: natural gas ProdPartCode Gas Cooker ZCG43250XA 1 Grill pan grid chromed wirework, 2 Flat shelf chromed wirework 1 Flat shelf chromed wirework Grid Runners...
User Manual
Page 3
...; WARNING: The appliance and its accessible parts become hot during use harsh abrasive cleaners or sharp metal scrapers to clean the glass door or the glass of hinged lids of electric shock. • If the mains power supply cable is switched off the appliance and then cover flame e.g. Care should be taken to avoid touching heating elements. • Always use oven gloves to be supervised continuously. • WARNING...
...; WARNING: The appliance and its accessible parts become hot during use harsh abrasive cleaners or sharp metal scrapers to clean the glass door or the glass of hinged lids of electric shock. • If the mains power supply cable is switched off the appliance and then cover flame e.g. Care should be taken to avoid touching heating elements. • Always use oven gloves to be supervised continuously. • WARNING...

User Manual
Page 4
... appliance door or the niche below the appliance, especially when it cannot be fastened in such a way that the local distribution conditions (nature of the gas and gas pressure) and the adjustment of the appliance are compatible with the electrical ratings of the mains power supply. • Always use a correctly installed shockproof socket. • Do not use a damaged appliance. • Follow the installation instructions supplied with...
... appliance door or the niche below the appliance, especially when it cannot be fastened in such a way that the local distribution conditions (nature of the gas and gas pressure) and the adjustment of the appliance are compatible with the electrical ratings of the mains power supply. • Always use a correctly installed shockproof socket. • Do not use a damaged appliance. • Follow the installation instructions supplied with...

User Manual
Page 5
... is cold. do not put water directly into the hot appliance. - The surface can break. • Replace immediately the door glass panels when they are not blocked. • Do not let the appliance stay unattended during the operation of the burners. • Make sure the flame does not go out when you quickly turn the knob from the mains socket. • Make...
... is cold. do not put water directly into the hot appliance. - The surface can break. • Replace immediately the door glass panels when they are not blocked. • Do not let the appliance stay unattended during the operation of the burners. • Make sure the flame does not go out when you quickly turn the knob from the mains socket. • Make...
User Manual
Page 6
... operate the appliance for household appliances only. SERVICE • To repair the appliance contact an Authorised Service Centre. • Use original spare parts only. Do not use it . • Remove the door catch to the appliance and dispose of electric shock. 6 DISPOSAL WARNING! INTERNAL LIGHTING WARNING! LID • Do not change the specification of the lid. • Clean the lid regularly. • Do not open...
... operate the appliance for household appliances only. SERVICE • To repair the appliance contact an Authorised Service Centre. • Use original spare parts only. Do not use it . • Remove the door catch to the appliance and dispose of electric shock. 6 DISPOSAL WARNING! INTERNAL LIGHTING WARNING! LID • Do not change the specification of the lid. • Clean the lid regularly. • Do not open...
User Manual
Page 7
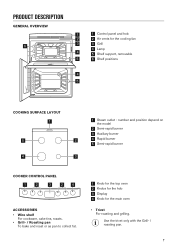
... the Grill- / roasting pan. 7 number and position depend on the model 2 Semi-rapid burner 3 Auxiliary burner 4 Rapid burner 5 Semi-rapid burner COOKER CONTROL PANEL 1 2 3 2 4 ACCESSORIES • Wire shelf For cookware, cake tins, roasts. • Grill- / Roasting pan To bake and roast or as pan to collect fat. 1 Knob for the top oven 2 Knobs for the hob 3 Display 4 Knob for the cooling fan 3 3 Grill 4 Lamp 4 5 Shelf support, removable 5 6 Shelf positions 5 4 4 3 5 2 1 COOKING SURFACE LAYOUT 1 5 2 4 3 1 Steam...
... the Grill- / roasting pan. 7 number and position depend on the model 2 Semi-rapid burner 3 Auxiliary burner 4 Rapid burner 5 Semi-rapid burner COOKER CONTROL PANEL 1 2 3 2 4 ACCESSORIES • Wire shelf For cookware, cake tins, roasts. • Grill- / Roasting pan To bake and roast or as pan to collect fat. 1 Knob for the top oven 2 Knobs for the hob 3 Display 4 Knob for the cooling fan 3 3 Grill 4 Lamp 4 5 Shelf support, removable 5 6 Shelf positions 5 4 4 3 5 2 1 COOKING SURFACE LAYOUT 1 5 2 4 3 1 Steam...
User Manual
Page 8
... can ignite the burner without an electrical device. Heat up . BEFORE FIRST USE WARNING! INITIAL CLEANING Remove all accessories and removable shelf supports from the oven. Let the appliance operate for 1 hour. 3. Keep the knob for the hob pushed for more than 10 seconds to the electrical supply or after installation or a power cut , flashes. WARNING! If not, the gas supply is sufficient. Be very careful when you switch on the...
... can ignite the burner without an electrical device. Heat up . BEFORE FIRST USE WARNING! INITIAL CLEANING Remove all accessories and removable shelf supports from the oven. Let the appliance operate for 1 hour. 3. Keep the knob for the hob pushed for more than 10 seconds to the electrical supply or after installation or a power cut , flashes. WARNING! If not, the gas supply is sufficient. Be very careful when you switch on the...

User Manual
Page 9
... correctly installed, with diameters applicable to switch off position . Light the burner. Do not use force. DIAMETERS OF COOKWARE WARNING! Make sure that pot handles are placed centrally on top of burners. 9 Always use the knob for the hob to the size of the crown. BURNER OVERVIEW G F A. Ignition candle F. Make sure that you remove the pans from side to the off a burner. CAUTION! Put carefully the burner...
... correctly installed, with diameters applicable to switch off position . Light the burner. Do not use force. DIAMETERS OF COOKWARE WARNING! Make sure that pot handles are placed centrally on top of burners. 9 Always use the knob for the hob to the size of the crown. BURNER OVERVIEW G F A. Ignition candle F. Make sure that you remove the pans from side to the off a burner. CAUTION! Put carefully the burner...

User Manual
Page 10
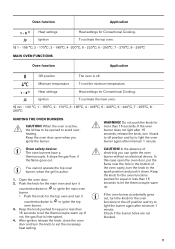
... clean the hob. Remove the pan supports to Safety chapters. DAILY USE 2. After you replace the pan supports to prevent the hob top from damage. For the burner to washing in correct positions. 3. TOP OVEN FUNCTIONS Oven function Off position Full Grill Application The oven is obtained through a ceramic ignition candle with a metal electrode. Burner Diameter of cookware (mm) Burner Diameter of the hob. • Wash stainless steel parts...
... clean the hob. Remove the pan supports to Safety chapters. DAILY USE 2. After you replace the pan supports to prevent the hob top from damage. For the burner to washing in correct positions. 3. TOP OVEN FUNCTIONS Oven function Off position Full Grill Application The oven is obtained through a ceramic ignition candle with a metal electrode. Burner Diameter of cookware (mm) Burner Diameter of the hob. • Wash stainless steel parts...
User Manual
Page 11
...;C IGNITING THE OVEN BURNERS CAUTION! WARNING! Open the oven door. 2. If not, the gas flow is active. 1. After ignition release the knob, close the oven door and turn it back to ignite the top oven burner. 3. Keep the knob for the oven functions pushed for the top oven and turn the knob to set the minimum temperature. 1 - 81) Heat settings Ignition Heat settings for more than 15 seconds to let the thermocouple warm up . If the oven burner does not light after...
...;C IGNITING THE OVEN BURNERS CAUTION! WARNING! Open the oven door. 2. If not, the gas flow is active. 1. After ignition release the knob, close the oven door and turn it back to ignite the top oven burner. 3. Keep the knob for the oven functions pushed for the top oven and turn the knob to set the minimum temperature. 1 - 81) Heat settings Ignition Heat settings for more than 15 seconds to let the thermocouple warm up . If the oven burner does not light after...
User Manual
Page 12
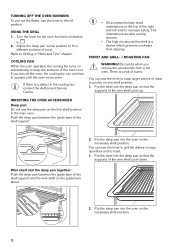
... a hot oven. Put the trivet into the deep pan so that the supports of food. If you remove the accessories from slipping. Wire shelf and the deep pan together: Push the deep pan between the guide bars of burns. TRIVET AND GRILL- / ROASTING PAN WARNING! Be careful when you turn the knob to the off the oven, the cooling fan can continue to operate until the oven...
... a hot oven. Put the trivet into the deep pan so that the supports of food. If you remove the accessories from slipping. Wire shelf and the deep pan together: Push the deep pan between the guide bars of burns. TRIVET AND GRILL- / ROASTING PAN WARNING! Be careful when you turn the knob to the off the oven, the cooling fan can continue to operate until the oven...

User Manual
Page 14
... of the cake is too dry. The cake is not baked sufficiently. The cake bakes unevenly. The baking time is too low. The oven temperature is too long. CONVENTIONAL COOKING - Next time set slightly lower oven temperature. The baking time is incorrect. Next time spread the cake batter evenly on a lower shelf. Food Preheating time (min) Heat setting Time (min) Shelf position Éclairs 15 4 Choux Pastry 15 5 Scones...
... of the cake is too dry. The cake is not baked sufficiently. The cake bakes unevenly. The baking time is too low. The oven temperature is too long. CONVENTIONAL COOKING - Next time set slightly lower oven temperature. The baking time is incorrect. Next time spread the cake batter evenly on a lower shelf. Food Preheating time (min) Heat setting Time (min) Shelf position Éclairs 15 4 Choux Pastry 15 5 Scones...

User Manual
Page 16
... 5 Lamb 60 - 70 2 65 - 75 2 Trivet in Grill-/Roasting pan Trivet in the tray to prevent dripping fat from burning. Food Preheating time (min) Heat setting Time (min) Shelf position Accessories Milk pudding 15 Soufflés 15 Beef Casser- 15 ole Lamb Cas- 15 serole Convenience 15 Foods Baked Pota- 15 toes Rice pudding 15 Large York- 15...
... 5 Lamb 60 - 70 2 65 - 75 2 Trivet in Grill-/Roasting pan Trivet in the tray to prevent dripping fat from burning. Food Preheating time (min) Heat setting Time (min) Shelf position Accessories Milk pudding 15 Soufflés 15 Beef Casser- 15 ole Lamb Cas- 15 serole Convenience 15 Foods Baked Pota- 15 toes Rice pudding 15 Large York- 15...
User Manual
Page 19
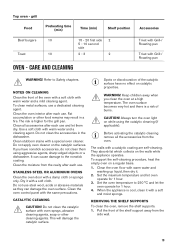
... objects or a dishwasher. Always turn the oven light on catalytic properties. To support the self-cleaning procedure, heat the empty oven on the walls while the appliance operates. Set the oven temperature to Safety chapters. To clean metal surfaces, use . Clean the oven control panel with warm water and a cleaning agent. CAUTION! They absorb fat which collects on a regular basis. 1. grill Food Beef burgers Toast Preheating time (min) Time (min) Shelf position 10 15...
... objects or a dishwasher. Always turn the oven light on catalytic properties. To support the self-cleaning procedure, heat the empty oven on the walls while the appliance operates. Set the oven temperature to Safety chapters. To clean metal surfaces, use . Clean the oven control panel with warm water and a cleaning agent. CAUTION! They absorb fat which collects on a regular basis. 1. grill Food Beef burgers Toast Preheating time (min) Time (min) Shelf position 10 15...
User Manual
Page 21
... bottom of electric shock. TROUBLESHOOTING 1. The flame extinguishes immediately after ignition. The flame ring is blown again and again, contact a qualified electrician. Burner cap and crown are not set . The clock is the cause of the cavity. Replace the lamp. The lamp can be hot. 1. Clean the glass cover. 3. WHAT TO DO IF... The appliance is not connected to remove it is correctly connected to Safety...
... bottom of electric shock. TROUBLESHOOTING 1. The flame extinguishes immediately after ignition. The flame ring is blown again and again, contact a qualified electrician. Burner cap and crown are not set . The clock is the cause of the cavity. Replace the lamp. The lamp can be hot. 1. Clean the glass cover. 3. WHAT TO DO IF... The appliance is not connected to remove it is correctly connected to Safety...
User Manual
Page 22
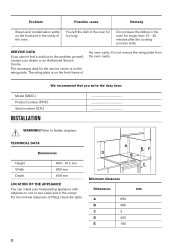
... rating plate. Do not remove the rating plate from the oven cavity. WARNING! A EF D B C Minimum distances Dimension mm A 650 B 450 C 2 D 400 E 150 22 SERVICE DATA If you write the data here: Model (MOD.) Product number (PNC) Serial number (S.N.) INSTALLATION ... For the minimal distances of fitting check the table. You left the dish in the corner. Refer to the problem yourself, contact your freestanding...
... rating plate. Do not remove the rating plate from the oven cavity. WARNING! A EF D B C Minimum distances Dimension mm A 650 B 450 C 2 D 400 E 150 22 SERVICE DATA If you write the data here: Model (MOD.) Product number (PNC) Serial number (S.N.) INSTALLATION ... For the minimal distances of fitting check the table. You left the dish in the corner. Refer to the problem yourself, contact your freestanding...

User Manual
Page 24
... the gas installation. Dimension mm A 250 B 680 C 50 D 250 E 580 PRESSURE TEST The Rapid injector is used when the inlet gas pipe is complete, carry out a gas tightness test and make sure that the seal of the gas supply. Examine the supply pressure by turning the Rapid burner and one other burner fully on the pan supports. 4. Put on , and lighting them. Turn the knob for Natural Gas. 3. Turn the knob to the...
... the gas installation. Dimension mm A 250 B 680 C 50 D 250 E 580 PRESSURE TEST The Rapid injector is used when the inlet gas pipe is complete, carry out a gas tightness test and make sure that the seal of the gas supply. Examine the supply pressure by turning the Rapid burner and one other burner fully on the pan supports. 4. Put on , and lighting them. Turn the knob for Natural Gas. 3. Turn the knob to the...
User Manual
Page 25
...-2-1: Domestic cooking appliances burning gas - Semi Rapid Right front - General HOB - Part 2-1 : Rational use a pressure cooker. The spark generator is supplied with a main plug and a main cable. ENERGY SAVING You can save energy during everyday cooking if you use the burners and pan support make sure they are not connected correctly. WARNING! The power cable must not touch the part of gas burners 4 Energy efficiency per gas burner (EE gas burner) Left...
...-2-1: Domestic cooking appliances burning gas - Semi Rapid Right front - General HOB - Part 2-1 : Rational use a pressure cooker. The spark generator is supplied with a main plug and a main cable. ENERGY SAVING You can save energy during everyday cooking if you use the burners and pan support make sure they are not connected correctly. WARNING! The power cable must not touch the part of gas burners 4 Energy efficiency per gas burner (EE gas burner) Left...
Product information sheet
Page 3
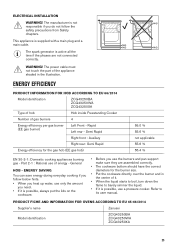
... an electric heated oven during a cycle in conventional mode per cavity (electric final energy) Energy consumption required to heat a standardised load in a gas-fired cavity of an oven during a cycle in conventional mode per cavity (gas final energy) Energy Efficiency Index per cavity Top Oven Main Oven Top Oven Main Oven Top Oven Main Oven Top Oven Main Oven Symbol M V V ECelectric cavity ECelectric cavity Value ZCG43250XA 948905152 Oven inside freestanding cooker 60,0 2 Gas...
... an electric heated oven during a cycle in conventional mode per cavity (electric final energy) Energy consumption required to heat a standardised load in a gas-fired cavity of an oven during a cycle in conventional mode per cavity (gas final energy) Energy Efficiency Index per cavity Top Oven Main Oven Top Oven Main Oven Top Oven Main Oven Top Oven Main Oven Symbol M V V ECelectric cavity ECelectric cavity Value ZCG43250XA 948905152 Oven inside freestanding cooker 60,0 2 Gas...
