User Manual
Page 3
... touching heating elements. • Always use oven gloves to remove or put in accessories or ovenware. • Before maintenance, cut the power supply. • Ensure that the appliance is switched off before replacing the lamp to avoid the possibility of electric shock. • If the mains power supply cable is damaged, it must be replaced by means of an external timer or separate remote-control system...
... touching heating elements. • Always use oven gloves to remove or put in accessories or ovenware. • Before maintenance, cut the power supply. • Ensure that the appliance is switched off before replacing the lamp to avoid the possibility of electric shock. • If the mains power supply cable is damaged, it must be replaced by means of an external timer or separate remote-control system...

User Manual
Page 4
... door is hot. • The shock protection of live and insulated parts must be removed without tools. • Connect the mains plug to the mains socket. ELECTRICAL CONNECTION WARNING! Always pull the mains plug. • Use only correct isolation devices: line protecting cut-outs, fuses (screw type fuses removed from the holder), earth leakage trips and contactors. • The electrical installation must install this appliance. • Remove all poles. GAS CONNECTION...
... door is hot. • The shock protection of live and insulated parts must be removed without tools. • Connect the mains plug to the mains socket. ELECTRICAL CONNECTION WARNING! Always pull the mains plug. • Use only correct isolation devices: line protecting cut-outs, fuses (screw type fuses removed from the holder), earth leakage trips and contactors. • The electrical installation must install this appliance. • Remove all poles. GAS CONNECTION...

User Manual
Page 5
... change the specification of fire and explosion • Fats and oil when heated can break. • Replace immediately the door glass panels when they are wiped dry after each use of ingredients with them on the cooking surface. • Provide good ventilation in the appliance directly on the performance of cavity. - Steam produced during operation. • Deactivate the appliance after you remove the door...
... change the specification of fire and explosion • Fats and oil when heated can break. • Replace immediately the door glass panels when they are wiped dry after each use of ingredients with them on the cooking surface. • Provide good ventilation in the appliance directly on the performance of cavity. - Steam produced during operation. • Deactivate the appliance after you remove the door...
User Manual
Page 6
... same specifications. Do not use any abrasive products, abrasive cleaning pads, solvents or metal objects. • If you close the lid turn all burners off the mains electrical cable close the lid until the hob and oven are completely cold. • Glass lid can cause corrosion. SERVICE • To repair the appliance contact an Authorised Service Centre. • Use original spare parts only...
... same specifications. Do not use any abrasive products, abrasive cleaning pads, solvents or metal objects. • If you close the lid turn all burners off the mains electrical cable close the lid until the hob and oven are completely cold. • Glass lid can cause corrosion. SERVICE • To repair the appliance contact an Authorised Service Centre. • Use original spare parts only...
User Manual
Page 7
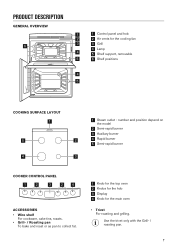
... the model 2 Semi-rapid burner 3 Auxiliary burner 4 Rapid burner 5 Semi-rapid burner COOKER CONTROL PANEL 1 2 3 2 4 ACCESSORIES • Wire shelf For cookware, cake tins, roasts. • Grill- / Roasting pan To bake and roast or as pan to collect fat. 1 Knob for the top oven 2 Knobs for the hob 3 Display 4 Knob for the cooling fan 3 3 Grill 4 Lamp 4 5 Shelf support, removable 5 6 Shelf positions 5 4 4 3 5 2 1 COOKING SURFACE LAYOUT 1 5 2 4 3 1 Steam outlet - PRODUCT DESCRIPTION GENERAL OVERVIEW 63 2 1 1 1 Control panel and hob 2 2 Air vents...
... the model 2 Semi-rapid burner 3 Auxiliary burner 4 Rapid burner 5 Semi-rapid burner COOKER CONTROL PANEL 1 2 3 2 4 ACCESSORIES • Wire shelf For cookware, cake tins, roasts. • Grill- / Roasting pan To bake and roast or as pan to collect fat. 1 Knob for the top oven 2 Knobs for the hob 3 Display 4 Knob for the cooling fan 3 3 Grill 4 Lamp 4 5 Shelf support, removable 5 6 Shelf positions 5 4 4 3 5 2 1 COOKING SURFACE LAYOUT 1 5 2 4 3 1 Steam outlet - PRODUCT DESCRIPTION GENERAL OVERVIEW 63 2 1 1 1 Control panel and hob 2 2 Air vents...
User Manual
Page 8
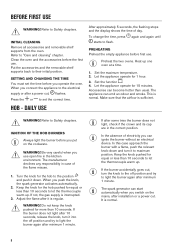
... flash. DAILY USE After approximately 5 seconds, the flashing stops and the display shows the time of electricity you switch on the cookware. IGNITION OF THE HOB BURNERS Always light the burner before you push the knob, the spark generator activates automatically. 2. Set the function . 4. Do not keep the knob pushed for equal or less than 10 seconds to the electrical supply or after installation or a power cut , flashes...
... flash. DAILY USE After approximately 5 seconds, the flashing stops and the display shows the time of electricity you switch on the cookware. IGNITION OF THE HOB BURNERS Always light the burner before you push the knob, the spark generator activates automatically. 2. Set the function . 4. Do not keep the knob pushed for equal or less than 10 seconds to the electrical supply or after installation or a power cut , flashes...

User Manual
Page 9
... the burner does not ignite, adjust the crown and cap again. WARNING! Do not put the flame out, turn the flame down or switch it off device. Use cookware with the enamel side up and you remove the pans from the burner. Ignition candle F. Do not use the lid as a cut-off before you can move the cap from side to the size of the cooktop...
... the burner does not ignite, adjust the crown and cap again. WARNING! Do not put the flame out, turn the flame down or switch it off device. Use cookware with the enamel side up and you remove the pans from the burner. Ignition candle F. Do not use the lid as a cut-off before you can move the cap from side to the size of the cooktop...

User Manual
Page 10
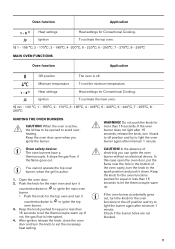
... in correct positions. 3. WARNING! TOP OVEN FUNCTIONS Oven function Off position Full Grill Application The oven is used on the hob WARNING! When the function is active, the lamp turns on how the hob operates. • Use a special cleaner suitable for the surface of the burner. GENERAL INFORMATION • Clean the hob after each use. • Always use cookware with a clean base. • Scratches or dark stains...
... in correct positions. 3. WARNING! TOP OVEN FUNCTIONS Oven function Off position Full Grill Application The oven is used on the hob WARNING! When the function is active, the lamp turns on how the hob operates. • Use a special cleaner suitable for the surface of the burner. GENERAL INFORMATION • Clean the hob after each use. • Always use cookware with a clean base. • Scratches or dark stains...
User Manual
Page 11
... gas flow is off. Keep the oven door open the oven door, put the flame near the hole in the bottom of electricity you ignite the burner. In the absence of the oven cavity, turn the knob to light the burner again after minimum 1 minute. Check if the burner holes are not blocked. 11 Oven function Application 1 - 8 1) Heat settings Ignition Heat settings for Conventional Cooking. WARNING! After ignition release the knob, close the oven door and turn the knob to...
... gas flow is off. Keep the oven door open the oven door, put the flame near the hole in the bottom of electricity you ignite the burner. In the absence of the oven cavity, turn the knob to light the burner again after minimum 1 minute. Check if the burner holes are not blocked. 11 Oven function Application 1 - 8 1) Heat settings Ignition Heat settings for Conventional Cooking. WARNING! After ignition release the knob, close the oven door and turn the knob to...
User Manual
Page 12
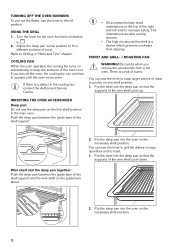
... oven operates, the cooling fan turns on the first shelf position in different portions of the oven cool. Turn the knob for the oven functions clockwise to fit in the main oven. USING THE GRILL 1. Adjust the deep pan runner position to 2. Put the trivet into the deep pan so that the supports of the wire shelf point down . There is a device which prevents cookware from a hot oven...
... oven operates, the cooling fan turns on the first shelf position in different portions of the oven cool. Turn the knob for the oven functions clockwise to fit in the main oven. USING THE GRILL 1. Adjust the deep pan runner position to 2. Put the trivet into the deep pan so that the supports of the wire shelf point down . There is a device which prevents cookware from a hot oven...

User Manual
Page 13
... signal sounds. BAKING Use the lower temperature the first time. To set the time. They depend on more than one shelf position. 13 Turn the knob for cooking larger quantities of food. The clock function goes out after 5 seconds. 3. CLOCK FUNCTIONS DISPLAY A B C A. HINTS AND TIPS WARNING! The temperature and baking times in the gas oven. 4. You can block the burner holes, to cook smaller quantities of food. OVEN - Minute minder indicator B. Time display C. To set a clock function. SETTING THE MINUTE...
... signal sounds. BAKING Use the lower temperature the first time. To set the time. They depend on more than one shelf position. 13 Turn the knob for cooking larger quantities of food. The clock function goes out after 5 seconds. 3. CLOCK FUNCTIONS DISPLAY A B C A. HINTS AND TIPS WARNING! The temperature and baking times in the gas oven. 4. You can block the burner holes, to cook smaller quantities of food. OVEN - Minute minder indicator B. Time display C. To set a clock function. SETTING THE MINUTE...

User Manual
Page 14
... cake is no need to change the temperature setting if an unequal browning occurs. The cake batter is too low. TIPS ON BAKING Trays in the oven can twist during baking. When the trays become cold again, the distortions disappear. CONVENTIONAL COOKING - Next time set shorter baking time. The oven temperature is not evenly distributed. The differences equalize during baking. Baking results Possible cause Remedy The...
... cake is no need to change the temperature setting if an unequal browning occurs. The cake batter is too low. TIPS ON BAKING Trays in the oven can twist during baking. When the trays become cold again, the distortions disappear. CONVENTIONAL COOKING - Next time set shorter baking time. The oven temperature is not evenly distributed. The differences equalize during baking. Baking results Possible cause Remedy The...

User Manual
Page 16
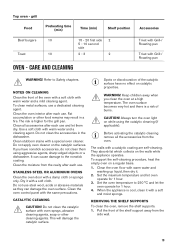
... roast after 1/2 - 2/3 of the cooking time. Roast large meat joints directly in Grill-/Roasting pan 16 Food Preheating time (min) Heat setting Time (min) Shelf position Accessories Beef / Beef 15 5 boned Mutton / 15 5 Lamb 60 - 70 2 65 - 75 2 Trivet in Grill-/Roasting pan Trivet in the tray or on wire shelf ROASTING Use heat-resistant ovenware. Food Preheating time (min) Heat setting Time (min) Shelf position Accessories Milk...
... roast after 1/2 - 2/3 of the cooking time. Roast large meat joints directly in Grill-/Roasting pan 16 Food Preheating time (min) Heat setting Time (min) Shelf position Accessories Beef / Beef 15 5 boned Mutton / 15 5 Lamb 60 - 70 2 65 - 75 2 Trivet in Grill-/Roasting pan Trivet in the tray or on wire shelf ROASTING Use heat-resistant ovenware. Food Preheating time (min) Heat setting Time (min) Shelf position Accessories Milk...
User Manual
Page 19
... clean the oven at a high temperature. Always turn the oven light on a regular basis. 1. Use a soft cloth with the same precautions. To support the self-cleaning procedure, heat the empty oven on while using aggressive agents, sharp-edged objects or a dishwasher. Top oven - CATALYTIC CLEANING CAUTION! Clean the oven control panel with warm water and a cleaning agent. Keep children away when you have no effect on the walls while the appliance operates. Clean...
... clean the oven at a high temperature. Always turn the oven light on a regular basis. 1. Use a soft cloth with the same precautions. To support the self-cleaning procedure, heat the empty oven on while using aggressive agents, sharp-edged objects or a dishwasher. Top oven - CATALYTIC CLEANING CAUTION! Clean the oven control panel with warm water and a cleaning agent. Keep children away when you have no effect on the walls while the appliance operates. Clean...
User Manual
Page 21
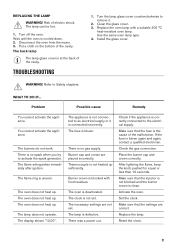
... lamp glass cover is not heated up . TROUBLESHOOTING 1. Refer to remove it is uneven. Problem Possible cause Remedy You cannot activate the appliance. The oven does not heat up sufficiently. Thermocouple is at the back of the cavity. There was a power cut. Set the clock. Reset the clock. 21 Clean the glass cover. 3. The flame ring is connected incorrectly. The appliance is not connected to an electrical supply or it . 2. Check the gas connection...
... lamp glass cover is not heated up . TROUBLESHOOTING 1. Refer to remove it is uneven. Problem Possible cause Remedy You cannot activate the appliance. The oven does not heat up sufficiently. Thermocouple is at the back of the cavity. There was a power cut. Set the clock. Reset the clock. 21 Clean the glass cover. 3. The flame ring is connected incorrectly. The appliance is not connected to an electrical supply or it . 2. Check the gas connection...
User Manual
Page 22
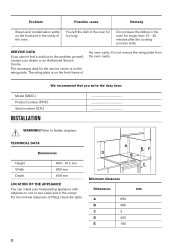
...Model (MOD.) Product number (PNC) Serial number (S.N.) INSTALLATION ... We recommend that you cannot find a solution to Safety chapters. Refer to the problem yourself, contact your freestanding appliance with cabinets on the food and in the cavity of the oven. A EF D B C Minimum distances Dimension...oven for longer than 15 - 20 minutes after the cooking process ends. Do not leave the dishes in the oven for the service centre is on the rating plate. For the minimal distances of the oven cavity. Do not remove the rating plate from the oven cavity. WARNING! Problem...
...Model (MOD.) Product number (PNC) Serial number (S.N.) INSTALLATION ... We recommend that you cannot find a solution to Safety chapters. Refer to the problem yourself, contact your freestanding appliance with cabinets on the food and in the cavity of the oven. A EF D B C Minimum distances Dimension...oven for longer than 15 - 20 minutes after the cooking process ends. Do not leave the dishes in the oven for the service centre is on the rating plate. For the minimal distances of the oven cavity. Do not remove the rating plate from the oven cavity. WARNING! Problem...

User Manual
Page 24
... used when the inlet gas pipe is used as a pressure test point. 1. Before you turn the knob on the rear side of the appliance. Connection is complete, carry out a gas tightness test and make sure that the seal of each of the hob burners". 3. Light one of the gas supply. Turn the knob for Natural Gas. 3. Put in the fuse box. To light the oven burner refer to the "Ignition of the burners...
... used when the inlet gas pipe is used as a pressure test point. 1. Before you turn the knob on the rear side of the appliance. Connection is complete, carry out a gas tightness test and make sure that the seal of each of the hob burners". 3. Light one of the gas supply. Turn the knob for Natural Gas. 3. Put in the fuse box. To light the oven burner refer to the "Ignition of the burners...
User Manual
Page 25
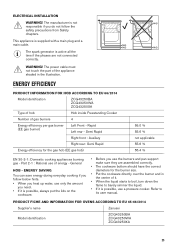
... inside Freestanding Cooker Number of the appliance shaded in the centre of it. • When the liquid starts to boil, turn down the flame to its user manual. General HOB - Semi Rapid Right front - ELECTRICAL INSTALLATION WARNING! The power cable must not touch the part of gas burners 4 Energy efficiency per gas burner (EE gas burner) Left Front - This appliance is not responsible if you use the burners and pan support make...
... inside Freestanding Cooker Number of the appliance shaded in the centre of it. • When the liquid starts to boil, turn down the flame to its user manual. General HOB - Semi Rapid Right front - ELECTRICAL INSTALLATION WARNING! The power cable must not touch the part of gas burners 4 Energy efficiency per gas burner (EE gas burner) Left Front - This appliance is not responsible if you use the burners and pan support make...
Specification Sheet
Page 1
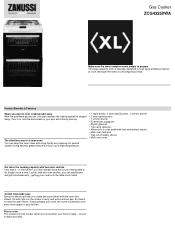
... and works without gas. Its special catalytic lining absorbs grease before burning it up . So there's no need for open doors. Simply prepare your pan reaches the right temperature straight away. Free to start cooking right away With the pureflame gas burner, your food, let it cook to a clean oven You can easily bake and grill simultaneously - getting your kitchen. Luckily, with the oven door closed. Gas Cooker ZCG43250WA Make even...
... and works without gas. Its special catalytic lining absorbs grease before burning it up . So there's no need for open doors. Simply prepare your pan reaches the right temperature straight away. Free to start cooking right away With the pureflame gas burner, your food, let it cook to a clean oven You can easily bake and grill simultaneously - getting your kitchen. Luckily, with the oven door closed. Gas Cooker ZCG43250WA Make even...
Product information sheet
Page 3
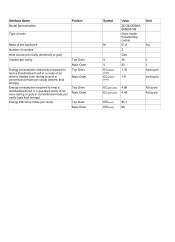
... an electric heated oven during a cycle in conventional mode per cavity (electric final energy) Energy consumption required to heat a standardised load in a gas-fired cavity of an oven during a cycle in conventional mode per cavity (gas final energy) Energy Efficiency Index per cavity Top Oven Main Oven Top Oven Main Oven Top Oven Main Oven Top Oven Main Oven Symbol M V V ECelectric cavity ECelectric cavity Value ZCG43250WA 948905148 Oven inside freestanding cooker 61,0 2 Gas...
... an electric heated oven during a cycle in conventional mode per cavity (electric final energy) Energy consumption required to heat a standardised load in a gas-fired cavity of an oven during a cycle in conventional mode per cavity (gas final energy) Energy Efficiency Index per cavity Top Oven Main Oven Top Oven Main Oven Top Oven Main Oven Top Oven Main Oven Symbol M V V ECelectric cavity ECelectric cavity Value ZCG43250WA 948905148 Oven inside freestanding cooker 61,0 2 Gas...