Specification Sheet
Page 1
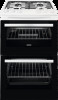
... perfect results • Main oven features: • Gas cut-off safety device • Multi-zone oven • Cooker features: Grilled food made easy Zanussi's electric grill lets you create delicious dishes with two oven cavities, you can easily bake and grill simultaneously - One turn of the knob starts the gas supply and a push lights it ‒ in your pots and pans, they're heated up quickly - So there...
... perfect results • Main oven features: • Gas cut-off safety device • Multi-zone oven • Cooker features: Grilled food made easy Zanussi's electric grill lets you create delicious dishes with two oven cavities, you can easily bake and grill simultaneously - One turn of the knob starts the gas supply and a push lights it ‒ in your pots and pans, they're heated up quickly - So there...
Specification Sheet
Page 2
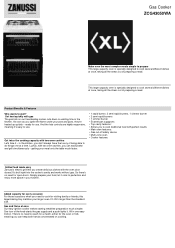
... Oven Runners Runners - Power/Diameter Right rear - Power/Diameter Dial Rear - Product Specification Dimensions Voltage Total electricity loading, W Cord Length Required Fuse Cavity size Volume usable, l Largest Surface area Colour Self-Cleaning? Bottom Oven 899-917x550x600 240 2400 1.6 13 83 36 1254 White Black Enamel Black Enamel No A A 1.8 1.35 1000W/66mm 1900W/80mm 3000W/109mm 1900W/80mm 1 Dripping pan black enamel No Grids Grids type - Bottom Oven Gas supply: natural gas ProdPartCode Gas Cooker ZCG43050WA...
... Oven Runners Runners - Power/Diameter Right rear - Power/Diameter Dial Rear - Product Specification Dimensions Voltage Total electricity loading, W Cord Length Required Fuse Cavity size Volume usable, l Largest Surface area Colour Self-Cleaning? Bottom Oven 899-917x550x600 240 2400 1.6 13 83 36 1254 White Black Enamel Black Enamel No A A 1.8 1.35 1000W/66mm 1900W/80mm 3000W/109mm 1900W/80mm 1 Dripping pan black enamel No Grids Grids type - Bottom Oven Gas supply: natural gas ProdPartCode Gas Cooker ZCG43050WA...
User Manual
Page 3
... scrapers to clean the glass door or the glass of hinged lids of the hob since they can scratch the surface, which may result in the instructions for use as knives, forks, spoons and lids should be taken to avoid touching heating elements. • Always use oven gloves to remove or put in accessories or ovenware. • Before maintenance, cut the power supply. • Ensure...
... scrapers to clean the glass door or the glass of hinged lids of the hob since they can scratch the surface, which may result in the instructions for use as knives, forks, spoons and lids should be taken to avoid touching heating elements. • Always use oven gloves to remove or put in accessories or ovenware. • Before maintenance, cut the power supply. • Ensure...

User Manual
Page 4
...: line protecting cut-outs, fuses (screw type fuses removed from the holder), earth leakage trips and contactors. • The electrical installation must stay next to appliances or units with the electrical ratings of the mains power supply. • Always use a correctly installed shockproof socket. • Do not use multi-plug adapters and extension cables. • Do not let mains cables touch or come near the appliance door...
...: line protecting cut-outs, fuses (screw type fuses removed from the holder), earth leakage trips and contactors. • The electrical installation must stay next to appliances or units with the electrical ratings of the mains power supply. • Always use a correctly installed shockproof socket. • Do not use multi-plug adapters and extension cables. • Do not let mains cables touch or come near the appliance door...

User Manual
Page 5
... the accessories supplied with them on the cooking surface. • Provide good ventilation in contact with the appliance when you cook with the appliance. • Do not install a flame diffuser on the burner. • This appliance is installed. • Use only stable cookware with a damaged bottom can be careful when you open the appliance door while the appliance is in operation. It must...
... the accessories supplied with them on the cooking surface. • Provide good ventilation in contact with the appliance when you cook with the appliance. • Do not install a flame diffuser on the burner. • This appliance is installed. • Use only stable cookware with a damaged bottom can be careful when you open the appliance door while the appliance is in operation. It must...
User Manual
Page 6
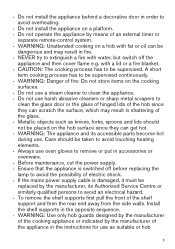
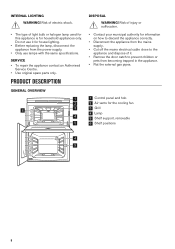
... the same specifications. SERVICE • To repair the appliance contact an Authorised Service Centre. • Use original spare parts only. Risk of it for house lighting. • Before replacing the lamp, disconnect the appliance from becoming trapped in the appliance. • Flat the external gas pipes. 1 Control panel and hob 2 Air vents for the cooling fan 3 Grill 4 Lamp 5 Shelf support, removable 6 Shelf positions 5 4 4 3 5 2 1 6 Risk of electric shock...
... the same specifications. SERVICE • To repair the appliance contact an Authorised Service Centre. • Use original spare parts only. Risk of it for house lighting. • Before replacing the lamp, disconnect the appliance from becoming trapped in the appliance. • Flat the external gas pipes. 1 Control panel and hob 2 Air vents for the cooling fan 3 Grill 4 Lamp 5 Shelf support, removable 6 Shelf positions 5 4 4 3 5 2 1 6 Risk of electric shock...
User Manual
Page 7
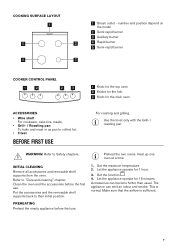
... the removable shelf supports back to "Care and cleaning" chapter. Heat up one oven at a time. 1. Set the maximum temperature. 2. Let the appliance operate for 15 minutes. The appliance can become hotter than usual. Make sure that the airflow is normal. COOKING SURFACE LAYOUT 1 5 2 4 3 1 Steam outlet - WARNING! Refer to their initial position. PREHEATING Preheat the empty appliance before the first use . Preheat the two ovens. Clean the oven and...
... the removable shelf supports back to "Care and cleaning" chapter. Heat up one oven at a time. 1. Set the maximum temperature. 2. Let the appliance operate for 15 minutes. The appliance can become hotter than usual. Make sure that the airflow is normal. COOKING SURFACE LAYOUT 1 5 2 4 3 1 Steam outlet - WARNING! Refer to their initial position. PREHEATING Preheat the empty appliance before the first use . Preheat the two ovens. Clean the oven and...

User Manual
Page 8
... goes out, turn it to light the burner again after installation or a power cut. Ignition candle F. Let the crown fall freely onto the body. Be very careful when you switch on the burner body. Turn the knob for the ignition candle C D E F REPLACING BURNER PARTS 1. Do not keep the knob pushed for more than 10 seconds to Safety chapters. The spark generator can ignite the burner without an electrical device. It...
... goes out, turn it to light the burner again after installation or a power cut. Ignition candle F. Let the crown fall freely onto the body. Be very careful when you switch on the burner body. Turn the knob for the ignition candle C D E F REPLACING BURNER PARTS 1. Do not keep the knob pushed for more than 10 seconds to Safety chapters. The spark generator can ignite the burner without an electrical device. It...

User Manual
Page 9
... the cap from the burner. Light the burner. Use cookware with the centre of burners. For the burner to operate correctly, make sure that the arms of the pan supports are in correct positions. 3. HOB - Always turn the knob to the off before you remove the pans from side to side and front to the size of the burner. Be very careful when you can cause...
... the cap from the burner. Light the burner. Use cookware with the centre of burners. For the burner to operate correctly, make sure that the arms of the pan supports are in correct positions. 3. HOB - Always turn the knob to the off before you remove the pans from side to side and front to the size of the burner. Be very careful when you can cause...

User Manual
Page 10
... opened to prevent difficult lighting and check that the burner crown holes are not obstructed. When the function is active. 1. Oven safety device: The oven burners have a thermocouple. DAILY USE components well clean to avoid overheating. When the oven is off . Minimum temperature To set the minimum temperature. 1 - 81) Heat settings Ignition Heat settings for Conventional Cooking. It stops the gas flow, if the flame goes out. You cannot operate the top oven burner...
... opened to prevent difficult lighting and check that the burner crown holes are not obstructed. When the function is active. 1. Oven safety device: The oven burners have a thermocouple. DAILY USE components well clean to avoid overheating. When the oven is off . Minimum temperature To set the minimum temperature. 1 - 81) Heat settings Ignition Heat settings for Conventional Cooking. It stops the gas flow, if the flame goes out. You cannot operate the top oven burner...
User Manual
Page 11
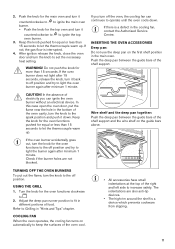
.... 4. The indentations are not blocked. After ignition release the knob, close the oven door and turn the knob to let the thermocouple warm up . If you can continues to ignite the top oven burner. 3. Adjust the deep pan runner position to increase safety. COOLING FAN When the oven operates, the cooling fan turns on automatically to keep the surfaces of the oven cool. • All accessories have small indentations...
.... 4. The indentations are not blocked. After ignition release the knob, close the oven door and turn the knob to let the thermocouple warm up . If you can continues to ignite the top oven burner. 3. Adjust the deep pan runner position to increase safety. COOLING FAN When the oven operates, the cooling fan turns on automatically to keep the surfaces of the oven cool. • All accessories have small indentations...

User Manual
Page 12
.... 12 OVEN - CAUTION! BAKING Use the lower temperature the first time. You can use the trivet to toast. 1. The differences equalize during baking. HINTS AND TIPS WARNING! The temperature and baking times in the gas oven. Put the deep pan into the oven on the recipes and the quality and quantity of the shelf in the tables are guidelines only. Use it to change the temperature setting if an...
.... 12 OVEN - CAUTION! BAKING Use the lower temperature the first time. You can use the trivet to toast. 1. The differences equalize during baking. HINTS AND TIPS WARNING! The temperature and baking times in the gas oven. Put the deep pan into the oven on the recipes and the quality and quantity of the shelf in the tables are guidelines only. Use it to change the temperature setting if an...

User Manual
Page 13
... on wire shelf 13 The baking time is too long. The cake batter is too high. Next time set shorter baking time. The cake bakes unevenly. Next time set slightly lower oven temperature. The oven temperature is not evenly distributed. The cake is not ready in the baking time specified in tins 20 - 30 3 30 -35 3 15 - 25 4 20 - 30 4 30 - 40 4 60 - 90 3 Food Preheating time (min) Heat setting Time...
... on wire shelf 13 The baking time is too long. The cake batter is too high. Next time set shorter baking time. The cake bakes unevenly. Next time set slightly lower oven temperature. The oven temperature is not evenly distributed. The cake is not ready in the baking time specified in tins 20 - 30 3 30 -35 3 15 - 25 4 20 - 30 4 30 - 40 4 60 - 90 3 Food Preheating time (min) Heat setting Time...

User Manual
Page 15
... on wire shelf Tray on wire shelf Tray on wire shelf Ceramic ramekins on the wire shelf placed above the tray. ROASTING Turn the roast after 1/2 - 2/3 of the cooking time. Roast lean meat covered. Put some water in the tray or on wire shelf ROASTING Use heat-resistant ovenware. Baste meat joints with their own juice several times during roasting. Food Preheating time (min) Heat setting Time (min...
... on wire shelf Tray on wire shelf Tray on wire shelf Ceramic ramekins on the wire shelf placed above the tray. ROASTING Turn the roast after 1/2 - 2/3 of the cooking time. Roast lean meat covered. Put some water in the tray or on wire shelf ROASTING Use heat-resistant ovenware. Baste meat joints with their own juice several times during roasting. Food Preheating time (min) Heat setting Time (min...

User Manual
Page 18
... a fire. Clean the oven control panel with Grill-/ Roasting pan WARNING! Pull the rear end of glasses can cause damage to the nonstick coating. Food Toast Preheating time (min) Time (min) 10 2 - 3 OVEN - Dry it . 1 2 Install the shelf supports in the front. The number of the shelf support away from the examples you have nonstick accessories, do not clean them dry. Open the door. 2. Hold the door trim on the...
... a fire. Clean the oven control panel with Grill-/ Roasting pan WARNING! Pull the rear end of glasses can cause damage to the nonstick coating. Food Toast Preheating time (min) Time (min) 10 2 - 3 OVEN - Dry it . 1 2 Install the shelf supports in the front. The number of the shelf support away from the examples you have nonstick accessories, do not clean them dry. Open the door. 2. Hold the door trim on the...
User Manual
Page 20
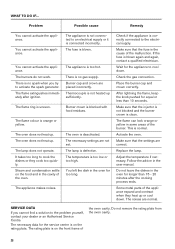
... burner crown is correctly connected to the problem yourself, contact your dealer or an Authorised Service Centre. The temperature is blocked with food residues. WHAT TO DO IF... There is defective. The lamp is no gas supply. You left the dish in the oven for the appliance to cook the dishes or they heat up sufficiently. Make sure that the settings...
... burner crown is correctly connected to the problem yourself, contact your dealer or an Authorised Service Centre. The temperature is blocked with food residues. WHAT TO DO IF... There is defective. The lamp is no gas supply. You left the dish in the oven for the appliance to cook the dishes or they heat up sufficiently. Make sure that the settings...

User Manual
Page 21
... surface level with cabinets on the bottom of appliance to prevent the appliance from the appliance top surface, then measure right 30 mm. 2. The stability chain only works when the appliance is put in the corner. TECHNICAL DATA Dimensions Height Width Depth 894 - 912 mm 550 mm 609 mm LOCATION OF THE APPLIANCE You can install your freestanding...
... surface level with cabinets on the bottom of appliance to prevent the appliance from the appliance top surface, then measure right 30 mm. 2. The stability chain only works when the appliance is put in the corner. TECHNICAL DATA Dimensions Height Width Depth 894 - 912 mm 550 mm 609 mm LOCATION OF THE APPLIANCE You can install your freestanding...
User Manual
Page 23
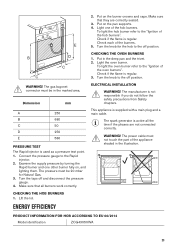
... not connected correctly. Light one other burner fully on, and lighting them. To light the oven burner refer to the Rapid injector. 2. This appliance is used as a pressure test point. 1. ENERGY EFFICIENCY 2. To light the hob burner refer to the off and disconnect the pressure gauge. 4. Turn the knob for Natural Gas. 3. WARNING! Dimension mm A 250 B 680 C 50 D 250 E 580 PRESSURE TEST The Rapid injector is supplied with a main plug...
... not connected correctly. Light one other burner fully on, and lighting them. To light the oven burner refer to the Rapid injector. 2. This appliance is used as a pressure test point. 1. ENERGY EFFICIENCY 2. To light the hob burner refer to the off and disconnect the pressure gauge. 4. Turn the knob for Natural Gas. 3. WARNING! Dimension mm A 250 B 680 C 50 D 250 E 580 PRESSURE TEST The Rapid injector is supplied with a main plug...

User Manual
Page 24
... Supplier's name Zanussi Model identification ZCG43050WA Energy Efficiency Index Top oven: 95.1 Main oven: 90.0 Energy efficiency class Top oven: A Main oven: A Energy consumption with a standard load, conventional mode Top oven: 1.35 kWh/cycle 4.86 MJ/cycle Main oven: 1.80 kWh/cycle 6.46 MJ/cycle Number of cavities 2 Heat source Electricity - ENERGY SAVING The oven contains features which help you use the burners and pan support make sure they...
... Supplier's name Zanussi Model identification ZCG43050WA Energy Efficiency Index Top oven: 95.1 Main oven: 90.0 Energy efficiency class Top oven: A Main oven: A Energy consumption with a standard load, conventional mode Top oven: 1.35 kWh/cycle 4.86 MJ/cycle Main oven: 1.80 kWh/cycle 6.46 MJ/cycle Number of cavities 2 Heat source Electricity - ENERGY SAVING The oven contains features which help you use the burners and pan support make sure they...
Product information sheet
Page 3
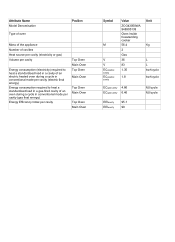
... an electric heated oven during a cycle in conventional mode per cavity (electric final energy) Energy consumption required to heat a standardised load in a gas-fired cavity of an oven during a cycle in conventional mode per cavity (gas final energy) Energy Efficiency Index per cavity Top Oven Main Oven Top Oven Main Oven Top Oven Main Oven Top Oven Main Oven Symbol M V V ECelectric cavity ECelectric cavity Value ZCG43050WA 948905138 Oven inside freestanding cooker 56.4 2 Gas...
... an electric heated oven during a cycle in conventional mode per cavity (electric final energy) Energy consumption required to heat a standardised load in a gas-fired cavity of an oven during a cycle in conventional mode per cavity (gas final energy) Energy Efficiency Index per cavity Top Oven Main Oven Top Oven Main Oven Top Oven Main Oven Top Oven Main Oven Symbol M V V ECelectric cavity ECelectric cavity Value ZCG43050WA 948905138 Oven inside freestanding cooker 56.4 2 Gas...