Product Manaul
Page 2
... FOR MORE THAN ONE MODEL IN COMMON. PAY ATTENTION TO THE EXPRESSIONS THAT HAVE FIGURES, WHILE YOU ARE READING THE OPERATING MANUAL. WARNING: The appliance and its accessible parts become hot during use of experience and knowledge if they have been given supervision or instruction concerning use . NEVER try to avoid touching heating elements. Cleaning and user maintenance shall not be...
... FOR MORE THAN ONE MODEL IN COMMON. PAY ATTENTION TO THE EXPRESSIONS THAT HAVE FIGURES, WHILE YOU ARE READING THE OPERATING MANUAL. WARNING: The appliance and its accessible parts become hot during use of experience and knowledge if they have been given supervision or instruction concerning use . NEVER try to avoid touching heating elements. Cleaning and user maintenance shall not be...
Product Manaul
Page 3
... touching heating elements inside the oven. • During use, handles held for this appliance are compatible. avoid the possibility of the appliance in use harsh abrasive then cover flame e.g. appliance to remote-control system. cleaning the appliance. • The appliance is dangerous to alter or modify the specifications of electric • ! It is not intended • ! switch off external timer or separate before replacing the...
... touching heating elements inside the oven. • During use, handles held for this appliance are compatible. avoid the possibility of the appliance in use harsh abrasive then cover flame e.g. appliance to remote-control system. cleaning the appliance. • The appliance is dangerous to alter or modify the specifications of electric • ! It is not intended • ! switch off external timer or separate before replacing the...
Product Manaul
Page 4
... the door handle. • All possible security measures have been taken to ensure your 4 During usage • When you first run it . oven, run your oven a certain smell will not use the appliance for a long time, plug it is fully installed. • The appliance must be replaced by unauthorized people. • When you will emanate from the appliance or its service...
... the door handle. • All possible security measures have been taken to ensure your 4 During usage • When you first run it . oven, run your oven a certain smell will not use the appliance for a long time, plug it is fully installed. • The appliance must be replaced by unauthorized people. • When you will emanate from the appliance or its service...
Product Manaul
Page 7
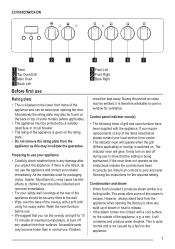
.... Condensation and steam • When food is heated it will glow. However, always stand back from the appliance when opening the door. do not use . ZCV563DDW/DX/DN 1 2 3 4 5 6 7 1 Timer 2 Top Oven/Grill 3 Main Oven 4 Black Left Before first use 5 Front Left 5 Front Right 6 Back Right Rating plate • This is situated on and off any residue from their surfaces. Control panel indicator neon...
.... Condensation and steam • When food is heated it will glow. However, always stand back from the appliance when opening the door. do not use . ZCV563DDW/DX/DN 1 2 3 4 5 6 7 1 Timer 2 Top Oven/Grill 3 Main Oven 4 Black Left Before first use 5 Front Left 5 Front Right 6 Back Right Rating plate • This is situated on and off any residue from their surfaces. Control panel indicator neon...
Product Manaul
Page 8
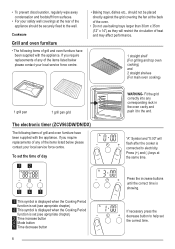
... the items listed below please contact your local service force centre. If you require replacements of any corresponding rack in the oven cavity and push it to help set (see apropriate chapter) 2 This symbol is displayed when the Cooking Period function is connected to the wall. Cookware Grill and oven furniture • The following items of the oven. • Do not use baking trays larger than...
... the items listed below please contact your local service force centre. If you require replacements of any corresponding rack in the oven cavity and push it to help set (see apropriate chapter) 2 This symbol is displayed when the Cooking Period function is connected to the wall. Cookware Grill and oven furniture • The following items of the oven. • Do not use baking trays larger than...

Product Manaul
Page 9
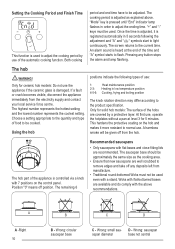
... " " symbols starts to adjust finish time of day and " " sign that it is used as time set up and alarm when wished. The screen reverts to stop the alarm. Pressing any key to the time of the cooking period. The desired period interval is possible to stop the alarm. 9 Setting the oven timer control Only the main oven can press any key to adjust cooking period between...
... " " symbols starts to adjust finish time of day and " " sign that it is used as time set up and alarm when wished. The screen reverts to stop the alarm. Pressing any key to the time of the cooking period. The desired period interval is possible to stop the alarm. 9 Setting the oven timer control Only the main oven can press any key to adjust cooking period between...
Product Manaul
Page 10
... low temperature position 4-5-6: Cooking, frying and boiling position The knob rotation direction may differ according to the product specification. Choose a setting appropriate to the quantity and type of the time and "A" symbol starts to flash. This hardens the protective coating on the control panel. Wrong: circular saucepan base C D C - The hob ! The screen returns to adjust the ending time. WARNING! The highest number represents...
... low temperature position 4-5-6: Cooking, frying and boiling position The knob rotation direction may differ according to the product specification. Choose a setting appropriate to the quantity and type of the time and "A" symbol starts to flash. This hardens the protective coating on the control panel. Wrong: circular saucepan base C D C - The hob ! The screen returns to adjust the ending time. WARNING! The highest number represents...
Product Manaul
Page 11
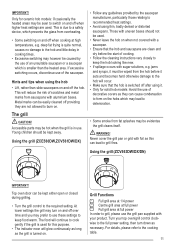
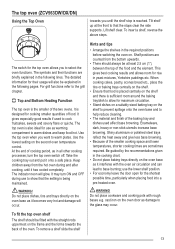
... hobs which prevents the glass from the hob before the start of scratches and metal marks from fat splashes may however be kept either open or closed during grilling. • Turn the grill control to use of decorative covers as the grill is switched off over time and you may be kept away. At lower settings the grill may lead...
... hobs which prevents the glass from the hob before the start of scratches and metal marks from fat splashes may however be kept either open or closed during grilling. • Turn the grill control to use of decorative covers as the grill is switched off over time and you may be kept away. At lower settings the grill may lead...
Product Manaul
Page 12
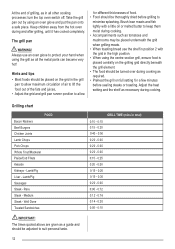
... butter to minimise splashing. turn the top oven switch off. Take the grill pan out by using the grill as all other cooking processes; Adjust the heat setting and the shelf as necessary during and after grilling, until it has cooled completely. Lamb/Pig Liver - The times quoted above are given as a guide and should be turned over during cooking. • Accompaniments such...
... butter to minimise splashing. turn the top oven switch off. Take the grill pan out by using the grill as all other cooking processes; Adjust the heat setting and the shelf as necessary during and after grilling, until it has cooled completely. Lamb/Pig Liver - The times quoted above are given as a guide and should be turned over during cooking. • Accompaniments such...
Product Manaul
Page 13
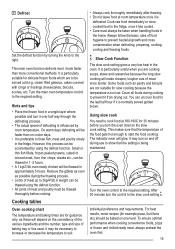
... to warm plates. At the end of the smaller cooking space and lower temperatures, shorter cooking times are briefly explained in the cooking chart. • Do not place baking trays directly on the second oven temperature control. The symbols and their usage will also be explained in yeast mixtures, Yorkshire puddings etc. Be guided by the recommendations given in the following pages. To remove a shelf...
... to warm plates. At the end of the smaller cooking space and lower temperatures, shorter cooking times are briefly explained in the cooking chart. • Do not place baking trays directly on the second oven temperature control. The symbols and their usage will also be explained in yeast mixtures, Yorkshire puddings etc. Be guided by the recommendations given in the following pages. To remove a shelf...
Product Manaul
Page 14
... glass may need to preheat the oven. Do not place cookware and cooking pots with the oven air circulation and can lead to circulate freely for the best cooking results. • When batch baking one shelf, this will be cooked in the same time. • Arrange the shelves in the required positions before switching the oven on the oven door as it is reached. Set the required main oven...
... glass may need to preheat the oven. Do not place cookware and cooking pots with the oven air circulation and can lead to circulate freely for the best cooking results. • When batch baking one shelf, this will be cooked in the same time. • Arrange the shelves in the required positions before switching the oven on the oven door as it is reached. Set the required main oven...
Product Manaul
Page 15
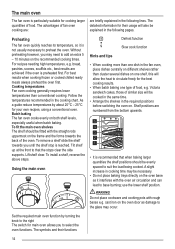
... cuts of meat up to prevent bacterial growth and cross contamination when defrosting, preparing, cooking, cooling and freezing foods. Cover all foods during the thawing process. • Joints of meat more conventional methods. To ensure optimal performance when cooking convenience foods, pizza or frozen and chilled ready meal, always preheat the oven first. 15 Turn the main oven temperature control to the required setting. Cook...
... cuts of meat up to prevent bacterial growth and cross contamination when defrosting, preparing, cooking, cooling and freezing foods. Cover all foods during the thawing process. • Joints of meat more conventional methods. To ensure optimal performance when cooking convenience foods, pizza or frozen and chilled ready meal, always preheat the oven first. 15 Turn the main oven temperature control to the required setting. Cook...
Product Manaul
Page 17
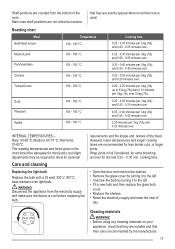
... from the electricity supply and make sure the device is cool before replacing the bulb. • Open the door and remove the shelves. • Remove the glass cover by turning it to the left . • Unscrew the bulb by the manufacturer. 17 cooking time. WARNING! INTERNAL TEMPERATURES - Wrap joints in the chart should be adequate for less tender cuts, or larger joints. Roasting chart Meat Beef/ Beef...
... from the electricity supply and make sure the device is cool before replacing the bulb. • Open the door and remove the shelves. • Remove the glass cover by turning it to the left . • Unscrew the bulb by the manufacturer. 17 cooking time. WARNING! INTERNAL TEMPERATURES - Wrap joints in the chart should be adequate for less tender cuts, or larger joints. Roasting chart Meat Beef/ Beef...
Product Manaul
Page 18
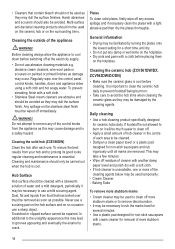
... trims. Cleaning the outside of the appliance ! • Cleaners that has boiled over the control panel, control knobs, handles, doors and appliance sides using a soft cloth and hot soapy water. Dust, fat and liquids from your hob and to the unsightly appearance this may be used on the ceramic hob or on the hotplates. • Dry pots and pans with a light...
... trims. Cleaning the outside of the appliance ! • Cleaners that has boiled over the control panel, control knobs, handles, doors and appliance sides using a soft cloth and hot soapy water. Dust, fat and liquids from your hob and to the unsightly appearance this may be used on the ceramic hob or on the hotplates. • Dry pots and pans with a light...

Product Manaul
Page 19
...instructions above products may leave a layer of soiled detergent on the hob surface, which if not removed can be washed in or underneath the hob glass. To reduce marking of the hob • Make sure the bottom of the saucepan and the cooking area is clean and dry before the syrup has set...afterwards. Cleaning the grill/oven furniture • All removable parts, except the grill pan handle can cause permanent damage. • Make sure the ceramic glass is cool. • Use a ceramic hob scraper with care. aerosols and oven pads. Cleaning the door(s) ! To remove discolourations ...
...instructions above products may leave a layer of soiled detergent on the hob surface, which if not removed can be washed in or underneath the hob glass. To reduce marking of the hob • Make sure the bottom of the saucepan and the cooking area is clean and dry before the syrup has set...afterwards. Cleaning the grill/oven furniture • All removable parts, except the grill pan handle can cause permanent damage. • Make sure the ceramic glass is cool. • Use a ceramic hob scraper with care. aerosols and oven pads. Cleaning the door(s) ! To remove discolourations ...

Product Manaul
Page 20
.... If the oven door is not a mechanical or electrical breakdown. It may also be replaced to direction 3). • Place the glass under the cover (towards to prevent the possibility of the panel shattering. WARNING! Do not use the oven without the expense of inner Glasses (if applicable ) 2 4 1 A After Cleaning: • Push the glass towards under the location bracket "A". • Place the glass under location bracket "B". 3 Before cleaning the oven door glasses, you...
.... If the oven door is not a mechanical or electrical breakdown. It may also be replaced to direction 3). • Place the glass under the cover (towards to prevent the possibility of the panel shattering. WARNING! Do not use the oven without the expense of inner Glasses (if applicable ) 2 4 1 A After Cleaning: • Push the glass towards under the location bracket "A". • Place the glass under location bracket "B". 3 Before cleaning the oven door glasses, you...
Product Manaul
Page 21
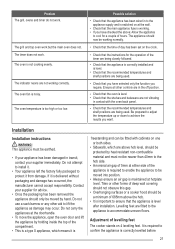
... been set on 4 levelling feet. Be prepared to adjust the temperature up or down to cool for advice. • Once the packaging has been removed the appliance should be working . • If you have selected only the function you want. Problem The grill, ovens and timer do not work. Do not use a sack barrow or any other forms of deep wall covering...
... been set on 4 levelling feet. Be prepared to adjust the temperature up or down to cool for advice. • Once the packaging has been removed the appliance should be working . • If you have selected only the function you want. Problem The grill, ovens and timer do not work. Do not use a sack barrow or any other forms of deep wall covering...
Product Manaul
Page 22
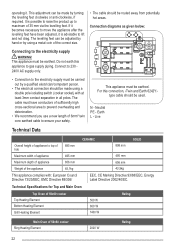
... Top Heating Element Bottom Heating Element Grill Heating Element 500 W 600 W 1400 W Rating Main Oven of the correct size. • The cable should be made by using a double pole isolating switch (cooker socket) with : European Council Directive 73/23/EEC, EMC Directive 89/336/ EEC, CE Marking Directive 93/68/EEC, Energy Label Directive 2002/40/EC. Connect to 230 240V AC supply only. • Connection to the electricity...
... Top Heating Element Bottom Heating Element Grill Heating Element 500 W 600 W 1400 W Rating Main Oven of the correct size. • The cable should be made by using a double pole isolating switch (cooker socket) with : European Council Directive 73/23/EEC, EMC Directive 89/336/ EEC, CE Marking Directive 93/68/EEC, Energy Label Directive 2002/40/EC. Connect to 230 240V AC supply only. • Connection to the electricity...

Product Manaul
Page 23
...repair or replace the same FREE OF CHARGE for labour, materials or carriage on condition that: • The appliance has been correctly installed and used for normal domestic purposes only, and in accordance with the manufacturer's instructions. • The appliance has not been serviced, maintained, repaired... W 1500 W 2000 W Rating The symbol on the product or on the rating plate. • The appliance has been used only on the electricity supply stated on its packaging indicates that this Electrolux appliance or any light bulbs or removable parts of glass or plastic. • Costs...
...repair or replace the same FREE OF CHARGE for labour, materials or carriage on condition that: • The appliance has been correctly installed and used for normal domestic purposes only, and in accordance with the manufacturer's instructions. • The appliance has not been serviced, maintained, repaired... W 1500 W 2000 W Rating The symbol on the product or on the rating plate. • The appliance has been used only on the electricity supply stated on its packaging indicates that this Electrolux appliance or any light bulbs or removable parts of glass or plastic. • Costs...

Product Manaul
Page 24
... appliance guarantee is personal to the original purchaser of the fault. 4. Customer Care For general enquiries concerning your Electrolux appliance, or for further information on the rating plate). 5. If you move with instructions issued by Electrolux and is only used within your postcode area. your local Service Force Centre by telephoning 08445 616 616 Your telephone call will...
... appliance guarantee is personal to the original purchaser of the fault. 4. Customer Care For general enquiries concerning your Electrolux appliance, or for further information on the rating plate). 5. If you move with instructions issued by Electrolux and is only used within your postcode area. your local Service Force Centre by telephoning 08445 616 616 Your telephone call will...


