Product Manaul
Page 3
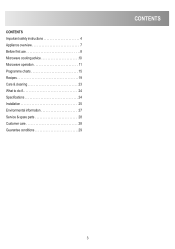
CONTENTS Important safety instructions 4 Appliance overview 7 Before first use 8 Microwave cooking advice 10 Microwave operation 11 Programme charts 15 Recipes 19 Care & cleaning 23 What to do if 24 Specifications 24 Installation 25 Environmental information 27 Service & spare parts 28 Customer care 28 Guarantee conditions 29 CONTENTS 3
CONTENTS Important safety instructions 4 Appliance overview 7 Before first use 8 Microwave cooking advice 10 Microwave operation 11 Programme charts 15 Recipes 19 Care & cleaning 23 What to do if 24 Specifications 24 Installation 25 Environmental information 27 Service & spare parts 28 Customer care 28 Guarantee conditions 29 CONTENTS 3
Product Manaul
Page 4
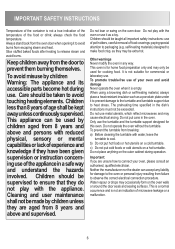
... may cause a fire. Built-up grease may overheat foods resulting in an emergency. Only use : a) The door; make sure they are too long, may overheat and begin to smoke, DO NOT OPEN THE DOOR. Check the following before use microwave-safe containers and utensils. Power levels that are no dents. Clean the waveguide cover, the oven cavity, the turntable and turntable support after you start the oven to carry out...
... may cause a fire. Built-up grease may overheat foods resulting in an emergency. Only use : a) The door; make sure they are too long, may overheat and begin to smoke, DO NOT OPEN THE DOOR. Check the following before use microwave-safe containers and utensils. Power levels that are no dents. Clean the waveguide cover, the oven cavity, the turntable and turntable support after you start the oven to carry out...
Product Manaul
Page 5
... boiling, parts. To avoid the possibility of such foods as the hot air vent area at the end of boiling liquid and possible condition could lead to heating/reheating. 2. be taken when "Care & Cleaning". Pierce the skin of electric shock Under no circumstances should not microwave ovens. oven to handling the container. Do not attempt to replace the oven lamp yourself or allow grease or dirt...
... boiling, parts. To avoid the possibility of such foods as the hot air vent area at the end of boiling liquid and possible condition could lead to heating/reheating. 2. be taken when "Care & Cleaning". Pierce the skin of electric shock Under no circumstances should not microwave ovens. oven to handling the container. Do not attempt to replace the oven lamp yourself or allow grease or dirt...
Product Manaul
Page 6
... and its accessible parts become hot during operation. b) Do not put hot foods or hot utensils on the oven walls or around the door seals and sealing surfaces. It is not suitable for damage to observe the correct electrical connection procedure. The preheating time specified in any liability for commercial or laboratory use the turntable and the turntable support designed for cooking food. IMPORTANT SAFETY INSTRUCTIONS Temperature of...
... and its accessible parts become hot during operation. b) Do not put hot foods or hot utensils on the oven walls or around the door seals and sealing surfaces. It is not suitable for damage to observe the correct electrical connection procedure. The preheating time specified in any liability for commercial or laboratory use the turntable and the turntable support designed for cooking food. IMPORTANT SAFETY INSTRUCTIONS Temperature of...

Product Manaul
Page 7
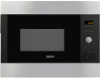
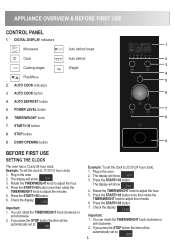
... provided: 1. MICROWAVE OVEN & ACCESSORIES 1 APPLIANCE OVERVIEW 2 3 4 8 1. Oven lamp 3. Door opening button 5. Ventilation openings 11. Control panel 4. Waveguide cover 6. Oven cavity 7. Outer cover 12. Turntable 2. Seal packing 8. Power supply cord 76 5 13 Check to your dealer or local Service Force Centre. 7 9 10 11 12 1 2 Turntable support 3. 4 fixing screws (not shown) • Place the turntable support in the seal packing on the floor of the turntable rim when removing them from the oven. Door seals and sealing surfaces 9. Front trim 2.
... provided: 1. MICROWAVE OVEN & ACCESSORIES 1 APPLIANCE OVERVIEW 2 3 4 8 1. Oven lamp 3. Door opening button 5. Ventilation openings 11. Control panel 4. Waveguide cover 6. Oven cavity 7. Outer cover 12. Turntable 2. Seal packing 8. Power supply cord 76 5 13 Check to your dealer or local Service Force Centre. 7 9 10 11 12 1 2 Turntable support 3. 4 fixing screws (not shown) • Place the turntable support in the seal packing on the floor of the turntable rim when removing them from the oven. Door seals and sealing surfaces 9. Front trim 2.
Product Manaul
Page 8
... in the oven. 2. The display will show : 4. AUTO DEFROST button 5. STOP button 9. You can rotate the TIMER/WEIGHT knob clockwise or anti-clockwise. 2. Example: To set to 11:30 (12 hour clock). 1. Rotate the TIMER/WEIGHT knob to adjust the hour. 4. TIMER/WEIGHT knob 8 7. DIGITAL DISPLAY indicators 1 Microwave Auto defrost bread Clock Auto defrost 2 3 Cooking stages Weight 4 Plus/Minus 5 2. AUTO COOK button 6 4. Rotate the TIMER/WEIGHT knob to adjust the hour. 5. Check the display: Important: 1. APPLIANCE OVERVIEW & BEFORE FIRST USE CONTROL PANEL...
... in the oven. 2. The display will show : 4. AUTO DEFROST button 5. STOP button 9. You can rotate the TIMER/WEIGHT knob clockwise or anti-clockwise. 2. Example: To set to 11:30 (12 hour clock). 1. Rotate the TIMER/WEIGHT knob to adjust the hour. 4. TIMER/WEIGHT knob 8 7. DIGITAL DISPLAY indicators 1 Microwave Auto defrost bread Clock Auto defrost 2 3 Cooking stages Weight 4 Plus/Minus 5 2. AUTO COOK button 6 4. Rotate the TIMER/WEIGHT knob to adjust the hour. 5. Check the display: Important: 1. APPLIANCE OVERVIEW & BEFORE FIRST USE CONTROL PANEL...
Product Manaul
Page 9
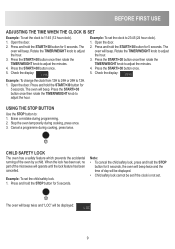
... during cooking, press once. 3. CHILD SAFETY LOCK The oven has a safety feature which prevents the accidental running of day will beep. Open the door. 2. Rotate the TIMER/WEIGHT knob to adjust the hour. 3. Press the START/+30 button once then rotate the TIMER/WEIGHT knob to : 1. USING THE STOP BUTTON Use the STOP button to adjust the minutes. 4. When the lock has been set, no part of the microwave will be set if the clock...
... during cooking, press once. 3. CHILD SAFETY LOCK The oven has a safety feature which prevents the accidental running of day will beep. Open the door. 2. Rotate the TIMER/WEIGHT knob to adjust the hour. 3. Press the START/+30 button once then rotate the TIMER/WEIGHT knob to : 1. USING THE STOP BUTTON Use the STOP button to adjust the minutes. 4. When the lock has been set, no part of the microwave will be set if the clock...
Product Manaul
Page 10
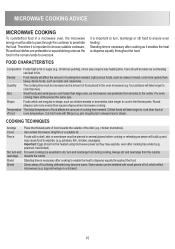
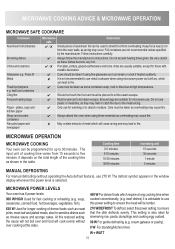
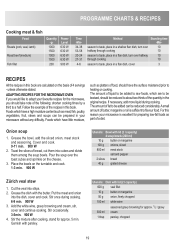
... cause food to overcook. Cover Use vented microwave cling film or a suitable lid. Warm areas can penetrate from the outside rearrange towards the outside of cooking time needed . four potatoes will affect the amount of the dish (e.g. poached, hard boiled). Always stir and rearrange from all the pieces the same size. legs and wings on a chicken). 10 MICROWAVE COOKING ADVICE MICROWAVE COOKING To cook/defrost food in the oven...
... cause food to overcook. Cover Use vented microwave cling film or a suitable lid. Warm areas can penetrate from the outside rearrange towards the outside of cooking time needed . four potatoes will affect the amount of the dish (e.g. poached, hard boiled). Always stir and rearrange from all the pieces the same size. legs and wings on a chicken). 10 MICROWAVE COOKING ADVICE MICROWAVE COOKING To cook/defrost food in the oven...
Product Manaul
Page 11
... exceed heating times given. Care should be programmed for those with metallic decoration. Must be taken as shown in the window display whenever the power level is also ideal for sensitive dishes such as arcing may cause fire. cream gateaux or pastry). 0 W For standing/kitchen timer. Care must be pierced to fire. W = WATT 11 Care must be used to shield food from the oven walls, as...
... exceed heating times given. Care should be programmed for those with metallic decoration. Must be taken as shown in the window display whenever the power level is also ideal for sensitive dishes such as arcing may cause fire. cream gateaux or pastry). 0 W For standing/kitchen timer. Care must be pierced to fire. W = WATT 11 Care must be used to shield food from the oven walls, as...
Product Manaul
Page 12
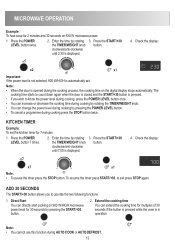
... during cooking press the STOP button twice. Direct Start You can extend the cooking time for 30 seconds by pressing the POWER LEVEL button. • To cancel a programme during AUTO COOK or AUTO DEFROST. 12 Press the START/+30 the TIMER/WEIGHT knob button. Extend the cooking time You can directly start cooking on the digital display stops automatically. Check the display: x7 x1 Note: • To pause the timer press the STOP button. KITCHEN TIMER Example: To set . MICROWAVE OPERATION Example: To heat soup...
... during cooking press the STOP button twice. Direct Start You can extend the cooking time for 30 seconds by pressing the POWER LEVEL button. • To cancel a programme during AUTO COOK or AUTO DEFROST. 12 Press the START/+30 the TIMER/WEIGHT knob button. Extend the cooking time You can directly start cooking on the digital display stops automatically. Check the display: x7 x1 Note: • To pause the timer press the STOP button. KITCHEN TIMER Example: To set . MICROWAVE OPERATION Example: To heat soup...
Product Manaul
Page 13
... boiled potatoes softer, use MINUS . Turn the TIMER/WEIGHT 3. Press the POWER LEVEL 4. Press the START/+30 by pressing the AUTO knob until 0.3 is displayed. Example: To cook: 5 minutes on 900 W power 16 minutes on 270 W. 13 Check the display: TIMER/WEIGHT knob clockwise until 16.00 is displayed. 3. Press the POWER LEVEL button 4 times. 2. COOK button twice. If you prefer boiled potatoes which are cooked but still firm, use PLUS . Enter the...
... boiled potatoes softer, use MINUS . Turn the TIMER/WEIGHT 3. Press the POWER LEVEL 4. Press the START/+30 by pressing the AUTO knob until 0.3 is displayed. Example: To cook: 5 minutes on 900 W power 16 minutes on 270 W. 13 Check the display: TIMER/WEIGHT knob clockwise until 16.00 is displayed. 3. Press the POWER LEVEL button 4 times. 2. COOK button twice. If you prefer boiled potatoes which are cooked but still firm, use PLUS . Enter the...
Product Manaul
Page 14
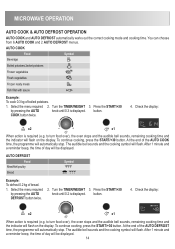
... button. Turn the TIMER/WEIGHT 3. Check the display: x2 x1 When action is required (e.g. At the end of boiled potatoes. 1. MICROWAVE OPERATION AUTO COOK & AUTO DEFROST OPERATION AUTO COOK and AUTO DEFROST automatically works out the correct cooking mode and cooking time. You can choose from 6 AUTO COOK and 2 AUTO DEFROST menus. COOK button twice. 4. Check the display: x2 x1 When action is required (e.g. AUTO DEFROST Food Meat/fish/poultry Bread Symbol Example: To defrost 0.2 kg of day will automatically stop . Press the START...
... button. Turn the TIMER/WEIGHT 3. Check the display: x2 x1 When action is required (e.g. At the end of boiled potatoes. 1. MICROWAVE OPERATION AUTO COOK & AUTO DEFROST OPERATION AUTO COOK and AUTO DEFROST automatically works out the correct cooking mode and cooking time. You can choose from 6 AUTO COOK and 2 AUTO DEFROST menus. COOK button twice. 4. Check the display: x2 x1 When action is required (e.g. AUTO DEFROST Food Meat/fish/poultry Bread Symbol Example: To defrost 0.2 kg of day will automatically stop . Press the START...
Product Manaul
Page 16
... aluminium foil. • After desfrosting, wrap in the Auto cook & defrost charts, use manual operation. • The final temperature will flash on the display. To continue cooking, press the START/+30 button. • After microwave mode the cooling fan may come on the turntable. • When the audible bell sounds, turn food over , rearrange and x2 remove defrosted slices. • After defrosting cover in one layer. 2. Steaks and chops should be...
... aluminium foil. • After desfrosting, wrap in the Auto cook & defrost charts, use manual operation. • The final temperature will flash on the display. To continue cooking, press the START/+30 button. • After microwave mode the cooling fan may come on the turntable. • When the audible bell sounds, turn food over , rearrange and x2 remove defrosted slices. • After defrosting cover in one layer. 2. Steaks and chops should be...
Product Manaul
Page 19
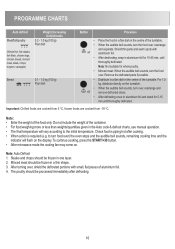
... & RECIPES Cooking meat & fish Food Roasts (pork, veal, lamb) Roast beef (medium) Fish fillet Quantity -g- 1000 1500 1000 1500 200 Power Level 630 W 630 W 630 W 630 W 900 W Time -Min- 34-38 53-58 20-24 27-31 4-6 Method Standing time -Min- Cut the veal into the dish, cover and cook. Stir once during cooking. Utensils: Dish with parsley. Cover and cook. 9-11...
... & RECIPES Cooking meat & fish Food Roasts (pork, veal, lamb) Roast beef (medium) Fish fillet Quantity -g- 1000 1500 1000 1500 200 Power Level 630 W 630 W 630 W 630 W 900 W Time -Min- 34-38 53-58 20-24 27-31 4-6 Method Standing time -Min- Cut the veal into the dish, cover and cook. Stir once during cooking. Utensils: Dish with parsley. Cover and cook. 9-11...
Product Manaul
Page 23
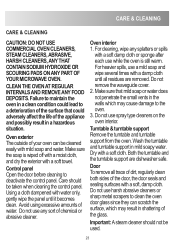
... oven in a hazardous remove the waveguide cover. 2. Turntable & turntable support Oven exterior The outside of your oven can scratch the surface, which may result in shattering of the appliance and possibly result in a clean condition could adversely affect the life of the glass. Remove the turntable and turntable support from the oven. Control panel Open the door before cleaning to a deterioration of the door, the door seals and sealing surfaces with a damp cloth YOUR MICROWAVE OVEN...
... oven in a hazardous remove the waveguide cover. 2. Turntable & turntable support Oven exterior The outside of your oven can scratch the surface, which may result in shattering of the appliance and possibly result in a clean condition could adversely affect the life of the glass. Remove the turntable and turntable support from the oven. Control panel Open the door before cleaning to a deterioration of the door, the door seals and sealing surfaces with a damp cloth YOUR MICROWAVE OVEN...
Product Manaul
Page 24
.../32/EC. The door is nothing in domestic establishments. ** Internal capacity is correctly connected to heat through and cook • than usual, rotate or turn from the fuse box. Set a longer cooking time (double quantity = nearly double time) or If the food is classified as group 2 class B equipment. The interior light bulb can be used in the well beneath the turntable. This oven complies with this...
.../32/EC. The door is nothing in domestic establishments. ** Internal capacity is correctly connected to heat through and cook • than usual, rotate or turn from the fuse box. Set a longer cooking time (double quantity = nearly double time) or If the food is classified as group 2 class B equipment. The interior light bulb can be used in the well beneath the turntable. This oven complies with this...
Product Manaul
Page 25
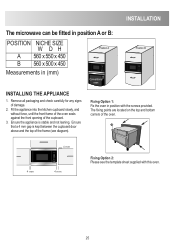
... frame of the oven seals against the front opening of damage. 2. The fixing points are located on the top and bottom corners of the frame (see the template sheet supplied with the screws provided. Fixing Option 1: Fix the oven in (mm) Position A Conventional oven Position B D INSTALLING THE APPLIANCE 1. INSTALLATION The microwave can be fitted in position A or B: POSITION NICHE SIZE W DH A 560...
... frame of the oven seals against the front opening of damage. 2. The fixing points are located on the top and bottom corners of the frame (see the template sheet supplied with the screws provided. Fixing Option 1: Fix the oven in (mm) Position A Conventional oven Position B D INSTALLING THE APPLIANCE 1. INSTALLATION The microwave can be fitted in position A or B: POSITION NICHE SIZE W DH A 560...
Product Manaul
Page 26
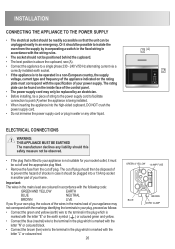
... may only be replaced by incorporating a switch in the fixed wiring in (A) accordance with the specification of your home. The rating plate can be unplugged easily in an emergency. The cut off and the appropriate plug fitted. • Remove the fuse from the supply by an electrician. • Before installing, tie a piece of string to the power supply cord to facilitate...
... may only be replaced by incorporating a switch in the fixed wiring in (A) accordance with the specification of your home. The rating plate can be unplugged easily in an emergency. The cut off and the appropriate plug fitted. • Remove the fuse from the supply by an electrician. • Before installing, tie a piece of string to the power supply cord to facilitate...
Product Manaul
Page 27
...to your household waste disposal service or the shop where you will help prevent potential negative consequences for the recycling of suffocation. ENVIRONMENTAL INFORMATION Ecologically responsible disposal of packaging materials and old appliances Packaging materials ZANUSSI microwave ovens require ...parts are marked as household waste. Packaging should be taken to the appropriate collection point for the environment and human health, which could otherwise be caused by removing the plug, and cutting off and disposing of the power cable. packaging straps By using and re-using...
...to your household waste disposal service or the shop where you will help prevent potential negative consequences for the recycling of suffocation. ENVIRONMENTAL INFORMATION Ecologically responsible disposal of packaging materials and old appliances Packaging materials ZANUSSI microwave ovens require ...parts are marked as household waste. Packaging should be taken to the appropriate collection point for the environment and human health, which could otherwise be caused by removing the plug, and cutting off and disposing of the power cable. packaging straps By using and re-using...
Product Manaul
Page 29
..., at our option repair or replace the same FREE OF CHARGE for labour, materials or carriage on the rating plate. • The appliance has been used for normal domestic purposes only, and in accordance with the manufacturer's instructions. • The appliance has not been serviced, maintained, repaired, taken apart or tampered with by any light bulbs or removable parts of glass or plastic...
..., at our option repair or replace the same FREE OF CHARGE for labour, materials or carriage on the rating plate. • The appliance has been used for normal domestic purposes only, and in accordance with the manufacturer's instructions. • The appliance has not been serviced, maintained, repaired, taken apart or tampered with by any light bulbs or removable parts of glass or plastic...


