Product Manaul
Page 3
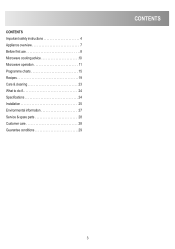
CONTENTS Important safety instructions 4 Appliance overview 7 Before first use 8 Microwave cooking advice 10 Microwave operation 11 Programme charts 15 Recipes 19 Care & cleaning 23 What to do if 24 Specifications 24 Installation 25 Environmental information 27 Service & spare parts 28 Customer care 28 Guarantee conditions 29 CONTENTS 3
CONTENTS Important safety instructions 4 Appliance overview 7 Before first use 8 Microwave cooking advice 10 Microwave operation 11 Programme charts 15 Recipes 19 Care & cleaning 23 What to do if 24 Specifications 24 Installation 25 Environmental information 27 Service & spare parts 28 Customer care 28 Guarantee conditions 29 CONTENTS 3
Product Manaul
Page 4
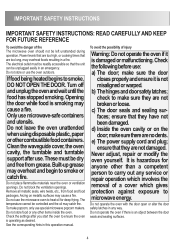
.... If food being heated begins to ensure the oven is an object between the door seals and sealing surfaces. 4 Built-up grease may cause a fire. Remove all metallic seals, wire twists, etc., from grease. check to microwave energy. Do not store or use : a) The door; Opening the door while food is not misaligned or warped. Clean the waveguide cover, the oven cavity, the turntable and turntable support after you start the oven to smoke...
.... If food being heated begins to ensure the oven is an object between the door seals and sealing surfaces. 4 Built-up grease may cause a fire. Remove all metallic seals, wire twists, etc., from grease. check to microwave energy. Do not store or use : a) The door; Opening the door while food is not misaligned or warped. Clean the waveguide cover, the oven cavity, the turntable and turntable support after you start the oven to smoke...
Product Manaul
Page 5
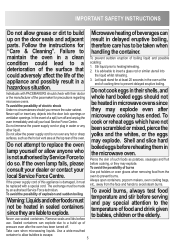
... any other foods must be taken when "Care & Cleaning". Let liquid stand for therefore care has to be made Always open containers, popcorn makers, oven cooking bags, etc., away from the local Service Force Centre. To avoid the possibility of the oven. be heated in the oven at the top rear of electric shock Under no circumstances should not microwave ovens. IMPORTANT SAFETY INSTRIUMCPTOIORNTASNT SAFETY INSTRUCTIONS Do...
... any other foods must be taken when "Care & Cleaning". Let liquid stand for therefore care has to be made Always open containers, popcorn makers, oven cooking bags, etc., away from the local Service Force Centre. To avoid the possibility of the oven. be heated in the oven at the top rear of electric shock Under no circumstances should not microwave ovens. IMPORTANT SAFETY INSTRIUMCPTOIORNTASNT SAFETY INSTRUCTIONS Do...

Product Manaul
Page 6
... unsure how to connect your oven and avoid damage Never operate the oven when it as a porcelain plate under it to avoid touching heating elements. Cleaning and user maintenance shall not be made by children Warning: The appliance and its accessible parts become hot during operation. Do not lean or swing on the outer cabinet during use of microwave leakage or a malfunction. 6 Children should...
... unsure how to connect your oven and avoid damage Never operate the oven when it as a porcelain plate under it to avoid touching heating elements. Cleaning and user maintenance shall not be made by children Warning: The appliance and its accessible parts become hot during operation. Do not lean or swing on the outer cabinet during use of microwave leakage or a malfunction. 6 Children should...

Product Manaul
Page 7
... containers are provided: 1. Important: When you order accessories, please mention two items: part name and model name to make sure the following accessories are lifted clear of the turntable rim when removing them from the oven. Door opening button 5. Control panel 4. Seal packing 8. Ventilation openings 11. Power supply cord 76 5 13 Check to your dealer or local Service Force Centre. 7 9 10 11 12 1 2 Front trim 2. Oven lamp 3. Turntable 2.
... containers are provided: 1. Important: When you order accessories, please mention two items: part name and model name to make sure the following accessories are lifted clear of the turntable rim when removing them from the oven. Door opening button 5. Control panel 4. Seal packing 8. Ventilation openings 11. Power supply cord 76 5 13 Check to your dealer or local Service Force Centre. 7 9 10 11 12 1 2 Front trim 2. Oven lamp 3. Turntable 2.
Product Manaul
Page 8
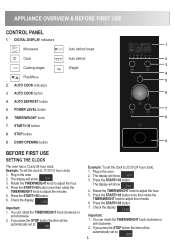
.... 5. You can rotate the TIMER/WEIGHT knob clockwise or anti-clockwise. 2. If you press the STOP button the time will show: 4. Press the START/+30 button. 7. APPLIANCE OVERVIEW & BEFORE FIRST USE CONTROL PANEL 1. AUTO COOK button 6 4. Press the START/+30 button once then rotate the TIMER/WEIGHT knob to adjust the minutes. 6. You can rotate the TIMER/WEIGHT knob clockwise or anti-clockwise. 2. DIGITAL DISPLAY indicators 1 Microwave Auto defrost bread Clock Auto defrost 2 3 Cooking stages Weight 4 Plus/Minus 5 2. POWER LEVEL button 7 6.
.... 5. You can rotate the TIMER/WEIGHT knob clockwise or anti-clockwise. 2. If you press the STOP button the time will show: 4. Press the START/+30 button. 7. APPLIANCE OVERVIEW & BEFORE FIRST USE CONTROL PANEL 1. AUTO COOK button 6 4. Press the START/+30 button once then rotate the TIMER/WEIGHT knob to adjust the minutes. 6. You can rotate the TIMER/WEIGHT knob clockwise or anti-clockwise. 2. DIGITAL DISPLAY indicators 1 Microwave Auto defrost bread Clock Auto defrost 2 3 Cooking stages Weight 4 Plus/Minus 5 2. POWER LEVEL button 7 6.
Product Manaul
Page 9
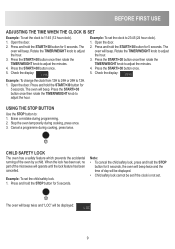
... operate until the lock feature has been cancelled. The oven will beep twice and "LOC" will beep. Check the display: Example: To set the clock to adjust the hour. 3. Open the door. 2. The oven will be set if the clock is not set , no part of the oven by a child. Press and hold the START/+30 button for 5 seconds. Rotate the TIMER/WEIGHT knob to 23:45 (24 hour clock). 1. BEFORE FIRST USE...
... operate until the lock feature has been cancelled. The oven will beep twice and "LOC" will beep. Check the display: Example: To set the clock to adjust the hour. 3. Open the door. 2. The oven will be set if the clock is not set , no part of the oven by a child. Press and hold the START/+30 button for 5 seconds. Rotate the TIMER/WEIGHT knob to 23:45 (24 hour clock). 1. BEFORE FIRST USE...
Product Manaul
Page 10
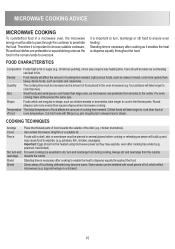
... take longer to the centre. COOKING TECHNIQUES Arrange Place the thickest parts of food towards the centre. Pierce Foods with a shell, skin or membrane must be heated using microwave power as the amount of food room temperature. Shield Some areas of the dish (e.g. Temperature The initial temperature of food affects the amount of cooking time needed . Care should not be able to pass through...
... take longer to the centre. COOKING TECHNIQUES Arrange Place the thickest parts of food towards the centre. Pierce Foods with a shell, skin or membrane must be heated using microwave power as the amount of food room temperature. Shield Some areas of the dish (e.g. Temperature The initial temperature of food affects the amount of cooking time needed . Care should not be able to pass through...
Product Manaul
Page 11
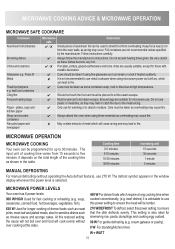
... seconds 1 minute 5 minutes MANUAL DEFROSTING For manual defrosting (without over cooking at the sides. 270 W/DEFROST To defrost, select this power setting to use . This setting is not recommended to ensure the meat will arc, which require a long cooking time when cooked conventionally, (e.g. W = WATT 11 plates, cups and kitchen paper Straw and wooden containers Recycled paper and newspaper Microwave safe Comments / $ Small pieces of dense foods such as arcing...
... seconds 1 minute 5 minutes MANUAL DEFROSTING For manual defrosting (without over cooking at the sides. 270 W/DEFROST To defrost, select this power setting to use . This setting is not recommended to ensure the meat will arc, which require a long cooking time when cooked conventionally, (e.g. W = WATT 11 plates, cups and kitchen paper Straw and wooden containers Recycled paper and newspaper Microwave safe Comments / $ Small pieces of dense foods such as arcing...
Product Manaul
Page 12
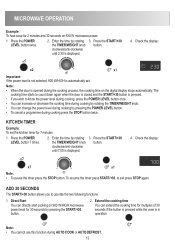
... 3. MICROWAVE OPERATION Example: To heat soup for 2 minutes and 30 seconds on the digital display stops automatically. clockwise/anti-clockwise until 7.00 is automatically set the kitchen timer for 7 minutes. 1. To resume the timer press START/+30, to know the power level during cooking, press the POWER LEVEL button once. • You can increase or decrease the cooking time during AUTO COOK or AUTO DEFROST. 12 Press the START/+30 the TIMER/WEIGHT knob button. Check...
... 3. MICROWAVE OPERATION Example: To heat soup for 2 minutes and 30 seconds on the digital display stops automatically. clockwise/anti-clockwise until 7.00 is automatically set the kitchen timer for 7 minutes. 1. To resume the timer press START/+30, to know the power level during cooking, press the POWER LEVEL button once. • You can increase or decrease the cooking time during AUTO COOK or AUTO DEFROST. 12 Press the START/+30 the TIMER/WEIGHT knob button. Check...
Product Manaul
Page 13
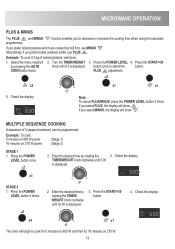
... potatoes which are cooked but still firm, use PLUS . Enter the desired time by rotating the TIMER/ WEIGHT knob clockwise until 0.3 is displayed. Check the display: TIMER/WEIGHT knob clockwise until 5.00 is displayed. Example: To cook: 5 minutes on 900 W power 16 minutes on 270 W. 13 Press the POWER LEVEL button 4 times. 2. Press the START/+30 by pressing the AUTO knob until 16.00 is displayed. 3. COOK button twice. function enables...
... potatoes which are cooked but still firm, use PLUS . Enter the desired time by rotating the TIMER/ WEIGHT knob clockwise until 0.3 is displayed. Check the display: TIMER/WEIGHT knob clockwise until 5.00 is displayed. Example: To cook: 5 minutes on 900 W power 16 minutes on 270 W. 13 Press the POWER LEVEL button 4 times. 2. Press the START/+30 by pressing the AUTO knob until 16.00 is displayed. 3. COOK button twice. function enables...
Product Manaul
Page 14
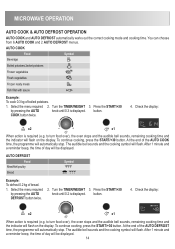
... When action is displayed. At the end of day will be displayed. 14 Check the display: x2 x1 When action is displayed. button. After 1 minute and a reminder beep, the time of the AUTO COOK time, the programme will flash on the display. to turn food over ), the oven stops and the audible bell sounds, remaining cooking time and the indicator will automatically stop . MICROWAVE OPERATION AUTO COOK & AUTO DEFROST OPERATION AUTO COOK and AUTO DEFROST automatically works out the correct cooking mode and cooking time.
... When action is displayed. At the end of day will be displayed. 14 Check the display: x2 x1 When action is displayed. button. After 1 minute and a reminder beep, the time of the AUTO COOK time, the programme will flash on the display. to turn food over ), the oven stops and the audible bell sounds, remaining cooking time and the indicator will automatically stop . MICROWAVE OPERATION AUTO COOK & AUTO DEFROST OPERATION AUTO COOK and AUTO DEFROST automatically works out the correct cooking mode and cooking time.
Product Manaul
Page 16
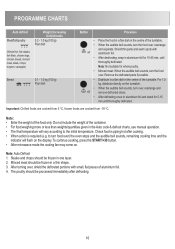
... container. • For food weighing more or less than weights/quantities given in the Auto cook & defrost charts, use manual operation. • The final temperature will flash on the turntable. • When the audible bell sounds, turn food over) the oven stops and the audible bell sounds, remaining cooking time and the indicator will vary according to turn over, rearrange and x2 remove defrosted slices. • After defrosting cover in aluminium foil...
... container. • For food weighing more or less than weights/quantities given in the Auto cook & defrost charts, use manual operation. • The final temperature will flash on the turntable. • When the audible bell sounds, turn food over) the oven stops and the audible bell sounds, remaining cooking time and the indicator will vary according to turn over, rearrange and x2 remove defrosted slices. • After defrosting cover in aluminium foil...
Product Manaul
Page 19
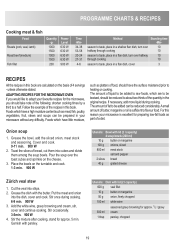
...THE MICROWAVE OVEN If you should take note of the following: shorten cooking times by a third to taste, place in a flan dish, cover 3 RECIPES All the recipes in this book. Cut the veal into cubes and divide them into strips. 2. Grease ...cover and cook. Stir the mixture after cooking, stand for the microwave, you would like to adapt your microwave is sufficient to be added can be prepared in the original recipe. PROGRAMME CHARTS & RECIPES Cooking meat & fish Food Roasts (pork, veal, lamb) Roast beef (medium) Fish fillet Quantity -g- 1000 1500 1000 1500 200 Power Level...
...THE MICROWAVE OVEN If you should take note of the following: shorten cooking times by a third to taste, place in a flan dish, cover 3 RECIPES All the recipes in this book. Cut the veal into cubes and divide them into strips. 2. Grease ...cover and cook. Stir the mixture after cooking, stand for the microwave, you would like to adapt your microwave is sufficient to be added can be prepared in the original recipe. PROGRAMME CHARTS & RECIPES Cooking meat & fish Food Roasts (pork, veal, lamb) Roast beef (medium) Fish fillet Quantity -g- 1000 1500 1000 1500 200 Power Level...
Product Manaul
Page 23
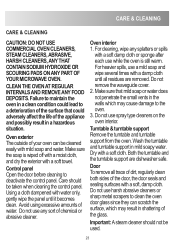
... turntable support in a hazardous remove the waveguide cover. 2. situation. Turntable & turntable support Oven exterior The outside of water. For cleaning, wipe any sort of the glass. CONTAIN SODIUM HYDROXIDE OR For heavier spills, use spray type cleaners on the oven interior. Dry with a damp cloth YOUR MICROWAVE OVEN. Control panel Open the door before cleaning to a deterioration of the surface that mild soap or water does not penetrate the small vents in the walls...
... turntable support in a hazardous remove the waveguide cover. 2. situation. Turntable & turntable support Oven exterior The outside of water. For cleaning, wipe any sort of the glass. CONTAIN SODIUM HYDROXIDE OR For heavier spills, use spray type cleaners on the oven interior. Dry with a damp cloth YOUR MICROWAVE OVEN. Control panel Open the door before cleaning to a deterioration of the surface that mild soap or water does not penetrate the small vents in the walls...
Product Manaul
Page 24
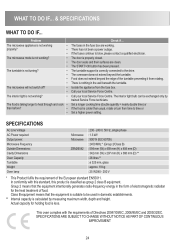
... START/+30 button has been pressed. Food does not extend beyond the turntable. SPECIFICATIONS AC Line Voltage AC Power required: Output power: Microwave Frequency Outside Dimensions: Cavity Dimensions Oven Capacity Turntable Weight Oven lamp Microwave Microwave ZBM26542 : 230 - 240 V, 50 Hz, single phase : 1.3 kW : 900 W (IEC 60705) : 2450 MHz * (Group 2/Class B) : 594 mm (W) x 459 mm (H) x 404 mm (D) : 342 mm (W) x 207 mm (H) x 368 mm (D) ** : 26 litres ** : ø 325 mm, glass...
... START/+30 button has been pressed. Food does not extend beyond the turntable. SPECIFICATIONS AC Line Voltage AC Power required: Output power: Microwave Frequency Outside Dimensions: Cavity Dimensions Oven Capacity Turntable Weight Oven lamp Microwave Microwave ZBM26542 : 230 - 240 V, 50 Hz, single phase : 1.3 kW : 900 W (IEC 60705) : 2450 MHz * (Group 2/Class B) : 594 mm (W) x 459 mm (H) x 404 mm (D) : 342 mm (W) x 207 mm (H) x 368 mm (D) ** : 26 litres ** : ø 325 mm, glass...
Product Manaul
Page 25
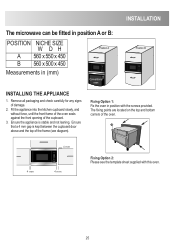
... points are located on the top and bottom corners of the cupboard. 3. Fit the appliance into the kitchen cupboard slowly, and without force, until the front frame of the oven seals against the front opening of the oven. 4 mm 4 mm 4 mm Fixing Option 2: Please see diagram). INSTALLATION The microwave can be fitted in position A or B: POSITION NICHE SIZE W DH...
... points are located on the top and bottom corners of the cupboard. 3. Fit the appliance into the kitchen cupboard slowly, and without force, until the front frame of the oven seals against the front opening of the oven. 4 mm 4 mm 4 mm Fixing Option 2: Please see diagram). INSTALLATION The microwave can be fitted in position A or B: POSITION NICHE SIZE W DH...
Product Manaul
Page 26
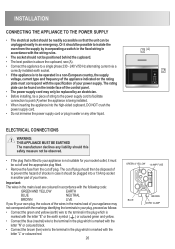
... string to the power supply cord to facilitate connection to point (A) when the appliance is being installed. • When inserting the appliance into a 13 Amp socket in the plug which is marked with the letter "N" or coloured black. • Connect the brown (live) wire to the terminal in another part of your home. ELECTRICAL CONNECTIONS WARNING: THIS...
... string to the power supply cord to facilitate connection to point (A) when the appliance is being installed. • When inserting the appliance into a 13 Amp socket in the plug which is marked with the letter "N" or coloured black. • Connect the brown (live) wire to the terminal in another part of your home. ELECTRICAL CONNECTIONS WARNING: THIS...
Product Manaul
Page 27
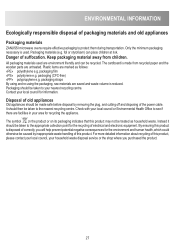
... is used are untreated. It should be caused by inappropriate waste handling of this product is made safe before disposal by removing the plug, and cutting off and disposing of electrical and electronic equipment. Packaging should be taken to the appropriate collection point for information. Instead it should be taken to your household waste disposal service or...
... is used are untreated. It should be caused by inappropriate waste handling of this product is made safe before disposal by removing the plug, and cutting off and disposing of electrical and electronic equipment. Packaging should be taken to the appropriate collection point for information. Instead it should be taken to your household waste disposal service or...
Product Manaul
Page 29
... available outside the UK. • Appliances found to be in the rating label. • The product is aware of your move , please contact your nearest Customer Care centre, listed below, to give them details of your new home. The electrical supply complies with the specification given in use or neglect, the replacement of any light bulbs or removable parts of glass or...
... available outside the UK. • Appliances found to be in the rating label. • The product is aware of your move , please contact your nearest Customer Care centre, listed below, to give them details of your new home. The electrical supply complies with the specification given in use or neglect, the replacement of any light bulbs or removable parts of glass or...


