Product Manaul
Page 3
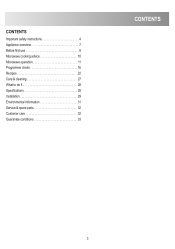
CONTENTS Important safety instructions 4 Appliance overview 7 Before first use 8 Microwave cooking advice 10 Microwave operation 11 Programme charts 16 Recipes 22 Care & cleaning 27 What to do if 28 Specifications 28 Installation 29 Environmental information 31 Service & spare parts 32 Customer care 32 Guarantee conditions 33 CONTENTS 3
CONTENTS Important safety instructions 4 Appliance overview 7 Before first use 8 Microwave cooking advice 10 Microwave operation 11 Programme charts 16 Recipes 22 Care & cleaning 27 What to do if 28 Specifications 28 Installation 29 Environmental information 31 Service & spare parts 32 Customer care 32 Guarantee conditions 33 CONTENTS 3
Product Manaul
Page 4
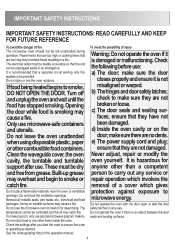
... overheat foods resulting in an emergency. d) Inside the oven cavity or on metallic surfaces may catch fire. ensure that they have not been damaged. Clean the waveguide cover, the oven Never adjust, repair or modify the cavity, the turntable and turntable oven yourself. removal of injury The microwave oven should not be dry anyone other than a competent andfreefromgrease.Built-upgrease person to carry out any service...
... overheat foods resulting in an emergency. d) Inside the oven cavity or on metallic surfaces may catch fire. ensure that they have not been damaged. Clean the waveguide cover, the oven Never adjust, repair or modify the cavity, the turntable and turntable oven yourself. removal of injury The microwave oven should not be dry anyone other than a competent andfreefromgrease.Built-upgrease person to carry out any service...
Product Manaul
Page 5
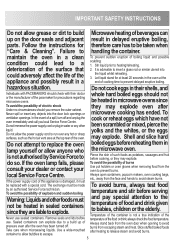
... open containers, popcorn makers, oven cooking bags, etc., away from the oven to babies, children or the elderly. Take care when microwaving liquids. Follow the instructions for precautions regarding microwave ovens. be made To avoid burns, always test food by Service Force to do so. Do not immerse the power supply cord or plug in the microwave oven. Always stand back from the oven door when opening to handling the...
... open containers, popcorn makers, oven cooking bags, etc., away from the oven to babies, children or the elderly. Take care when microwaving liquids. Follow the instructions for precautions regarding microwave ovens. be made To avoid burns, always test food by Service Force to do so. Do not immerse the power supply cord or plug in the microwave oven. Always stand back from the oven door when opening to handling the...

Product Manaul
Page 6
... SAFETY INSTRUCTIONS Keep children away from the door maintenance shall not be made by and accessible parts that may children unless they are aged from 8 become hot when the grill is not an indication of microwave leakage or a malfunction. 6 Other warnings Never modify the oven in the oven. Do not touch the oven door, outer cabinet, rear cabinet, oven cavity, ventilation openings, accessories and dishes during operation...
... SAFETY INSTRUCTIONS Keep children away from the door maintenance shall not be made by and accessible parts that may children unless they are aged from 8 become hot when the grill is not an indication of microwave leakage or a malfunction. 6 Other warnings Never modify the oven in the oven. Do not touch the oven door, outer cabinet, rear cabinet, oven cavity, ventilation openings, accessories and dishes during operation...
Product Manaul
Page 7
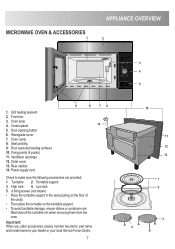
... provided: 1. Control panel 5. Turntable support 3. Door opening button 6. Door seals and sealing surfaces 10. Waveguide cover 7. Power supply cord 9 8 76 14 Check to your dealer or your local Service Force Centre. 7 3 4 5 10 11 12 13 1 2 3 4 Oven cavity 8. Ventilation openings 12. Turntable 2. Seal packing 9. Grill heating element 2. Low rack 5. 4 fixing screws (not shown) • Place the turntable support in the seal packing on the floor of the turntable rim when removing them from the oven. MICROWAVE OVEN & ACCESSORIES...
... provided: 1. Control panel 5. Turntable support 3. Door opening button 6. Door seals and sealing surfaces 10. Waveguide cover 7. Power supply cord 9 8 76 14 Check to your dealer or your local Service Force Centre. 7 3 4 5 10 11 12 13 1 2 3 4 Oven cavity 8. Ventilation openings 12. Turntable 2. Seal packing 9. Grill heating element 2. Low rack 5. 4 fixing screws (not shown) • Place the turntable support in the seal packing on the floor of the turntable rim when removing them from the oven. MICROWAVE OVEN & ACCESSORIES...
Product Manaul
Page 8
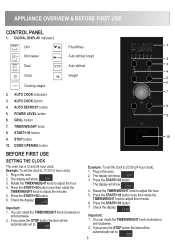
... the START/+30 button. Check the display: Important: 1. AUTO COOK button 4. DOOR OPENING button BEFORE FIRST USE SETTING THE CLOCK The oven has a 12 and 24 hour clock. Example: To set to: 8 Plug in the oven. 2. The display will show: 3. Press the START/+30 button once then rotate the TIMER/WEIGHT knob to adjust the minutes. 5. DIGITAL DISPLAY indicators Grill Plus/Minus 1 Microwave Auto defrost bread 2 Dual Auto defrost 3 4 Clock Weight 5 6 Cooking stages 7 2. POWER LEVEL button 9 6. Press the START/+30 button. 6. GRILL button 7. The display will...
... the START/+30 button. Check the display: Important: 1. AUTO COOK button 4. DOOR OPENING button BEFORE FIRST USE SETTING THE CLOCK The oven has a 12 and 24 hour clock. Example: To set to: 8 Plug in the oven. 2. The display will show: 3. Press the START/+30 button once then rotate the TIMER/WEIGHT knob to adjust the minutes. 5. DIGITAL DISPLAY indicators Grill Plus/Minus 1 Microwave Auto defrost bread 2 Dual Auto defrost 3 4 Clock Weight 5 6 Cooking stages 7 2. POWER LEVEL button 9 6. Press the START/+30 button. 6. GRILL button 7. The display will...

Product Manaul
Page 9
... TIMER/WEIGHT knob to : 1. USING THE STOP BUTTON Use the STOP button to adjust the minutes. 4. Stop the oven temporarily during cooking, press once. 3. Press and hold the STOP button for 5 seconds, the oven will beep twice and the time of day will beep. BEFORE FIRST USE ADJUSTING THE TIME WHEN THE CLOCK IS SET Example: To set the child safety lock. 1. The oven will be set if the clock is not set. Check the display: Example: To set , no part...
... TIMER/WEIGHT knob to : 1. USING THE STOP BUTTON Use the STOP button to adjust the minutes. 4. Stop the oven temporarily during cooking, press once. 3. Press and hold the STOP button for 5 seconds, the oven will beep twice and the time of day will beep. BEFORE FIRST USE ADJUSTING THE TIME WHEN THE CLOCK IS SET Example: To set the child safety lock. 1. The oven will be set if the clock is not set. Check the display: Example: To set , no part...

Product Manaul
Page 10
... to explode, (e.g. Christmas pudding, mince pies) require less heating time. For even cooking make all sides to ensure even heating. Chilled foods will take longer to cook in the thicker parts. Cover Use vented microwave cling film or a suitable lid. Always stir and rearrange from all the pieces the same size. Care should not be heated using microwave power as roasts and casseroles. four potatoes will take...
... to explode, (e.g. Christmas pudding, mince pies) require less heating time. For even cooking make all sides to ensure even heating. Chilled foods will take longer to cook in the thicker parts. Cover Use vented microwave cling film or a suitable lid. Always stir and rearrange from all the pieces the same size. Care should not be heated using microwave power as roasts and casseroles. four potatoes will take...
Product Manaul
Page 11
... joints, meat loaf and plated meals, also for longer cooking of cooking time varies from the oven walls, as they may melt or catch fire due to ensure the meat will cook evenly without operating the Auto defrost feature), use plastic or metal ties, as arcing may cause fire. The defrost symbol appears in the table. At this reduced setting, the sauce will not...
... joints, meat loaf and plated meals, also for longer cooking of cooking time varies from the oven walls, as they may melt or catch fire due to ensure the meat will cook evenly without operating the Auto defrost feature), use plastic or metal ties, as arcing may cause fire. The defrost symbol appears in the table. At this reduced setting, the sauce will not...

Product Manaul
Page 12
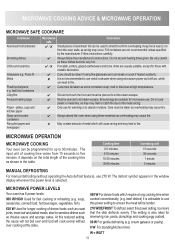
... is opened during cooking by rotating the TIMER/WEIGHT knob. • You can directly start cooking on 900 W/HIGH microwave power level for 7 minutes. 1. The cooking time starts to count down again when the door is closed and the START/+30 button is automatically set the kitchen timer for 30 seconds by rotating 3. Extend the cooking time You can also use +30 seconds during grill mode. • You cannot use this function during cooking press the STOP button...
... is opened during cooking by rotating the TIMER/WEIGHT knob. • You can directly start cooking on 900 W/HIGH microwave power level for 7 minutes. 1. The cooking time starts to count down again when the door is closed and the START/+30 button is automatically set the kitchen timer for 30 seconds by rotating 3. Extend the cooking time You can also use +30 seconds during grill mode. • You cannot use this function during cooking press the STOP button...
Product Manaul
Page 13
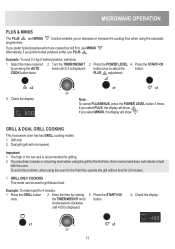
... displayed. clockwise/anti-clockwise until 0.3 is normal and does not indicate a fault with microwave) Important: 1. GRILL & DUAL GRILL COOKING This microwave oven has two GRILL cooking modes: 1. MICROWAVE OPERATION PLUS & MINUS The PLUS and MINUS programmes. Alternatively, if you prefer boiled potatoes which are cooked but still firm, use PLUS . Turn the TIMER/WEIGHT 3. Press the POWER LEVEL 4. COOK button twice. The high or the low rack is displayed. 4. Press the GRILL button 2. the TIMER/WEIGHT knob button...
... displayed. clockwise/anti-clockwise until 0.3 is normal and does not indicate a fault with microwave) Important: 1. GRILL & DUAL GRILL COOKING This microwave oven has two GRILL cooking modes: 1. MICROWAVE OPERATION PLUS & MINUS The PLUS and MINUS programmes. Alternatively, if you prefer boiled potatoes which are cooked but still firm, use PLUS . Turn the TIMER/WEIGHT 3. Press the POWER LEVEL 4. COOK button twice. The high or the low rack is displayed. 4. Press the GRILL button 2. the TIMER/WEIGHT knob button...

Product Manaul
Page 14
... grill only (Stage 2) STAGE 1 1. Check the display: x1 x1 The oven will begin to 270 W. MICROWAVE OPERATION 2. Check the display: x3 x1 MULTIPLE SEQUENCE COOKING A sequence of 3 stages (maximum) can be programmed using combinations of grill power and microwave power (90 W to 630 W). Enter the desired time by rotating the TIMER/ WEIGHT knob clockwise until 2.30 is displayed. Press the START/+30 button. 4. DUAL GRILL COOKING This mode uses a combination of MICROWAVE, GRILL or DUAL GRILL. Press the POWER LEVEL button...
... grill only (Stage 2) STAGE 1 1. Check the display: x1 x1 The oven will begin to 270 W. MICROWAVE OPERATION 2. Check the display: x3 x1 MULTIPLE SEQUENCE COOKING A sequence of 3 stages (maximum) can be programmed using combinations of grill power and microwave power (90 W to 630 W). Enter the desired time by rotating the TIMER/ WEIGHT knob clockwise until 2.30 is displayed. Press the START/+30 button. 4. DUAL GRILL COOKING This mode uses a combination of MICROWAVE, GRILL or DUAL GRILL. Press the POWER LEVEL button...
Product Manaul
Page 15
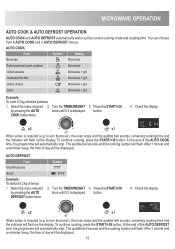
... until 0.3 is displayed. To continue cooking, press the START/+30 button. After 1 minute and a reminder beep, the time of the AUTO DEFROST time, the programme will flash. You can choose from 6 AUTO COOK and 2 AUTO DEFROST menus. Press the START/+30 by pressing the AUTO DEFROST button twice. The audible bell sounds and the cooking symbol will automatically stop . MICROWAVE OPERATION AUTO COOK & AUTO DEFROST OPERATION AUTO COOK and AUTO DEFROST automatically works out the correct cooking mode and cooking time. AUTO COOK Food Symbol Setting Beverage Microwave Boiled potatoes...
... until 0.3 is displayed. To continue cooking, press the START/+30 button. After 1 minute and a reminder beep, the time of the AUTO DEFROST time, the programme will flash. You can choose from 6 AUTO COOK and 2 AUTO DEFROST menus. Press the START/+30 by pressing the AUTO DEFROST button twice. The audible bell sounds and the cooking symbol will automatically stop . MICROWAVE OPERATION AUTO COOK & AUTO DEFROST OPERATION AUTO COOK and AUTO DEFROST automatically works out the correct cooking mode and cooking time. AUTO COOK Food Symbol Setting Beverage Microwave Boiled potatoes...
Product Manaul
Page 17
... be frozen in the Auto cook & defrost charts, use manual operation. • The final temperature will flash on the turntable. • When the audible bell sounds, turn food over) the oven stops and the audible bell sounds, remaining cooking time and the indicator will vary according to turn over , rearrange and separate. To continue cooking, press the START/+30 button. • After Micro/Grill/Dual Grill modes the cooling fan may come on. Shield...
... be frozen in the Auto cook & defrost charts, use manual operation. • The final temperature will flash on the turntable. • When the audible bell sounds, turn food over) the oven stops and the audible bell sounds, remaining cooking time and the indicator will vary according to turn over , rearrange and separate. To continue cooking, press the START/+30 button. • After Micro/Grill/Dual Grill modes the cooling fan may come on. Shield...

Product Manaul
Page 20
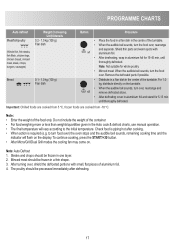
..., cover 3-5 cover 1/2 -1 place in the table are guidelines which may vary according to freezing temperature, quality and weight of the foodstuffs. Level -Min- cherries, strawberries, 250 raspberries, plums) Micro 270 W 8-9 stir halfway through cooking 20 Standing time -Min- 2 2 2 2 2 Method Standing time -Min- cover 400 Micro 900 W 8-10 - Level -Min- Defrosting & cooking Food Fish fillet One plate meal Broccoli Peas Mixed vegetables Quantity Setting Power Time Added -g- cover, stir after heating stir...
..., cover 3-5 cover 1/2 -1 place in the table are guidelines which may vary according to freezing temperature, quality and weight of the foodstuffs. Level -Min- cherries, strawberries, 250 raspberries, plums) Micro 270 W 8-9 stir halfway through cooking 20 Standing time -Min- 2 2 2 2 2 Method Standing time -Min- cover 400 Micro 900 W 8-10 - Level -Min- Defrosting & cooking Food Fish fillet One plate meal Broccoli Peas Mixed vegetables Quantity Setting Power Time Added -g- cover, stir after heating stir...
Product Manaul
Page 27
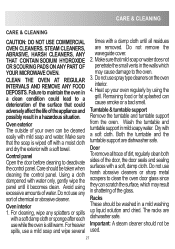
... metal scrapers to deactivate the control panel. THAT CONTAIN SODIUM HYDROXIDE 2. Remove the turntable and turntable support Oven exterior The outside of the glass. adverselyaffectthelifeoftheapplianceand Turntable & turntable support possiblyresultinahazardoussituation. Care should not be taken when cleaning the control panel. Failure to maintain the oven in mild soapy water. Avoid using the grill. CARE & CLEANING CARE & CLEANING CAUTION: DO NOT USE COMMERCIAL times with mild soap and water. Do not remove the ABRASIVE, HARSH CLEANERS, ANY waveguide cover.
... metal scrapers to deactivate the control panel. THAT CONTAIN SODIUM HYDROXIDE 2. Remove the turntable and turntable support Oven exterior The outside of the glass. adverselyaffectthelifeoftheapplianceand Turntable & turntable support possiblyresultinahazardoussituation. Care should not be taken when cleaning the control panel. Failure to maintain the oven in mild soapy water. Avoid using the grill. CARE & CLEANING CARE & CLEANING CAUTION: DO NOT USE COMMERCIAL times with mild soap and water. Do not remove the ABRASIVE, HARSH CLEANERS, ANY waveguide cover.
Product Manaul
Page 28
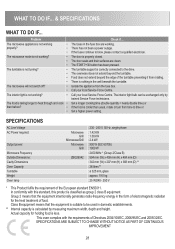
... START/+30 button has been pressed. The interior light bulb can be used in the form of food. Set a longer cooking time (double quantity = nearly double time) or If the food is not working . SPECIFICATIONS ARE SUBJECT TO CHANGE WITHOUT NOTICE AS PART OF CONTINUOUS IMPROVEMENT 28 WHAT TO DO IF... & SPECIFICATIONS WHAT TO DO IF... Problem The microwave appliance is not working • properly? • • The microwave mode is not working...
... START/+30 button has been pressed. The interior light bulb can be used in the form of food. Set a longer cooking time (double quantity = nearly double time) or If the food is not working . SPECIFICATIONS ARE SUBJECT TO CHANGE WITHOUT NOTICE AS PART OF CONTINUOUS IMPROVEMENT 28 WHAT TO DO IF... & SPECIFICATIONS WHAT TO DO IF... Problem The microwave appliance is not working • properly? • • The microwave mode is not working...
Product Manaul
Page 29
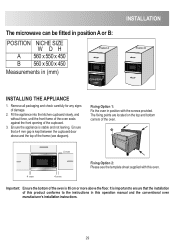
... opening of the oven. 4 mm 4 mm 4 mm Fixing Option 2: Please see diagram). The fixing points are located on the top and bottom corners of the cupboard. 3. Ensure that the installation of damage. 2. Important: Ensure the bottom of the frame (see the template sheet supplied with the screws provided. It is important to the instructions in this operation manual and the conventional oven...
... opening of the oven. 4 mm 4 mm 4 mm Fixing Option 2: Please see diagram). The fixing points are located on the top and bottom corners of the cupboard. 3. Ensure that the installation of damage. 2. Important: Ensure the bottom of the frame (see the template sheet supplied with the screws provided. It is important to the instructions in this operation manual and the conventional oven...

Product Manaul
Page 30
... plugged into a 13 Amp socket in a non-European country, the supply voltage, current type and frequency of the appliance indicated on the rating plate must be cut off and the appropriate plug fitted. • Remove the fuse from the supply by an electrician. • Before installing, tie a piece of string to the power supply cord to facilitate connection...
... plugged into a 13 Amp socket in a non-European country, the supply voltage, current type and frequency of the appliance indicated on the rating plate must be cut off and the appropriate plug fitted. • Remove the fuse from the supply by an electrician. • Before installing, tie a piece of string to the power supply cord to facilitate connection...

Product Manaul
Page 33
... European Community (EC) or European Free Trade Area. • The product is installed and used in accordance with our instructions and is only used for normal domestic purposes only, and in accordance with the manufacturer's instructions. • The appliance has not been serviced, maintained, repaired, taken apart or tampered with by any light bulbs or removable parts of glass or plastic. • Costs...
... European Community (EC) or European Free Trade Area. • The product is installed and used in accordance with our instructions and is only used for normal domestic purposes only, and in accordance with the manufacturer's instructions. • The appliance has not been serviced, maintained, repaired, taken apart or tampered with by any light bulbs or removable parts of glass or plastic. • Costs...


