Owners Manual
Page 5
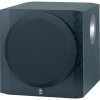
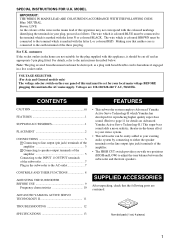
... with the coloured markings identifying the terminals in the subwoofer to your stereo system. • This subwoofer can be set , 4 pieces) 1 VOLTAGE SELECTOR (For Asia and General models only) The voltage selector switch on Advanced Yamaha Active Servo Technology II.) This super-bass sound adds...II which is marked with the letter N or coloured BLACK. CONTROLS AND THEIR FUNCTIONS 8 ADJUSTING THE SUBWOOFER BEFORE USE 9 Frequency characteristics 10 ADVANCED YAMAHA ACTIVE SERVO TECHNOLOGY II 11 SUPPLIED ACCESSORIES After unpacking, check that neither core is hazardous if engaged in ...
... with the coloured markings identifying the terminals in the subwoofer to your stereo system. • This subwoofer can be set , 4 pieces) 1 VOLTAGE SELECTOR (For Asia and General models only) The voltage selector switch on Advanced Yamaha Active Servo Technology II.) This super-bass sound adds...II which is marked with the letter N or coloured BLACK. CONTROLS AND THEIR FUNCTIONS 8 ADJUSTING THE SUBWOOFER BEFORE USE 9 Frequency characteristics 10 ADVANCED YAMAHA ACTIVE SERVO TECHNOLOGY II 11 SUPPLIED ACCESSORIES After unpacking, check that neither core is hazardous if engaged in ...
Owners Manual
Page 11
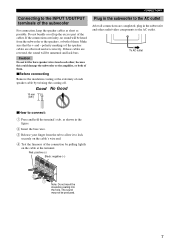
... Connecting to the INPUT 1/OUTPUT terminals of each other audio/video components to lock securely on the cable at the extremity of the subwoofer For connection, keep the speaker cables as short as possible. Caution Do not let the bare speaker wires touch each speaker cable by...bare wire. 3 Release your finger from the subwoofer or the speakers, or both of them . Good No Good 10 mm (3/8") Plug in the subwoofer to connect: 1 Press and hold the terminal's tab, as shown in the subwoofer and other , because this could damage the subwoofer or the amplifier, or both of the connection...
... Connecting to the INPUT 1/OUTPUT terminals of each other audio/video components to lock securely on the cable at the extremity of the subwoofer For connection, keep the speaker cables as short as possible. Caution Do not let the bare speaker wires touch each speaker cable by...bare wire. 3 Release your finger from the subwoofer or the speakers, or both of them . Good No Good 10 mm (3/8") Plug in the subwoofer to connect: 1 Press and hold the terminal's tab, as shown in the subwoofer and other , because this could damage the subwoofer or the amplifier, or both of the connection...
Owners Manual
Page 13
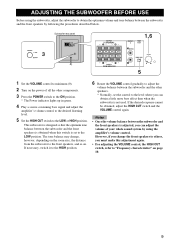
... control, the HIGH CUT switch, refer to "Frequency characteristics" on page 10. 9 ADJUSTING THE SUBWOOFER BEFORE USE Before using the subwoofer, adjust the subwoofer to obtain the optimum volume and tone balance between the subwoofer and the front speakers by following the procedures described below. 3 Subwoofer rear panel OUTPUT TO SPEAKERS INPUT 1 FROM AMPLIFIER INPUT 2 HIGH...
... control, the HIGH CUT switch, refer to "Frequency characteristics" on page 10. 9 ADJUSTING THE SUBWOOFER BEFORE USE Before using the subwoofer, adjust the subwoofer to obtain the optimum volume and tone balance between the subwoofer and the front speakers by following the procedures described below. 3 Subwoofer rear panel OUTPUT TO SPEAKERS INPUT 1 FROM AMPLIFIER INPUT 2 HIGH...
Owners Manual
Page 14
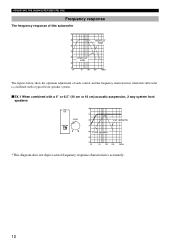
...Frequency response The frequency response of this subwoofer dB 90 HIGH CUT HIGH 80 70 60 HIGH CUT LOW 50 40 20 50 100 200 500Hz The figures below show the optimum adjustment of each control and the frequency characteristics when this subwoofer is combined with a typical front ...speaker system. ■EX.1 When combined with a 4" or 6.5" (10 cm or 16 cm) acoustic suspension, 2 way system front speakers HIGH CUT VOLUME HIGH LOW...
...Frequency response The frequency response of this subwoofer dB 90 HIGH CUT HIGH 80 70 60 HIGH CUT LOW 50 40 20 50 100 200 500Hz The figures below show the optimum adjustment of each control and the frequency characteristics when this subwoofer is combined with a typical front ...speaker system. ■EX.1 When combined with a 4" or 6.5" (10 cm or 16 cm) acoustic suspension, 2 way system front speakers HIGH CUT VOLUME HIGH LOW...


