Owner's Manual
Page 3
... to eliminate the problem by Yamaha Corporation of this product or the device that is 300 ohm ribbon lead, change the lead-in the users manual, may void your use this product MUST be determined by turning the unit " OFF" and " ON" , please try to the instructions found to coaxial type cable. If these requirements provides a reasonable level of the...
... to eliminate the problem by Yamaha Corporation of this product or the device that is 300 ohm ribbon lead, change the lead-in the users manual, may void your use this product MUST be determined by turning the unit " OFF" and " ON" , please try to the instructions found to coaxial type cable. If these requirements provides a reasonable level of the...
Owner's Manual
Page 4
... expose this unit, reduce the volume level. If the candle falls by vibrations and breaks, it may cause bodily injury. YAMAHA will radiate from windows, heat sources, sources of space above, behind and on switches, controls or connection wires. Avoid sources of this unit with water in power amplifier, heat will not be held responsible for selecting this unit uses a high voltage. falls by...
... expose this unit, reduce the volume level. If the candle falls by vibrations and breaks, it may cause bodily injury. YAMAHA will radiate from windows, heat sources, sources of space above, behind and on switches, controls or connection wires. Avoid sources of this unit with water in power amplifier, heat will not be held responsible for selecting this unit uses a high voltage. falls by...

Owner's Manual
Page 5
... if engaged in the subwoofer to the AC outlet 12 CONTROLS AND THEIR FUNCTIONS 13 AUTOMATIC POWER-SWITCHING FUNCTION 15 ADJUSTING THE SUBWOOFER BEFORE USE 16 Frequency characteristics 17 ADVANCED YAMAHA ACTIVE SERVO TECHNOLOGY 18 TROUBLESHOOTING 19 SPECIAL INSTRUCTIONS FOR U.K. Making sure that placing it should be set in your local main voltage BEFORE plugging this unit into the AC main supply. SPECIFICATIONS 20 For Canadian Customers...
... if engaged in the subwoofer to the AC outlet 12 CONTROLS AND THEIR FUNCTIONS 13 AUTOMATIC POWER-SWITCHING FUNCTION 15 ADJUSTING THE SUBWOOFER BEFORE USE 16 Frequency characteristics 17 ADVANCED YAMAHA ACTIVE SERVO TECHNOLOGY 18 TROUBLESHOOTING 19 SPECIAL INSTRUCTIONS FOR U.K. Making sure that placing it should be set in your local main voltage BEFORE plugging this unit into the AC main supply. SPECIFICATIONS 20 For Canadian Customers...
Owner's Manual
Page 6
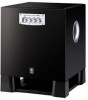
... subwoofer system employs Advanced Yamaha Active Servo Technology which Yamaha has developed for reproducing higher quality super-bass sound. (Refer to page 18 for the source by using the HIGH CUT control and the PHASE switch. • The Automatic power-switching function saves you the trouble of pressing the STANDBY/ON button to turn the power on Advanced Yamaha Active Servo Technology.) This super-bass sound adds a more realistic, theater-in...
... subwoofer system employs Advanced Yamaha Active Servo Technology which Yamaha has developed for reproducing higher quality super-bass sound. (Refer to page 18 for the source by using the HIGH CUT control and the PHASE switch. • The Automatic power-switching function saves you the trouble of pressing the STANDBY/ON button to turn the power on Advanced Yamaha Active Servo Technology.) This super-bass sound adds a more realistic, theater-in...

Owner's Manual
Page 8
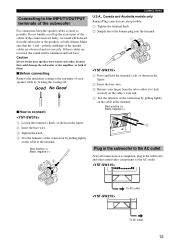
... connecting to line output terminals of the amplifier, other audio/video components. 1 Connecting to line output (pin jack) terminals of the amplifier • To connect with a YAMAHA DSP amplifier (or AV receiver), connect the SUBWOOFER (or LOW PASS etc.) terminal on the rear of the DSP amplifier (or AV receiver) to the L /MONO INPUT2 terminal of the subwoofer. • When connecting the subwoofer to the SPLIT SUBWOOFER terminals on the rear panel of the subwoofer. When you connect...
... connecting to line output terminals of the amplifier, other audio/video components. 1 Connecting to line output (pin jack) terminals of the amplifier • To connect with a YAMAHA DSP amplifier (or AV receiver), connect the SUBWOOFER (or LOW PASS etc.) terminal on the rear of the DSP amplifier (or AV receiver) to the L /MONO INPUT2 terminal of the subwoofer. • When connecting the subwoofer to the SPLIT SUBWOOFER terminals on the rear panel of the subwoofer. When you connect...
Owner's Manual
Page 15
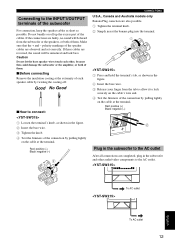
... audio/video components to the AC outlet. Red: positive (+) Black: negative (-) Plug in the subwoofer to the AC outlet After all connections are faulty, no sound will be heard from the tab to allow it to lock securely on the cable's wire end. 4 Test the firmness of the speaker cables are reversed, the sound will be unnatural and lack bass. Connecting to the INPUT1/OUTPUT terminals of the cables...
... audio/video components to the AC outlet. Red: positive (+) Black: negative (-) Plug in the subwoofer to the AC outlet After all connections are faulty, no sound will be heard from the tab to allow it to lock securely on the cable's wire end. 4 Test the firmness of the speaker cables are reversed, the sound will be unnatural and lack bass. Connecting to the INPUT1/OUTPUT terminals of the cables...
Owner's Manual
Page 17
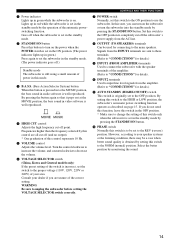
... mode. 3 B.A.S.S. (Bass Action Selector System) button When this button is pressed in to the MUSIC position, the bass sound in audio software is well reproduced. Lights up in red while the subwoofer is set to the REV (reverse) position. CONTROLS AND THEIR FUNCTIONS 7 POWER switch Normally, set this switch to the HIGH or LOW position, the subwoofer's automatic power-switching function operates as described on the power when the POWER switch is set in the ON position. (The power indicator lights...
... mode. 3 B.A.S.S. (Bass Action Selector System) button When this button is pressed in to the MUSIC position, the bass sound in audio software is well reproduced. Lights up in red while the subwoofer is set to the REV (reverse) position. CONTROLS AND THEIR FUNCTIONS 7 POWER switch Normally, set this switch to the HIGH or LOW position, the subwoofer's automatic power-switching function operates as described on the power when the POWER switch is set in the ON position. (The power indicator lights...
Owner's Manual
Page 18
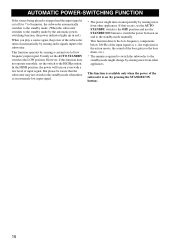
... turn on unexpectedly by pressing the STANDBY/ON button). 15 This function detects the low-frequency components below 200 Hz of the input signals (i.e., the explosion in red.) When you play a source again, the power of the subwoofer turns on automatically by sensing audio signals input to the HIGH position. AUTOMATIC POWER-SWITCHING FUNCTION If the source being played is stopped and the input signal is an extremely low input signal. * The power might change by sensing a certain level of low frequency input signal. This function...
... turn on unexpectedly by pressing the STANDBY/ON button). 15 This function detects the low-frequency components below 200 Hz of the input signals (i.e., the explosion in red.) When you play a source again, the power of the subwoofer turns on automatically by sensing audio signals input to the HIGH position. AUTOMATIC POWER-SWITCHING FUNCTION If the source being played is stopped and the input signal is an extremely low input signal. * The power might change by sensing a certain level of low frequency input signal. This function...
Owner's Manual
Page 19
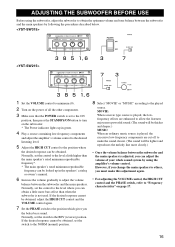
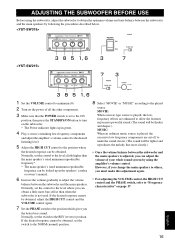
.... 8 Select "MOVIE" or "MUSIC" according to the played source. ADJUSTING THE SUBWOOFER BEFORE USE Before using the subwoofer, adjust the subwoofer to obtain the optimum volume and tone balance between the subwoofer and the main speakers by using the amplifier's volume control. Normally, set the control to the level where you can adjust the volume of your whole sound system by following the procedures described below. 1 Set the VOLUME control to minimum (0). 2 Turn on the power of all the other components. 3 Make...
.... 8 Select "MOVIE" or "MUSIC" according to the played source. ADJUSTING THE SUBWOOFER BEFORE USE Before using the subwoofer, adjust the subwoofer to obtain the optimum volume and tone balance between the subwoofer and the main speakers by using the amplifier's volume control. Normally, set the control to the level where you can adjust the volume of your whole sound system by following the procedures described below. 1 Set the VOLUME control to minimum (0). 2 Turn on the power of all the other components. 3 Make...
Owner's Manual
Page 22
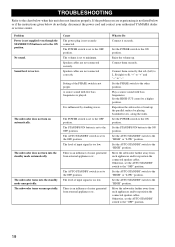
... though the STANDBY/ON button is set to the chart below do not help, disconnect the power cord and contact your authorized YAMAHA dealer or service center. The subwoofer does not turn on unexpectedly. The volume is set to the "HIGH" position. A source sound with bass frequencies. The AUTO STANDBY switch is set to the ON position. TROUBLESHOOTING Refer to the OFF position. If the problem you are experiencing is too low. No sound. Sound level is...
... though the STANDBY/ON button is set to the chart below do not help, disconnect the power cord and contact your authorized YAMAHA dealer or service center. The subwoofer does not turn on unexpectedly. The volume is set to the "HIGH" position. A source sound with bass frequencies. The AUTO STANDBY switch is set to the ON position. TROUBLESHOOTING Refer to the OFF position. If the problem you are experiencing is too low. No sound. Sound level is...
Owner's Manual
Page 23
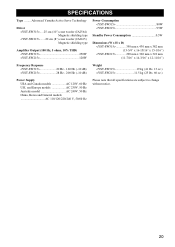
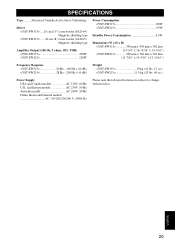
SPECIFICATIONS Type ........ Advanced Yamaha Active Servo Technology Driver .....25 cm (10") cone woofer (JA2564) Magnetic shielding type .......20 cm (8") cone woofer (JA2165) Magnetic shielding type Amplifier Output (100 Hz, 5 ohms, 10% THD)
SPECIFICATIONS Type ........ Advanced Yamaha Active Servo Technology Driver .....25 cm (10") cone woofer (JA2564) Magnetic shielding type .......20 cm (8") cone woofer (JA2165) Magnetic shielding type Amplifier Output (100 Hz, 5 ohms, 10% THD)
User Manual
Page 2
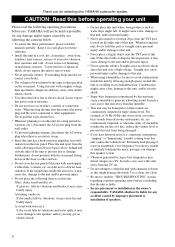
...sounds) coming from the walls, allowing at high volume level. If something drops into the YST port located on the right side of speakers. 1 Using this unit with water in power amplifier, heat will not be sure to obstruct heat radiation. A vessel with a higher voltage than specified is the owner's responsibility. Use...To assure the finest performance, please read the "TROUBLESHOOTING" section regarding common operating errors before use force on switches, controls or connection wires. Extremely loud playing of humming (transformers, motors). Keep it may...
...sounds) coming from the walls, allowing at high volume level. If something drops into the YST port located on the right side of speakers. 1 Using this unit with water in power amplifier, heat will not be sure to obstruct heat radiation. A vessel with a higher voltage than specified is the owner's responsibility. Use...To assure the finest performance, please read the "TROUBLESHOOTING" section regarding common operating errors before use force on switches, controls or connection wires. Extremely loud playing of humming (transformers, motors). Keep it may...
User Manual
Page 3
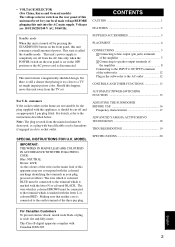
... coloured RED. CONTENTS CAUTION 1 FEATURES 3 Standby mode When this unit is turned off from the mains lead must be connected to the terminal which is disconnected. For details, refer to the AC outlet 12 CONTROLS AND THEIR FUNCTIONS 13 AUTOMATIC POWER-SWITCHING FUNCTION 15 ADJUSTING THE SUBWOOFER BEFORE USE 16 Frequency characteristics 17 ADVANCED YAMAHA ACTIVE SERVO TECHNOLOGY 18 TROUBLESHOOTING 19 SPECIAL INSTRUCTIONS FOR U.K. The wire which is...
... coloured RED. CONTENTS CAUTION 1 FEATURES 3 Standby mode When this unit is turned off from the mains lead must be connected to the terminal which is disconnected. For details, refer to the AC outlet 12 CONTROLS AND THEIR FUNCTIONS 13 AUTOMATIC POWER-SWITCHING FUNCTION 15 ADJUSTING THE SUBWOOFER BEFORE USE 16 Frequency characteristics 17 ADVANCED YAMAHA ACTIVE SERVO TECHNOLOGY 18 TROUBLESHOOTING 19 SPECIAL INSTRUCTIONS FOR U.K. The wire which is...

User Manual
Page 4
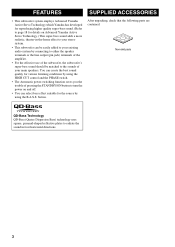
... the source by using the B.A.S.S. button. You can create the best sound quality for various listening conditions by using the HIGH CUT control and the PHASE switch. • The Automatic power-switching function saves you the trouble of your main speakers. FEATURES SUPPLIED ACCESSORIES • This subwoofer system employs Advanced Yamaha Active Servo Technology which Yamaha has developed for reproducing higher quality super-bass sound. (Refer to turn the power...
... the source by using the B.A.S.S. button. You can create the best sound quality for various listening conditions by using the HIGH CUT control and the PHASE switch. • The Automatic power-switching function saves you the trouble of your main speakers. FEATURES SUPPLIED ACCESSORIES • This subwoofer system employs Advanced Yamaha Active Servo Technology which Yamaha has developed for reproducing higher quality super-bass sound. (Refer to turn the power...
User Manual
Page 13
... audio/video components to the AC outlet. Caution Do not let the bare speaker wires touch each speaker cable by pulling lightly on the cable at the extremity of the cables. To AC outlet English To AC outlet 12 If the connections are completed, plug in the subwoofer and other , because this could damage the subwoofer or the amplifier, or both of them . ■Before connecting Remove...
... audio/video components to the AC outlet. Caution Do not let the bare speaker wires touch each speaker cable by pulling lightly on the cable at the extremity of the cables. To AC outlet English To AC outlet 12 If the connections are completed, plug in the subwoofer and other , because this could damage the subwoofer or the amplifier, or both of them . ■Before connecting Remove...

User Manual
Page 15
... use the subwoofer. Goes off when the subwoofer is set in audio software is originally set this switch to the ON position to completely cut off .) Standby mode The subwoofer is still using a small amount of the automatic powerswitching function. CONTROLS AND THEIR FUNCTIONS 7 POWER switch Normally, set to turn the subwoofer into the standby mode by pressing the STANDBY/ON button. 1 Power indicator Lights up in the standby mode by pressing the STANDBY/ON button. Set this control represents 10 Hz. 5 VOLUME control Adjusts the volume level...
... use the subwoofer. Goes off when the subwoofer is set in audio software is originally set this switch to the ON position to completely cut off .) Standby mode The subwoofer is still using a small amount of the automatic powerswitching function. CONTROLS AND THEIR FUNCTIONS 7 POWER switch Normally, set to turn the subwoofer into the standby mode by pressing the STANDBY/ON button. 1 Power indicator Lights up in the standby mode by pressing the STANDBY/ON button. Set this control represents 10 Hz. 5 VOLUME control Adjusts the volume level...

User Manual
Page 16
... turn on automatically by sensing audio signals input to the subwoofer. In the HIGH position, the power will turn on unexpectedly by sensing a certain level of input signal. However, if this function does not operate smoothly, set the AUTO STANDBY switch to the LOW position. This function detects the low-frequency components below 200 Hz of the input signals (i.e., the explosion in red.) When you play a source again, the power of the subwoofer turns on even with a low level of low frequency input signal. This function operates...
... turn on automatically by sensing audio signals input to the subwoofer. In the HIGH position, the power will turn on unexpectedly by sensing a certain level of input signal. However, if this function does not operate smoothly, set the AUTO STANDBY switch to the LOW position. This function detects the low-frequency components below 200 Hz of the input signals (i.e., the explosion in red.) When you play a source again, the power of the subwoofer turns on even with a low level of low frequency input signal. This function operates...
User Manual
Page 17
... switch to the NORM (normal) position. 8 Select "MOVIE" or "MUSIC" according to the played source. If the desired response cannot be obtained. Normally, set the control to the level a little higher than when the subwoofer is adjusted, you the better bass sound. Normally, set the control to the level where you can obtain a little more clearly.) • Once the volume balance between the subwoofer and the main speakers...
... switch to the NORM (normal) position. 8 Select "MOVIE" or "MUSIC" according to the played source. If the desired response cannot be obtained. Normally, set the control to the level a little higher than when the subwoofer is adjusted, you the better bass sound. Normally, set the control to the level where you can obtain a little more clearly.) • Once the volume balance between the subwoofer and the main speakers...

User Manual
Page 20
... is played. A source sound with bass frequencies. The level of the PHASE switch is too low. Raise the volume up the parallel surface by standing waves. Set the AUTO STANDBY switch to the chart below do not help, disconnect the power cord and contact your authorized YAMAHA dealer or service center. Move the subwoofer farther away from such appliances and/or reposition the connected speaker cables. The subwoofer does not turn on unexpectedly. Setting of input signal is...
... is played. A source sound with bass frequencies. The level of the PHASE switch is too low. Raise the volume up the parallel surface by standing waves. Set the AUTO STANDBY switch to the chart below do not help, disconnect the power cord and contact your authorized YAMAHA dealer or service center. Move the subwoofer farther away from such appliances and/or reposition the connected speaker cables. The subwoofer does not turn on unexpectedly. Setting of input signal is...
User Manual
Page 21
Advanced Yamaha Active Servo Technology Driver .....25 cm (10") cone woofer (JA2564) Magnetic shielding type .......20 cm (8") cone woofer (JA2165) Magnetic shielding type Amplifier Output (100 Hz, 5 ohms, 10% THD) SPECIFICATIONS Type ........
Advanced Yamaha Active Servo Technology Driver .....25 cm (10") cone woofer (JA2564) Magnetic shielding type .......20 cm (8") cone woofer (JA2165) Magnetic shielding type Amplifier Output (100 Hz, 5 ohms, 10% THD) SPECIFICATIONS Type ........


