Owner's Manual
Page 4
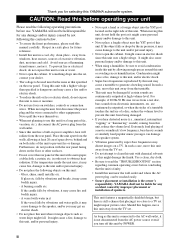
..." section regarding common operating errors before use this unit for selecting this YAMAHA subwoofer system. It might fall. YAMAHA shall not be held responsible for any accident caused by improper placement or... as this unit is not disconnected from electronic instruments, etc. If something drops into the YST port located on the right side of excessive vibration, dust, moisture and cold. Glass, china... if 20 Hz-50 Hz sine waves from a test disc, bass sounds from the AC power source even if you for a long period (ie., vacation, etc.), disconnect the AC power plug from being...
..." section regarding common operating errors before use this unit for selecting this YAMAHA subwoofer system. It might fall. YAMAHA shall not be held responsible for any accident caused by improper placement or... as this unit is not disconnected from electronic instruments, etc. If something drops into the YST port located on the right side of excessive vibration, dust, moisture and cold. Glass, china... if 20 Hz-50 Hz sine waves from a test disc, bass sounds from the AC power source even if you for a long period (ie., vacation, etc.), disconnect the AC power plug from being...
Owner's Manual
Page 8
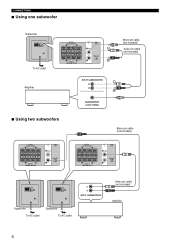
...2 HIGH CUT /MONO VOLUME HIGH LOW POWER ON OFF To AC outlet OUTPUT TO SPEAKERS INPUT 1 FROM AMPLIFIER INPUT 2 HIGH CUT /MONO HIGH LOW Amplifier Mono pin cable (not included) Audio pin cable (not included) ■ Using two subwoofers OUTPUT TO SPEAKERS INPUT 1 FROM AMPLIFIER INPUT... HIGH LOW OUTPUT TO SPEAKERS INPUT 1 FROM AMPLIFIER INPUT 2 HIGH CUT /MONO VOLUME HIGH LOW POWER ON OFF OUTPUT TO SPEAKERS INPUT 1 FROM AMPLIFIER INPUT 2 HIGH CUT /MONO VOLUME HIGH LOW POWER ON OFF Subwoofer To AC outlet Subwoofer To AC outlet Mono pin cable (not included) Amplifier 4
...2 HIGH CUT /MONO VOLUME HIGH LOW POWER ON OFF To AC outlet OUTPUT TO SPEAKERS INPUT 1 FROM AMPLIFIER INPUT 2 HIGH CUT /MONO HIGH LOW Amplifier Mono pin cable (not included) Audio pin cable (not included) ■ Using two subwoofers OUTPUT TO SPEAKERS INPUT 1 FROM AMPLIFIER INPUT... HIGH LOW OUTPUT TO SPEAKERS INPUT 1 FROM AMPLIFIER INPUT 2 HIGH CUT /MONO VOLUME HIGH LOW POWER ON OFF OUTPUT TO SPEAKERS INPUT 1 FROM AMPLIFIER INPUT 2 HIGH CUT /MONO VOLUME HIGH LOW POWER ON OFF Subwoofer To AC outlet Subwoofer To AC outlet Mono pin cable (not included) Amplifier 4
Owner's Manual
Page 9
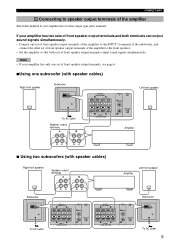
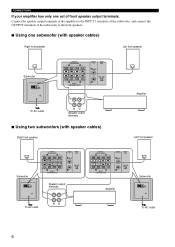
...so that both terminals can output sound signals simultaneously. • Connect one subwoofer (with speaker cables) Right front speaker Subwoofer OUTPUT TO SPEAKERS INPUT 1 FROM AMPLIFIER INPUT 2 HIGH CUT /MONO VOLUME HIGH LOW POWER ON OFF To AC outlet Speaker output terminals OUTPUT TO SPEAKERS INPUT 1.../MONO HIGH LOW OUTPUT TO SPEAKERS INPUT 1 FROM AMPLIFIER INPUT 2 HIGH CUT /MONO HIGH LOW Subwoofer OUTPUT TO SPEAKERS INPUT 1 FROM AMPLIFIER INPUT 2 HIGH CUT /MONO VOLUME HIGH LOW POWER ON OFF To AC outlet 5 If your amplifier has no line output (pin jack) terminal.
...so that both terminals can output sound signals simultaneously. • Connect one subwoofer (with speaker cables) Right front speaker Subwoofer OUTPUT TO SPEAKERS INPUT 1 FROM AMPLIFIER INPUT 2 HIGH CUT /MONO VOLUME HIGH LOW POWER ON OFF To AC outlet Speaker output terminals OUTPUT TO SPEAKERS INPUT 1.../MONO HIGH LOW OUTPUT TO SPEAKERS INPUT 1 FROM AMPLIFIER INPUT 2 HIGH CUT /MONO HIGH LOW Subwoofer OUTPUT TO SPEAKERS INPUT 1 FROM AMPLIFIER INPUT 2 HIGH CUT /MONO VOLUME HIGH LOW POWER ON OFF To AC outlet 5 If your amplifier has no line output (pin jack) terminal.
Owner's Manual
Page 10
... has only one set of the subwoofer to the front speakers. ■ Using one subwoofer (with speaker cables) Right front speaker Left front speaker Subwoofer OUTPUT TO SPEAKERS INPUT 1 FROM AMPLIFIER INPUT 2 HIGH CUT /MONO VOLUME HIGH LOW POWER ON OFF OUTPUT TO SPEAKERS INPUT ...Amplifier To AC outlet Speaker output terminals ■ Using two subwoofers (with speaker cables) Right front speaker Left front speaker Subwoofer OUTPUT TO SPEAKERS INPUT 1 FROM AMPLIFIER INPUT 2 HIGH CUT /MONO VOLUME HIGH LOW POWER ON OFF OUTPUT TO SPEAKERS INPUT 1 FROM AMPLIFIER INPUT 2...
... has only one set of the subwoofer to the front speakers. ■ Using one subwoofer (with speaker cables) Right front speaker Left front speaker Subwoofer OUTPUT TO SPEAKERS INPUT 1 FROM AMPLIFIER INPUT 2 HIGH CUT /MONO VOLUME HIGH LOW POWER ON OFF OUTPUT TO SPEAKERS INPUT ...Amplifier To AC outlet Speaker output terminals ■ Using two subwoofers (with speaker cables) Right front speaker Left front speaker Subwoofer OUTPUT TO SPEAKERS INPUT 1 FROM AMPLIFIER INPUT 2 HIGH CUT /MONO VOLUME HIGH LOW POWER ON OFF OUTPUT TO SPEAKERS INPUT 1 FROM AMPLIFIER INPUT 2...
Owner's Manual
Page 12
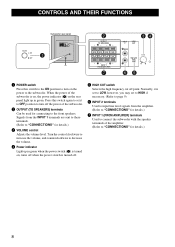
... clockwise to increase the volume, and counterclockwise to decrease the volume. 4 Power indicator Light up in green when the power switch (1) is turned off. 5 HIGH CUT switch Selects the high frequency cut off the power of the subwoofer. 2 OUTPUT (TO SPEAKERS) terminals Can be used for connecting to the... the volume level. Signals from the amplifier. (Refer to "CONNECTIONS" for details.) 8 Normally, it to OFF position to turn on the power to the subwoofer. Press this switch to the ON position to "CONNECTIONS" for details.) 7 INPUT 1 (FROM AMPLIFIER) terminals Used to connect the...
... clockwise to increase the volume, and counterclockwise to decrease the volume. 4 Power indicator Light up in green when the power switch (1) is turned off. 5 HIGH CUT switch Selects the high frequency cut off the power of the subwoofer. 2 OUTPUT (TO SPEAKERS) terminals Can be used for connecting to the... the volume level. Signals from the amplifier. (Refer to "CONNECTIONS" for details.) 8 Normally, it to OFF position to turn on the power to the subwoofer. Press this switch to the ON position to "CONNECTIONS" for details.) 7 INPUT 1 (FROM AMPLIFIER) terminals Used to connect the...
Owner's Manual
Page 13
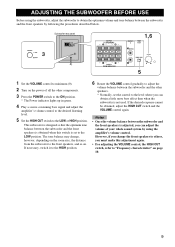
... can adjust the volume of your whole sound system by following the procedures described below. 3 Subwoofer rear panel OUTPUT TO SPEAKERS INPUT 1 FROM AMPLIFIER INPUT 2 HIGH CUT /MONO VOLUME HIGH LOW POWER ON OFF OUTPUT TO SPEAKERS INPUT 1 FROM AMPLIFIER 1,6 INPUT 2 HIGH CUT /MONO HIGH LOW...to the HIGH position. 6 Rotate the VOLUME control gradually to adjust the volume balance between the subwoofer and the other components. 3 Press the POWER switch to the ON position. * The Power indicator lights up in green. 4 Play a source containing bass signal and adjust the amplifier's ...
... can adjust the volume of your whole sound system by following the procedures described below. 3 Subwoofer rear panel OUTPUT TO SPEAKERS INPUT 1 FROM AMPLIFIER INPUT 2 HIGH CUT /MONO VOLUME HIGH LOW POWER ON OFF OUTPUT TO SPEAKERS INPUT 1 FROM AMPLIFIER 1,6 INPUT 2 HIGH CUT /MONO HIGH LOW...to the HIGH position. 6 Rotate the VOLUME control gradually to adjust the volume balance between the subwoofer and the other components. 3 Press the POWER switch to the ON position. * The Power indicator lights up in green. 4 Play a source containing bass signal and adjust the amplifier's ...
Owner's Manual
Page 16
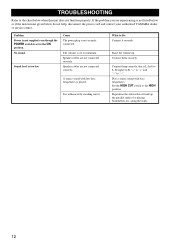
... securely. What to the chart below do not help, disconnect the power cord and contact your authorized YAMAHA dealer or service center. Connect them correctly, that is set to the HIGH position. Reposition the subwoofer or break up . along the walls. 12 TROUBLESHOOTING Refer to Do... if the instructions given below when this unit does not function properly. Cause The power plug is played. A source sound with bass frequencies. Problem Power is not supplied even though the POWER switch is influenced by placing bookshelves etc. No sound. It is set to "-"....
... securely. What to the chart below do not help, disconnect the power cord and contact your authorized YAMAHA dealer or service center. Connect them correctly, that is set to the HIGH position. Reposition the subwoofer or break up . along the walls. 12 TROUBLESHOOTING Refer to Do... if the instructions given below when this unit does not function properly. Cause The power plug is played. A source sound with bass frequencies. Problem Power is not supplied even though the POWER switch is influenced by placing bookshelves etc. No sound. It is set to "-"....


