Owner's Manual
Page 4
...this unit. For example, if 20 Hz-50 Hz sine waves from a test disc, bass sounds from the walls, allowing at high volume level. iii YAMAHA will radiate from windows, heat sources, sources ...water spills, it in a safe place for selecting this YAMAHA subwoofer system. If glass etc. A burning candle etc. If the candle falls by POWER. It might damage the finish. Keep it may cause ...unit is faulty. • Install this unit near the YST port of humming (transformers, motors). If something drops into the YST port located on switches, controls or connection wires. When moving...
...this unit. For example, if 20 Hz-50 Hz sine waves from a test disc, bass sounds from the walls, allowing at high volume level. iii YAMAHA will radiate from windows, heat sources, sources ...water spills, it in a safe place for selecting this YAMAHA subwoofer system. If glass etc. A burning candle etc. If the candle falls by POWER. It might damage the finish. Keep it may cause ...unit is faulty. • Install this unit near the YST port of humming (transformers, motors). If something drops into the YST port located on switches, controls or connection wires. When moving...
Owner's Manual
Page 8
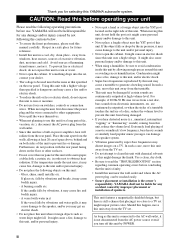
...2 HIGH CUT /MONO VOLUME HIGH LOW POWER ON OFF To AC outlet OUTPUT TO SPEAKERS INPUT 1 FROM AMPLIFIER INPUT 2 HIGH CUT /MONO HIGH LOW Amplifier Mono pin cable (not included) Audio pin cable (not included) ■ Using two subwoofers OUTPUT TO SPEAKERS INPUT 1 FROM AMPLIFIER INPUT... HIGH LOW OUTPUT TO SPEAKERS INPUT 1 FROM AMPLIFIER INPUT 2 HIGH CUT /MONO VOLUME HIGH LOW POWER ON OFF OUTPUT TO SPEAKERS INPUT 1 FROM AMPLIFIER INPUT 2 HIGH CUT /MONO VOLUME HIGH LOW POWER ON OFF Subwoofer To AC outlet Subwoofer To AC outlet Mono pin cable (not included) Amplifier 4
...2 HIGH CUT /MONO VOLUME HIGH LOW POWER ON OFF To AC outlet OUTPUT TO SPEAKERS INPUT 1 FROM AMPLIFIER INPUT 2 HIGH CUT /MONO HIGH LOW Amplifier Mono pin cable (not included) Audio pin cable (not included) ■ Using two subwoofers OUTPUT TO SPEAKERS INPUT 1 FROM AMPLIFIER INPUT... HIGH LOW OUTPUT TO SPEAKERS INPUT 1 FROM AMPLIFIER INPUT 2 HIGH CUT /MONO VOLUME HIGH LOW POWER ON OFF OUTPUT TO SPEAKERS INPUT 1 FROM AMPLIFIER INPUT 2 HIGH CUT /MONO VOLUME HIGH LOW POWER ON OFF Subwoofer To AC outlet Subwoofer To AC outlet Mono pin cable (not included) Amplifier 4
Owner's Manual
Page 9
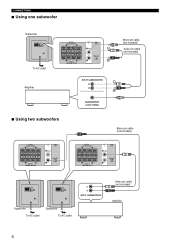
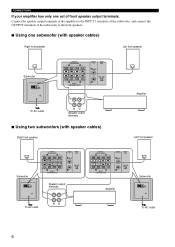
...both terminals can output sound signals simultaneously. • Connect one subwoofer (with speaker cables) Right front speaker Subwoofer OUTPUT TO SPEAKERS INPUT 1 FROM AMPLIFIER INPUT 2 HIGH CUT /MONO VOLUME HIGH LOW POWER ON OFF To AC outlet Speaker output terminals OUTPUT TO SPEAKERS... front speaker Amplifier ■ Using two subwoofers (with speaker cables) Right front speaker Speaker output terminals Amplifier Left front speaker Subwoofer OUTPUT TO SPEAKERS INPUT 1 FROM AMPLIFIER INPUT 2 HIGH CUT /MONO VOLUME HIGH LOW POWER ON OFF To AC outlet OUTPUT TO ...
...both terminals can output sound signals simultaneously. • Connect one subwoofer (with speaker cables) Right front speaker Subwoofer OUTPUT TO SPEAKERS INPUT 1 FROM AMPLIFIER INPUT 2 HIGH CUT /MONO VOLUME HIGH LOW POWER ON OFF To AC outlet Speaker output terminals OUTPUT TO SPEAKERS... front speaker Amplifier ■ Using two subwoofers (with speaker cables) Right front speaker Speaker output terminals Amplifier Left front speaker Subwoofer OUTPUT TO SPEAKERS INPUT 1 FROM AMPLIFIER INPUT 2 HIGH CUT /MONO VOLUME HIGH LOW POWER ON OFF To AC outlet OUTPUT TO ...
Owner's Manual
Page 10
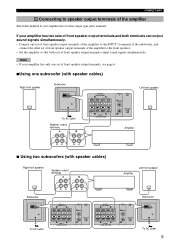
... Amplifier To AC outlet Speaker output terminals ■ Using two subwoofers (with speaker cables) Right front speaker Left front speaker Subwoofer OUTPUT TO SPEAKERS INPUT 1 FROM AMPLIFIER INPUT 2 HIGH CUT /MONO VOLUME HIGH LOW POWER ON OFF OUTPUT TO SPEAKERS INPUT 1 FROM AMPLIFIER INPUT 2 ...outlet OUTPUT TO SPEAKERS INPUT 1 FROM AMPLIFIER INPUT 2 HIGH CUT /MONO HIGH LOW Amplifier Subwoofer OUTPUT TO SPEAKERS INPUT 1 FROM AMPLIFIER INPUT 2 HIGH CUT /MONO VOLUME HIGH LOW POWER ON OFF To AC outlet 6 Connect the speaker output terminals of the amplifier to the ...
... Amplifier To AC outlet Speaker output terminals ■ Using two subwoofers (with speaker cables) Right front speaker Left front speaker Subwoofer OUTPUT TO SPEAKERS INPUT 1 FROM AMPLIFIER INPUT 2 HIGH CUT /MONO VOLUME HIGH LOW POWER ON OFF OUTPUT TO SPEAKERS INPUT 1 FROM AMPLIFIER INPUT 2 ...outlet OUTPUT TO SPEAKERS INPUT 1 FROM AMPLIFIER INPUT 2 HIGH CUT /MONO HIGH LOW Amplifier Subwoofer OUTPUT TO SPEAKERS INPUT 1 FROM AMPLIFIER INPUT 2 HIGH CUT /MONO VOLUME HIGH LOW POWER ON OFF To AC outlet 6 Connect the speaker output terminals of the amplifier to the ...
Owner's Manual
Page 12
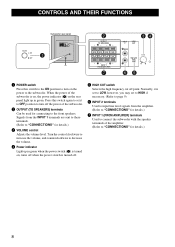
...Selects the high frequency cut off when the power switch is turned on the power to the subwoofer. Normally, it to OFF position to turn on ; Press this switch to the ON position to turn off the power of the subwoofer is on, the power indicator (4) on the rear panel light ...up in green. CONTROLS AND THEIR FUNCTIONS Subwoofer rear panel 1 OUTPUT TO SPEAKERS INPUT 1 FROM AMPLIFIER INPUT 2 HIGH CUT /MONO ...
...Selects the high frequency cut off when the power switch is turned on the power to the subwoofer. Normally, it to OFF position to turn on ; Press this switch to the ON position to turn off the power of the subwoofer is on, the power indicator (4) on the rear panel light ...up in green. CONTROLS AND THEIR FUNCTIONS Subwoofer rear panel 1 OUTPUT TO SPEAKERS INPUT 1 FROM AMPLIFIER INPUT 2 HIGH CUT /MONO ...
Owner's Manual
Page 13
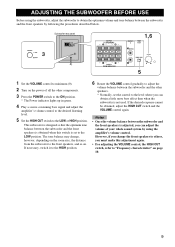
..., switch it to the HIGH position. 6 Rotate the VOLUME control gradually to adjust the volume balance between the subwoofer and the other components. 3 Press the POWER switch to the ON position. * The Power indicator lights up in green. 4 Play a source containing bass signal and adjust the amplifier's volume control to...minimum (0). 2 Turn on . However, if you change , however, depending on the room size, the distance from the subwoofer to the front speakers, and so on the power of all the other speakers. * Normally, set the control to the level where you can adjust the volume of your whole...
..., switch it to the HIGH position. 6 Rotate the VOLUME control gradually to adjust the volume balance between the subwoofer and the other components. 3 Press the POWER switch to the ON position. * The Power indicator lights up in green. 4 Play a source containing bass signal and adjust the amplifier's volume control to...minimum (0). 2 Turn on . However, if you change , however, depending on the room size, the distance from the subwoofer to the front speakers, and so on the power of all the other speakers. * Normally, set the control to the level where you can adjust the volume of your whole...
Owner's Manual
Page 16
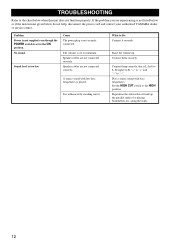
...them correctly, that is played. If the problem you are not connected securely. What to the chart below do not help, disconnect the power cord and contact your authorized YAMAHA dealer or service center. Play a source sound with few bass frequencies is L (left) to L, R (right) to R, "+" to...connected correctly. Raise the volume up the parallel surface by standing waves. Problem Power is not supplied even though the POWER switch is set to minimum. Reposition the subwoofer or break up . Cause The power plug is too low. The volume is set to the ON position. A...
...them correctly, that is played. If the problem you are not connected securely. What to the chart below do not help, disconnect the power cord and contact your authorized YAMAHA dealer or service center. Play a source sound with few bass frequencies is L (left) to L, R (right) to R, "+" to...connected correctly. Raise the volume up the parallel surface by standing waves. Problem Power is not supplied even though the POWER switch is set to minimum. Reposition the subwoofer or break up . Cause The power plug is too low. The volume is set to the ON position. A...


