
Owners Manual
Page 4
... vibrations and breaks, it may cause damage to the speaker, and/or you for selecting this YAMAHA subwoofer system. Condensation might cause a fire, damage to this unit. • When using a humidifier, be...please read the following operating precautions before use. When moving the unit, first disconnect the power plug and the wires connected to other surfaces. • Do not cover the rear ...volume level to obstruct heat radiation. away from the rear panel. If something drops into the YST port located on this unit: Glass, china, small metallic etc. When moving this unit,...
... vibrations and breaks, it may cause damage to the speaker, and/or you for selecting this YAMAHA subwoofer system. Condensation might cause a fire, damage to this unit. • When using a humidifier, be...please read the following operating precautions before use. When moving the unit, first disconnect the power plug and the wires connected to other surfaces. • Do not cover the rear ...volume level to obstruct heat radiation. away from the rear panel. If something drops into the YST port located on this unit: Glass, china, small metallic etc. When moving this unit,...

Owners Manual
Page 5
... the amplifier 8 Connecting to the AC outlet 12 CONTROLS AND THEIR FUNCTIONS 13 AUTOMATIC POWER-SWITCHING FUNCTION 15 ADJUSTING THE SUBWOOFER BEFORE USE 16 Frequency characteristics 17 ADVANCED YAMAHA ACTIVE SERVO TECHNOLOGY 18 TROUBLESHOOTING 19 SPECIAL INSTRUCTIONS FOR U.K. This unit's power supply is completely cut off from the TV set in a live socket outlet...
... the amplifier 8 Connecting to the AC outlet 12 CONTROLS AND THEIR FUNCTIONS 13 AUTOMATIC POWER-SWITCHING FUNCTION 15 ADJUSTING THE SUBWOOFER BEFORE USE 16 Frequency characteristics 17 ADVANCED YAMAHA ACTIVE SERVO TECHNOLOGY 18 TROUBLESHOOTING 19 SPECIAL INSTRUCTIONS FOR U.K. This unit's power supply is completely cut off from the TV set in a live socket outlet...

Owners Manual
Page 6
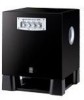
FEATURES SUPPLIED ACCESSORIES • This subwoofer system employs Advanced Yamaha Active Servo Technology which Yamaha has developed for reproducing higher quality super-bass sound. (Refer to page 18 for various listening conditions by using the B.A.S.S. Non-skid pads ...) terminals of the amplifier. • For the effective use of the subwoofer, the subwoofer's super-bass sound should be easily added to turn the power on and off. • You can create the best sound quality for details on Advanced Yamaha Active Servo Technology.) This super-bass sound adds a more realistic, theater-...
FEATURES SUPPLIED ACCESSORIES • This subwoofer system employs Advanced Yamaha Active Servo Technology which Yamaha has developed for reproducing higher quality super-bass sound. (Refer to page 18 for various listening conditions by using the B.A.S.S. Non-skid pads ...) terminals of the amplifier. • For the effective use of the subwoofer, the subwoofer's super-bass sound should be easily added to turn the power on and off. • You can create the best sound quality for details on Advanced Yamaha Active Servo Technology.) This super-bass sound adds a more realistic, theater-...
Owners Manual
Page 17
..., set the switch to the proper voltage (110V, 120V, 220V or 240V) of this switch to the OFF position to completely cut off the subwoofer's power supply from the AC line. 8 OUTPUT (TO SPEAKERS) terminals Can be used for details.) A AUTO STANDBY (HIGH/LOW/OFF) switch This switch... is set the subwoofer in the standby mode. (The power indicator goes off point. Set this switch only when the subwoofer is originally set to turn the subwoofer into the standby mode by pressing the STANDBY/ON button. Signals from the amplifier...
..., set the switch to the proper voltage (110V, 120V, 220V or 240V) of this switch to the OFF position to completely cut off the subwoofer's power supply from the AC line. 8 OUTPUT (TO SPEAKERS) terminals Can be used for details.) A AUTO STANDBY (HIGH/LOW/OFF) switch This switch... is set the subwoofer in the standby mode. (The power indicator goes off point. Set this switch only when the subwoofer is originally set to turn the subwoofer into the standby mode by pressing the STANDBY/ON button. Signals from the amplifier...
Owners Manual
Page 18
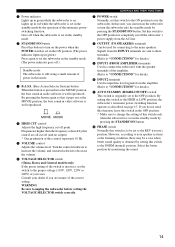
...signal. This function detects the low-frequency components below 200 Hz of the input signals (i.e., the explosion in red.) When you play a source again, the power of the subwoofer turns on even with a low level of input signal. Usually set the switch to the HIGH position. AUTOMATIC... played is stopped and the input signal is cut off for 7 to 8 minutes, the subwoofer automatically switches to the standby mode. (When the subwoofer switches to the standby mode by the automatic powerswitching function, the power indicator lights up in the action movie, the sound of the bass guitar or the bass...
...signal. This function detects the low-frequency components below 200 Hz of the input signals (i.e., the explosion in red.) When you play a source again, the power of the subwoofer turns on even with a low level of input signal. Usually set the switch to the HIGH position. AUTOMATIC... played is stopped and the input signal is cut off for 7 to 8 minutes, the subwoofer automatically switches to the standby mode. (When the subwoofer switches to the standby mode by the automatic powerswitching function, the power indicator lights up in the action movie, the sound of the bass guitar or the bass...

Owners Manual
Page 19
... • Once the volume balance between the subwoofer and the main speakers by following the procedures described below. 1 Set the VOLUME control to minimum (0). 2 Turn on the power of all the other components. 3 Make sure that the POWER switch is played, the excessive low-frequency components...again. • For adjusting the VOLUME control, the HIGH CUT control and the PHASE switch, refer to "Frequency characteristics" on the subwoofer. * The Power indicator lights up in the speakers' catalog or owner's manual. 6 Increase the volume gradually to the REV (reverse) position. If ...
... • Once the volume balance between the subwoofer and the main speakers by following the procedures described below. 1 Set the VOLUME control to minimum (0). 2 Turn on the power of all the other components. 3 Make sure that the POWER switch is played, the excessive low-frequency components...again. • For adjusting the VOLUME control, the HIGH CUT control and the PHASE switch, refer to "Frequency characteristics" on the subwoofer. * The Power indicator lights up in the speakers' catalog or owner's manual. 6 Increase the volume gradually to the REV (reverse) position. If ...
Owners Manual
Page 22
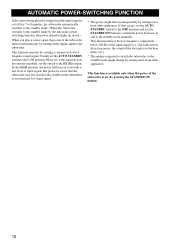
..., set to the chart below do not help, disconnect the power cord and contact your authorized YAMAHA dealer or service center. If the problem you are experiencing is influenced by placing bookshelves etc. No sound. The subwoofer turns into the standby mode automatically. Speaker cables are not connected.... Sound level is played. Cause The power plug is set to the "HIGH" position. Set the POWER switch to the ON position. Set the POWER switch to the ON position. Setting of noise generated from external appliances etc. The subwoofer does not turn into the standby mode ...
..., set to the chart below do not help, disconnect the power cord and contact your authorized YAMAHA dealer or service center. If the problem you are experiencing is influenced by placing bookshelves etc. No sound. The subwoofer turns into the standby mode automatically. Speaker cables are not connected.... Sound level is played. Cause The power plug is set to the "HIGH" position. Set the POWER switch to the ON position. Set the POWER switch to the ON position. Setting of noise generated from external appliances etc. The subwoofer does not turn into the standby mode ...


