
Owners Manual
Page 2
... a risk of uninsulated "dangerous voltage" within an equilateral triangle is damaged, liquid has been spilled or objects have fallen into your safety. NO USER-SERVICEABLE PARTS INSIDE. A grounding type plug has two blades and a third grounding prong. REFER SERVICING TO QUALIFIED SERVICE PERSONNEL. ■ Explanation of Graphical Symbols The lightning flash...
... a risk of uninsulated "dangerous voltage" within an equilateral triangle is damaged, liquid has been spilled or objects have fallen into your safety. NO USER-SERVICEABLE PARTS INSIDE. A grounding type plug has two blades and a third grounding prong. REFER SERVICING TO QUALIFIED SERVICE PERSONNEL. ■ Explanation of Graphical Symbols The lightning flash...

Owners Manual
Page 3
...Since hearing damage from loud sounds is found to be the source of interference, which can not locate the appropriate retailer, please contact YAMAHA Electronics Corp., U.S.A. 6660 Orangethorpe Ave, Buena Park, CA 90620. ii En IMPORTANT SAFETY INSTRUCTIONS FCC INFORMATION (for Class "B" digital ...NOTICE: DO NOT MODIFY THIS UNIT! One that interference will not result in FCC Regulations, Part 15 for US customers) 1. If the antenna lead-in is too late, YAMAHA and the Electronic Industries Association's Consumer Electronics Group recommend you to the operation of the ...
...Since hearing damage from loud sounds is found to be the source of interference, which can not locate the appropriate retailer, please contact YAMAHA Electronics Corp., U.S.A. 6660 Orangethorpe Ave, Buena Park, CA 90620. ii En IMPORTANT SAFETY INSTRUCTIONS FCC INFORMATION (for Class "B" digital ...NOTICE: DO NOT MODIFY THIS UNIT! One that interference will not result in FCC Regulations, Part 15 for US customers) 1. If the antenna lead-in is too late, YAMAHA and the Electronic Industries Association's Consumer Electronics Group recommend you to the operation of the ...
Owners Manual
Page 8
... STARTED" on page 81. 4 En For details regarding the operation of differences between the manual and product, the product has priority. 1 Install this unit in part as a result of this unit to fine-tune settings and/or set remote control codes. If you want to make additional settings and adjustments 7 Run...
... STARTED" on page 81. 4 En For details regarding the operation of differences between the manual and product, the product has priority. 1 Install this unit in part as a result of this unit to fine-tune settings and/or set remote control codes. If you want to make additional settings and adjustments 7 Run...

Owners Manual
Page 9
... (×4) Cardboard microphone stand (×1) Power supply cable (×1) English 5 En INTRODUCTION SUPPLIED ACCESSORIES SUPPLIED ACCESSORIES Check that you have received all of the following parts.
... (×4) Cardboard microphone stand (×1) Power supply cable (×1) English 5 En INTRODUCTION SUPPLIED ACCESSORIES SUPPLIED ACCESSORIES Check that you have received all of the following parts.

Owners Manual
Page 33
... to optimize the beam angle, delay, volume and quality. This unit employs the beam optimization and sound optimization features with the aid of all or part of frequency characteristics. DISTANCE: Checks the distance of each sound beam reaches the listening position at the same time. LEVEL: Checks and adjusts the sound...
... to optimize the beam angle, delay, volume and quality. This unit employs the beam optimization and sound optimization features with the aid of all or part of frequency characteristics. DISTANCE: Checks the distance of each sound beam reaches the listening position at the same time. LEVEL: Checks and adjusts the sound...
Owners Manual
Page 34
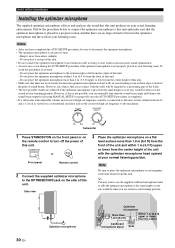
... actual listening environment. To avoid the possibility of this unit produces in contact with the optimizer microphone head upward at the same height as a protruding part of this unit. Do not place the optimizer microphone more than 1.8 m (6.0 ft) Within 1 m (3.3 ft) upper or lower from the center Cardboard microphone stand Sofa Follow...
... actual listening environment. To avoid the possibility of this unit produces in contact with the optimizer microphone head upward at the same height as a protruding part of this unit. Do not place the optimizer microphone more than 1.8 m (6.0 ft) Within 1 m (3.3 ft) upper or lower from the center Cardboard microphone stand Sofa Follow...

Owners Manual
Page 35
... ■ Assembling the supplied cardboard microphone stand You will find three separate parts (one circular-shaped part and two longitudinal-shaped parts) of the cardboard microphone stand originally put together. 1 2 3 4 1 Disassemble the three parts of the cardboard microphone stand originally put together. 2 Insert one of the...can also enter the AUTO SETUP procedure simply by pressing and holding AUTO SETUP on top of the two combined longitudinal-shaped parts. 4 Place the supplied optimizer microphone on the remote control more than 2 seconds. INPUT VOLUME + STANDBY/ON STANDBY/ON...
... ■ Assembling the supplied cardboard microphone stand You will find three separate parts (one circular-shaped part and two longitudinal-shaped parts) of the cardboard microphone stand originally put together. 1 2 3 4 1 Disassemble the three parts of the cardboard microphone stand originally put together. 2 Insert one of the...can also enter the AUTO SETUP procedure simply by pressing and holding AUTO SETUP on top of the two combined longitudinal-shaped parts. 4 Place the supplied optimizer microphone on the remote control more than 2 seconds. INPUT VOLUME + STANDBY/ON STANDBY/ON...
