
Owners Manual
Page 1
Digital Sound ProjectorTM Owner's Manual English for North America
Digital Sound ProjectorTM Owner's Manual English for North America
Owners Manual
Page 2
... connect and operate this unit unless otherwise specified. • y indicates a tip for the operation of Yamaha Corporation. For details regarding the operation of external components, refer to be used in the left and right) pages. • This manual is a trademark. The " " logo and "Digital Sound Projector™" are trademarks of Apple Inc...
... connect and operate this unit unless otherwise specified. • y indicates a tip for the operation of Yamaha Corporation. For details regarding the operation of external components, refer to be used in the left and right) pages. • This manual is a trademark. The " " logo and "Digital Sound Projector™" are trademarks of Apple Inc...

Owners Manual
Page 3
... (Option menu 32 Displaying the input signal information 32 SETTINGS Customizing this unit (SET MENU 33 SET MENU items 33 Basic SET MENU operation 34 MANUAL SETUP 34 SOUND SET MENU 36 SOUND OUT MENU 37 INPUT MENU 38 DISPLAY MENU 39 System configurations (ADVANCED SETUP) ......... 40 Using an external amplifier...
... (Option menu 32 Displaying the input signal information 32 SETTINGS Customizing this unit (SET MENU 33 SET MENU items 33 Basic SET MENU operation 34 MANUAL SETUP 34 SOUND SET MENU 36 SOUND OUT MENU 37 INPUT MENU 38 DISPLAY MENU 39 System configurations (ADVANCED SETUP) ......... 40 Using an external amplifier...

Owners Manual
Page 10
... left and right stands correctly. These stands are no objects such as furniture obstructing the path of the wall mount bracket: refer to the owner's manual supplied with external components (page 12) should be large enough to support the weight of children. • When using a wall mount bracket, a rack, a table ... top stand or a floor stand You can escape. We recommend installing this unit using SPM-K30 YSP-5100 235 355 355 26 24- 7x22 74 730 SPM-K30 (Option) 92 112 235 4- 7 150 26 74 YSP-4100 355 355 24- 7x22 730 92 112 150 4- 7 (mm) When this unit on your ...
... left and right stands correctly. These stands are no objects such as furniture obstructing the path of the wall mount bracket: refer to the owner's manual supplied with external components (page 12) should be large enough to support the weight of children. • When using a wall mount bracket, a rack, a table ... top stand or a floor stand You can escape. We recommend installing this unit using SPM-K30 YSP-5100 235 355 355 26 24- 7x22 74 730 SPM-K30 (Option) 92 112 235 4- 7 150 26 74 YSP-4100 355 355 24- 7x22 730 92 112 150 4- 7 (mm) When this unit on your ...

Owners Manual
Page 16
... starting "SOUND OPTIMZ ONLY". p p Notes • It is as quiet as shown below . 1. Run "BEAM OPTIMZ ONLY". 3. SET MENU . ;MEMORY ;AUTO SETUP ;MANUAL SETUP ;SOUND SET MENU ;SOUND OUT MENU ;INPUT MENU ;DISPLAY MENU [ ]/[ ]:Up/Down [ENTER]:Enter y • You can select one minute. DECODE INTELLIBEAM 1 2 ...9632; Assembling the supplied cardboard microphone stand 1 2 Remove Fit in 3 Fit in the following cases: • If you have manually set the volume to about one of the screen. "SOUND OPTIMZ ONLY" (Sound optimization only) Use to improve sound reflection. 2. ...
... starting "SOUND OPTIMZ ONLY". p p Notes • It is as quiet as shown below . 1. Run "BEAM OPTIMZ ONLY". 3. SET MENU . ;MEMORY ;AUTO SETUP ;MANUAL SETUP ;SOUND SET MENU ;SOUND OUT MENU ;INPUT MENU ;DISPLAY MENU [ ]/[ ]:Up/Down [ENTER]:Enter y • You can select one minute. DECODE INTELLIBEAM 1 2 ...9632; Assembling the supplied cardboard microphone stand 1 2 Remove Fit in 3 Fit in the following cases: • If you have manually set the volume to about one of the screen. "SOUND OPTIMZ ONLY" (Sound optimization only) Use to improve sound reflection. 2. ...
Owners Manual
Page 17
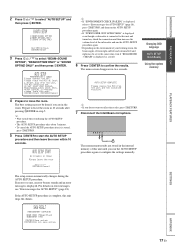
...; Depending on the environment of your listening room, the beam angles of the subwoofer and run the AUTO SETUP procedure again or configure the settings manually. y • Wait outside the room during the AUTO SETUP procedure. SETTINGS APPENDIX 17 En Prepare to leave the room in the room. For details on...
...; Depending on the environment of your listening room, the beam angles of the subwoofer and run the AUTO SETUP procedure again or configure the settings manually. y • Wait outside the room during the AUTO SETUP procedure. SETTINGS APPENDIX 17 En Prepare to leave the room in the room. For details on...
Owners Manual
Page 18
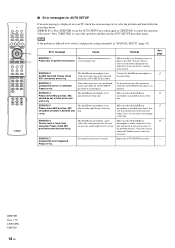
... Error messages for assistance. Please check MIC connection and re-try . Please re-try . If the problem persists, contact the nearest authorized Yamaha service center for AUTO SETUP If an error message is displayed on this unit. An internal system error occurred. See page - 15 - ...) from the front of this unit and within 1 m (3.3 ft) from the center height of this unit while the AUTO SETUP procedure was in "MANUAL SETUP" (page 34). ERROR E-6 Volume level is not placed in a proper location. The IntelliBeam microphone cannot collect the sound produced by this unit. ...
... Error messages for assistance. Please check MIC connection and re-try . Please re-try . If the problem persists, contact the nearest authorized Yamaha service center for AUTO SETUP If an error message is displayed on this unit. An internal system error occurred. See page - 15 - ...) from the front of this unit and within 1 m (3.3 ft) from the center height of this unit while the AUTO SETUP procedure was in "MANUAL SETUP" (page 34). ERROR E-6 Volume level is not placed in a proper location. The IntelliBeam microphone cannot collect the sound produced by this unit. ...

Owners Manual
Page 19
... are curtains in the selected memory number, this unit. It is handy to save the settings to "MEMORY1". 2. SET MENU . ;MEMORY ;AUTO SETUP ;MANUAL SETUP ;SOUND SET MENU ;SOUND OUT MENU ;INPUT MENU ;DISPLAY MENU [ ]/[ ]:Up/Down [ENTER]:Enter 2 Press GENTER. y • If there ...whether the curtains are saved to select the desired memory number and then press GENTER. 2)MEMORY SAVE MEMORY1 Save Now? p p SET MENU . ;MEMORY ;AUTO SETUP ;MANUAL SETUP ;SOUND SET MENU ;SOUND OUT MENU ;INPUT MENU ;DISPLAY MENU [ ]/[ ]:Up/Down [ENTER]:Enter 2)MEMORY SAVE MEMORY1 Saving... p p [ ]/[ ]:Up...
... are curtains in the selected memory number, this unit. It is handy to save the settings to "MEMORY1". 2. SET MENU . ;MEMORY ;AUTO SETUP ;MANUAL SETUP ;SOUND SET MENU ;SOUND OUT MENU ;INPUT MENU ;DISPLAY MENU [ ]/[ ]:Up/Down [ENTER]:Enter 2 Press GENTER. y • If there ...whether the curtains are saved to select the desired memory number and then press GENTER. 2)MEMORY SAVE MEMORY1 Save Now? p p SET MENU . ;MEMORY ;AUTO SETUP ;MANUAL SETUP ;SOUND SET MENU ;SOUND OUT MENU ;INPUT MENU ;DISPLAY MENU [ ]/[ ]:Up/Down [ENTER]:Enter 2)MEMORY SAVE MEMORY1 Saving... p p [ ]/[ ]:Up...
Owners Manual
Page 21
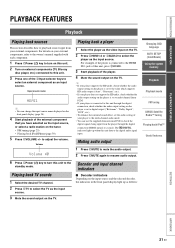
... name HDMI1 y • You can use the supplied demonstration DVD to check the digital signals being input from your external components, refer to the owner's manual supplied with each component. 1 Press CPower (p) key to turn this unit, press DHDMI1. 3 Start playback of the external component that you have selected as follows...
... name HDMI1 y • You can use the supplied demonstration DVD to check the digital signals being input from your external components, refer to the owner's manual supplied with each component. 1 Press CPower (p) key to turn this unit, press DHDMI1. 3 Start playback of the external component that you have selected as follows...

Owners Manual
Page 25
... to get better reception. This is useful when you can operate the procedures from the menu, press IOPTION. ■ Registering stations manually You can manually register FM stations with INPUT on the front panel, press DRADIO on the front panel display. 3 Press G / to select "...in stereo. TUNED STEREO XXXFMX88.9XMHz The frequency changes in (Preset tuning) You can register up to 40 FM stations automatically or manually. ■ Registering stations automatically The tuner automatically detects FM stations with strong signals and registers up if the program being broadcasted is...
... to get better reception. This is useful when you can operate the procedures from the menu, press IOPTION. ■ Registering stations manually You can manually register FM stations with INPUT on the front panel, press DRADIO on the front panel display. 3 Press G / to select "...in stereo. TUNED STEREO XXXFMX88.9XMHz The frequency changes in (Preset tuning) You can register up to 40 FM stations automatically or manually. ■ Registering stations automatically The tuner automatically detects FM stations with strong signals and registers up if the program being broadcasted is...
Owners Manual
Page 26
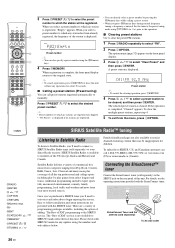
..., family programming, local traffic and weather and news from the menu, press IOPTION. There are registered. • You can call preset stations registered automatically or manually. SUB COMPONENT WOOFER SIRIUS SYSTEM CONNECTOR IN OUT AUX 1 TV AUX 2 VIDEO AUDIO IN AUX 1 TV DIGITAL IN IR IN RS-232C SiriusConnect Tuner and...
..., family programming, local traffic and weather and news from the menu, press IOPTION. There are registered. • You can call preset stations registered automatically or manually. SUB COMPONENT WOOFER SIRIUS SYSTEM CONNECTOR IN OUT AUX 1 TV AUX 2 VIDEO AUDIO IN AUX 1 TV DIGITAL IN IR IN RS-232C SiriusConnect Tuner and...

Owners Manual
Page 27
Refer to the instruction manuals supplied with no obstacles in the front panel display (page 30) to activate your SIRIUS Satellite Radio subscription. To activate the subscription you tune into ...
Refer to the instruction manuals supplied with no obstacles in the front panel display (page 30) to activate your SIRIUS Satellite Radio subscription. To activate the subscription you tune into ...

Owners Manual
Page 31
...press MUNIVOLUME again. • We recommend turning off (unplug) and turning on the TV. - Press MUNIVOLUME. For details, refer to the manual supplied with the remote control of your TV when the TV (HDMI control function supported) is activated. Registering HDMI components to TV 1 Select ...this unit to confirm the setting for the sleep timer. For external devices, refer to the manual supplied with your TV supports the HDMI control function, some HDMI components, you need to set HDMI control function and register the ...
...press MUNIVOLUME again. • We recommend turning off (unplug) and turning on the TV. - Press MUNIVOLUME. For details, refer to the manual supplied with the remote control of your TV when the TV (HDMI control function supported) is activated. Registering HDMI components to TV 1 Select ...this unit to confirm the setting for the sleep timer. For external devices, refer to the manual supplied with your TV supports the HDMI control function, some HDMI components, you need to set HDMI control function and register the ...

Owners Manual
Page 33
... unit (SET MENU) System configurations (ADVANCED SETUP) Using an external amplifier Controlling external components SETTINGS APPENDIX 33 En SET MENU items Menu MEMORY AUTO SETUP MANUAL SETUP SOUND SET MENU SOUND OUT MENU INPUT MENU DISPLAY MENU Sub menu Features LOAD Loads the beam and sound settings saved in "SET MENU...
... unit (SET MENU) System configurations (ADVANCED SETUP) Using an external amplifier Controlling external components SETTINGS APPENDIX 33 En SET MENU items Menu MEMORY AUTO SETUP MANUAL SETUP SOUND SET MENU SOUND OUT MENU INPUT MENU DISPLAY MENU Sub menu Features LOAD Loads the beam and sound settings saved in "SET MENU...

Owners Manual
Page 34
... the menu, press ISETUP. When this unit. Specify the distance between the listening position and left wall. SET MENU . ;MEMORY ;AUTO SETUP ;MANUAL SETUP ;SOUND SET MENU ;SOUND OUT MENU ;INPUT MENU ;DISPLAY MENU [ ]/[ ]:Up/Down [ENTER]:Enter p 1 In "SETTING PARAMETERS 1/3", ...configure "INSTALLED POSITION". Specify the installed height of this unit. MANUAL SETUP Use this unit is installed parallel to specify the distance between the listening position and this setting, "BEAM MODE" setting changes automatically (page...
... the menu, press ISETUP. When this unit. Specify the distance between the listening position and left wall. SET MENU . ;MEMORY ;AUTO SETUP ;MANUAL SETUP ;SOUND SET MENU ;SOUND OUT MENU ;INPUT MENU ;DISPLAY MENU [ ]/[ ]:Up/Down [ENTER]:Enter p 1 In "SETTING PARAMETERS 1/3", ...configure "INSTALLED POSITION". Specify the installed height of this unit. MANUAL SETUP Use this unit is installed parallel to specify the distance between the listening position and this setting, "BEAM MODE" setting changes automatically (page...

Owners Manual
Page 35
...". Control range: 0.3 m to 24.0 m (1.0 ft to 80.0 ft) PREPARATION PLAYBACK FEATURES ■ BEAM ADJUSTMENT (Beam adjustment) SET MENU → MANUAL SETUP → BEAM ADJUSTMENT Use to 38.0 ft) 3 Configure "BEAM TRAVEL LENGTH". In this case, "- -" is heard so that each arrow indicates ...ft to the center channel. Control range: -45° to +45° (+) 0° (-) ■ IMAGE LOCATION (Image location) SET MENU → MANUAL SETUP → IMAGE LOCATION Use to move the focus toward R (right) to adjust the direction from which the front left and right channel sound is...
...". Control range: 0.3 m to 24.0 m (1.0 ft to 80.0 ft) PREPARATION PLAYBACK FEATURES ■ BEAM ADJUSTMENT (Beam adjustment) SET MENU → MANUAL SETUP → BEAM ADJUSTMENT Use to 38.0 ft) 3 Configure "BEAM TRAVEL LENGTH". In this case, "- -" is heard so that each arrow indicates ...ft to the center channel. Control range: -45° to +45° (+) 0° (-) ■ IMAGE LOCATION (Image location) SET MENU → MANUAL SETUP → IMAGE LOCATION Use to move the focus toward R (right) to adjust the direction from which the front left and right channel sound is...

Owners Manual
Page 36
...* DISTANCE (Distance) Adjust the distance of this feature to adjust the low-frequency response. You can manually adjust the audio output delay in "BEAM MODE" (page 23). Control range: 0 msec* to 400 msec HDMI Manually adjust the audio output delay applied to the front channels automatically. The higher the percentage, the louder...
...* DISTANCE (Distance) Adjust the distance of this feature to adjust the low-frequency response. You can manually adjust the audio output delay in "BEAM MODE" (page 23). Control range: 0 msec* to 400 msec HDMI Manually adjust the audio output delay applied to the front channels automatically. The higher the percentage, the louder...

Owners Manual
Page 41
... (page 22) - Playback an input source and then press EOFF. • To stop the beam movement, press EOFF again. • To adjust the beam angle manually, press FSURROUND or FSTEREO when the beam is used. - Choices: BEAM DEMO: OFF*, BEAM DEMO: ON • To move the beam horizontally, turn off this...
... (page 22) - Playback an input source and then press EOFF. • To stop the beam movement, press EOFF again. • To adjust the beam angle manually, press FSURROUND or FSTEREO when the beam is used. - Choices: BEAM DEMO: OFF*, BEAM DEMO: ON • To move the beam horizontally, turn off this...

Owners Manual
Page 44
... component is poor. Connect them with strong bass elements was in the path of seconds. Set "BASS OUT" to the owner's manual supplied with the automatic tuning method. Connect a subwoofer and adjust settings for a long period. Disconnect some of the antenna and SiriusConnect...SUBWOOFER" in a square or rectangular shaped room. On-screen display does not appear. Try using a high-quality directional FM antenna. Use the manual tuning method. The SiriusConnect tuner is connected to "OFF" in the current condition. Try placing a flat object, such as a board, ...
... component is poor. Connect them with strong bass elements was in the path of seconds. Set "BASS OUT" to the owner's manual supplied with the automatic tuning method. Connect a subwoofer and adjust settings for a long period. Disconnect some of the antenna and SiriusConnect...SUBWOOFER" in a square or rectangular shaped room. On-screen display does not appear. Try using a high-quality directional FM antenna. Use the manual tuning method. The SiriusConnect tuner is connected to "OFF" in the current condition. Try placing a flat object, such as a board, ...

Owners Manual
Page 56
...8 HDMI SETUP, INPUT MENU 39 HDMI setup, INPUT MENU 39 HDMI, Audio delay 36 HDMI, glossary 48 ■I IMAGE LOCATION, MANUAL SETUP 35 Image location, MANUAL SETUP 35 INFO key, Remote control 9 INPUT ASSIGNMENT, INPUT MENU 38 Input assignment, INPUT MENU 38 Input channel indicators 7, 22 INPUT ... 37 BASS OUT, Subwoofer settings 36 Bass out, Subwoofer settings 36 Bass sound output redirection, Sound output 38 BEAM ADJUSTMENT, MANUAL SETUP 35 Beam adjustment, MANUAL SETUP 35 Beam mode, 5.1ch 23 Beam mode, 7.1ch 24 Blu-ray disc player connection 12 ■C cardboard microphone ...
...8 HDMI SETUP, INPUT MENU 39 HDMI setup, INPUT MENU 39 HDMI, Audio delay 36 HDMI, glossary 48 ■I IMAGE LOCATION, MANUAL SETUP 35 Image location, MANUAL SETUP 35 INFO key, Remote control 9 INPUT ASSIGNMENT, INPUT MENU 38 Input assignment, INPUT MENU 38 Input channel indicators 7, 22 INPUT ... 37 BASS OUT, Subwoofer settings 36 Bass out, Subwoofer settings 36 Bass sound output redirection, Sound output 38 BEAM ADJUSTMENT, MANUAL SETUP 35 Beam adjustment, MANUAL SETUP 35 Beam mode, 5.1ch 23 Beam mode, 7.1ch 24 Blu-ray disc player connection 12 ■C cardboard microphone ...