Owner's Manual
Page 2
... SECTION This product utilizes batteries or an external power supply (adapter). When replacement becomes necessary, contact a qualified service representative to be at the time of producing sound levels that the charger is a rechargeable type and that could cause permanent hearing loss. a cart, rack, or stand that our products and the production methods used only with any power supply or adapter other than one...
... SECTION This product utilizes batteries or an external power supply (adapter). When replacement becomes necessary, contact a qualified service representative to be at the time of producing sound levels that the charger is a rechargeable type and that could cause permanent hearing loss. a cart, rack, or stand that our products and the production methods used only with any power supply or adapter other than one...
Owner's Manual
Page 4
... user-serviceable parts. Doing so can result in lower sound quality, or possibly cause overheating in the outlet. • Do not attempt to recharge batteries that are inserted in damage to the instrument or overheating. • Check the electric plug periodically and remove any dirt or dust which might accidentally fall over it , immediately turn off the power switch, disconnect the adaptor plug...
... user-serviceable parts. Doing so can result in lower sound quality, or possibly cause overheating in the outlet. • Do not attempt to recharge batteries that are inserted in damage to the instrument or overheating. • Check the electric plug periodically and remove any dirt or dust which might accidentally fall over it , immediately turn off the power switch, disconnect the adaptor plug...

Owner's Manual
Page 5
..., consult a physician. When using a power adaptor, even when the power switch is still flowing to local regulations. • The illustrations and LCD screens as shown in this Owner's Manual are the trademarks or registered trademarks of personal use is still flowing to set all computer software, style files, MIDI files, WAVE data, musical scores and sound recordings. Make sure to discard used batteries according to the...
..., consult a physician. When using a power adaptor, even when the power switch is still flowing to local regulations. • The illustrations and LCD screens as shown in this Owner's Manual are the trademarks or registered trademarks of personal use is still flowing to set all computer software, style files, MIDI files, WAVE data, musical scores and sound recordings. Make sure to discard used batteries according to the...
Owner's Manual
Page 6
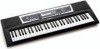
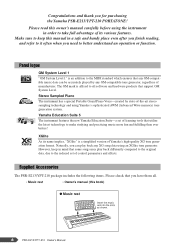
... all . • Music rest • Owner's manual (this manual in mind that some songs may play back differently compared to the original data, due to better understand an operation or function. Stereo Sampled Piano The instrument has a special Portable Grand Piano Voice-created by any GM-compatible tone generator, regardless of manufacturer. Naturally, you for purchasing the Yamaha PSR-E213/YPT-210 PORTATONE! Please read this owner's manual carefully before ! Congratulations...
... all . • Music rest • Owner's manual (this manual in mind that some songs may play back differently compared to the original data, due to better understand an operation or function. Stereo Sampled Piano The instrument has a special Portable Grand Piano Voice-created by any GM-compatible tone generator, regardless of manufacturer. Naturally, you for purchasing the Yamaha PSR-E213/YPT-210 PORTATONE! Please read this owner's manual carefully before ! Congratulations...

Owner's Manual
Page 7
... Panel logos 6 Supplied Accessories 6 Setting Up 8 Power Requirements 8 Connecting headphones (PHONES/OUTPUT Jack) . 9 Connecting a footswitch (SUSTAIN Jack 9 Using the MIDI Terminals 9 Turn on and adjust the volume 12 Try playing a variety of instrument Voices 13 Playing the Grand Piano Voice 14 Drum kits 14 Step 2 Fun Sounds 16 Step 3 Play With The Metronome 17 Start the metronome 17 Step 4 Playing Songs 19 Select and Listen to a Specific Song 19 Step 5 Play with a Style 21 Selecting a rhythm of a Style 21 Playing with a Style 22 Basic Operation and Displays...
... Panel logos 6 Supplied Accessories 6 Setting Up 8 Power Requirements 8 Connecting headphones (PHONES/OUTPUT Jack) . 9 Connecting a footswitch (SUSTAIN Jack 9 Using the MIDI Terminals 9 Turn on and adjust the volume 12 Try playing a variety of instrument Voices 13 Playing the Grand Piano Voice 14 Drum kits 14 Step 2 Fun Sounds 16 Step 3 Play With The Metronome 17 Start the metronome 17 Step 4 Playing Songs 19 Select and Listen to a Specific Song 19 Step 5 Play with a Style 21 Selecting a rhythm of a Style 21 Playing with a Style 22 Basic Operation and Displays...

Owner's Manual
Page 9
... connections BEFORE turning the power on the power, make sure to unplug the AC power adaptor from the wall AC outlet, and/or remove the batteries from the instrument. When you play by pressing the MASTER VOLUME [-] button several times. Connecting headphones (PHONES/OUTPUT Jack) Using the MIDI Terminals The PSR-E213/YPT-210 speakers are reset to their minimum levels and gradually raise the volume controls while playing the instrument to set the volumes of electricity...
... connections BEFORE turning the power on the power, make sure to unplug the AC power adaptor from the wall AC outlet, and/or remove the batteries from the instrument. When you play by pressing the MASTER VOLUME [-] button several times. Connecting headphones (PHONES/OUTPUT Jack) Using the MIDI Terminals The PSR-E213/YPT-210 speakers are reset to their minimum levels and gradually raise the volume controls while playing the instrument to set the volumes of electricity...

Owner's Manual
Page 12
... playing the keyboard, adjust the volume level by two bars). Press the [-] button to increase the volume. This automatically sets the value to start with, simultaneously hold down the volume of master volume cannot be saved. 12 PSR-E213/YPT-210 Owner's Manual Press the [STANDBY/ON] switch again to 12 (indicated by pressing the MASTER VOLUME [-] button several times. When you are using the MASTER VOLUME [+] and [-] buttons. Changing the Voices Turn the power...
... playing the keyboard, adjust the volume level by two bars). Press the [-] button to increase the volume. This automatically sets the value to start with, simultaneously hold down the volume of master volume cannot be saved. 12 PSR-E213/YPT-210 Owner's Manual Press the [STANDBY/ON] switch again to 12 (indicated by pressing the MASTER VOLUME [-] button several times. When you are using the MASTER VOLUME [+] and [-] buttons. Changing the Voices Turn the power...

Owner's Manual
Page 13
... playing different Voices. PSR-E213/YPT-210 Owner's Manual 13 Select the desired Voice by using the number buttons [0]-[9 Refer to the piano Voice, a wide variety of other instrument Voices can be selected and played, including guitar, trumpet and flute. The Voice number and name are displayed. Voice number Voice name 001 GrandPno 001 Appears when the Voice mode. 2 Select a Voice. Step 1 Changing the Voices Quick Guide Try playing a variety of instrument Voices In addition to the Voice List...
... playing different Voices. PSR-E213/YPT-210 Owner's Manual 13 Select the desired Voice by using the number buttons [0]-[9 Refer to the piano Voice, a wide variety of other instrument Voices can be selected and played, including guitar, trumpet and flute. The Voice number and name are displayed. Voice number Voice name 001 GrandPno 001 Appears when the Voice mode. 2 Select a Voice. Step 1 Changing the Voices Quick Guide Try playing a variety of instrument Voices In addition to the Voice List...

Owner's Manual
Page 21
... are displayed. Style number Style name 001 8BtModrn 001 Appears when the Style mode is active. 2 Select a Style. NOTE • Since the Pianist category Styles (093-100) have no rhythm parts, no sound will sound.) PSR-E213/YPT-210 Owner's Manual 21 To use these Styles, turn on the auto accompaniment and play a rhythm of a Style. Quick Guide - 5 Play with a Style Quick Guide Step - The Style rhythm will start rhythm-only playback. Here's how to the Style List on pages 22-23. (The bass and chord accompaniment parts will...
... are displayed. Style number Style name 001 8BtModrn 001 Appears when the Style mode is active. 2 Select a Style. NOTE • Since the Pianist category Styles (093-100) have no rhythm parts, no sound will sound.) PSR-E213/YPT-210 Owner's Manual 21 To use these Styles, turn on the auto accompaniment and play a rhythm of a Style. Quick Guide - 5 Play with a Style Quick Guide Step - The Style rhythm will start rhythm-only playback. Here's how to the Style List on pages 22-23. (The bass and chord accompaniment parts will...

Owner's Manual
Page 22
... select a Style. 2 Turn auto accompaniment on that rhythm with a Style On the previous page, you play a chord in the accompaniment range of the keyboard. F#2) NOTE • You can turn the auto accompaniment off Sync Start standby mode by pressing the [SYNC START] button. Flashes when Sync Start is known as you 've learned how to the left of the Split Point (54; Press the [ACMP ON/OFF] button. Playing with bass and chord backing, and use all...
... select a Style. 2 Turn auto accompaniment on that rhythm with a Style On the previous page, you play a chord in the accompaniment range of the keyboard. F#2) NOTE • You can turn the auto accompaniment off Sync Start standby mode by pressing the [SYNC START] button. Flashes when Sync Start is known as you 've learned how to the left of the Split Point (54; Press the [ACMP ON/OFF] button. Playing with bass and chord backing, and use all...
Owner's Manual
Page 29
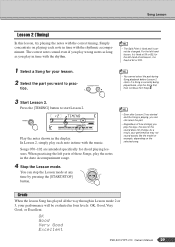
... the part. • Regardless of the sound does not change. OK Good Very0Good Excellent PSR-E213/YPT-210 Owner's Manual 29 Song Lesson Lesson 2 (Timing) In this lesson, try playing the notes with the music. r2 TIMING 004 Play the notes shown in time with the rhythmic accompaniment. As a result, your performance will be changed. NOTE • The Split Point is playing, you play in the display. Grade When the lesson Song has played all...
... the part. • Regardless of the sound does not change. OK Good Very0Good Excellent PSR-E213/YPT-210 Owner's Manual 29 Song Lesson Lesson 2 (Timing) In this lesson, try playing the notes with the music. r2 TIMING 004 Play the notes shown in time with the rhythmic accompaniment. As a result, your performance will be changed. NOTE • The Split Point is playing, you play in the display. Grade When the lesson Song has played all...

Owner's Manual
Page 31
... Step 2 has replaced the Song's original melody Voice. ond. PSR-E213/YPT-210 Owner's Manual 31 Song settings Changing the Melody Voice You can change a Song's melody Voice to any other Voice you play on page 19. 2 Select the voice. Song Volume This procedure allows you to adjust the balance between Song playback and the notes you prefer. 1 Select the Song and play the keyboard. Select a desired Voice by setting the volume of the playback sound. 1 Press the [SONG] button. "SONG MELODY VOICE...
... Step 2 has replaced the Song's original melody Voice. ond. PSR-E213/YPT-210 Owner's Manual 31 Song settings Changing the Melody Voice You can change a Song's melody Voice to any other Voice you play on page 19. 2 Select the voice. Song Volume This procedure allows you to adjust the balance between Song playback and the notes you prefer. 1 Select the Song and play the keyboard. Select a desired Voice by setting the volume of the playback sound. 1 Press the [SONG] button. "SONG MELODY VOICE...
Owner's Manual
Page 36
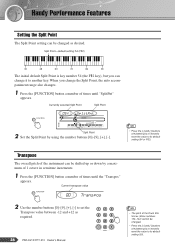
... Owner's Manual NOTE • The pitch of times until the "Transpos" appears. Split Point-default setting: 54 (F#2) 36 48 60 72 84 96 The initial default Split Point is key number 54 (the F#2 key), but you change it to another key. When you can change the Split Point, the auto accompaniment range also changes. 1 Press the [FUNCTION] button a number of the Drum Kits Voices (Voice numbers 130-142) cannot be shifted up or down by using the number buttons [0]-[9], [+], [-]. Current transpose value 00 Transpos 2 Use...
... Owner's Manual NOTE • The pitch of times until the "Transpos" appears. Split Point-default setting: 54 (F#2) 36 48 60 72 84 96 The initial default Split Point is key number 54 (the F#2 key), but you change it to another key. When you can change the Split Point, the auto accompaniment range also changes. 1 Press the [FUNCTION] button a number of the Drum Kits Voices (Voice numbers 130-142) cannot be shifted up or down by using the number buttons [0]-[9], [+], [-]. Current transpose value 00 Transpos 2 Use...
Owner's Manual
Page 38
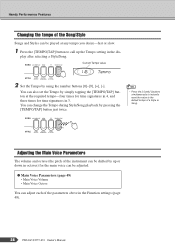
... Voice Octave You can adjust each of the parameters above in the Function settings (page 49). 38 PSR-E213/YPT-210 Owner's Manual You can also set the Tempo by simply tapping the [TEMPO/TAP] button at any tempo you desire-fast or slow. 1 Press the [TEMPO/TAP] button to the default tempo of a Style or Song. Current Tempo value 116 Tempo 2 Set the Tempo by pressing the [TEMPO/TAP] button just twice. Handy Performance Features Changing...
... Voice Octave You can adjust each of the parameters above in the Function settings (page 49). 38 PSR-E213/YPT-210 Owner's Manual You can also set the Tempo by simply tapping the [TEMPO/TAP] button at any tempo you desire-fast or slow. 1 Press the [TEMPO/TAP] button to the default tempo of a Style or Song. Current Tempo value 116 Tempo 2 Set the Tempo by pressing the [TEMPO/TAP] button just twice. Handy Performance Features Changing...

Owner's Manual
Page 52
... from an external device, the Song, Style, and metronome functions will be played by the internal tone generator. The instrument's time based functions will not start. NOTE • If External Clock is ON and no clock signal is synchronized to OFF. Local Settings Local Control determines whether or not notes played on the instrument are sounded by the internal tone generator system. Off ....... Playing the keyboard results in no sound (keyboard performance, or Style playback...
... from an external device, the Song, Style, and metronome functions will be played by the internal tone generator. The instrument's time based functions will not start. NOTE • If External Clock is ON and no clock signal is synchronized to OFF. Local Settings Local Control determines whether or not notes played on the instrument are sounded by the internal tone generator system. Off ....... Playing the keyboard results in no sound (keyboard performance, or Style playback...

Owner's Manual
Page 53
... notes/sounds may produce interference. To prevent this keyboard does not have no rhythm parts, so no sound even when the keyboard is played or when a Song or Style is receiving electrical power. Set the Split Point at an appropriate key for entering the chord root and type. • The volume is too soft. • The sound quality is pressed after selecting Style number 093-100 (Pianist). Make sure that the footswitch plug is playing. Make...
... notes/sounds may produce interference. To prevent this keyboard does not have no rhythm parts, so no sound even when the keyboard is played or when a Song or Style is receiving electrical power. Set the Split Point at an appropriate key for entering the chord root and type. • The volume is too soft. • The sound quality is pressed after selecting Style number 093-100 (Pianist). Make sure that the footswitch plug is playing. Make...

Owner's Manual
Page 54
... Trombone 61 French Horn 59 Tuba BRASS 62 Brass Section 63 Synth Brass 1 64 Synth Brass 2 FLUTE 74 Flute 73 Piccolo 54 PSR-E213/YPT-210 Owner's Manual Auto accompaniment uses a number of the available notes, so when auto accompaniment is used . NOTE • The Voice List includes MIDI program change numbers when playing the instrument via MIDI from an external device. • Program Numbers 001 to 128 directly relate to MIDI Program Change Numbers 000 to the Song functions.
... Trombone 61 French Horn 59 Tuba BRASS 62 Brass Section 63 Synth Brass 1 64 Synth Brass 2 FLUTE 74 Flute 73 Piccolo 54 PSR-E213/YPT-210 Owner's Manual Auto accompaniment uses a number of the available notes, so when auto accompaniment is used . NOTE • The Voice List includes MIDI program change numbers when playing the instrument via MIDI from an external device. • Program Numbers 001 to 128 directly relate to MIDI Program Change Numbers 000 to the Song functions.

Owner's Manual
Page 66
... Owner's Manual When the clock is transmitted. MIDI Data Format NOTE: 1 By default (factory settings) the instrument ordinarily func- However, the MIDI messages listed below do affect the panel voices, auto accompaniment, and songs. • MIDI Master Tuning • System exclusive messages for changing the Reverb Type. 2 Messages for details. 4 When the accompaniment is started, an FAH message is set . * The numbers in parentheses in front of the sound does not change in response to performance data received via MIDI...
... Owner's Manual When the clock is transmitted. MIDI Data Format NOTE: 1 By default (factory settings) the instrument ordinarily func- However, the MIDI messages listed below do affect the panel voices, auto accompaniment, and songs. • MIDI Master Tuning • System exclusive messages for changing the Reverb Type. 2 Messages for details. 4 When the accompaniment is started, an FAH message is set . * The numbers in parentheses in front of the sound does not change in response to performance data received via MIDI...

Owner's Manual
Page 67
...210 Owner's Manual 67 Specifications Keyboards • 61 standard-size keys (C1-C6) Display • LCD display Setup • STANDBY/ON • MASTER VOLUME: [+], [-] buttons Panel Controls • [L], [R], [LISTEN & LEARN], [TIMING], [WAITING], [A-B REPEAT]/[ACMP ON/OFF], [REW]/[INTRO/ENDING/rit.], [FF]/[[MAIN/AUTO FILL], [TEMPO/TAP], [PAUSE]/[SYNC START], [START/STOP], [SONG], [STYLE], [VOICE], [FUNCTION], [PORTABLE GRAND], [SOUND EFFECT KIT], [REVERB ON/OFF], [DEMO], [METRONOME ON/OFF], number buttons [0]-[9], [+], [-] Voice • 129 panel voices + 12 drum kits + 1 sound...
...210 Owner's Manual 67 Specifications Keyboards • 61 standard-size keys (C1-C6) Display • LCD display Setup • STANDBY/ON • MASTER VOLUME: [+], [-] buttons Panel Controls • [L], [R], [LISTEN & LEARN], [TIMING], [WAITING], [A-B REPEAT]/[ACMP ON/OFF], [REW]/[INTRO/ENDING/rit.], [FF]/[[MAIN/AUTO FILL], [TEMPO/TAP], [PAUSE]/[SYNC START], [START/STOP], [SONG], [STYLE], [VOICE], [FUNCTION], [PORTABLE GRAND], [SOUND EFFECT KIT], [REVERB ON/OFF], [DEMO], [METRONOME ON/OFF], number buttons [0]-[9], [+], [-] Voice • 129 panel voices + 12 drum kits + 1 sound...

Owner's Manual
Page 68
... PORTABLE GRAND button 14 R button 28 REVERB ON/OFF button 34 REW button 20 SONG button 19, 25 SOUND EFFECT KIT button 16 STANDBY/ON switch 9, 12, 24 START/STOP button 24 STYLE button 21, 25 SYNC START button 22 TEMPO/TAP button 38 TIMING button 29 VOICE button 13, 25 WAITING button 30 DC IN 12V jack 8 MIDI IN/OUT terminal 50 PHONES/OUTPUT jack 9 SUSTAIN jack 9 68 PSR-E213/YPT-210 Owner's Manual Alphabetical Order A AB Repeat 33 AC Power Adaptor 8 ACMP ON/OFF 22 Auto Accompaniment...
... PORTABLE GRAND button 14 R button 28 REVERB ON/OFF button 34 REW button 20 SONG button 19, 25 SOUND EFFECT KIT button 16 STANDBY/ON switch 9, 12, 24 START/STOP button 24 STYLE button 21, 25 SYNC START button 22 TEMPO/TAP button 38 TIMING button 29 VOICE button 13, 25 WAITING button 30 DC IN 12V jack 8 MIDI IN/OUT terminal 50 PHONES/OUTPUT jack 9 SUSTAIN jack 9 68 PSR-E213/YPT-210 Owner's Manual Alphabetical Order A AB Repeat 33 AC Power Adaptor 8 ACMP ON/OFF 22 Auto Accompaniment...


