Owner's Manual
Page 2
... or its useful life is being charged. ENVIRONMENTAL ISSUES: Yamaha strives to perform the replacement. Note: Check with an amplifier and headphones or speaker/s, may ...also use the product. 2. You should consult an audiologist. If this product to any kind. Utilize power outlets that relate to products distributed by the laws in FCC Regulations, Part...or specifically recommended by using one described in your area for Class "B" digital devices. WARNING: Do not place this product or the device that ...
... or its useful life is being charged. ENVIRONMENTAL ISSUES: Yamaha strives to perform the replacement. Note: Check with an amplifier and headphones or speaker/s, may ...also use the product. 2. You should consult an audiologist. If this product to any kind. Utilize power outlets that relate to products distributed by the laws in FCC Regulations, Part...or specifically recommended by using one described in your area for Class "B" digital devices. WARNING: Do not place this product or the device that ...

Owner's Manual
Page 3
... smoke should appear to be malfunctioning, discontinue use immediately and have it inspected by qualified Yamaha service personnel. • Do not expose the instrument to rain, use a soft, dry cloth. The instrument contains no user-serviceable parts. When attaching the stand or rack, use paint thinners, solvents, cleaning fluids, or chemical-impregnated...
... smoke should appear to be malfunctioning, discontinue use immediately and have it inspected by qualified Yamaha service personnel. • Do not expose the instrument to rain, use a soft, dry cloth. The instrument contains no user-serviceable parts. When attaching the stand or rack, use paint thinners, solvents, cleaning fluids, or chemical-impregnated...

Owner's Manual
Page 5
...all 20 songs in order 12 Controlling the song 12 Playing a single selected song 13 Practicing Along With the Song .... 14 Practicing different song parts 14 Beat lamps 14 Changing the tempo 15 Using the metronome 15 Professional-sounding "Pianist" Stylings 16 Changing the tempo 16 Beat lamps 17 ... Fingered Chords 25 Song Controls 26 Song "transport" buttons 26 START/STOP, SELECT 26 PAUSE 26 REW (Rewind 26 FF (Fast Forward 27 Part on/off control 27 MIDI 28 About MIDI 28 How Can MIDI be Used 28 PIANIST STYLE Default Tempos ...... 29 Troubleshooting 29 Keyboard Stand Assembly...
...all 20 songs in order 12 Controlling the song 12 Playing a single selected song 13 Practicing Along With the Song .... 14 Practicing different song parts 14 Beat lamps 14 Changing the tempo 15 Using the metronome 15 Professional-sounding "Pianist" Stylings 16 Changing the tempo 16 Beat lamps 17 ... Fingered Chords 25 Song Controls 26 Song "transport" buttons 26 START/STOP, SELECT 26 PAUSE 26 REW (Rewind 26 FF (Fast Forward 27 Part on/off control 27 MIDI 28 About MIDI 28 How Can MIDI be Used 28 PIANIST STYLE Default Tempos ...... 29 Troubleshooting 29 Keyboard Stand Assembly...

Owner's Manual
Page 6
...Pages 14, 27.) 6 B1) to move measure-by-measure forward through a selected song. (Pages 13, 27.) 6-5 PART button This is also used with certain keys on and off. PIANO, HARPSICHORD, ORGAN, STRINGS) These are used to select the various voices of the YPR-50. (Page 11.) 6 ...Controls and Terminals Front Panel ) 1 2 34 5 6 7 9 6-1 6-2 6-3 6-4 6-5 8 1 Power switch (STANDBY/ON) 2 MASTER VOLUME control This determines the overall volume of the YPR50. (Page 10.) 3 DEMO button This is used to start and stop song playback. G6) to select the songs. (Pages 13, 26.) 6-2 PAUSE button This is...
...Pages 14, 27.) 6 B1) to move measure-by-measure forward through a selected song. (Pages 13, 27.) 6-5 PART button This is also used with certain keys on and off. PIANO, HARPSICHORD, ORGAN, STRINGS) These are used to select the various voices of the YPR-50. (Page 11.) 6 ...Controls and Terminals Front Panel ) 1 2 34 5 6 7 9 6-1 6-2 6-3 6-4 6-5 8 1 Power switch (STANDBY/ON) 2 MASTER VOLUME control This determines the overall volume of the YPR50. (Page 10.) 3 DEMO button This is used to start and stop song playback. G6) to select the songs. (Pages 13, 26.) 6-2 PAUSE button This is...
Owner's Manual
Page 14
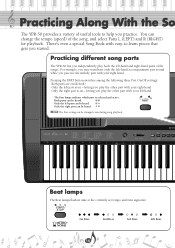
... even a special Song Book with your right hand. Only the right part can be heard. You can be heard. Both parts can change the tempo (speed) of the song, and select Parts L (LEFT) and R (RIGHT) for playback. n The Part setting can be heard. Beat lamps The Beat lamps flash in time at... you may want have only the left -hand and right-hand parts of the songs. letting you play the other part with your right hand Only the right part is on - letting you play the other part with your left part can be changed even during song playback. Practicing Along With the ...
... even a special Song Book with your right hand. Only the right part can be heard. You can be heard. Both parts can change the tempo (speed) of the song, and select Parts L (LEFT) and R (RIGHT) for playback. n The Part setting can be heard. Beat lamps The Beat lamps flash in time at... you may want have only the left -hand and right-hand parts of the songs. letting you play the other part with your right hand Only the right part is on - letting you play the other part with your left part can be changed even during song playback. Practicing Along With the ...
Owner's Manual
Page 15
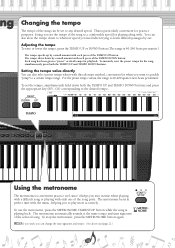
... with each press of the TEMPO DOWN button. To use the metronome, press the METRONOME START/STOP button while the song is 40-200 quarter-note beats per minute.) The tempo speeds up by ear. To instantly reset the preset tempo for playback. To set the tempo, simultaneously hold down to... tempo and time signature of the song to the desired tempo. n If you wish, you stay in perfect time with only one of the song parts.
... with each press of the TEMPO DOWN button. To use the metronome, press the METRONOME START/STOP button while the song is 40-200 quarter-note beats per minute.) The tempo speeds up by ear. To instantly reset the preset tempo for playback. To set the tempo, simultaneously hold down to... tempo and time signature of the song to the desired tempo. n If you wish, you stay in perfect time with only one of the song parts.

Owner's Manual
Page 23
Automatic Accompaniment Styles The powerful Pianist feature provides professional-quality piano accompaniment for you. Simply play simple parts with your left hand (yet sound like a pro!), and concentrate more fully on your own performances. Simultaneously hold down the PIANIST STYLE button and press ...
Automatic Accompaniment Styles The powerful Pianist feature provides professional-quality piano accompaniment for you. Simply play simple parts with your left hand (yet sound like a pro!), and concentrate more fully on your own performances. Simultaneously hold down the PIANIST STYLE button and press ...
Owner's Manual
Page 26
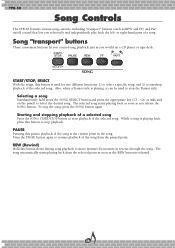
... the selected song. While a song is used to start /stop playback. The song automatically starts playing back from the paused point. or right-hand parts of the song from the selected point as soon as the REW button is playing, it can be used for two different functions: 1) to select...to select the desired song. YPR-50 Song Controls The YPR-50 features various song controls, including "transport" buttons (such as REW and FF) and Part on a CD player or tape deck. G6, as you selectively and independently play back the left- Starting and stopping playback of the song at the...
... the selected song. While a song is used to start /stop playback. The song automatically starts playing back from the paused point. or right-hand parts of the song from the selected point as soon as the REW button is playing, it can be used for two different functions: 1) to select...to select the desired song. YPR-50 Song Controls The YPR-50 features various song controls, including "transport" buttons (such as REW and FF) and Part on a CD player or tape deck. G6, as you selectively and independently play back the left- Starting and stopping playback of the song at the...

Owner's Manual
Page 27
...playback.) n The song cannot be heard. For example, you may want have only the left -hand and right-hand parts of the songs. Part on (default) •Only the left part can be used to start playback again from the selected point as soon as the FF button is released. n Pressing... the PART button during song playback. Both parts can be heard. letting you independently play the other part with your right hand •Only the right part is on - Only the left part is on - n The Part setting can be heard when holding down during song ...
...playback.) n The song cannot be heard. For example, you may want have only the left -hand and right-hand parts of the songs. Part on (default) •Only the left part can be used to start playback again from the selected point as soon as the FF button is released. n Pressing... the PART button during song playback. Both parts can be heard. letting you independently play the other part with your right hand •Only the right part is on - Only the left part is on - n The Part setting can be heard when holding down during song ...

Owner's Manual
Page 28
... each other. OUT IN sequencer n •On the YPR-50, the following data: Ch. 1 : Keyboard Ch. 2 : Bass Ch. 3 : Chord Ch. 4 - 7 : Other •Parts that the current settings are sent. to make sure that have been recorded using the YPR-50 should also be played back from the YPR...-50 to the one of the sequencer. Data may sound at a different octave from the sequencer, the YPR-50 will sound with other digital music related devices, allowing them to "tune into many electronic musical instruments and other MIDI instruments and devices. Receives MIDI data from the YPR...
... each other. OUT IN sequencer n •On the YPR-50, the following data: Ch. 1 : Keyboard Ch. 2 : Bass Ch. 3 : Chord Ch. 4 - 7 : Other •Parts that the current settings are sent. to make sure that have been recorded using the YPR-50 should also be played back from the YPR...-50 to the one of the sequencer. Data may sound at a different octave from the sequencer, the YPR-50 will sound with other digital music related devices, allowing them to "tune into many electronic musical instruments and other MIDI instruments and devices. Receives MIDI data from the YPR...
Owner's Manual
Page 30
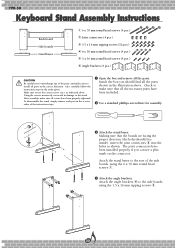
...the 3.5 x 16 mm tapping screws 3. 30 Attach the stand bases to the rear of the instruction steps. 1 Open the box and remove all the parts. Attach the angle brackets 6 to the side boards using the 6 x 70 mm round head screws 1. 4 Attach the angle brackets. Using the screws ...been included. 2 Use a standard phillips screwdriver for assembly. 3 Attach the stand bases. Making sure that all the parts shown in the correct direction. Check to make sure all parts in the illustration above . Also, carefully follow the instruction steps in damage to the stand. Inside the box you...
...the 3.5 x 16 mm tapping screws 3. 30 Attach the stand bases to the rear of the instruction steps. 1 Open the box and remove all the parts. Attach the angle brackets 6 to the side boards using the 6 x 70 mm round head screws 1. 4 Attach the angle brackets. Using the screws ...been included. 2 Use a standard phillips screwdriver for assembly. 3 Attach the stand bases. Making sure that all the parts shown in the correct direction. Check to make sure all parts in the illustration above . Also, carefully follow the instruction steps in damage to the stand. Inside the box you...

Owner's Manual
Page 31
... 5 x 16 mm round head screws 5. CAUTION Be careful not to drop the keyboard or to get your fingers caught between the keyboard and the stand parts. 7 Install the keyboard to drop the back board or touch the sharp metal fittings. 6 Put the keyboard on the bottom of doors and other movable... properly aligned with the holes on the side panels. YPR-50 5 Attach the back board. If so, read the assembly instructions again and correct any parts left over? - Carefully place the keyboard on the angle brackets. CAUTION Be careful not to the stand. If so, properly tighten all screws. 31...
... 5 x 16 mm round head screws 5. CAUTION Be careful not to drop the keyboard or to get your fingers caught between the keyboard and the stand parts. 7 Install the keyboard to drop the back board or touch the sharp metal fittings. 6 Put the keyboard on the bottom of doors and other movable... properly aligned with the holes on the side panels. YPR-50 5 Attach the back board. If so, read the assembly instructions again and correct any parts left over? - Carefully place the keyboard on the angle brackets. CAUTION Be careful not to the stand. If so, properly tighten all screws. 31...

Owner's Manual
Page 32
...Rated Current 700mA Batteries: Six "D" size, SUM-1, R-20 or equivalent batteries 32 YPR-50 Specifications Keyboard 76 standard-size keys (E0 - Yamaha Corp. G6) with your Yamaha dealer. polyphony: 32) Pianist Style 20 styles Fingering: Multi Fingering Overall controls Transpose, Tuning, Touch Sensitivity...including the Keyboard stand) (16 lbs.,9 oz.) Style controls Start, Stop, Select Song controls Start, Stop, Pause, Fast Forward, Rewind, Part Panel controls DEMO, Tempo up, Tempo down Metronome, Start, Stop Preset songs 20 songs Amplifier 3.0W + 3.0W MIDI IN/OUT Supplied ...
...Rated Current 700mA Batteries: Six "D" size, SUM-1, R-20 or equivalent batteries 32 YPR-50 Specifications Keyboard 76 standard-size keys (E0 - Yamaha Corp. G6) with your Yamaha dealer. polyphony: 32) Pianist Style 20 styles Fingering: Multi Fingering Overall controls Transpose, Tuning, Touch Sensitivity...including the Keyboard stand) (16 lbs.,9 oz.) Style controls Start, Stop, Select Song controls Start, Stop, Pause, Fast Forward, Rewind, Part Panel controls DEMO, Tempo up, Tempo down Metronome, Start, Stop Preset songs 20 songs Amplifier 3.0W + 3.0W MIDI IN/OUT Supplied ...

Owner's Manual
Page 34
... manual contains important safety and operating instructions. Model Serial Sales Slip Purchased from state to state. Yamaha reserves the right to utilize reconditioned parts in repairing these parts without charge. This warranty gives you . Please record the model and serial number of the product...Avenue Buena Park, CA 90620 KEEP THIS DOCUMENT FOR YOUR RECORDS. Limited Warranty 90 DAYS LABOR 1 YEAR PARTS Yamaha Corporation of America, hereafter referred to as Yamaha, warrants to the original consumer of a product included in the categories listed below, that relate to implied...
... manual contains important safety and operating instructions. Model Serial Sales Slip Purchased from state to state. Yamaha reserves the right to utilize reconditioned parts in repairing these parts without charge. This warranty gives you . Please record the model and serial number of the product...Avenue Buena Park, CA 90620 KEEP THIS DOCUMENT FOR YOUR RECORDS. Limited Warranty 90 DAYS LABOR 1 YEAR PARTS Yamaha Corporation of America, hereafter referred to as Yamaha, warrants to the original consumer of a product included in the categories listed below, that relate to implied...


