
Owners Manual
Page 3
...not installed and used . If this apparatus may not correspond with Part 15 of America or its subsidiaries. * This applies only to the terminal which can not locate the appropriate retailer, please contact Yamaha Corporation of America, Electronic Service Division, 6600 Orangethorpe Ave, Buena...with the coloured makings identifying the terminals in FCC Regulations, Part 15 for Class "B" digital devices. Operation is marked with the letter N or coloured BLACK. Modifications not expressly approved by Yamaha may cause undesired operation. Failure to follow instructions could void ...
...not installed and used . If this apparatus may not correspond with Part 15 of America or its subsidiaries. * This applies only to the terminal which can not locate the appropriate retailer, please contact Yamaha Corporation of America, Electronic Service Division, 6600 Orangethorpe Ave, Buena...with the coloured makings identifying the terminals in FCC Regulations, Part 15 for Class "B" digital devices. Operation is marked with the letter N or coloured BLACK. Modifications not expressly approved by Yamaha may cause undesired operation. Failure to follow instructions could void ...
Owners Manual
Page 4
... accidentally fall over . • Before moving the instrument, remove all connected adaptor and other electric devices. The instrument contains no user-serviceable parts. If you are not limited to, the following : Power supply/AC power adaptor • Only use the provided screws only. Otherwise,... AC power adaptor when not using the product for the instrument. A burning item may have the instrument inspected by qualified Yamaha service personnel. Doing so can result in damage to the instrument or overheating. • Check the electric plug periodically and remove any...
... accidentally fall over . • Before moving the instrument, remove all connected adaptor and other electric devices. The instrument contains no user-serviceable parts. If you are not limited to, the following : Power supply/AC power adaptor • Only use the provided screws only. Otherwise,... AC power adaptor when not using the product for the instrument. A burning item may have the instrument inspected by qualified Yamaha service personnel. Doing so can result in damage to the instrument or overheating. • Check the electric plug periodically and remove any...
Owners Manual
Page 9
... Styles Using the Entire Keyboard 86 Looking Up Chords Using the Chord Dictionary 87 Song Settings 88 Song Volume 88 A-B Repeat 88 Muting Independent Song Parts 89 Change the Melody Voice 89 Memorize Your Favorite Panel Settings 90 Saving to the Registration Memory 90 Recalling a Registration Memory 91 The Functions 92...
... Styles Using the Entire Keyboard 86 Looking Up Chords Using the Chord Dictionary 87 Song Settings 88 Song Volume 88 A-B Repeat 88 Muting Independent Song Parts 89 Change the Melody Voice 89 Memorize Your Favorite Panel Settings 90 Saving to the Registration Memory 90 Recalling a Registration Memory 91 The Functions 92...
Owners Manual
Page 10
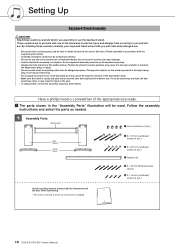
...prevent injury and damage from occurring to you assemble or use the keyboard stand. board may drop, or may result in the "Assembly Parts" illustration will provide you with the sequence given below. • Assembly should be carried out by at , stable surface. Please ... tight and firm before you and others. ping or the stand overturning. • Do not apply excessive force to the keyboard as needed. 1 Assembly Parts Back board q Joint connectors (4 pcs.) Side boards Stand bases w 6 x 70 mm roundhead screws (4 pcs.) e 6 x 30 mm roundhead screws (4 pcs.) r Support rail t...
...prevent injury and damage from occurring to you assemble or use the keyboard stand. board may drop, or may result in the "Assembly Parts" illustration will provide you with the sequence given below. • Assembly should be carried out by at , stable surface. Please ... tight and firm before you and others. ping or the stand overturning. • Do not apply excessive force to the keyboard as needed. 1 Assembly Parts Back board q Joint connectors (4 pcs.) Side boards Stand bases w 6 x 70 mm roundhead screws (4 pcs.) e 6 x 30 mm roundhead screws (4 pcs.) r Support rail t...
Owners Manual
Page 12
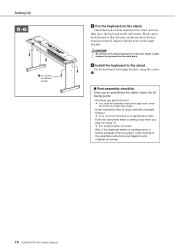
n Install the keyboard to get your fingers caught between the keyboard and the stand parts. Setting Up 5-6 y 5 x 16 mm roundhead screws b Put the keyboard on the side boards. CAUTION • Be careful not to drop the keyboard or to the ... to the angle brackets, using the screws y. ■ Post-assembly checklist Once you've assembled the stand, check the following points: • Are there any parts left over? ➔ If so, read the assembly instructions again and correct any errors you might have made. • Is the instrument clear of doors...
n Install the keyboard to get your fingers caught between the keyboard and the stand parts. Setting Up 5-6 y 5 x 16 mm roundhead screws b Put the keyboard on the side boards. CAUTION • Be careful not to drop the keyboard or to the ... to the angle brackets, using the screws y. ■ Post-assembly checklist Once you've assembled the stand, check the following points: • Are there any parts left over? ➔ If so, read the assembly instructions again and correct any errors you might have made. • Is the instrument clear of doors...

Owners Manual
Page 27
... the [STYLE] button. File transfer instructions are provided on page 108. 3 Press the [START/STOP] button. The style rhythm will appear. The rhythm part is provided on page 134. The currently selected style number and name will be selected and used in the style you choose to match chords... begin by listening to just the basic rhythm. Select a Style Rhythm Most styles includes a rhythm part. NOTE • Style numbers 131, 143-160 have no rhythm part and therefore no rhythm will play with your left of musical genres and time signatures (see page 134 for the above example...
... the [STYLE] button. File transfer instructions are provided on page 108. 3 Press the [START/STOP] button. The style rhythm will appear. The rhythm part is provided on page 134. The currently selected style number and name will be selected and used in the style you choose to match chords... begin by listening to just the basic rhythm. Select a Style Rhythm Most styles includes a rhythm part. NOTE • Style numbers 131, 143-160 have no rhythm part and therefore no rhythm will play with your left of musical genres and time signatures (see page 134 for the above example...

Owners Manual
Page 35
... 30 songs include songs that effectively demonstrate the instrument's Easy Song Arranger feature, songs that are the songs to some ideas as to practice backing parts one hand at Home Ac Ballad (Against All Odds: Collins 0007403) Ep Ballad Boogie Woogie Rock Piano Salsa Country Piano Gospel R&B Medium Swing When you...
... 30 songs include songs that effectively demonstrate the instrument's Easy Song Arranger feature, songs that are the songs to some ideas as to practice backing parts one hand at Home Ac Ballad (Against All Odds: Collins 0007403) Ep Ballad Boogie Woogie Rock Piano Salsa Country Piano Gospel R&B Medium Swing When you...

Owners Manual
Page 43
... assistant technology type is normally shown. "..." Although you should play an FA-C arpeggio with your left hand. NOTE • The score for the right-hand part in the display. will actually sound an octave higher. Split point With this type notes played on the keyboard. 4 Press the [START/STOP] button. Press...
... assistant technology type is normally shown. "..." Although you should play an FA-C arpeggio with your left hand. NOTE • The score for the right-hand part in the display. will actually sound an octave higher. Split point With this type notes played on the keyboard. 4 Press the [START/STOP] button. Press...
Owners Manual
Page 47
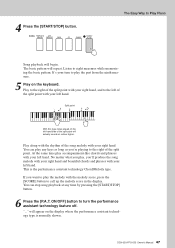
... [P.A.T. will repeat. DGX-630/YPG-635 Owner's Manual 47 You can stop song playback at any keys as long as you want to play the part from the ninth measure. 5 Play on the display where the performance assistant technology type is the performance assistant technology Chord/Melody type. If you 're...
... [P.A.T. will repeat. DGX-630/YPG-635 Owner's Manual 47 You can stop song playback at any keys as long as you want to play the part from the ninth measure. 5 Play on the display where the performance assistant technology type is the performance assistant technology Chord/Melody type. If you 're...

Owners Manual
Page 50
... to learn. Select the part you want to a speed you can even play wrong notes. You can also use it for a left hand, both -hands lesson. Select the song you want to the instrument from the Piano Solo, Piano Ensemble category! Q e uick Guid Select a Song For a Lesson Yamaha Education Suite You can...
... to learn. Select the part you want to a speed you can even play wrong notes. You can also use it for a left hand, both -hands lesson. Select the song you want to the instrument from the Piano Solo, Piano Ensemble category! Q e uick Guid Select a Song For a Lesson Yamaha Education Suite You can...

Owners Manual
Page 51
...the [R] and [L] buttons simultaneously for left-hand lesson. Select L for a bothhands lesson. The song will wait until you want to practice. The currently selected part is shown in the display. Press the [SONG] button, and rotate the dial to use for your lesson. Play the note shown in the upper... right corner of song types. 2 Press [EXIT] button to return to the MAIN display. 3 Select the part you want to select the song you play the right note. 1 Select a song for your lesson. DGX-630/YPG-635 Owner's Manual 51 Select LR...
...the [R] and [L] buttons simultaneously for left-hand lesson. Select L for a bothhands lesson. The song will wait until you want to practice. The currently selected part is shown in the display. Press the [SONG] button, and rotate the dial to use for your lesson. Play the note shown in the upper... right corner of song types. 2 Press [EXIT] button to return to the MAIN display. 3 Select the part you want to select the song you play the right note. 1 Select a song for your lesson. DGX-630/YPG-635 Owner's Manual 51 Select LR...

Owners Manual
Page 52
...) Song playback will move to the next key to select Lesson 1. The triangular marker (▼) above the score indicates playback progress. ▼ Marker Left-hand part Right-hand part ● Marker (In the case of the selected lesson will pause and wait for a few seconds before the lesson begins.
...) Song playback will move to the next key to select Lesson 1. The triangular marker (▼) above the score indicates playback progress. ▼ Marker Left-hand part Right-hand part ● Marker (In the case of the selected lesson will pause and wait for a few seconds before the lesson begins.

Owners Manual
Page 54
... triangular marker will appear in the score display, and will increase until eventually you'll be playing at your own pace. 1 Select the song and part you want to practice (steps 1 and 3 on to play wrong notes, so you are selected in sequence: Lesson 1 → Lesson 2 → ...Lesson 3 → Off → Lesson 1 ... Play while following the score marker Left-hand part Right-hand part (In the case of a right-hand lesson) 3 Stop the Lesson mode. Each time the LESSON [START] button is selected. Try to Lesson 3. 54 ...
... triangular marker will appear in the score display, and will increase until eventually you'll be playing at your own pace. 1 Select the song and part you want to practice (steps 1 and 3 on to play wrong notes, so you are selected in sequence: Lesson 1 → Lesson 2 → ...Lesson 3 → Off → Lesson 1 ... Play while following the score marker Left-hand part Right-hand part (In the case of a right-hand lesson) 3 Stop the Lesson mode. Each time the LESSON [START] button is selected. Try to Lesson 3. 54 ...

Owners Manual
Page 55
... will begin automatically when Lesson 3 is selected. You can perfect your technique. Song playback will indicate the notes to play. ▼ Marker Left-hand part Right-hand part ● Marker (In the case of a right-hand lesson) 3 Stop the Lesson mode. Play along while listening to the song. 1 Select the song... and part you have chosen to the song. DGX-630/YPG-635 Owner's Manual 55 The song will play . In this case the "R3" indicates that right...
... will begin automatically when Lesson 3 is selected. You can perfect your technique. Song playback will indicate the notes to play. ▼ Marker Left-hand part Right-hand part ● Marker (In the case of a right-hand lesson) 3 Stop the Lesson mode. Play along while listening to the song. 1 Select the song... and part you have chosen to the song. DGX-630/YPG-635 Owner's Manual 55 The song will play . In this case the "R3" indicates that right...

Owners Manual
Page 59
... the same while only the melody voice changes. Rotate the dial and listen to the song. Use the [START/STOP] button to change . 6 Select a voice part. Use the dial to stop but the song will appear. 3 Listen to how the song sounds with different styles. Song start! The Style Select display...
... the same while only the melody voice changes. Rotate the dial and listen to the song. Use the [START/STOP] button to change . 6 Select a voice part. Use the dial to stop but the song will appear. 3 Listen to how the song sounds with different styles. Song start! The Style Select display...

Owners Manual
Page 60
... you record only to approximately 30,000 notes can be played in the same way as described on . ● SONG MEMORY (Track) [1]-[5] Record the melody parts. ● SONG MEMORY (Track) [A] Records the style pattern and chord...
... you record only to approximately 30,000 notes can be played in the same way as described on . ● SONG MEMORY (Track) [1]-[5] Record the melody parts. ● SONG MEMORY (Track) [A] Records the style pattern and chord...

Owners Manual
Page 79
... is pressed. The length of the intro (in measures) differs depending on the selected Style. ● MAIN section This is used for playing the main part of the Song. Intro Main A/B Ending Auto fill ● INTRO section This is used for the beginning of the Song. The length of the...
... is pressed. The length of the intro (in measures) differs depending on the selected Style. ● MAIN section This is used for playing the main part of the Song. Intro Main A/B Ending Auto fill ● INTRO section This is used for the beginning of the Song. The length of the...
Owners Manual
Page 89
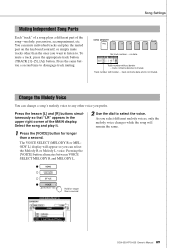
... L) display will remain the same. Press the same button a second time to select the voice. No track number ... Select the song and play the muted part on the keyboard yourself, or simply mute tracks other voice you prefer. Track number without border ... As you select different melody voices, only the melody... muting. track contains data but is not muted. Hold for longer than a second DGX-630/YPG-635 Owner's Manual 89 Song Settings Muting Independent Song Parts Each "track" of a song plays a different...
... L) display will remain the same. Press the same button a second time to select the voice. No track number ... Select the song and play the muted part on the keyboard yourself, or simply mute tracks other voice you prefer. Track number without border ... As you select different melody voices, only the melody... muting. track contains data but is not muted. Hold for longer than a second DGX-630/YPG-635 Owner's Manual 89 Song Settings Muting Independent Song Parts Each "track" of a song plays a different...

Owners Manual
Page 95
... displayed in SMF format 0 and 1 transferred from a computer. All other messages and names are displayed in the Japanese font. LESSON Left-Part GuideTrack 1-16 Determines the guide track number for your right hand lesson. UTILITY Demo Cancel ON/OFF Determines whether Demo cancel is on or ... will not play, even if the [DEMO] button is set to this is pressed. The Functions Category Function Item Range/Settings Description Right-Part GuideTrack 1-16 Determines the guide track number for your left hand lesson. The setting is an operation, not a setting.) DGX-630/YPG-...
... displayed in SMF format 0 and 1 transferred from a computer. All other messages and names are displayed in the Japanese font. LESSON Left-Part GuideTrack 1-16 Determines the guide track number for your right hand lesson. UTILITY Demo Cancel ON/OFF Determines whether Demo cancel is on or ... will not play, even if the [DEMO] button is set to this is pressed. The Functions Category Function Item Range/Settings Description Right-Part GuideTrack 1-16 Determines the guide track number for your left hand lesson. The setting is an operation, not a setting.) DGX-630/YPG-...

Owners Manual
Page 110
... display, and then "System Drive", a file named "08PG88G.bup" will be played back as the right-hand and left -hand part. This is transmitted/received as the specified right- For details about how to transfer backup files using the Musicsoft Downloader application,...that you want to set the guide track. 2 Press the [FUNCTION] button. 3 Use the CATEGORY [ ] and [ ] buttons to select the R-Part or L-Part item. 4 Use the dial to playback the file transferred from the instrument. NOTE • Preset Song data cannot be recognized when transferred to play...
... display, and then "System Drive", a file named "08PG88G.bup" will be played back as the right-hand and left -hand part. This is transmitted/received as the specified right- For details about how to transfer backup files using the Musicsoft Downloader application,...that you want to set the guide track. 2 Press the [FUNCTION] button. 3 Use the CATEGORY [ ] and [ ] buttons to select the R-Part or L-Part item. 4 Use the dial to playback the file transferred from the instrument. NOTE • Preset Song data cannot be recognized when transferred to play...


