Owners Manual
Page 3
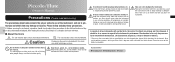
Piccolo/Flute Owner's Manual Precautions Please read before using polish. Please follow and obey these precautions to disfigure the instrument. Keep the oil, polish, etc., out of the instrument, and are to key balance, linkage, or pads, resulting in disfigurement. Be aware of no concern in any damage or injuries. Doing so may change over time however, it should be...
Piccolo/Flute Owner's Manual Precautions Please read before using polish. Please follow and obey these precautions to disfigure the instrument. Keep the oil, polish, etc., out of the instrument, and are to key balance, linkage, or pads, resulting in disfigurement. Be aware of no concern in any damage or injuries. Doing so may change over time however, it should be...

Owners Manual
Page 4
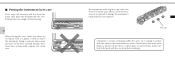
Nomenclature ■ Piccolo Headjoint 18 Crown Embouchure Hole ■ Flute Headjoint Body Crown Embouchure Hole Keys Headjoint Crown Body Lip Plate Embouchure Hole Footjoint Keys Body Keys Footjoint
Nomenclature ■ Piccolo Headjoint 18 Crown Embouchure Hole ■ Flute Headjoint Body Crown Embouchure Hole Keys Headjoint Crown Body Lip Plate Embouchure Hole Footjoint Keys Body Keys Footjoint

Owners Manual
Page 5
■ Alto Flute Crown Headjoint 19 Lip Plate Embouchure Hole Lip Plate U-Joint Crown Headjoint Embouchure Hole Body Keys ■ Bass Flute U-Joint Body Hand rest Footjoint Headjoint Lip Plate Embouchure Hole Crown Keys Footjoint
■ Alto Flute Crown Headjoint 19 Lip Plate Embouchure Hole Lip Plate U-Joint Crown Headjoint Embouchure Hole Body Keys ■ Bass Flute U-Joint Body Hand rest Footjoint Headjoint Lip Plate Embouchure Hole Crown Keys Footjoint

Owners Manual
Page 6
... sections together. For this applies to piccolo and bass flutes only). 1. Hand rest Turn the thicker end of the hand rest so it is at which the instrument is used. • During winter, wait until the entire instrument has adjusted to room temperature before assembling. • If you experience difficulty connecting the joints together, apply a thin coat of...
... sections together. For this applies to piccolo and bass flutes only). 1. Hand rest Turn the thicker end of the hand rest so it is at which the instrument is used. • During winter, wait until the entire instrument has adjusted to room temperature before assembling. • If you experience difficulty connecting the joints together, apply a thin coat of...
Owners Manual
Page 7
...coming in contact with ring key caps, take care not to change the instrument's tonal character as a gauze or cloth on top of the silver or silver plate. Fit it into the case. For instruments with the metal on the instrument can be freely removed or replaced to loosen the caps. ...Also, never leave a damp cloth or gauze, etc., in the case. To prevent this, make sure there are clean before playing. ■ Putting the instrument in its case First, ...
...coming in contact with ring key caps, take care not to change the instrument's tonal character as a gauze or cloth on top of the silver or silver plate. Fit it into the case. For instruments with the metal on the instrument can be freely removed or replaced to loosen the caps. ...Also, never leave a damp cloth or gauze, etc., in the case. To prevent this, make sure there are clean before playing. ■ Putting the instrument in its case First, ...
Owners Manual
Page 8
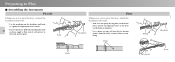
Marks Marks Body Footjoint Headjoint Body Preparing to Play ■ Assembling the instrument Piccolo Taking care not to press the keys, connect the headjoint to the body. * Use the markings on the body or footjoint. * Use a gauze to the cork and try again. Body Flute Headjoint Taking care not to press the keys, attach the headjoint to the body...
Marks Marks Body Footjoint Headjoint Body Preparing to Play ■ Assembling the instrument Piccolo Taking care not to press the keys, connect the headjoint to the body. * Use the markings on the body or footjoint. * Use a gauze to the cork and try again. Body Flute Headjoint Taking care not to press the keys, attach the headjoint to the body...
Owners Manual
Page 9
... care not to apply unnecessary force to the keys. Footjoint Body If you experience difficulty attaching the joint sections, use a cloth or gauze to tighten the handle too firmly. Next, rotate the headjoint and adjust the position (angle) of the keys when looking at the keys from the joints before attaching. Align the U-...in the middle and try to attach it is to attach the hand rest to the instrument at its uppermost point, and the footjoint by its lowest point, and attach the footjoint to the body. * Use a gauze to the main body. Attach the U-joint to wipe off any dirt ...
... care not to apply unnecessary force to the keys. Footjoint Body If you experience difficulty attaching the joint sections, use a cloth or gauze to tighten the handle too firmly. Next, rotate the headjoint and adjust the position (angle) of the keys when looking at the keys from the joints before attaching. Align the U-...in the middle and try to attach it is to attach the hand rest to the instrument at its uppermost point, and the footjoint by its lowest point, and attach the footjoint to the body. * Use a gauze to the main body. Attach the U-joint to wipe off any dirt ...

Owners Manual
Page 10
... up before tuning. 1. When adjusting the tone reflector's position Adjusting the tone reflector's position requires some air through the instrument to properly position the tone reflector. Checking the position 24 Using the supplied cleaning rod accessory, insert it be done by the dealer from whom you purchased the instrument, rather than by yourself. Should it into the headjoint and make sure...
... up before tuning. 1. When adjusting the tone reflector's position Adjusting the tone reflector's position requires some air through the instrument to properly position the tone reflector. Checking the position 24 Using the supplied cleaning rod accessory, insert it be done by the dealer from whom you purchased the instrument, rather than by yourself. Should it into the headjoint and make sure...
Owners Manual
Page 11
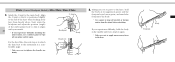
... too far from the body. * Do not adjust the space between the headjoint and U-joint. Doing so will degrade the pitch balance making it in to raise the pitch. If the tone reflector is out of the cleaning rod with a gauze before carrying out the task. •When too far right... the cork has become worn or loose due to tone reflector slippage, replace the cork with a new one (about once a year). •When too far left Too far left Crown Headcork 2. Headjoint Body Alto Flute/Bass Flute On the alto and bass flutes, tuning is accomplished by sliding the headjoint slightly toward or ...
... too far from the body. * Do not adjust the space between the headjoint and U-joint. Doing so will degrade the pitch balance making it in to raise the pitch. If the tone reflector is out of the cleaning rod with a gauze before carrying out the task. •When too far right... the cork has become worn or loose due to tone reflector slippage, replace the cork with a new one (about once a year). •When too far left Too far left Crown Headcork 2. Headjoint Body Alto Flute/Bass Flute On the alto and bass flutes, tuning is accomplished by sliding the headjoint slightly toward or ...
Owners Manual
Page 12
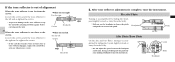
... in cracking. Insert the corner of a gauze through the hole at the end of the cleaning rod, making sure no bare metal is wrapped and wipe away moisture from wooden instruments. Cleaning rod Gauze Gauze 3. Gauze Gauze Wrap the gauze around the end of the cleaning rod. 26 ...2. Wipe away moisture from the joint sections as well. * Take extra care removing moisture from the instrument's bore. Maintenance ■ After playing the instrument ● Cleaning the body 1. Rotate the body in the same direction that the gauze is exposed. * Exposed metal can result...
... in cracking. Insert the corner of a gauze through the hole at the end of the cleaning rod, making sure no bare metal is wrapped and wipe away moisture from wooden instruments. Cleaning rod Gauze Gauze 3. Gauze Gauze Wrap the gauze around the end of the cleaning rod. 26 ...2. Wipe away moisture from the joint sections as well. * Take extra care removing moisture from the instrument's bore. Maintenance ■ After playing the instrument ● Cleaning the body 1. Rotate the body in the same direction that the gauze is exposed. * Exposed metal can result...

Owners Manual
Page 13
● Pad maintenance 1. Cleaning paper Powder paper ● Cleaning the exterior Taking care not to apply pressure on the keys, use a piece of cleaning paper between the pad and the tone hole and completely remove moisture from the instrument's exterior. * When cleaning the keys, take care not to remove the stickiness. While the pads are still sticky, use a polishing cloth to wipe away fingerprints or oil from them. 27 2. If the pads are still wet, insert a piece of powder paper to damage the pads. Polishing cloth Polishing cloth
● Pad maintenance 1. Cleaning paper Powder paper ● Cleaning the exterior Taking care not to apply pressure on the keys, use a piece of cleaning paper between the pad and the tone hole and completely remove moisture from the instrument's exterior. * When cleaning the keys, take care not to remove the stickiness. While the pads are still sticky, use a polishing cloth to wipe away fingerprints or oil from them. 27 2. If the pads are still wet, insert a piece of powder paper to damage the pads. Polishing cloth Polishing cloth

Owners Manual
Page 14
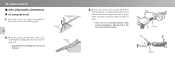
Also, do not point the end of the spout and possibly into your eyes. 1. Oil can be a danger. Apply some key oil to the key mechanisms. 28 * Do not apply too much key oil. * Completely remove any oil that gets onto the surface of the oil spout is sharp and therefore can spray out of the spout toward your hand. ■ Maintenance required every two to three months Be careful when using the key oil The end of the keys or instrument. Never touch the end of the spout with your face. Key oil 2. After applying oil, move the key several times to spread the oil evenly.
Also, do not point the end of the spout and possibly into your eyes. 1. Oil can be a danger. Apply some key oil to the key mechanisms. 28 * Do not apply too much key oil. * Completely remove any oil that gets onto the surface of the oil spout is sharp and therefore can spray out of the spout toward your hand. ■ Maintenance required every two to three months Be careful when using the key oil The end of the keys or instrument. Never touch the end of the spout with your face. Key oil 2. After applying oil, move the key several times to spread the oil evenly.

Owners Manual
Page 15
... of tune. Troubleshooting The tone is difficult. Felts or corks may have come loose. → Re-tighten the screws. The keys produce noise when played. Attaching or removing the headjoint is not clear, or the instrument plays out of alignment or the pads may be deformed. The body may be out of alignment. → If you couldn't properly adjust...
... of tune. Troubleshooting The tone is difficult. Felts or corks may have come loose. → Re-tighten the screws. The keys produce noise when played. Attaching or removing the headjoint is not clear, or the instrument plays out of alignment or the pads may be deformed. The body may be out of alignment. → If you couldn't properly adjust...

Owners Manual
Page 19
Ce document a été imprimé sur du papier non blanchi au chlore avec de l'encre d'huile de soja. Auf Umweltpapier mit Sojatinte gedruckt. Este documento se ha impreso en papel sin cloro alguno, con tinta de soja ECF ECF ECF ECF xxxxxxx 2500852 0709PONK-B0 Printed in Japan This document is printed on chlorine free (ECF) paper with soy ink.
Ce document a été imprimé sur du papier non blanchi au chlore avec de l'encre d'huile de soja. Auf Umweltpapier mit Sojatinte gedruckt. Este documento se ha impreso en papel sin cloro alguno, con tinta de soja ECF ECF ECF ECF xxxxxxx 2500852 0709PONK-B0 Printed in Japan This document is printed on chlorine free (ECF) paper with soy ink.


