

YHT-33 Connection Diagram
Page 2
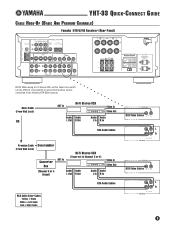
... wall, at least ear level or preferably higher) For wire runs over 30 feet, use the interconnect diagrams (on floor) C Sub NS-A16 (right side, same height as those that came with (1) universal remote control, (1) DV-S5270 DVD Player, (4) 2-way NS-A16 front/rear speakers, (1) NS-AC16 2-way centerchannel speaker, 100' of speaker wire, (1) SW-201 Powered Subwoofer, and related owner's manuals. Save this Quick-Connect Guide for your system. TOOLS AND PARTS The YHT-33 Home Theater...
... wall, at least ear level or preferably higher) For wire runs over 30 feet, use the interconnect diagrams (on floor) C Sub NS-A16 (right side, same height as those that came with (1) universal remote control, (1) DV-S5270 DVD Player, (4) 2-way NS-A16 front/rear speakers, (1) NS-AC16 2-way centerchannel speaker, 100' of speaker wire, (1) SW-201 Powered Subwoofer, and related owner's manuals. Save this Quick-Connect Guide for your system. TOOLS AND PARTS The YHT-33 Home Theater...
YHT-33 Connection Diagram
Page 3
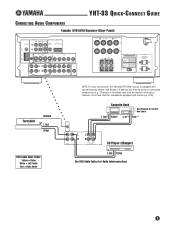
...* L In** R In** LL RR CD Player (Changer) L Out R Out Use RCA Audio Cables For Audio Interconnections 3 YHT-33 QUICK-CON N ECT GUIDE CONNECTING AUDIO COMPONENTS Yamaha HTR-5240 Receiver (Rear Panel) Turntable Ground L Out R Out RCA Cable Color Codes Yellow = Video White = Left Audio Red = Right Audio NOTE: For your convenience, the Yamaha HTR-5240 receiver is turned on. If desired, use them to power on connected components (e.g., CD player or turntable) each time the receiver is equipped with clocks (e.g.,VCR).
...* L In** R In** LL RR CD Player (Changer) L Out R Out Use RCA Audio Cables For Audio Interconnections 3 YHT-33 QUICK-CON N ECT GUIDE CONNECTING AUDIO COMPONENTS Yamaha HTR-5240 Receiver (Rear Panel) Turntable Ground L Out R Out RCA Cable Color Codes Yellow = Video White = Left Audio Red = Right Audio NOTE: For your convenience, the Yamaha HTR-5240 receiver is turned on. If desired, use them to power on connected components (e.g., CD player or turntable) each time the receiver is equipped with clocks (e.g.,VCR).

YHT-33 Connection Diagram
Page 4
YHT-33 QUICK-CON N ECT GUIDE CONNECTING THE YHT-33 SPEAKERS NS-A16 SW-201 (Front Right Ch.) (Subwoofer) POWER ON OFF Subwoofer Wiring Clear/ Stripe Wire Clear Wire VOLUME STANDBY-RED ON-GREEN AUTO STANDBY HIGH LOW OFF 0 I0 INPUT2 /MONO INPUT1 FROM AMPLIFIER OUTPUT TO SPEAKERS To AC Outlet INPUT2 /MONO NS-A16 (Front Left Ch.) Clear/ Stripe Wire Clear Wire RCA Audio Cable (included) Yamaha HTR-5240 A/V Receiver (Rear Panel Speaker Terminals) + R M−ain Spk−rs. L + Surround Cntr R L + + − −...
YHT-33 QUICK-CON N ECT GUIDE CONNECTING THE YHT-33 SPEAKERS NS-A16 SW-201 (Front Right Ch.) (Subwoofer) POWER ON OFF Subwoofer Wiring Clear/ Stripe Wire Clear Wire VOLUME STANDBY-RED ON-GREEN AUTO STANDBY HIGH LOW OFF 0 I0 INPUT2 /MONO INPUT1 FROM AMPLIFIER OUTPUT TO SPEAKERS To AC Outlet INPUT2 /MONO NS-A16 (Front Left Ch.) Clear/ Stripe Wire Clear Wire RCA Audio Cable (included) Yamaha HTR-5240 A/V Receiver (Rear Panel Speaker Terminals) + R M−ain Spk−rs. L + Surround Cntr R L + + − −...
YHT-33 Connection Diagram
Page 5
... power on all other components. POWER ON OFF ❸ POWER ON OFF VOLUME STANDBY-RED ON-GREEN AUTO STANDBY HIGH LOW OFF 0 I0 HIGH LOW HIGH CUT INPUT2 /MONO INPUT1 FROM AMPLIFIER OUTPUT TO SPEAKERS VOLUME STANDBY-RED ON-GREEN AUTO STANDBY HIGH LOW OFF 0 I0 HIGH LOW HIGH CUT ❷ ❶ To AC Outlet 5 SW-201 Subwoofer (Rear Panel) 4. Press the SW-201's POWER switch to LOW. 3. Play an audio source and adjust the HTR-5240's VOLUME control to adjust the balance the volume...
... power on all other components. POWER ON OFF ❸ POWER ON OFF VOLUME STANDBY-RED ON-GREEN AUTO STANDBY HIGH LOW OFF 0 I0 HIGH LOW HIGH CUT INPUT2 /MONO INPUT1 FROM AMPLIFIER OUTPUT TO SPEAKERS VOLUME STANDBY-RED ON-GREEN AUTO STANDBY HIGH LOW OFF 0 I0 HIGH LOW HIGH CUT ❷ ❶ To AC Outlet 5 SW-201 Subwoofer (Rear Panel) 4. Press the SW-201's POWER switch to LOW. 3. Play an audio source and adjust the HTR-5240's VOLUME control to adjust the balance the volume...

YHT-33 Connection Diagram
Page 6
.../TV VIDEO SIGNAL VIDEO SAT/D-TV IN OUT VCR MONITOR OUT Video In Optional 75-ohm Coaxial Cable ANT In RCA Cable Color Codes Yellow = Video White = Left Audio Red = Right Audio Hi-Fi Stereo VCR Video In Video Out ANT Out (RF Out) Use RCA Video Cables And Jacks For Video Interconnections 6 YHT-33 QUICK-CON N ECT GUIDE CONNECTING VIDEO CABLES FOR VIDEO COMPONENTS Yamaha HTR-5240 Receiver (Rear Panel) Satellite Receiver (or Video Game) Video Out NOTE: When using a hi-fi stereo VCR, set the Tuner/Line switch...
.../TV VIDEO SIGNAL VIDEO SAT/D-TV IN OUT VCR MONITOR OUT Video In Optional 75-ohm Coaxial Cable ANT In RCA Cable Color Codes Yellow = Video White = Left Audio Red = Right Audio Hi-Fi Stereo VCR Video In Video Out ANT Out (RF Out) Use RCA Video Cables And Jacks For Video Interconnections 6 YHT-33 QUICK-CON N ECT GUIDE CONNECTING VIDEO CABLES FOR VIDEO COMPONENTS Yamaha HTR-5240 Receiver (Rear Panel) Satellite Receiver (or Video Game) Video Out NOTE: When using a hi-fi stereo VCR, set the Tuner/Line switch...
YHT-33 Connection Diagram
Page 7
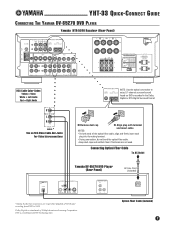
COMPONENT VIDEO PR PB Y AC IN Optical-Fiber Cable (included) 7 YHT-33 QUICK-CON N ECT GUIDE CONNECTING THE YAMAHA DV-S5270 DVD PLAYER Yamaha HTR-5240 Receiver (Rear Panel) RCA Cable Color Codes Yellow = Video White = Left Audio Red = Right Audio V L R * DVD/LD Use an RCA Video Cable And Jacks For Video Interconnections NOTE: Use the optical connection to VCR. DTS is a trademark of CD-Rs and recording from DVD to enjoy 5.1-channel surround sound found on DVDs recorded in the Dolby Digital or DTS Digital Surround format. ❶ Remove dust cap ❷...
COMPONENT VIDEO PR PB Y AC IN Optical-Fiber Cable (included) 7 YHT-33 QUICK-CON N ECT GUIDE CONNECTING THE YAMAHA DV-S5270 DVD PLAYER Yamaha HTR-5240 Receiver (Rear Panel) RCA Cable Color Codes Yellow = Video White = Left Audio Red = Right Audio V L R * DVD/LD Use an RCA Video Cable And Jacks For Video Interconnections NOTE: Use the optical connection to VCR. DTS is a trademark of CD-Rs and recording from DVD to enjoy 5.1-channel surround sound found on DVDs recorded in the Dolby Digital or DTS Digital Surround format. ❶ Remove dust cap ❷...
YHT-33 Connection Diagram
Page 8
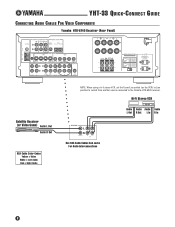
Hi-Fi Stereo VCR Audio Audio Audio Audio L Out R Out L In R In AUDIO SIGNAL L R SAT/D-TV IN OUT VCR Use RCA Audio Cables And Jacks For Audio Interconnections 8 YHT-33 QUICK-CON N ECT GUIDE CONNECTING AUDIO CABLES FOR VIDEO COMPONENTS Yamaha HTR-5240 Receiver (Rear Panel) Satellite Receiver (or Video Game) Audio L Out Audio R Out RCA Cable Color Codes Yellow = Video White = Left Audio Red = Right Audio NOTE: When using a hi-fi stereo VCR, set the Tuner/Line switch (on the VCR) to Line position to record from another source connected to the Yamaha HTR-5240 receiver.
Hi-Fi Stereo VCR Audio Audio Audio Audio L Out R Out L In R In AUDIO SIGNAL L R SAT/D-TV IN OUT VCR Use RCA Audio Cables And Jacks For Audio Interconnections 8 YHT-33 QUICK-CON N ECT GUIDE CONNECTING AUDIO CABLES FOR VIDEO COMPONENTS Yamaha HTR-5240 Receiver (Rear Panel) Satellite Receiver (or Video Game) Audio L Out Audio R Out RCA Cable Color Codes Yellow = Video White = Left Audio Red = Right Audio NOTE: When using a hi-fi stereo VCR, set the Tuner/Line switch (on the VCR) to Line position to record from another source connected to the Yamaha HTR-5240 receiver.
YHT-33 Connection Diagram
Page 9
... (Tuner set the Tuner/Line switch (on the VCR) to Line position to record from another source connected to Channel 3 or 4) Video In Video Out (Channel 3 or 4 Output) Audio Audio L Out R Out Audio Audio L In R In RCA Audio Cables RCA Cable Color Codes Yellow = Video White = Left Audio Red = Right Audio VIDEO SIGNAL RCA Video Cables VCR IN OUT L R IN VCR OUT AUDIO SIGNAL VIDEO SIGNAL RCA Video Cables VCR IN OUT L R IN VCR OUT AUDIO SIGNAL 9 YHT-33 QUICK-CON N ECT GUIDE CABLE HOOK-UP (BASIC AND PREMIUM CHANNELS) Yamaha HTR-5240 Receiver (Rear Panel...
... (Tuner set the Tuner/Line switch (on the VCR) to Line position to record from another source connected to Channel 3 or 4) Video In Video Out (Channel 3 or 4 Output) Audio Audio L Out R Out Audio Audio L In R In RCA Audio Cables RCA Cable Color Codes Yellow = Video White = Left Audio Red = Right Audio VIDEO SIGNAL RCA Video Cables VCR IN OUT L R IN VCR OUT AUDIO SIGNAL VIDEO SIGNAL RCA Video Cables VCR IN OUT L R IN VCR OUT AUDIO SIGNAL 9 YHT-33 QUICK-CON N ECT GUIDE CABLE HOOK-UP (BASIC AND PREMIUM CHANNELS) Yamaha HTR-5240 Receiver (Rear Panel...

YHT-33 Connection Diagram
Page 10
... the indicator LED flashes twice. If it doesn't respond, use the original remote control supplied with factory codes to control most Yamaha audio components. YHT-33 QUICK-CON N ECT GUIDE PROGRAMMING THE UNIVERSAL REMOTE CONTROL Indicator LED Use Keypad To Enter Setup Codes Component Selector Buttons Turns On Component's Power SETTING UP COMPONENTS Perform the procedure for the same manufacturer and repeat steps 3 through 5. 10 Press and hold both VOLUME buttons at the receiver, press AMP/ TUNER, and then press POWER. 3. It comes pre...
... the indicator LED flashes twice. If it doesn't respond, use the original remote control supplied with factory codes to control most Yamaha audio components. YHT-33 QUICK-CON N ECT GUIDE PROGRAMMING THE UNIVERSAL REMOTE CONTROL Indicator LED Use Keypad To Enter Setup Codes Component Selector Buttons Turns On Component's Power SETTING UP COMPONENTS Perform the procedure for the same manufacturer and repeat steps 3 through 5. 10 Press and hold both VOLUME buttons at the receiver, press AMP/ TUNER, and then press POWER. 3. It comes pre...

YHT-33 Connection Diagram
Page 11
...-digit setup code. If it doesn't respond, use another code for your brand of the HTR-5240 Owner's Manual). 2. Press and hold both VOLUME buttons at least four seconds until the indicator LED flashes twice. 4. SETTING UP OTHER COMPONENTS 1. On the remote control, press the desired component button (e.g., CD or TAPE/MD). 3. To verify the code works, aim the remote control at the back of VCR. 2. YHT-33 QUICK-CON N ECT GUIDE PROGRAMMING THE UNIVERSAL REMOTE CONTROL (CONTINUED) SETTING...
...-digit setup code. If it doesn't respond, use another code for your brand of the HTR-5240 Owner's Manual). 2. Press and hold both VOLUME buttons at least four seconds until the indicator LED flashes twice. 4. SETTING UP OTHER COMPONENTS 1. On the remote control, press the desired component button (e.g., CD or TAPE/MD). 3. To verify the code works, aim the remote control at the back of VCR. 2. YHT-33 QUICK-CON N ECT GUIDE PROGRAMMING THE UNIVERSAL REMOTE CONTROL (CONTINUED) SETTING...
YHT-33 Connection Diagram
Page 12
... LED flashes twice. 3. PLAYING A DVD 1. Press and hold both VOLUME buttons at the TV, press the TV to select the component, and then press POWER to factory values. Press and hold both VOLUME buttons at the DVD (or LD) player, and press > (forward button) to factory codes. 2. Using the keypad, enter the code "0000". 4. FAX: (888) 435-7922 http://www.yamaha.com 12 YHT-33 QUICK-CON N ECT GUIDE OPERATING THE UNIVERSAL REMOTE CONTROL OVERVIEW The universal remote control will control...
... LED flashes twice. 3. PLAYING A DVD 1. Press and hold both VOLUME buttons at the TV, press the TV to select the component, and then press POWER to factory values. Press and hold both VOLUME buttons at the DVD (or LD) player, and press > (forward button) to factory codes. 2. Using the keypad, enter the code "0000". 4. FAX: (888) 435-7922 http://www.yamaha.com 12 YHT-33 QUICK-CON N ECT GUIDE OPERATING THE UNIVERSAL REMOTE CONTROL OVERVIEW The universal remote control will control...


