Owner's Manual
Page 7
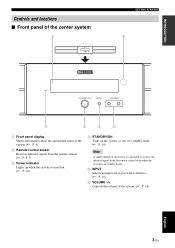
...; P. 16) Note A small amount of electricity is consumed to receive the infrared signal from the remote control even when the system is in standby mode. 5 INPUT Selects an input source you want to listen to. (☞ P. 16) 6 VOLUME -/+ Controls the volume of the system. (☞ P. 16) 3 En English
...; P. 16) Note A small amount of electricity is consumed to receive the infrared signal from the remote control even when the system is in standby mode. 5 INPUT Selects an input source you want to listen to. (☞ P. 16) 6 VOLUME -/+ Controls the volume of the system. (☞ P. 16) 3 En English
Owner's Manual
Page 8
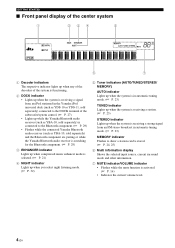
...of the system is functioning. 2 DOCK indicator • Lights up when the system is receiving a signal from an iPod stationed in the Yamaha iPod universal dock (such as YDS-10 or YDS-11, sold separately) connected to the DOCK terminal of the subwoofer/system control. (☞...(☞ P. 23) MEMORY indicator Flashes to show a station can be stored. (☞ P. 24, 25) 6 Multi information display Shows the selected input source, current surround mode and other information. 7 MUTE indicator/VOLUME indicator • Flashes while the mute function is activated. (☞ P. 16) • Indicates the...
...of the system is functioning. 2 DOCK indicator • Lights up when the system is receiving a signal from an iPod stationed in the Yamaha iPod universal dock (such as YDS-10 or YDS-11, sold separately) connected to the DOCK terminal of the subwoofer/system control. (☞...(☞ P. 23) MEMORY indicator Flashes to show a station can be stored. (☞ P. 24, 25) 6 Multi information display Shows the selected input source, current surround mode and other information. 7 MUTE indicator/VOLUME indicator • Flashes while the mute function is activated. (☞ P. 16) • Indicates the...
Owner's Manual
Page 9
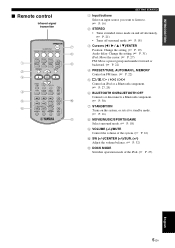
INTRODUCTION ■ Remote control Infrared signal transmitter GETTING STARTED 1 Input buttons Select an input source you want to listen to. (☞ P. 16) 2 STEREO • Turns extended stereo mode on and off alternately. (☞ P. 21) • Turns off surround mode. (☞ P. 18) 3 Cursors (W / X / S / T)/... (☞ P. 30) 7 STANDBY/ON Turns on the system, or sets it to standby mode. (☞ P. 16) 8 MOVIE/MUSIC/SPORTS/GAME Select surround mode. (☞ P. 18) 9 VOLUME (+/-)/MUTE Control the volume of the system. (☞ P. 16) 0 SW (+/-)/CENTER (+/-)/SUR. (+/-) Adjust the volume...
INTRODUCTION ■ Remote control Infrared signal transmitter GETTING STARTED 1 Input buttons Select an input source you want to listen to. (☞ P. 16) 2 STEREO • Turns extended stereo mode on and off alternately. (☞ P. 21) • Turns off surround mode. (☞ P. 18) 3 Cursors (W / X / S / T)/... (☞ P. 30) 7 STANDBY/ON Turns on the system, or sets it to standby mode. (☞ P. 16) 8 MOVIE/MUSIC/SPORTS/GAME Select surround mode. (☞ P. 18) 9 VOLUME (+/-)/MUTE Control the volume of the system. (☞ P. 16) 0 SW (+/-)/CENTER (+/-)/SUR. (+/-) Adjust the volume...
Owner's Manual
Page 16
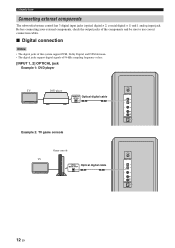
... jacks of this system support PCM, Dolby Digital, and DTS bitstream. • The digital jacks support digital signals of 96 kHz sampling frequency or less. [INPUT 1, 2] OPTICAL jack Example 1: DVD player TV DVD player Optical digital cable Example 2: TV game console Game console TV Optical digital cable 12 En CONNECTION Connecting...
... jacks of this system support PCM, Dolby Digital, and DTS bitstream. • The digital jacks support digital signals of 96 kHz sampling frequency or less. [INPUT 1, 2] OPTICAL jack Example 1: DVD player TV DVD player Optical digital cable Example 2: TV game console Game console TV Optical digital cable 12 En CONNECTION Connecting...
Owner's Manual
Page 20
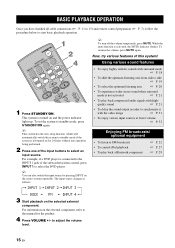
... STANDBY/ON. For example, if a DVD player is connected to the INPUT 1 jack of the subwoofer/system control, press INPUT 1 to side ☞ P. 19 • To select the optimum listening area ☞ P. 20 • To experience wider stereo sound when surround mode is turned on the center system repeatedly. To resume the volume...
... STANDBY/ON. For example, if a DVD player is connected to the INPUT 1 jack of the subwoofer/system control, press INPUT 1 to side ☞ P. 19 • To select the optimum listening area ☞ P. 20 • To experience wider stereo sound when surround mode is turned on the center system repeatedly. To resume the volume...
Owner's Manual
Page 22
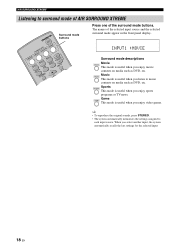
AIR SURROUND XTREME Listening to surround mode of AIR SURROUND XTREME Surround mode buttons Press one of the selected input source and the selected surround mode appear in the front panel display. Game This mode is useful when you listen to each input source. Music This mode is useful when you enjoy sports programs or TV... news. When you enjoy movie contents on media such as DVD, etc. Surround mode descriptions Movie This mode is useful when you ...
AIR SURROUND XTREME Listening to surround mode of AIR SURROUND XTREME Surround mode buttons Press one of the selected input source and the selected surround mode appear in the front panel display. Game This mode is useful when you listen to each input source. Music This mode is useful when you enjoy sports programs or TV... news. When you enjoy movie contents on media such as DVD, etc. Surround mode descriptions Movie This mode is useful when you ...
Owner's Manual
Page 23
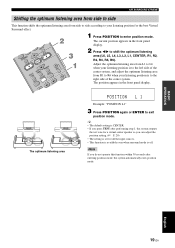
... The default setting is CENTER. • If you press TEST after performing step 1, the system outputs the test tone for a virtual center speaker so you do not operate this function within 30 seconds after entering position mode, the system automatically exits position mode. Note If you can adjust...in the front panel display. AIR SURROUND XTREME Shifting the optimum listening area from side to side This function shifts the optimum listening area from R1 to R6 when your listening position for all the input sources. • This function is available even when surround mode is to the right...
... The default setting is CENTER. • If you press TEST after performing step 1, the system outputs the test tone for a virtual center speaker so you do not operate this function within 30 seconds after entering position mode, the system automatically exits position mode. Note If you can adjust...in the front panel display. AIR SURROUND XTREME Shifting the optimum listening area from side to side This function shifts the optimum listening area from R1 to R6 when your listening position for all the input sources. • This function is available even when surround mode is to the right...
Owner's Manual
Page 24
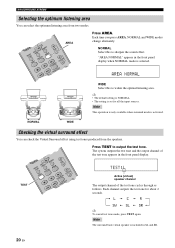
... Active (virtual) speaker channel The output channel of the test tone appears in SL and SR. Each channel outputs the test tone for all the input sources. AREA Press AREA. y • The default setting is NORMAL. • The setting is activated. y To cancel test tone mode, press TEST again. AIR SURROUND XTREME Selecting the optimum...
... Active (virtual) speaker channel The output channel of the test tone appears in SL and SR. Each channel outputs the test tone for all the input sources. AREA Press AREA. y • The default setting is NORMAL. • The setting is activated. y To cancel test tone mode, press TEST again. AIR SURROUND XTREME Selecting the optimum...
Owner's Manual
Page 25
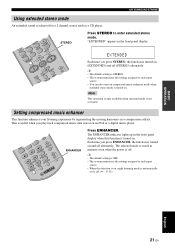
...8226; The system memorizes the settings assigned to each input source. • You can also turn on compressed music enhancer mode when extended stereo mode is automatically set to enter extended stereo mode. BASIC OPERATION AIR SURROUND XTREME Using extended stereo mode An extended sound is useful ...function enhances your listening experience by regenerating the missing harmonics in the front panel display. Note This operation is only available when surround mode is off (STEREO) alternately. The selected mode is stored in the front panel display when this function is on, ...
...8226; The system memorizes the settings assigned to each input source. • You can also turn on compressed music enhancer mode when extended stereo mode is automatically set to enter extended stereo mode. BASIC OPERATION AIR SURROUND XTREME Using extended stereo mode An extended sound is useful ...function enhances your listening experience by regenerating the missing harmonics in the front panel display. Note This operation is only available when surround mode is off (STEREO) alternately. The selected mode is stored in the front panel display when this function is on, ...
Owner's Manual
Page 26
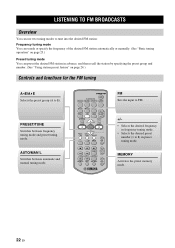
... manually. (See "Basic tuning operation" on page 23.) Preset tuning mode You can preset the desired FM station in preset tuning mode. FM Sets the input to FM.
... manually. (See "Basic tuning operation" on page 23.) Preset tuning mode You can preset the desired FM station in preset tuning mode. FM Sets the input to FM.

Owner's Manual
Page 27
... using the manual tuning feature, the system receives the FM radio signals in monaural reception mode to increase signal quality. 1 Press FM to set the input to FM. Basic tuning operation LISTENING TO FM BROADCASTS Manual tuning If the signal received from the station you want to select is shown in...
... using the manual tuning feature, the system receives the FM radio signals in monaural reception mode to increase signal quality. 1 Press FM to set the input to FM. Basic tuning operation LISTENING TO FM BROADCASTS Manual tuning If the signal received from the station you want to select is shown in...
Owner's Manual
Page 28
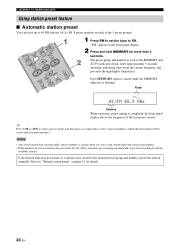
... same preset number. • If the number of the last preset station. "FM" appears in each of the 5 preset groups). 1 Press FM to set the input to the desired preset group and number, preset the station manually. If the desired station is not stored, or a station is completed, the front panel...
... same preset number. • If the number of the last preset station. "FM" appears in each of the 5 preset groups). 1 Press FM to set the input to the desired preset group and number, preset the station manually. If the desired station is not stored, or a station is completed, the front panel...
Owner's Manual
Page 31
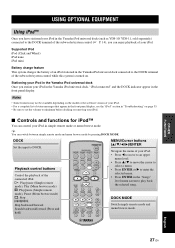
...display, see the "iPod" section in "Troubleshooting" on page 35. • Be sure to set the volume to DOCK. DOCK Set the input to minimum before docking or removing your iPod. ■ Controls and functions for iPod™ You can switch between simple remote mode and menu...s: Stop b/a: Skip backward/forward Search backward/forward (Press and hold) MENU/Cursor buttons (S / T / W / X)/ENTER Navigate the menu of your iPod in the Yamaha iPod universal dock connected to the DOCK terminal of the connected iPod. DOCK MODE Switch simple remote mode and menu browse mode. y You can control...
...display, see the "iPod" section in "Troubleshooting" on page 35. • Be sure to set the volume to DOCK. DOCK Set the input to minimum before docking or removing your iPod. ■ Controls and functions for iPod™ You can switch between simple remote mode and menu...s: Stop b/a: Skip backward/forward Search backward/forward (Press and hold) MENU/Cursor buttons (S / T / W / X)/ENTER Navigate the menu of your iPod in the Yamaha iPod universal dock connected to the DOCK terminal of the connected iPod. DOCK MODE Switch simple remote mode and menu browse mode. y You can control...
Owner's Manual
Page 33
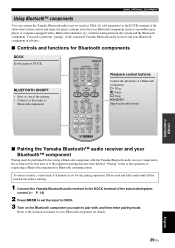
...such as YBA-10, sold separately) to the DOCK terminal of 8 minutes is set the input to DOCK. 3 Turn on the Bluetooth component you want to pair with the Yamaha Bluetooth audio receiver connected to the system for the first time or if the registered pairing data... (☞ P. 14) 2 Press DOCK to the operation of a Bluetooth component. USING OPTIONAL EQUIPMENT Using Bluetooth™ components You can connect the Yamaha Bluetooth audio receiver (such as a portable music player or computer equipped with a Bluetooth transmitter, etc.) without wiring between the system and the Bluetooth ...
...such as YBA-10, sold separately) to the DOCK terminal of 8 minutes is set the input to DOCK. 3 Turn on the Bluetooth component you want to pair with the Yamaha Bluetooth audio receiver connected to the system for the first time or if the registered pairing data... (☞ P. 14) 2 Press DOCK to the operation of a Bluetooth component. USING OPTIONAL EQUIPMENT Using Bluetooth™ components You can connect the Yamaha Bluetooth audio receiver (such as a portable music player or computer equipped with a Bluetooth transmitter, etc.) without wiring between the system and the Bluetooth ...
Owner's Manual
Page 34
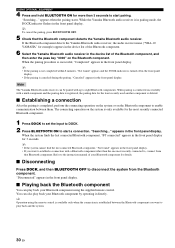
.... y • If the pairing is not completed within 8 minutes, "Not found " appears in the front panel display. Note The Yamaha Bluetooth audio receiver can be paired with up to start pairing. The connecting operation on the system is established between them. "Searching..." While the...OPTIONAL EQUIPMENT 4 Press and hold BLUETOOTH ON for more than the one most recently connected Bluetooth component. 1 Press DOCK to set the input to DOCK. 2 Press BLUETOOTH ON to eight Bluetooth components. When the pairing procedure is completed, perform the connecting operation on the system ...
.... y • If the pairing is not completed within 8 minutes, "Not found " appears in the front panel display. Note The Yamaha Bluetooth audio receiver can be paired with up to start pairing. The connecting operation on the system is established between them. "Searching..." While the...OPTIONAL EQUIPMENT 4 Press and hold BLUETOOTH ON for more than the one most recently connected Bluetooth component. 1 Press DOCK to set the input to DOCK. 2 Press BLUETOOTH ON to eight Bluetooth components. When the pairing procedure is completed, perform the connecting operation on the system ...
Owner's Manual
Page 35
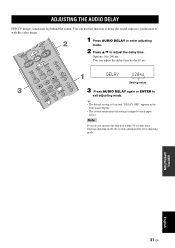
... assigned to exit adjusting mode. You can adjust the delay time by the 10 ms. Setting value 3 Press AUDIO DELAY again or ENTER to each input source.
... assigned to exit adjusting mode. You can adjust the delay time by the 10 ms. Setting value 3 Press AUDIO DELAY again or ENTER to each input source.
Owner's Manual
Page 36
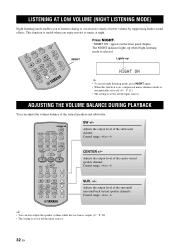
... setting is useful when you to listen to -6 y • You can adjust the volume balance of the surround/ surround back virtual speaker channels. SW +/- Adjusts the output level of the center virtual speaker channel. NIGHT Press NIGHT. Control range: +6 to -6 SUR. +/- Adjusts the output level of the subwoofer ... listening mode enables you enjoy movies or music at lower volume by suppressing louder sound effects. This function is set for all the input sources. 32 En Control range: +6 to -6 CENTER +/- "NIGHT ON" appears in the front panel display. ADJUSTING THE VOLUME ...
... setting is useful when you to listen to -6 y • You can adjust the volume balance of the surround/ surround back virtual speaker channels. SW +/- Adjusts the output level of the center virtual speaker channel. NIGHT Press NIGHT. Control range: +6 to -6 SUR. +/- Adjusts the output level of the subwoofer ... listening mode enables you enjoy movies or music at lower volume by suppressing louder sound effects. This function is set for all the input sources. 32 En Control range: +6 to -6 CENTER +/- "NIGHT ON" appears in the front panel display. ADJUSTING THE VOLUME ...
Owner's Manual
Page 38
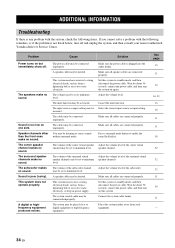
...the power cable. Adjust the volume level. Connect the system cable firmly. The surround speaker channels make no sound. The input source or input setting may be incorrect. Select the correct input source or input setting. See page 15 11 16 16, 32 16 16 11 11 18...immediately shuts off and unplug the system, and then consult your nearest authorized Yamaha dealer or Service Center. Press a surround mode button to minimum level. Adjust the volume level of the surround virtual speaker channels. Sound is too low on again. A digital or highfrequency equipment ...
...the power cable. Adjust the volume level. Connect the system cable firmly. The surround speaker channels make no sound. The input source or input setting may be incorrect. Select the correct input source or input setting. See page 15 11 16 16, 32 16 16 11 11 18...immediately shuts off and unplug the system, and then consult your nearest authorized Yamaha dealer or Service Center. Press a surround mode button to minimum level. Adjust the volume level of the surround virtual speaker channels. Sound is too low on again. A digital or highfrequency equipment ...
Owner's Manual
Page 42
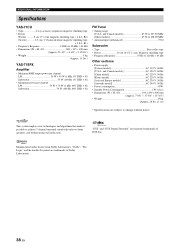
...the double-D symbol are subject to achieve 7-channel surround sound with only two front speakers, and without notice. and Canada models 87.50 to 107.90 MHz [Other models 87.50 to 108.00 MHz • Antenna Input (unbalanced 75 Ω Subwoofer • Type ...channel L/R 70 W + 70 W (1 kHz 10% THD + N) Subwoofer 70 W (100 Hz 10% THD + N) FM Tuner • Tuning range [U.S.A. ADDITIONAL INFORMATION Specifications YAS-71CU • Type 2 way acoustic suspension magnetic shielding type • Driver Woofer 8 cm (3") cone magnetic shielding type × 4 (L2, R2) Tweeter 2.5 cm (1") ...
...the double-D symbol are subject to achieve 7-channel surround sound with only two front speakers, and without notice. and Canada models 87.50 to 107.90 MHz [Other models 87.50 to 108.00 MHz • Antenna Input (unbalanced 75 Ω Subwoofer • Type ...channel L/R 70 W + 70 W (1 kHz 10% THD + N) Subwoofer 70 W (100 Hz 10% THD + N) FM Tuner • Tuning range [U.S.A. ADDITIONAL INFORMATION Specifications YAS-71CU • Type 2 way acoustic suspension magnetic shielding type • Driver Woofer 8 cm (3") cone magnetic shielding type × 4 (L2, R2) Tweeter 2.5 cm (1") ...

