

CISSCA V3.1 Users Manual
Page 1
If you wish to be situated, and the type and arrangement of speakers are input, enabling rapid estimation of the optimal numbers of speakers and confirmation of the virtual sound pressure values in more detail, please use Yamaha's Y-S3 audio simulation software. 1 CISSCA User's Manual V3.1: December 2022 About CISSCA Commercial Installation Solutions Speaker Calculator (CISSCA) is a simulation software application into which conditions including the size and application of the room in which speakers are to specify conditions in the estimated results.
If you wish to be situated, and the type and arrangement of speakers are input, enabling rapid estimation of the optimal numbers of speakers and confirmation of the virtual sound pressure values in more detail, please use Yamaha's Y-S3 audio simulation software. 1 CISSCA User's Manual V3.1: December 2022 About CISSCA Commercial Installation Solutions Speaker Calculator (CISSCA) is a simulation software application into which conditions including the size and application of the room in which speakers are to specify conditions in the estimated results.
CISSCA V3.1 Users Manual
Page 2
... cease download or installation and/or delete the software files. The rights to the recorded media recorded using the Software, nor establish services that is not permitted to use copyrighted music tracks available through the use of this Software for commercial purposes, to as any copies thereof. ・ Warranty of Use. You may be terminated even if Yamaha does not send you read these to an unspecified number...
... cease download or installation and/or delete the software files. The rights to the recorded media recorded using the Software, nor establish services that is not permitted to use copyrighted music tracks available through the use of this Software for commercial purposes, to as any copies thereof. ・ Warranty of Use. You may be terminated even if Yamaha does not send you read these to an unspecified number...
CISSCA V3.1 Users Manual
Page 3
... for any direct, consequential, incidental, or indirect damages whatsoever (including, without limitation, lost data, lost profits, business interruption, and lost business information) resulting from 2 to Yamaha's after -sales services regarding the operation of Third Party Software, defects in Third Party Software, or other provisions shall be governed by and construed in the manual accompanying the Software that indicates that...
... for any direct, consequential, incidental, or indirect damages whatsoever (including, without limitation, lost data, lost profits, business interruption, and lost business information) resulting from 2 to Yamaha's after -sales services regarding the operation of Third Party Software, defects in Third Party Software, or other provisions shall be governed by and construed in the manual accompanying the Software that indicates that...

CISSCA V3.1 Users Manual
Page 4
...use the latest version of the ceiling speaker. File compatibility with future versions It is unified with the setting of CISSCA. PC System Requirements OS Windows 7 / 8 / 8.1 / 10 / 11 (Framework 4.5 or above) CPU 32 or 64-bit processor, 1 GHz or above Memory ...free space Display 1024×768 pixels, 256 colors or more Install the Software 1. Double-click the "CISSCA" folder. 2. If the following message is displayed when reading the file, please use added speaker data. File compatibility with previous versions Version 2.1: No compatibility Version 3.0: Reading and sound...
...use the latest version of the ceiling speaker. File compatibility with future versions It is unified with the setting of CISSCA. PC System Requirements OS Windows 7 / 8 / 8.1 / 10 / 11 (Framework 4.5 or above) CPU 32 or 64-bit processor, 1 GHz or above Memory ...free space Display 1024×768 pixels, 256 colors or more Install the Software 1. Double-click the "CISSCA" folder. 2. If the following message is displayed when reading the file, please use added speaker data. File compatibility with previous versions Version 2.1: No compatibility Version 3.0: Reading and sound...
CISSCA V3.1 Users Manual
Page 5
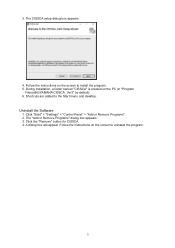
During installation, a folder named "CISSCA" is created on the screen to install the program. 5. Click the "Remove" button for CISSCA. 4. Uninstall the Software 1. The "Add or Remove Programs" dialog box appears. 3. A dialog box will appear. Follow the instructions on the PC (in "Program Files(x86)\YAMAHA\CISSCA_Ver3" by default). 6. Click "Start" > "Settings" > "Control Panel" > "Add or Remove Programs". 2. The CISSCA setup dialog box appears. 4. Follow the instructions on the screen to the Start menu and desktop. 3. Shortcuts are added to uninstall the program. 5
During installation, a folder named "CISSCA" is created on the screen to install the program. 5. Click the "Remove" button for CISSCA. 4. Uninstall the Software 1. The "Add or Remove Programs" dialog box appears. 3. A dialog box will appear. Follow the instructions on the PC (in "Program Files(x86)\YAMAHA\CISSCA_Ver3" by default). 6. Click "Start" > "Settings" > "Control Panel" > "Add or Remove Programs". 2. The CISSCA setup dialog box appears. 4. Follow the instructions on the screen to the Start menu and desktop. 3. Shortcuts are added to uninstall the program. 5

CISSCA V3.1 Users Manual
Page 6
... 2-8. Starting CISSCA...7 1-1. Screen Operations...7 1-2. Editing a Project ...9 1-4. Adjusting Speaker Output...16 2-5-1. Generating Reports ...24 6 Entering Room Conditions ...10 2-2. Configuring the Application...14 2-5. Common Features...9 2. Configuring Speaker Density...12 2-3. Subwoofers...20 2-6. Viewing Settings ...21 2-7. Data Entry...10 2-1. Ceiling speakers ...16 2-5-2. Index of Contents About CISSCA...1 Version information...3 File compatibility with previous versions 4 File compatibility with future versions...4 PC System Requirements ...4 Install the...
... 2-8. Starting CISSCA...7 1-1. Screen Operations...7 1-2. Editing a Project ...9 1-4. Adjusting Speaker Output...16 2-5-1. Generating Reports ...24 6 Entering Room Conditions ...10 2-2. Configuring the Application...14 2-5. Common Features...9 2. Configuring Speaker Density...12 2-3. Subwoofers...20 2-6. Viewing Settings ...21 2-7. Data Entry...10 2-1. Ceiling speakers ...16 2-5-2. Index of Contents About CISSCA...1 Version information...3 File compatibility with previous versions 4 File compatibility with future versions...4 PC System Requirements ...4 Install the...

CISSCA V3.1 Users Manual
Page 7
... screens. HOME screen CISSCA is indicated in a wizard format. 1. A design for a single room is referred to perform the following operations from the Start menu. You can be used to as a "project", and can select English or Japanese. ・ Unit: Set the unit of measure. Screen Operations CISSCA can select meters or inches. ・ SPL on/off: Select whether to specify the number...
... screens. HOME screen CISSCA is indicated in a wizard format. 1. A design for a single room is referred to perform the following operations from the Start menu. You can be used to as a "project", and can select English or Japanese. ・ Unit: Set the unit of measure. Screen Operations CISSCA can select meters or inches. ・ SPL on/off: Select whether to specify the number...

CISSCA V3.1 Users Manual
Page 8
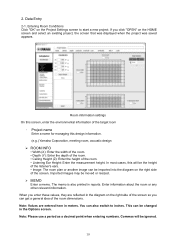
... application • 2.5: Adjust speaker output • 2.6: View settings • 2.7: View results • 2.8: Generate report On each condition entry screen, pressing the NEXT button will return to the next step (screen). Creating a Project Select "New" on the initial screen (HOME screen) to change the values that have been entered. 8 Pressing the BACK button will advance to the previous step (screen). Project Settings screen Enter the...
... application • 2.5: Adjust speaker output • 2.6: View settings • 2.7: View results • 2.8: Generate report On each condition entry screen, pressing the NEXT button will return to the next step (screen). Creating a Project Select "New" on the initial screen (HOME screen) to change the values that have been entered. 8 Pressing the BACK button will advance to the previous step (screen). Project Settings screen Enter the...

CISSCA V3.1 Users Manual
Page 9
Editing a Project Select "OPEN" on the initial screen (HOME screen) to a CSV (comma-separated text) file. • OPTIONS: Set various CISSCA options. • Help: Opens the PDF manual. • Quit: Closes the application. 9 1-3. Other common features are as follows: • NEW: Creates a new project. • OPEN: Opens an existing project. • SAVE: .... • SAVE AS: Saves the current project with another name. • Export CSV: Saves the project content to open the Select Previous Project File screen. 1-4. Common Features After a project is created, you can save it at any...
Editing a Project Select "OPEN" on the initial screen (HOME screen) to a CSV (comma-separated text) file. • OPTIONS: Set various CISSCA options. • Help: Opens the PDF manual. • Quit: Closes the application. 9 1-3. Other common features are as follows: • NEW: Creates a new project. • OPEN: Opens an existing project. • SAVE: .... • SAVE AS: Saves the current project with another name. • Export CSV: Saves the project content to open the Select Previous Project File screen. 1-4. Common Features After a project is created, you can save it at any...
CISSCA V3.1 Users Manual
Page 10
... room dimensions. 2. If you enter these values, they are entered here in the Options screen. Note: Values are reflected in reports. You can be ignored. 10 Note: Please use a period as a decimal point when entering numbers. The memo is also printed in the diagram on the Project Settings screen to inches. In most cases, this design information. (e.g.) Yamaha...
... room dimensions. 2. If you enter these values, they are entered here in the Options screen. Note: Values are reflected in reports. You can be ignored. 10 Note: Please use a period as a decimal point when entering numbers. The memo is also printed in the diagram on the Project Settings screen to inches. In most cases, this design information. (e.g.) Yamaha...

CISSCA V3.1 Users Manual
Page 11
.... ・ Delete: Deletes the imported image. Note: Please use the mouse to more easily visualize the room. Image operations ・ Move: Press the Move button to twice its size at once. After you enter the values, press the NEXT button to move to the right expands it. Imported images may be... expanded up to use a period as follows. The button will be moved or resized as a decimal point when entering numbers. Once the scale has been set to the left shrinks the image. Commas will appear as shown in the figure to a...
.... ・ Delete: Deletes the imported image. Note: Please use the mouse to more easily visualize the room. Image operations ・ Move: Press the Move button to twice its size at once. After you enter the values, press the NEXT button to move to the right expands it. Imported images may be... expanded up to use a period as follows. The button will be moved or resized as a decimal point when entering numbers. Once the scale has been set to the left shrinks the image. Commas will appear as shown in the figure to a...

CISSCA V3.1 Users Manual
Page 12
Note: AUTO mode only (the speaker type is set to the next step. 12 After you configure the speaker density, press the NEXT button to move to ceiling speaker and cannot be changed). 2-2. Speaker density settings ・ Density: Configure the number of speakers (layout density). * Explanations for each setting are shown in the Settings screen. Configuring Speaker Density On this screen, configure the speaker density.
Note: AUTO mode only (the speaker type is set to the next step. 12 After you configure the speaker density, press the NEXT button to move to ceiling speaker and cannot be changed). 2-2. Speaker density settings ・ Density: Configure the number of speakers (layout density). * Explanations for each setting are shown in the Settings screen. Configuring Speaker Density On this screen, configure the speaker density.
CISSCA V3.1 Users Manual
Page 13
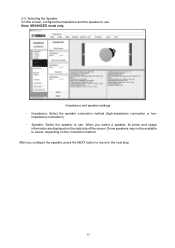
... move to select, depending on the right side of the screen. impedance connection). ・ Speaker: Select the speaker to use . Note: ADVANCED mode only. After you select a speaker, its photo and usage information are displayed on the connection method. Some speakers may not be available to the next step. 13 Impedance and speaker settings ・ Impedance: Select the speaker connection method (high-impedance connection or low- 2-3.
... move to select, depending on the right side of the screen. impedance connection). ・ Speaker: Select the speaker to use . Note: ADVANCED mode only. After you select a speaker, its photo and usage information are displayed on the connection method. Some speakers may not be available to the next step. 13 Impedance and speaker settings ・ Impedance: Select the speaker connection method (high-impedance connection or low- 2-3.
CISSCA V3.1 Users Manual
Page 14
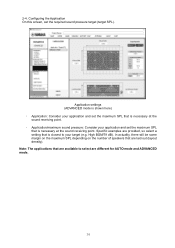
... margin on the maximum SPL depending on the number of speakers that are different for AUTO mode and ADVANCED mode. 14 Specific examples are available to your application and set the required sound pressure target (target SPL). Configuring the Application On this screen, set the maximum SPL that is necessary at the sound receiving point. Note: The applications that are provided...
... margin on the maximum SPL depending on the number of speakers that are different for AUTO mode and ADVANCED mode. 14 Specific examples are available to your application and set the required sound pressure target (target SPL). Configuring the Application On this screen, set the maximum SPL that is necessary at the sound receiving point. Note: The applications that are provided...
CISSCA V3.1 Users Manual
Page 16
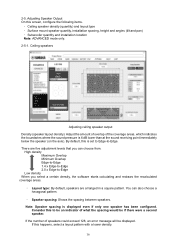
Adjusting Speaker Output On this happens, select a layout pattern with a lower density. 16 There are five adjustment levels that you select a certain density, the software starts calculating and redraws the recalculated coverage areas. ・ Layout type: By default, speakers are arranged in a square pattern. Note: Speaker spacing is 6 dB lower than at the sound receiving point immediately below the speaker (on the...
Adjusting Speaker Output On this happens, select a layout pattern with a lower density. 16 There are five adjustment levels that you select a certain density, the software starts calculating and redraws the recalculated coverage areas. ・ Layout type: By default, speakers are arranged in a square pattern. Note: Speaker spacing is 6 dB lower than at the sound receiving point immediately below the speaker (on the...
CISSCA V3.1 Users Manual
Page 19
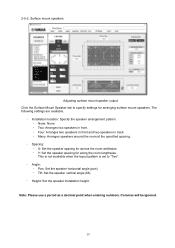
... mount speakers. This is not available when the layout pattern is set to specify settings for along the room lengthwise. Commas will be ignored. 19 2-5-2. Surface mount speakers Adjusting surface mount speaker output Click the Surface Mount Speaker tab to "Two". ・ Angle: ・ Pan: Set the speaker horizontal angle (pan). ・ Tilt: Set the speaker vertical angle (tilt). ・ Height: Set the speaker installation...
... mount speakers. This is not available when the layout pattern is set to specify settings for along the room lengthwise. Commas will be ignored. 19 2-5-2. Surface mount speakers Adjusting surface mount speaker output Click the Surface Mount Speaker tab to "Two". ・ Angle: ・ Pan: Set the speaker horizontal angle (pan). ・ Tilt: Set the speaker vertical angle (tilt). ・ Height: Set the speaker installation...
CISSCA V3.1 Users Manual
Page 21
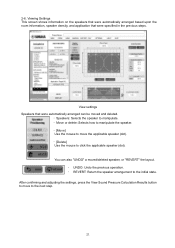
... moved and deleted. ・ Speakers: Selects the speaker to manipulate. ・ Move or delete: Selects how to manipulate the speaker. ・ [Move] Use the mouse to move to click the applicable speaker (dot). After confirming and adjusting the settings, press the View Sound Pressure Calculation Results button to move the applicable speaker (dot). ・ [Delete] Use the mouse to the next...
... moved and deleted. ・ Speakers: Selects the speaker to manipulate. ・ Move or delete: Selects how to manipulate the speaker. ・ [Move] Use the mouse to move to click the applicable speaker (dot). After confirming and adjusting the settings, press the View Sound Pressure Calculation Results button to move the applicable speaker (dot). ・ [Delete] Use the mouse to the next...
CISSCA V3.1 Users Manual
Page 22
... as the speaker output settings and the measurement frequency. You can also change a parameter, the software recalculates and redraws the map. ・ Lo-Z/HI-Z Tap: Selects the tap. Other available settings are indicated on the left of the screen. Viewing Results On this . The software recalculates the sound pressure distribution based upon the specified conditions. This is output. If you change this screen, you...
... as the speaker output settings and the measurement frequency. You can also change a parameter, the software recalculates and redraws the map. ・ Lo-Z/HI-Z Tap: Selects the tap. Other available settings are indicated on the left of the screen. Viewing Results On this . The software recalculates the sound pressure distribution based upon the specified conditions. This is output. If you change this screen, you...

CISSCA V3.1 Users Manual
Page 23
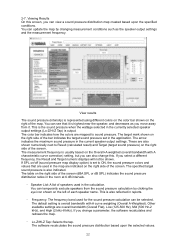
... design information. To adjust the number of speakers will increase. Note: Overlapping speaker coverage areas creates an acoustic space that the required number of speakers, go back to the next step. 23 Press the REPORT button to move to the speaker density settings and adjust the speaker density. ・ REPORT: The software generates a PDF report that can open the PDF file in Adobe Reader...
... design information. To adjust the number of speakers will increase. Note: Overlapping speaker coverage areas creates an acoustic space that the required number of speakers, go back to the next step. 23 Press the REPORT button to move to the speaker density settings and adjust the speaker density. ・ REPORT: The software generates a PDF report that can open the PDF file in Adobe Reader...

CISSCA V3.1 Users Manual
Page 25
...sound pressure map display option) is displayed in the "SPEAKER LAYOUT" section of output reports. Note: An image of the measurement frequency [LOW, [LOW, 125 Hz-500 Hz] 125 Hz-500 Hz] to OFF, the SPL MAP cannot be specified for output. The following items may be specified for JPG output. Item Output [JPG] SPEAKERLAYOUT Outputs the speaker layout diagrams... MAP Outputs the sound pressure map of the room is set to a JPEG image. If this is not required, set SPL on /off (sound pressure map display option) to "hidden" using the image adjustment settings, and then output the ...
...sound pressure map display option) is displayed in the "SPEAKER LAYOUT" section of output reports. Note: An image of the measurement frequency [LOW, [LOW, 125 Hz-500 Hz] 125 Hz-500 Hz] to OFF, the SPL MAP cannot be specified for output. The following items may be specified for JPG output. Item Output [JPG] SPEAKERLAYOUT Outputs the speaker layout diagrams... MAP Outputs the sound pressure map of the room is set to a JPEG image. If this is not required, set SPL on /off (sound pressure map display option) to "hidden" using the image adjustment settings, and then output the ...


