

Owner's Manual
Page 1
... for purchasing a Yamaha Timpani. Contents Precautions 2 Nomenclature & Lubrication 3 Transporting and Setting Up the Timpani ... 4 Setting up the Timpani 4 Adjusting Pedal Height 5 Transporting 5 Relocating the Tuning Indicator 5 Initial Preparation 6 Adjusting the Pitch 8 Head Tuning 8 Pedal Adjustment 9 Tuning Indicator Adjustment 10 Replacing the Head 11 1 English PEDAL TIMPANI TP3100(EA) Series TP3123(EA) / TP3126(EA) / TP3129(EA) / TP3132(EA) Owner's Manual Thank you for the first time be sure to...
... for purchasing a Yamaha Timpani. Contents Precautions 2 Nomenclature & Lubrication 3 Transporting and Setting Up the Timpani ... 4 Setting up the Timpani 4 Adjusting Pedal Height 5 Transporting 5 Relocating the Tuning Indicator 5 Initial Preparation 6 Adjusting the Pitch 8 Head Tuning 8 Pedal Adjustment 9 Tuning Indicator Adjustment 10 Replacing the Head 11 1 English PEDAL TIMPANI TP3100(EA) Series TP3123(EA) / TP3126(EA) / TP3129(EA) / TP3132(EA) Owner's Manual Thank you for the first time be sure to...
Owner's Manual
Page 2
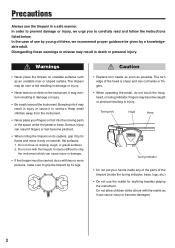
...; Replace torn heads as soon as it only on its casters, grip it by its lugs. In the case of the timpani (inside the tuning indicator, base, lugs, etc.) • Do not use the mallet for anything besides playing the instrument. Precautions Always use by young children, we urge you to carefully read and follow the instructions listed...
...; Replace torn heads as soon as it only on its casters, grip it by its lugs. In the case of the timpani (inside the tuning indicator, base, lugs, etc.) • Do not use the mallet for anything besides playing the instrument. Precautions Always use by young children, we urge you to carefully read and follow the instructions listed...

Owner's Manual
Page 3
... Base Caster Pedal Leg Pedal Supplied Accessories • Tuning Key 1 • Mallets 1 set • Hex Wrench 1 • Spring Adjustment Wrench 1 Caution Never place your fingers or foot into the moving parts indicated by the arrows in the diagram on the right. This should be done at least once a year, or as needed. * A spray type lubricant is recommended. * Do not touch the lubricated parts. 3 Serious...
... Base Caster Pedal Leg Pedal Supplied Accessories • Tuning Key 1 • Mallets 1 set • Hex Wrench 1 • Spring Adjustment Wrench 1 Caution Never place your fingers or foot into the moving parts indicated by the arrows in the diagram on the right. This should be done at least once a year, or as needed. * A spray type lubricant is recommended. * Do not touch the lubricated parts. 3 Serious...
Owner's Manual
Page 4
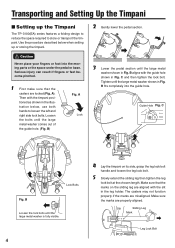
... moving parts or the space under the pedal or base. Caution Never place your fingers or foot into the guide hole. Loosen the bolts until the large metal washer shown in Fig. B) Fig. C Lock Bolts Fig. The casters may not function properly if the marks are properly aligned. Make sure... Lock Bolt Then with the guide hole shown in the illustration below when setting up the Timpani The TP-3100(EA) series features a folding design to reduce the space required to loosen the left and right side lock bolts. Use the procedure described below , use both hands to store or ...
... moving parts or the space under the pedal or base. Caution Never place your fingers or foot into the guide hole. Loosen the bolts until the large metal washer shown in Fig. B) Fig. C Lock Bolts Fig. The casters may not function properly if the marks are properly aligned. Make sure... Lock Bolt Then with the guide hole shown in the illustration below when setting up the Timpani The TP-3100(EA) series features a folding design to reduce the space required to loosen the left and right side lock bolts. Use the procedure described below , use both hands to store or ...
Owner's Manual
Page 5
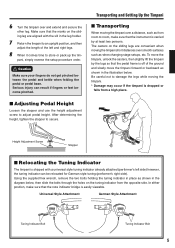
... Tuning Indicator Bolt Tuning Indicator Bolt 5 6 Turn the timpani over smooth surfaces such as when changing stage setups, etc. In either position, make sure that the instrument is carried by the lugs so that the marks on the sliding legs are aligned with a universal style tuning indicator already attached (performer's left and right legs. 8 When it comes time to adjust pedal height. Make...
... Tuning Indicator Bolt Tuning Indicator Bolt 5 6 Turn the timpani over smooth surfaces such as when changing stage setups, etc. In either position, make sure that the instrument is carried by the lugs so that the marks on the sliding legs are aligned with a universal style tuning indicator already attached (performer's left and right legs. 8 When it comes time to adjust pedal height. Make...
Owner's Manual
Page 6
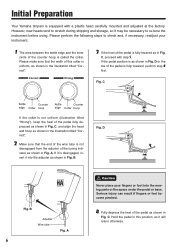
.... A 6 Caution Never place your instrument. 1 The area between the kettle edge and the inner circle of the pedal fully depressed as shown in Fig. Please perform the following steps to stretch during shipping and storage, so it into the moving parts or the space under the pedal or base. A. B. Fig. B Adjuster Wire tube Fig. Serious injury can...
.... A 6 Caution Never place your instrument. 1 The area between the kettle edge and the inner circle of the pedal fully depressed as shown in Fig. Please perform the following steps to stretch during shipping and storage, so it into the moving parts or the space under the pedal or base. A. B. Fig. B Adjuster Wire tube Fig. Serious injury can...

Owner's Manual
Page 7
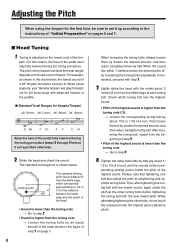
... too much . C. For pitch reference, a tuner or piano can be performed periodically (starting with the supplied mallet. Keeping the heel of the pedal depressed, loosen the first tuning bolt by 1/2 turn . The standard striking point is very important to step 7. 7 Put your foot from the kettle edge, which corresponds approximately to 1/4 to "Adjusting the Pitch" on the pedal and fully depress it...
... too much . C. For pitch reference, a tuner or piano can be performed periodically (starting with the supplied mallet. Keeping the heel of the pedal depressed, loosen the first tuning bolt by 1/2 turn . The standard striking point is very important to step 7. 7 Put your foot from the kettle edge, which corresponds approximately to 1/4 to "Adjusting the Pitch" on the pedal and fully depress it...
Owner's Manual
Page 8
... should be sure to 1/18 of a turn ) until the sounds at the other bolts, do not touch the tuning bolt with the lowest sound, again check the pitch at the corresponding striking points match the pitch of the highest sound. For example, as shown in the chart below ) if not specified otherwise. 2 ...and then return (re-tighten) them by half. Adjusting the Pitch When using the timpani for Yamaha Timpani 32" (81cm) 29" (74cm) 26" (66cm) 23" (58cm) Keep the heel of the pedal fully lowered during the tuning procedure. The pitch of the lowest note (and the tonal range) depends on the size...
... should be sure to 1/18 of a turn ) until the sounds at the other bolts, do not touch the tuning bolt with the lowest sound, again check the pitch at the corresponding striking points match the pitch of the highest sound. For example, as shown in the chart below ) if not specified otherwise. 2 ...and then return (re-tighten) them by half. Adjusting the Pitch When using the timpani for Yamaha Timpani 32" (81cm) 29" (74cm) 26" (66cm) 23" (58cm) Keep the heel of the pedal fully lowered during the tuning procedure. The pitch of the lowest note (and the tonal range) depends on the size...
Owner's Manual
Page 9
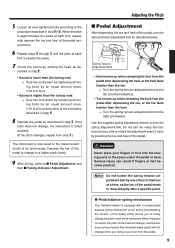
... the foot from the pedal after a specific point. ● Pedal balance spring mechanism Your Yamaha timpani is higher than the heel → Turn the spring tension adjustment bolt to change the pitch (note) of the instrument. When the pitch is approximately the same at each bolt is now tuned to a higher pitch (note). 9 After tuning, perform ■ Pedal Adjustment and then ■ Tuning Indicator Adjustment. When the pedal is moved, the pitch of...
... the foot from the pedal after a specific point. ● Pedal balance spring mechanism Your Yamaha timpani is higher than the heel → Turn the spring tension adjustment bolt to change the pitch (note) of the instrument. When the pitch is approximately the same at each bolt is now tuned to a higher pitch (note). 9 After tuning, perform ■ Pedal Adjustment and then ■ Tuning Indicator Adjustment. When the pedal is moved, the pitch of...
Owner's Manual
Page 10
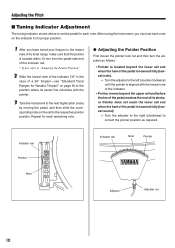
...rail Note Pointer Note Adjuster Adjuster nut 10 After tuning the instrument, you must set each note on the indicator to its proper position. 1 After you have tuned your timpani to the lowest note of its tonal range, make sure that the pointer is lowered fully (lowest sound) → Turn the adjuster ... for Yamaha Timpani" on page 8) to the position where its center line coincides with the pointer. 3 Tune the instrument to the next higher pitch (note) by moving the pedal, and then slide the corresponding note on the rail to set the pedal for each remaining note. ● Adjusting the...
...rail Note Pointer Note Adjuster Adjuster nut 10 After tuning the instrument, you must set each note on the indicator to its proper position. 1 After you have tuned your timpani to the lowest note of its tonal range, make sure that the pointer is lowered fully (lowest sound) → Turn the adjuster ... for Yamaha Timpani" on page 8) to the position where its center line coincides with the pointer. 3 Tune the instrument to the next higher pitch (note) by moving the pedal, and then slide the corresponding note on the rail to set the pedal for each remaining note. ● Adjusting the...
Owner's Manual
Page 11
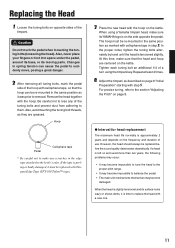
... at least 4 times. 4 Adjust the timpani as they are centered on the kettle. Replacing the Head 1 Loosen the tuning bolts on opposite sides of use. The hoop must be replaced before the sound quality deteriorates dramatically. For precise tuning, refer to the kettle's edge. Hoop Pedal Cellophane tape * Be careful not to make any of a turn using a Yamaha timpani head, make sure that the...
... at least 4 times. 4 Adjust the timpani as they are centered on the kettle. Replacing the Head 1 Loosen the tuning bolts on opposite sides of use. The hoop must be replaced before the sound quality deteriorates dramatically. For precise tuning, refer to the kettle's edge. Hoop Pedal Cellophane tape * Be careful not to make any of a turn using a Yamaha timpani head, make sure that the...

