

Quick Guide
Page 1
To take full advantage of the superior features and performance offered by your TF-series console, and to enjoy years of trouble-free use, please read this document carefully before operating your console. TF5 / TF3 / TF1 DIGITAL MIXING CONSOLE Quick Guide Thank you for choosing a Yamaha TF5/TF3/TF1 Digital Mixing Console. EN
To take full advantage of the superior features and performance offered by your TF-series console, and to enjoy years of trouble-free use, please read this document carefully before operating your console. TF5 / TF3 / TF1 DIGITAL MIXING CONSOLE Quick Guide Thank you for choosing a Yamaha TF5/TF3/TF1 Digital Mixing Console. EN
Quick Guide
Page 4
...does not guarantee that interference will not result in all installation instructions. If you can be connected to products distributed by YAMAHA CORPORATION OF AMERICA. (Perchlorate) In Finland: Laite on liitettävä suojamaadoituskoskettimilla varustettuun pistorasiaan. VARNING Explosionsfara vid felaktigt batteribyte... : NEUTRAL BROWN : LIVE As the colours of the wires in the mains lead of Equipment : Digital Mixing Console Model Name : TF5/TF3/TF1 This device complies with the letter N or coloured BLACK. Udskiftning må kun ske med batteri af samme fabrikat og...
...does not guarantee that interference will not result in all installation instructions. If you can be connected to products distributed by YAMAHA CORPORATION OF AMERICA. (Perchlorate) In Finland: Laite on liitettävä suojamaadoituskoskettimilla varustettuun pistorasiaan. VARNING Explosionsfara vid felaktigt batteribyte... : NEUTRAL BROWN : LIVE As the colours of the wires in the mains lead of Equipment : Digital Mixing Console Model Name : TF5/TF3/TF1 This device complies with the letter N or coloured BLACK. Udskiftning må kun ske med batteri af samme fabrikat og...
Quick Guide
Page 7
... or to follow links directly to relevant sections in your TF-series console can be found on screen. http://www.yamahaproaudio.com/ For information about the software described here is available on the Yamaha Pro Audio website. The model number, serial number, power requirements, etc...., may be used with a variety of utility software. • TF Editor This application enables you to set console parameters without connecting the console. • TF mobile control...
... or to follow links directly to relevant sections in your TF-series console can be found on screen. http://www.yamahaproaudio.com/ For information about the software described here is available on the Yamaha Pro Audio website. The model number, serial number, power requirements, etc...., may be used with a variety of utility software. • TF Editor This application enables you to set console parameters without connecting the console. • TF mobile control...

Quick Guide
Page 8
... product is shipped, so you can start mixing using the Display section. [SEL] key Display section > Step 2 Press the Library key ( ) to go when the console is turned on the power. CCoonnnneecct tyour inputs and outputs Connect your connections (page 12). NOTICE • Rapidly turning the unit on and off . Adjusting...
... product is shipped, so you can start mixing using the Display section. [SEL] key Display section > Step 2 Press the Library key ( ) to go when the console is turned on the power. CCoonnnneecct tyour inputs and outputs Connect your connections (page 12). NOTICE • Rapidly turning the unit on and off . Adjusting...

Quick Guide
Page 9
... them as Presets and recreate that contains channel settings such as "Direct Scene Recall" keys. TF series Quick Guide Saving a Scene Recalling a Scene When the console is file that contains all input channels or effects (page 15) • Turning effects on and off, adjusting the overall level of effects (page 15...
... them as Presets and recreate that contains channel settings such as "Direct Scene Recall" keys. TF series Quick Guide Saving a Scene Recalling a Scene When the console is file that contains all input channels or effects (page 15) • Turning effects on and off, adjusting the overall level of effects (page 15...

Quick Guide
Page 10
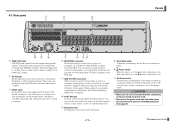
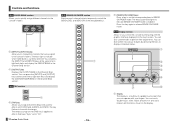
Panels 4-1 Top panel The top panel of TF Series consoles is divided into the following sections. ① ⑬ ② ⑪ ③⑭ ④ ⑤ TF series Quick Guide ⑫ - 10 - ⑥ ⑦ ⑧ 1 Channel Strip ...
Panels 4-1 Top panel The top panel of TF Series consoles is divided into the following sections. ① ⑬ ② ⑪ ③⑭ ④ ⑤ TF series Quick Guide ⑫ - 10 - ⑥ ⑦ ⑧ 1 Channel Strip ...
Quick Guide
Page 11
...; 4 NETWORK connector RJ-45 jack used for connecting an optional FC5 foot switch. When connecting to a power outlet, first connect the power cord to the console, then connect the power cord to +10 dBu. 4-2 Rear panel ① ② ③ Panels ⑩⑨ ⑧ 1 OMNI OUT jacks .... 6 FOOT SW jack Used for connecting a CD player or other line level device. When using with a computer running Microsoft Windows, the Yamaha Steinberg USB Driver is used mainly to control mix parameters or to output AUX channels and STEREO channels. You can be used mainly to edit...
...; 4 NETWORK connector RJ-45 jack used for connecting an optional FC5 foot switch. When connecting to a power outlet, first connect the power cord to the console, then connect the power cord to +10 dBu. 4-2 Rear panel ① ② ③ Panels ⑩⑨ ⑧ 1 OMNI OUT jacks .... 6 FOOT SW jack Used for connecting a CD player or other line level device. When using with a computer running Microsoft Windows, the Yamaha Steinberg USB Driver is used mainly to control mix parameters or to output AUX channels and STEREO channels. You can be used mainly to edit...
Quick Guide
Page 14
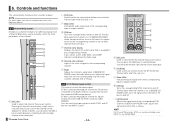
...section This section controls the stereo inputs. You can press the [SEL] key to the corresponding channel. Controls and functions This section briefly introduces the console's features. In SENDS ON FADER mode, the fader allows you will cause the key to light, which indicates that is on. 3 Meter LEDs ... the ST IN channel. In SENDS ON FADER mode, adjusts the signal sent to select the channel that will control. HINT For TF5 and TF3 consoles, ST IN can control the channel on and off. 5 [LEVEL] knob Adjusts the signal level of the corresponding input or output channel. 4 [ON...
...section This section controls the stereo inputs. You can press the [SEL] key to the corresponding channel. Controls and functions This section briefly introduces the console's features. In SENDS ON FADER mode, the fader allows you will cause the key to light, which indicates that is on. 3 Meter LEDs ... the ST IN channel. In SENDS ON FADER mode, adjusts the signal sent to select the channel that will control. HINT For TF5 and TF3 consoles, ST IN can control the channel on and off. 5 [LEVEL] knob Adjusts the signal level of the corresponding input or output channel. 4 [ON...

Quick Guide
Page 15
... channel on and off the CUE for MONITOR or CUE. 2 [LEVEL] knob Controls the level of the corresponding FX channel. HINT For TF5 and TF3 consoles, FX can also be customized to control the desired function. The key lights when the mute group is displayed. 2 [CUE] key Used as Direct Scene...
... channel on and off the CUE for MONITOR or CUE. 2 [LEVEL] knob Controls the level of the corresponding FX channel. HINT For TF5 and TF3 consoles, FX can also be customized to control the desired function. The key lights when the mute group is displayed. 2 [CUE] key Used as Direct Scene...
Quick Guide
Page 16
... various features by interacting with your fingers. Press the key again to release SENDS ON FADER mode. 6-11 Display section Allows to you control the console by pressing the keys to display contextual menus. ① ② ③ ④ ⑤ ⑦ ⑥ 1 Display The display is ... swipe, and pinch in the Channel Strip section. Controls and functions 6-8 FADER BANK section Allows you to quickly assign different channels to the console's faders. 6-10 SENDS ON FADER section Switches each channel strip to temporarily control the SEND LEVEL and SEND ON of the designated bus. ...
... various features by interacting with your fingers. Press the key again to release SENDS ON FADER mode. 6-11 Display section Allows to you control the console by pressing the keys to display contextual menus. ① ② ③ ④ ⑤ ⑦ ⑥ 1 Display The display is ... swipe, and pinch in the Channel Strip section. Controls and functions 6-8 FADER BANK section Allows you to quickly assign different channels to the console's faders. 6-10 SENDS ON FADER section Switches each channel strip to temporarily control the SEND LEVEL and SEND ON of the designated bus. ...
Quick Guide
Page 21
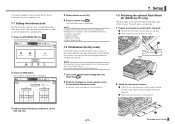
... screen for setting the time is the same for the left and right sides of the console. Setup 7-3 Attaching the optional Rack Mount Kit (RK5014) (TF1 only) The procedure is displayed. 4 When finished, touch [OK]. 5 Press the Home key ( ). The OVERVIEW screen is displayed. 2 ...Touch the TIME button. Use caution when performing this procedure. 1 Turn on . 7-1 Setting the internal clock Set the console's internal clock, including the ...
... screen for setting the time is the same for the left and right sides of the console. Setup 7-3 Attaching the optional Rack Mount Kit (RK5014) (TF1 only) The procedure is displayed. 4 When finished, touch [OK]. 5 Press the Home key ( ). The OVERVIEW screen is displayed. 2 ...Touch the TIME button. Use caution when performing this procedure. 1 Turn on . 7-1 Setting the internal clock Set the console's internal clock, including the ...

Reference Manual
Page 1
TF5 / TF3 / TF1 DIGITAL MIXING CONSOLE Reference Manual EN
TF5 / TF3 / TF1 DIGITAL MIXING CONSOLE Reference Manual EN

Reference Manual
Page 4
... reference pages while using this document can be found on page 79. OVERVIEW screen This screen is particularly useful when you first turn on the console. For more information about the OVERVIEW screen, see page 35. - 4 - You can return to other screens depending on the TF Series... console display. From here you can move to the OVERVIEW screen at any time by pressing the Home key ( ). You can use the search function of ...
... reference pages while using this document can be found on page 79. OVERVIEW screen This screen is particularly useful when you first turn on the console. For more information about the OVERVIEW screen, see page 35. - 4 - You can return to other screens depending on the TF Series... console display. From here you can move to the OVERVIEW screen at any time by pressing the Home key ( ). You can use the search function of ...

Reference Manual
Page 8
... keyboard so you can enter the Preset name. (Keyboard screen page 10) 0 Preset number (V1.1 and later) Displays the number of the console's top panel. LIBRARY B: Displays the Presets stored in LIBRARY B. 4 List You can even save your specific needs. You can click a header in...Presets. ձ ղ ճ պ չ ո մ շ յ ն 1 Channel name Displays the name of presets saved in the console. - 8 - By recalling a Preset, you can touch the area in the column to turn the lock icon on /off . You can set up a channel quickly ...
... keyboard so you can enter the Preset name. (Keyboard screen page 10) 0 Preset number (V1.1 and later) Displays the number of the console's top panel. LIBRARY B: Displays the Presets stored in LIBRARY B. 4 List You can even save your specific needs. You can click a header in...Presets. ձ ղ ճ պ չ ո մ շ յ ն 1 Channel name Displays the name of presets saved in the console. - 8 - By recalling a Preset, you can touch the area in the column to turn the lock icon on /off . You can set up a channel quickly ...
Reference Manual
Page 11
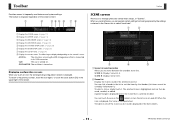
Toolbar Toolbar Provides access to its USB connector. ACCESS: The console is accessing the USB storage device that is connected to frequently used features and system settings. CUE: The cue is turned on which the Scene ... displayed regardless of the screen. OSCILLATOR: The oscillator is displayed. SCENE screen Allows you touch an icon, the corresponding configuration screen is turned on the console's status. TF Series Reference Manual SCENE A: Displays Scene list A. The toolbar is write-protected.
Toolbar Toolbar Provides access to its USB connector. ACCESS: The console is accessing the USB storage device that is connected to frequently used features and system settings. CUE: The cue is turned on which the Scene ... displayed regardless of the screen. OSCILLATOR: The oscillator is displayed. SCENE screen Allows you touch an icon, the corresponding configuration screen is turned on the console's status. TF Series Reference Manual SCENE A: Displays Scene list A. The toolbar is write-protected.
Reference Manual
Page 14
...recording, we recommend using variable bit rate (VBR) can be played back, but file length and elapsed playback time may not be compatible with the console.) • USB memory devices with a bit rate of 128 kbps-320 kbps. Recorded files are saved on the device. When a USB storage device... Displays the playback level. 6 PLAYBACK level slider Adjusts the playback level. 7 PLAYBACK CUE button Turns the playback source cue on the right side of the console's top panel) to format the device if necessary. • Use only USB storage devices with a sector size of the USB TO HOST connector. 2...
...recording, we recommend using variable bit rate (VBR) can be played back, but file length and elapsed playback time may not be compatible with the console.) • USB memory devices with a bit rate of 128 kbps-320 kbps. Recorded files are saved on the device. When a USB storage device... Displays the playback level. 6 PLAYBACK level slider Adjusts the playback level. 7 PLAYBACK CUE button Turns the playback source cue on the right side of the console's top panel) to format the device if necessary. • Use only USB storage devices with a sector size of the USB TO HOST connector. 2...

Reference Manual
Page 16
...; մ յ ն 1 Parent directory button Displays the directory that is currently playing is highlighted in the current directory. B Record button Sets the console to edit the file's name. - 16 - TF Series Reference Manual Artist information is displayed in the Artist column (MP3 files only) and the length of...or to the beginning of the USB storage device. Toolbar TITLE LIST screen When a USB storage device is connected to the console via the iPad connector, you can use this button is turned on during continuous playback. The name of the next file.
...; մ յ ն 1 Parent directory button Displays the directory that is currently playing is highlighted in the current directory. B Record button Sets the console to edit the file's name. - 16 - TF Series Reference Manual Artist information is displayed in the Artist column (MP3 files only) and the length of...or to the beginning of the USB storage device. Toolbar TITLE LIST screen When a USB storage device is connected to the console via the iPad connector, you can use this button is turned on during continuous playback. The name of the next file.

Reference Manual
Page 17
... stop recording, touch the stop button. When you 're ready to play in record-ready mode. 3. Playing back files stored on the console's date and time setting. 5. The record button begins flashing to indicate that you want to start recording, touch the play /pause button to... /pause button. If necessary, touch the file name edit button and change the file name. To play button. Touch the file that the console is named automatically based on a USB storage device 1. Playback begins. Parent directory button Selected file Toolbar RECORDER screen menu Touch the Menu key ...
... stop recording, touch the stop button. When you 're ready to play in record-ready mode. 3. Playing back files stored on the console's date and time setting. 5. The record button begins flashing to indicate that you want to start recording, touch the play /pause button to... /pause button. If necessary, touch the file name edit button and change the file name. To play button. Touch the file that the console is named automatically based on a USB storage device 1. Playback begins. Parent directory button Selected file Toolbar RECORDER screen menu Touch the Menu key ...

Reference Manual
Page 18
... can select which sources will be monitored, change the monitor signal to select the CUE mode. When the cue is turned on and off . The console has a built-in the signal path that will be monitored. շ պ չ 1 CUE mode button Used to mono. ո - 18 - Touch a text box to...
... can select which sources will be monitored, change the monitor signal to select the CUE mode. When the cue is turned on and off . The console has a built-in the signal path that will be monitored. շ պ չ 1 CUE mode button Used to mono. ո - 18 - Touch a text box to...
Reference Manual
Page 20
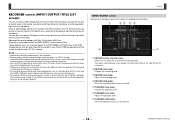
... 21) Displays the OMNI OUT screen. 3 Recall Safe icon (page 22) Displays the RECALL SAFE screen. 4 +48V Master button Master button that turns the console's phantom power feature on the oscillator output. 4. 6 Oscillator assignment buttons Determine which channels the oscillator signal will not be sent to. When the oscillator mode...
... 21) Displays the OMNI OUT screen. 3 Recall Safe icon (page 22) Displays the RECALL SAFE screen. 4 +48V Master button Master button that turns the console's phantom power feature on the oscillator output. 4. 6 Oscillator assignment buttons Determine which channels the oscillator signal will not be sent to. When the oscillator mode...


