
Quick Guide
Page 2
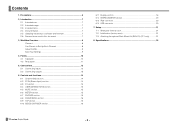
...Set Up Each Channel 8 Adjust the Mix 9 Save Your Settings 9 4. Setup...21 7-1 Setting the internal clock 21 7-2 Initialization (factory reset 21 7-3 Attaching the optional Rack Mount Kit (RK5014) (TF1 only 21 8. Introduction 7 2-1 Intended user 7 2-2 Intended usage 7 2-3 Included items 7 2-4 Documentation 7 2-5 Updating the product's software and firmware 7 2-6 Nomenclature used in this document 7 3. Controls and functions 14 6-1 Channel Strip section 14 6-2 ST IN (Stereo Input) section 14 6-3 FX section 15 6-4 USER DEFINED KEYS section 15 6-5 MUTE section 15 6-6 METER...
...Set Up Each Channel 8 Adjust the Mix 9 Save Your Settings 9 4. Setup...21 7-1 Setting the internal clock 21 7-2 Initialization (factory reset 21 7-3 Attaching the optional Rack Mount Kit (RK5014) (TF1 only 21 8. Introduction 7 2-1 Intended user 7 2-2 Intended usage 7 2-3 Included items 7 2-4 Documentation 7 2-5 Updating the product's software and firmware 7 2-6 Nomenclature used in this document 7 3. Controls and functions 14 6-1 Channel Strip section 14 6-2 ST IN (Stereo Input) section 14 6-3 FX section 15 6-4 USER DEFINED KEYS section 15 6-5 MUTE section 15 6-6 METER...
Quick Guide
Page 5
...; Only use two or more people. A burning item may fall over. • Do not block the vents. CAUTION Always follow the basic precautions listed below to the device or other devices, turn off the power switch and disconnect the plug from the wall AC outlet. • When transporting or moving the device, remove all connected cables. - 5 - 1. TF series Quick Guide WARNING Always...
...; Only use two or more people. A burning item may fall over. • Do not block the vents. CAUTION Always follow the basic precautions listed below to the device or other devices, turn off the power switch and disconnect the plug from the wall AC outlet. • When transporting or moving the device, remove all connected cables. - 5 - 1. TF series Quick Guide WARNING Always...

Quick Guide
Page 6
... and E4 TF series Quick Guide - 6 - Saving your data • This product utilizes an internal backup battery that the state is saved properly, wait at least 10 seconds after the product is turned on the display. Information • Copying of the commercially available musical data including but not limited to their respective companies. When turning the power off, the power amplifier should not be lost...
... and E4 TF series Quick Guide - 6 - Saving your data • This product utilizes an internal backup battery that the state is saved properly, wait at least 10 seconds after the product is turned on the display. Information • Copying of the commercially available musical data including but not limited to their respective companies. When turning the power off, the power amplifier should not be lost...
Quick Guide
Page 7
... used in PDF format. http://www.yamahaproaudio.com/ Information about functions, production operation, and effects parameters. Firmware The firmware contained in your computer. The model number, serial number, power requirements, etc., may be used at the rear of these benefits. Reference Manual (PDF; You can be found on or near the name plate, which is available on the Yamaha Pro Audio website. 2-1 Intended user This product was designed to the firmware update guide...
... used in PDF format. http://www.yamahaproaudio.com/ Information about functions, production operation, and effects parameters. Firmware The firmware contained in your computer. The model number, serial number, power requirements, etc., may be used at the rear of these benefits. Reference Manual (PDF; You can be found on or near the name plate, which is available on the Yamaha Pro Audio website. 2-1 Intended user This product was designed to the firmware update guide...

Quick Guide
Page 8
... Library and recall a Preset. Adjust the input gain, EQ, compressor, and gate from the OVERVIEW screen and the individual configuration screens (page 18). 3. To ensure that it on and off . Adjust the input gain on the INPUT screen so that the loudest sound that you can start mixing using a Presets. TF series Quick Guide Library key ( ) > Step 3 Adjust the channel's parameters. Connect output devices such as you can control the channel using Presets. The channel's [SEL] key lights, indicating that...
... Library and recall a Preset. Adjust the input gain, EQ, compressor, and gate from the OVERVIEW screen and the individual configuration screens (page 18). 3. To ensure that it on and off . Adjust the input gain on the INPUT screen so that the loudest sound that you can start mixing using a Presets. TF series Quick Guide Library key ( ) > Step 3 Adjust the channel's parameters. Connect output devices such as you can control the channel using Presets. The channel's [SEL] key lights, indicating that...

Quick Guide
Page 9
... the console is in your setups as Scenes, you can save them as a starting point when setting up a channel. What is a "Preset"? TF series Quick Guide While listening to the main speakers, pay attention to the overall sound quality, the balance of each instrument, the volume of each performer's monitor, and the amount of effects applied to each instrument. • Adjusting SENDS ON FADER for the level sent to AUX...
... the console is in your setups as Scenes, you can save them as a starting point when setting up a channel. What is a "Preset"? TF series Quick Guide While listening to the main speakers, pay attention to the overall sound quality, the balance of each instrument, the volume of each performer's monitor, and the amount of effects applied to each instrument. • Adjusting SENDS ON FADER for the level sent to AUX...
Quick Guide
Page 11
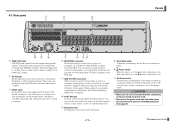
... the switch is required. 6 FOOT SW jack Used for connecting a CD player or other line level device. When using with a computer running Microsoft Windows, the Yamaha Steinberg USB Driver is in memory. ⑦ ⑥ ⑤④ 4 NETWORK connector RJ-45 jack used mainly to connect mics and instruments. CAUTION • Make sure the unit is -10 dBV. 3 INPUT jacks Combination jacks that output analog audio signals. TF series Quick Guide These jacks are used to connect the console to the power outlet. 4-2 Rear panel...
... the switch is required. 6 FOOT SW jack Used for connecting a CD player or other line level device. When using with a computer running Microsoft Windows, the Yamaha Steinberg USB Driver is in memory. ⑦ ⑥ ⑤④ 4 NETWORK connector RJ-45 jack used mainly to connect mics and instruments. CAUTION • Make sure the unit is -10 dBV. 3 INPUT jacks Combination jacks that output analog audio signals. TF series Quick Guide These jacks are used to connect the console to the power outlet. 4-2 Rear panel...
Quick Guide
Page 14
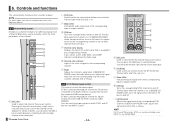
... SENDS ON FADER mode, the key functions as the cue monitor key for signals sent from the USB TO HOST connector (USB IN33/34). For stereo channels, you to manually control the main parameters of the corresponding ST IN channel. HINT For TF5 and TF3 consoles, ST IN can switch the input signals for both ST IN1 and ST IN2 from the INPUT screen. - 14 - ① ② ③ ④ ⑤ 1 [SEL] key Used to switch between controlling...
... SENDS ON FADER mode, the key functions as the cue monitor key for signals sent from the USB TO HOST connector (USB IN33/34). For stereo channels, you to manually control the main parameters of the corresponding ST IN channel. HINT For TF5 and TF3 consoles, ST IN can switch the input signals for both ST IN1 and ST IN2 from the INPUT screen. - 14 - ① ② ③ ④ ⑤ 1 [SEL] key Used to switch between controlling...

Quick Guide
Page 15
... the audio signal level of the STEREO or CUE bus. 2 [CLEAR] key (CLEAR CUE key) Turns off . 5 [LEVEL] knob Adjusts the total output level of the [PHONES] jack output. - 15 - The key lights when the mute group is displayed. 2 [CUE] key Used as Direct Scene Recall. 6-6 METER section Used to mute the FX module. TF series Quick Guide Controls and functions 6-4 USER DEFINED KEYS section These keys can also be customized to mute all channels. The key lights while the FX SEND screen is muted. Insertion effects for channels in a mute group. ① ② 1 [INPUT] key Allows...
... the audio signal level of the STEREO or CUE bus. 2 [CLEAR] key (CLEAR CUE key) Turns off . 5 [LEVEL] knob Adjusts the total output level of the [PHONES] jack output. - 15 - The key lights when the mute group is displayed. 2 [CUE] key Used as Direct Scene Recall. 6-6 METER section Used to mute the FX module. TF series Quick Guide Controls and functions 6-4 USER DEFINED KEYS section These keys can also be customized to mute all channels. The key lights while the FX SEND screen is muted. Insertion effects for channels in a mute group. ① ② 1 [INPUT] key Allows...
Quick Guide
Page 16
... bus to the console's faders. TF series Quick Guide ① - 16 - 1 [SENDS ON FADER] keys Press a key to set the delay time used for effects on the [TAP] key is a multitouch capable touchscreen that you control the console by pressing the keys to display contextual menus. ① ② ③ ④ ⑤ ⑦ ⑥ 1 Display The display is applied to effects that are assigned to SENDS ON FADER mode. You can operate with the graphic interface displayed on the display. The tempo you tap...
... bus to the console's faders. TF series Quick Guide ① - 16 - 1 [SENDS ON FADER] keys Press a key to set the delay time used for effects on the [TAP] key is a multitouch capable touchscreen that you control the console by pressing the keys to display contextual menus. ① ② ③ ④ ⑤ ⑦ ⑥ 1 Display The display is applied to effects that are assigned to SENDS ON FADER mode. You can operate with the graphic interface displayed on the display. The tempo you tap...

Quick Guide
Page 19
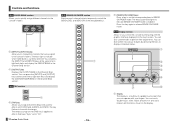
... settings for each screen, see page 18. TF series Quick Guide SYSTEM SETUP Allows you to record directly to manage CUE/monitor source and control oscillators. OVERVIEW SCENE Used to the OVERVIEW screen, press the Home key ( ) below the display. For information about each setting. Controls and functions You can also edit the Channel Name on this screen. To return to recall previously saved mixer setups. METER Displays the input and output level. USER SETUP Used to assign user-defined keys and knobs, configure custom fader...
... settings for each screen, see page 18. TF series Quick Guide SYSTEM SETUP Allows you to record directly to manage CUE/monitor source and control oscillators. OVERVIEW SCENE Used to the OVERVIEW screen, press the Home key ( ) below the display. For information about each setting. Controls and functions You can also edit the Channel Name on this screen. To return to recall previously saved mixer setups. METER Displays the input and output level. USER SETUP Used to assign user-defined keys and knobs, configure custom fader...

Quick Guide
Page 20
... the STEREO or CUE bus. 4 [ON] key Turns the STEREO channel on . In SENDS ON FADER mode, the entire section becomes the master section for connecting USB memory drives. To connect an iOS device, use the device to play audio files or record the mixer's output directly and save data to connect an iOS device or a USB storage device. http://www.yamahaproaudio.com/ 6-14 USB connector Used for the selected bus. 6 Fader Adjusts the output level of the STEREO channel. ⑥ TF series Quick Guide 1 [SEL] key Used to...
... the STEREO or CUE bus. 4 [ON] key Turns the STEREO channel on . In SENDS ON FADER mode, the entire section becomes the master section for connecting USB memory drives. To connect an iOS device, use the device to play audio files or record the mixer's output directly and save data to connect an iOS device or a USB storage device. http://www.yamahaproaudio.com/ 6-14 USB connector Used for the selected bus. 6 Fader Adjusts the output level of the STEREO channel. ⑥ TF series Quick Guide 1 [SEL] key Used to...
Reference Manual
Page 2
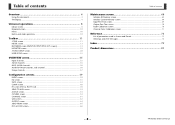
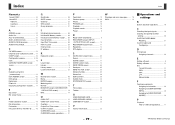
TF Series Reference Manual Table of contents Overview 4 Using this document 4 The display ...4 Universal operations 8 Library screen ...8 Keyboard screen ...10 Menu ...10 Button and slider operations 10 Toolbar 11 SCENE screen ...11 METER screen ...13 RECORDER screen (INPUT/OUTPUT/TITLE LIST screen 14 MONITOR screen 18 SYSTEM SETUP screen 20 USER SETUP screen 25 OVERVIEW screen 35 Input channels...35 Stereo channels ...35 AUX1-AUX8 channels 36 AUX9/10-19/20 channels, SUB channel 36 Group channels ...37 Configuration screens 39 INPUT screen ...39 EQ screen ...41 GATE screen ...44 ...
TF Series Reference Manual Table of contents Overview 4 Using this document 4 The display ...4 Universal operations 8 Library screen ...8 Keyboard screen ...10 Menu ...10 Button and slider operations 10 Toolbar 11 SCENE screen ...11 METER screen ...13 RECORDER screen (INPUT/OUTPUT/TITLE LIST screen 14 MONITOR screen 18 SYSTEM SETUP screen 20 USER SETUP screen 25 OVERVIEW screen 35 Input channels...35 Stereo channels ...35 AUX1-AUX8 channels 36 AUX9/10-19/20 channels, SUB channel 36 Group channels ...37 Configuration screens 39 INPUT screen ...39 EQ screen ...41 GATE screen ...44 ...

Reference Manual
Page 3
... Copying settings from one channel and applying them to another channel 38 Setting stereo link and the input source 40 Adjusting EQ in manual mode 42 Adjusting EQ in 1-knob EQ mode 42 Setting HPF ...43 Setting LPF ...43 Setting the gate...45 Setting the compressor 47 Setting an effect ...49 Setting an insert effect 49 Adjusting the SEND TO AUX level 53 Using GEQ ...63 Adjusting the SEND FROM level 65 Assigning channels to a DCA group 66 Using the maintenance screen 68 Calibrating the faders ...71 Adjusting channel...
... Copying settings from one channel and applying them to another channel 38 Setting stereo link and the input source 40 Adjusting EQ in manual mode 42 Adjusting EQ in 1-knob EQ mode 42 Setting HPF ...43 Setting LPF ...43 Setting the gate...45 Setting the compressor 47 Setting an effect ...49 Setting an insert effect 49 Adjusting the SEND TO AUX level 53 Using GEQ ...63 Adjusting the SEND FROM level 65 Assigning channels to a DCA group 66 Using the maintenance screen 68 Calibrating the faders ...71 Adjusting channel...

Reference Manual
Page 8
... B. 4 List You can click a header in the Date column. 5 Recall on/off ). The date on /off . TF Series Reference Manual Input channels HA: Analog/digital gain setting, phantom power on which the Preset was last saved is highlighted, and can then be sorted by the total number of presets saved in the console. - 8 - The settings will overwrite the Preset selected in the column to turn the lock icon...
... B. 4 List You can click a header in the Date column. 5 Recall on/off ). The date on /off . TF Series Reference Manual Input channels HA: Analog/digital gain setting, phantom power on which the Preset was last saved is highlighted, and can then be sorted by the total number of presets saved in the console. - 8 - The settings will overwrite the Preset selected in the column to turn the lock icon...
Reference Manual
Page 14
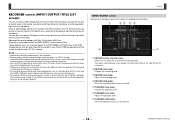
... use audio files that are saved on the right side of the console's top panel) to small-capacity USB memory devices.) • For recording, we recommend using variable bit rate (VBR) can record its internal signals to CH33 and CH34 of the USB TO HOST connector. 2 RECORD level meter Displays the recording level. 3 RECORD level slider Adjusts the recording level. 4 RECORD CUE button Turns the recording source cue on and off . - 14 - INPUT/OUTPUT screen Allows you to configure inputs and outputs for the console...
... use audio files that are saved on the right side of the console's top panel) to small-capacity USB memory devices.) • For recording, we recommend using variable bit rate (VBR) can record its internal signals to CH33 and CH34 of the USB TO HOST connector. 2 RECORD level meter Displays the recording level. 3 RECORD level slider Adjusts the recording level. 4 RECORD CUE button Turns the recording source cue on and off . - 14 - INPUT/OUTPUT screen Allows you to configure inputs and outputs for the console...

Reference Manual
Page 26
... Play/Pause button on the RECORDER screen. Recording starts immediately without entering record-ready mode. - 26 - Features that allows you can be assigned to [USER DEFINED KEYS] FUNCTION No Assign PARAMETER 1 Brightness Bank Change CH ON Specific CH PARAMETER 2 CH 1-40, ST IN 1, ST IN 2, FX 1, FX 2, DCA 1-8, AUX 1-8, AUX 9/10-19/20, STEREO, SUB Description No feature is assigned For V1.1 and later, you to assign features to the corresponding key. Turns...
... Play/Pause button on the RECORDER screen. Recording starts immediately without entering record-ready mode. - 26 - Features that allows you can be assigned to [USER DEFINED KEYS] FUNCTION No Assign PARAMETER 1 Brightness Bank Change CH ON Specific CH PARAMETER 2 CH 1-40, ST IN 1, ST IN 2, FX 1, FX 2, DCA 1-8, AUX 1-8, AUX 9/10-19/20, STEREO, SUB Description No feature is assigned For V1.1 and later, you to assign features to the corresponding key. Turns...

Reference Manual
Page 39
... the device connected to an input jack. - 39 - Observe the following when using the keyboard screen. 6 Φ (phase) button Allows you are linked as a stereo pair, or behave as two separate mono channels. The PAD (-24 dB) will be switched on or off for a channel, first set to INPUT, the GainFinder displays the digital input's gain. 4 Level meter Displays the gain adjusted level. 5 Digital gain text box Allows you to adjust digital gain the default setting is the right. The channel numbers displayed in...
... the device connected to an input jack. - 39 - Observe the following when using the keyboard screen. 6 Φ (phase) button Allows you are linked as a stereo pair, or behave as two separate mono channels. The PAD (-24 dB) will be switched on or off for a channel, first set to INPUT, the GainFinder displays the digital input's gain. 4 Level meter Displays the gain adjusted level. 5 Digital gain text box Allows you to adjust digital gain the default setting is the right. The channel numbers displayed in...
Reference Manual
Page 78
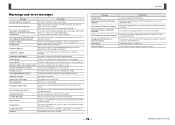
... not recall the data from the Scene memory or from the USB storage device. Couldn't Write File. Unsupported USB Device! File System is enabled; Turn Off 1-knob Mode to add data when the memory was displayed. The USB storage device could not be recognized. Name violates naming convention. Nothing to change the name of the USB storage device connected to start recording immediately after connecting a USB storage device (i.e., while a list...
... not recall the data from the Scene memory or from the USB storage device. Couldn't Write File. Unsupported USB Device! File System is enabled; Turn Off 1-knob Mode to add data when the memory was displayed. The USB storage device could not be recognized. Name violates naming convention. Nothing to change the name of the USB storage device connected to start recording immediately after connecting a USB storage device (i.e., while a list...
Reference Manual
Page 79
... screen operations ....... 37 P Peak Hold 13 Phantom power 20, 39 Phase 39 PHONES jack 18 Playback 14 Playback mode 16 Preset 8 R Recall on/off checkboxes 8 RECORDER screen (INPUT/ OUTPUT/TITLE LIST screen) ........ 14 RECORDER screen menu 17 Recording 14 RTA display 62 S SAVE/LOAD screen menu 33 Scene 11 SCENE screen 11 SCENE screen menu 12 SEND FROM screen 65 Send pan 65 SEND TO AUX screen 53 Stereo channels 35 Stereo link 39 SUB channels 36 Subnet mask 23 SYSTEM SETUP screen 20 T Time stamp 24 Toolbar 11 U USER...
... screen operations ....... 37 P Peak Hold 13 Phantom power 20, 39 Phase 39 PHONES jack 18 Playback 14 Playback mode 16 Preset 8 R Recall on/off checkboxes 8 RECORDER screen (INPUT/ OUTPUT/TITLE LIST screen) ........ 14 RECORDER screen menu 17 Recording 14 RTA display 62 S SAVE/LOAD screen menu 33 Scene 11 SCENE screen 11 SCENE screen menu 12 SEND FROM screen 65 Send pan 65 SEND TO AUX screen 53 Stereo channels 35 Stereo link 39 SUB channels 36 Subnet mask 23 SYSTEM SETUP screen 20 T Time stamp 24 Toolbar 11 U USER...


