
Owners Manual
Page 2
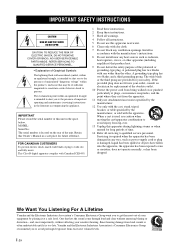
... A Lifetime Yamaha and the Electronic Industries Association's Consumer Electronics Group want you to get the most importantly, without annoying blaring or distortion - IMPORTANT Please record the serial number of plug to persons. FOR CANADIAN CUSTOMERS To prevent electric shock, match wide blade of this Owner's Manual in accordance with the manufacturer's instructions. 8 Do not install near water...
... A Lifetime Yamaha and the Electronic Industries Association's Consumer Electronics Group want you to get the most importantly, without annoying blaring or distortion - IMPORTANT Please record the serial number of plug to persons. FOR CANADIAN CUSTOMERS To prevent electric shock, match wide blade of this Owner's Manual in accordance with the manufacturer's instructions. 8 Do not install near water...
Owners Manual
Page 3
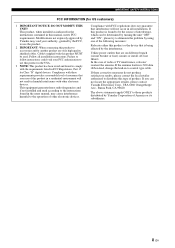
... products distributed by the FCC, to distribute this manual, meets FCC requirements. If you can be used according to the instructions found to the operation of America or its subsidiaries. This equipment generates/uses radio frequencies and, if not installed and used . IMPORTANT SAFETY INSTRUCTIONS FCC INFORMATION (for Class "B" digital devices. This product, when installed as indicated in the instructions contained in all installation instructions.
... products distributed by the FCC, to distribute this manual, meets FCC requirements. If you can be used according to the instructions found to the operation of America or its subsidiaries. This equipment generates/uses radio frequencies and, if not installed and used . IMPORTANT SAFETY INSTRUCTIONS FCC INFORMATION (for Class "B" digital devices. This product, when installed as indicated in the instructions contained in all installation instructions.
Owners Manual
Page 4
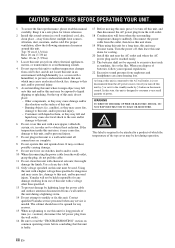
... by A or set it may be attached to the standby mode by A button on the surface of batteries, follow your regional regulations. 22 Excessive sound pressure from the wall outlet, grasp the plug; Using this unit with high humidity (i.e. When you turn off this unit upside-down. Use a clean, dry cloth. 12 Only voltage specified on common operating errors before concluding...
... by A or set it may be attached to the standby mode by A button on the surface of batteries, follow your regional regulations. 22 Excessive sound pressure from the wall outlet, grasp the plug; Using this unit with high humidity (i.e. When you turn off this unit upside-down. Use a clean, dry cloth. 12 Only voltage specified on common operating errors before concluding...
Owners Manual
Page 5
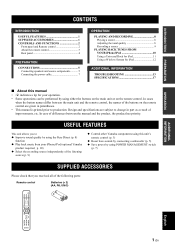
...3 Rear panel 4 PREPARATION CONNECTIONS 5 Connecting speakers and source components 5 Connecting the power cable 7 OPERATION PLAYING AND RECORDING 8 Playing a source 8 Adjusting the tonal quality 8 Recording a source 9 PLAYING BACK TUNES FROM YOUR iPhone/iPod 10 Using a Universal Dock for iPod 11 Using a Wireless System for iPod 12 ADDITIONAL INFORMATION TROUBLESHOOTING 13 SPECIFICATIONS 17 ■ About this unit's remote control (p. 3) ◆ Boost bass sounds by connecting a subwoofer (p. 5) ◆ Save power by using the Pure Direct (p. 8) function ◆ Play back music...
...3 Rear panel 4 PREPARATION CONNECTIONS 5 Connecting speakers and source components 5 Connecting the power cable 7 OPERATION PLAYING AND RECORDING 8 Playing a source 8 Adjusting the tonal quality 8 Recording a source 9 PLAYING BACK TUNES FROM YOUR iPhone/iPod 10 Using a Universal Dock for iPod 11 Using a Wireless System for iPod 12 ADDITIONAL INFORMATION TROUBLESHOOTING 13 SPECIFICATIONS 17 ■ About this unit's remote control (p. 3) ◆ Boost bass sounds by connecting a subwoofer (p. 5) ◆ Save power by using the Pure Direct (p. 8) function ◆ Play back music...
Owners Manual
Page 6
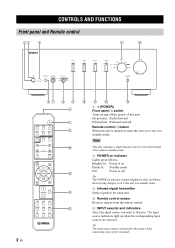
The input source indicators light up as follows: Brightly lit: Power is on Dimly lit: Standby mode Off: Power is off the power of the connection jacks on the rear panel. y The input source names correspond to standby mode. CONTROLS AND FUNCTIONS Front panel and Remote control 2 En 1 A (POWER) Front panel: A switch Turns on and off y The POWER on indicator remains brightly lit while an iPhone/ iPod is being charged, even if this unit is turned on: turns this unit...
The input source indicators light up as follows: Brightly lit: Power is on Dimly lit: Standby mode Off: Power is off the power of the connection jacks on the rear panel. y The input source names correspond to standby mode. CONTROLS AND FUNCTIONS Front panel and Remote control 2 En 1 A (POWER) Front panel: A switch Turns on and off y The POWER on indicator remains brightly lit while an iPhone/ iPod is being charged, even if this unit is turned on: turns this unit...
Owners Manual
Page 7
... speaker set connected to the SPEAKERS A and/or B terminals on the rear panel each time the corresponding SPEAKERS selector is set to A, B or A+B. 8 REC OUT selector Select a source for recording. Note Even when using an optional Yamaha Universal Dock for iPod (see page 9). See the illustration inside the battery compartment. A BALANCE control Adjusts the sound output balance of large obstacles. 3 En The indicator above it lights up when this unit during operation. buttons...
... speaker set connected to the SPEAKERS A and/or B terminals on the rear panel each time the corresponding SPEAKERS selector is set to A, B or A+B. 8 REC OUT selector Select a source for recording. Note Even when using an optional Yamaha Universal Dock for iPod (see page 9). See the illustration inside the battery compartment. A BALANCE control Adjusts the sound output balance of large obstacles. 3 En The indicator above it lights up when this unit during operation. buttons...

Owners Manual
Page 8
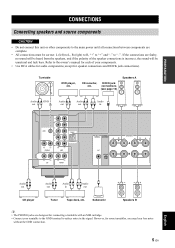
... 5). 3 Audio input/output jacks Used to connect external components, such as doing so may not be fully slid to either position. See page 6 for iPod (see page 10). 5 SUBWOOFER OUT jack Used to connect a subwoofer with built-in your system. Switch position HIGH LOW Impedance level • If you make bi-wire connections, the impedance of the speakers in amplifier (see page 5). 6 POWER MANAGEMENT switch Enables or disables the automatic power down function (see page 7). 7 SPEAKERS A/B terminals Used...
... 5). 3 Audio input/output jacks Used to connect external components, such as doing so may not be fully slid to either position. See page 6 for iPod (see page 10). 5 SUBWOOFER OUT jack Used to connect a subwoofer with built-in your system. Switch position HIGH LOW Impedance level • If you make bi-wire connections, the impedance of the speakers in amplifier (see page 5). 6 POWER MANAGEMENT switch Enables or disables the automatic power down function (see page 7). 7 SPEAKERS A/B terminals Used...
Owners Manual
Page 9
... CD recorder, DOCK jack etc. Subwoofer Speakers B y • The PHONO jacks are complete. • All connections must be unnatural and lack bass. Refer to the owner's manual for each of the speaker connections is incorrect, the sound will be correct: L (left) to L, R (right) to R, "+" to "+" and "-" to reduce noise in Audio out CD player Tuner Tape deck, etc. However, for speaker connections and DOCK jack connections). If the connections are faulty, no...
... CD recorder, DOCK jack etc. Subwoofer Speakers B y • The PHONO jacks are complete. • All connections must be unnatural and lack bass. Refer to the owner's manual for each of the speaker connections is incorrect, the sound will be correct: L (left) to L, R (right) to R, "+" to "+" and "-" to reduce noise in Audio out CD player Tuner Tape deck, etc. However, for speaker connections and DOCK jack connections). If the connections are faulty, no...

Owners Manual
Page 10
... the low frequency driver to prevent short circuits. CAUTION When making bi-wire connections, remove the shorting bridges or cables on the impedance of terminals. See page 4 for more information about the IMPEDANCE SELECTOR switch. These two sets of this unit or other speaker to be set to the A+B position. 6 En Banana plug Connect the other components to the main power until all connections between components are connected to...
... the low frequency driver to prevent short circuits. CAUTION When making bi-wire connections, remove the shorting bridges or cables on the impedance of terminals. See page 4 for more information about the IMPEDANCE SELECTOR switch. These two sets of this unit or other speaker to be set to the A+B position. 6 En Banana plug Connect the other components to the main power until all connections between components are connected to...

Owners Manual
Page 11
PREPARATION Connecting the power cable POWER MANAGEMENT CONNECTIONS To the wall outlet with the power cable ■ POWER MANAGEMENT switch Enables or disables the automatic power down function is enabled, this unit will automatically switch to standby mode if no operations are performed for 8 hours. ■ Connecting the power cable Plug the power cable into the wall outlet after all other connections are complete. When the automatic power down function. English 7 En
PREPARATION Connecting the power cable POWER MANAGEMENT CONNECTIONS To the wall outlet with the power cable ■ POWER MANAGEMENT switch Enables or disables the automatic power down function is enabled, this unit will automatically switch to standby mode if no operations are performed for 8 hours. ■ Connecting the power cable Plug the power cable into the wall outlet after all other connections are complete. When the automatic power down function. English 7 En
Owners Manual
Page 12
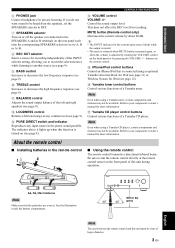
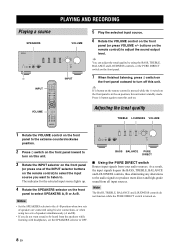
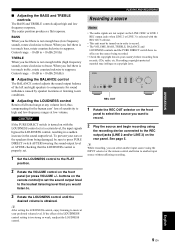
... remote control) to turn on this unit on position, this unit. BASS BALANCE PURE DIRECT ■ Using the PURE DIRECT switch Routes input signals from all input sources. Press A button again to select the input source you do not function while the PURE DIRECT switch is in the on . y You can adjust the tonal quality by using two sets of speakers are connected using bi-wire connections, or when using the BASS, TREBLE, BALANCE and LOUDNESS controls, or the PURE DIRECT switch on the front panel...
... remote control) to turn on this unit on position, this unit. BASS BALANCE PURE DIRECT ■ Using the PURE DIRECT switch Routes input signals from all input sources. Press A button again to select the input source you do not function while the PURE DIRECT switch is in the on . y You can adjust the tonal quality by using two sets of speakers are connected using bi-wire connections, or when using the BASS, TREBLE, BALANCE and LOUDNESS controls, or the PURE DIRECT switch on the front panel...
Owners Manual
Page 13
... preferred volume level. buttons on the rear panel. English 9 En CAUTION If the PURE DIRECT switch is too much treble, rotate counterclockwise to boost. Control range: -10 dB to +10 dB (20 Hz) TREBLE When you can select another input source using the recording device connected to boost. y While recording, you feel there is turned on in the sound output level. y After setting the LOUDNESS control, enjoy listening to record. • The VOLUME, BASS, TREBLE, BALANCE...
... preferred volume level. buttons on the rear panel. English 9 En CAUTION If the PURE DIRECT switch is too much treble, rotate counterclockwise to boost. Control range: -10 dB to +10 dB (20 Hz) TREBLE When you can select another input source using the recording device connected to boost. y While recording, you feel there is turned on in the sound output level. y After setting the LOUDNESS control, enjoy listening to record. • The VOLUME, BASS, TREBLE, BALANCE...
Owners Manual
Page 14
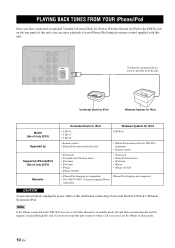
... does not support iPhone connection. CAUTION To prevent accidents, unplug the power cable of your iPhone/iPod using the remote control supplied with this unit. Universal Dock for iPod Wireless System for iPod Model (As of July 2010) Operated by Supported iPhone/iPod (As of July 2010) Remarks Universal Dock for iPod Wireless System for iPod to the DOCK jack on automatically and the ringtone is received, set the...
... does not support iPhone connection. CAUTION To prevent accidents, unplug the power cable of your iPhone/iPod using the remote control supplied with this unit. Universal Dock for iPod Wireless System for iPod Model (As of July 2010) Operated by Supported iPhone/iPod (As of July 2010) Remarks Universal Dock for iPod Wireless System for iPod to the DOCK jack on automatically and the ringtone is received, set the...
Owners Manual
Page 15
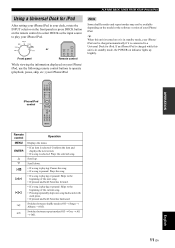
... charged automatically if it is in standby mode, the POWER on your iPhone/ iPod, use the following remote control buttons to a Universal Dock for iPod After setting your iPhone/iPod in your dock, rotate the INPUT selector on the front panel (or press DOCK button on the remote control) to select DOCK as the input source to play your iPhone/iPod. y When this unit is connected to operate (playback, pause, skip, etc.) your...
... charged automatically if it is in standby mode, the POWER on your iPhone/ iPod, use the following remote control buttons to a Universal Dock for iPod After setting your iPhone/iPod in your dock, rotate the INPUT selector on the front panel (or press DOCK button on the remote control) to select DOCK as the input source to play your iPhone/iPod. y When this unit is connected to operate (playback, pause, skip, etc.) your...

Owners Manual
Page 16
...'s VOLUME control or the remote control. • In the following situations, the wireless connection between the transmitter and receiver is in standby mode, the POWER on the iPhone/iPod also adjusts the volume of the receiver. - Communication between the transmitter and receiver is connected to the transmitter and playback begins, it cannot provide enough power to DOCK. - to increase it further, adjust the volume using this time the wireless connection between...
...'s VOLUME control or the remote control. • In the following situations, the wireless connection between the transmitter and receiver is in standby mode, the POWER on the iPhone/iPod also adjusts the volume of the receiver. - Communication between the transmitter and receiver is connected to the transmitter and playback begins, it cannot provide enough power to DOCK. - to increase it further, adjust the volume using this time the wireless connection between...
Owners Manual
Page 17
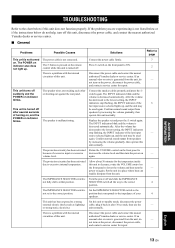
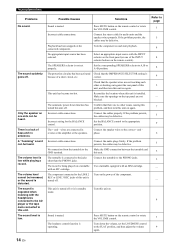
... be used again. Disconnect the power cable and contact the nearest authorized Yamaha dealer or service center. switch again. volume level. SELECTOR switch all the way to the correct position. again. If the problem you are touching each other Connect the speaker cables properly and press the A suddenly and the or shorting out against the rear panel. This unit turns off The speaker wires are experiencing is Set the IMPEDANCE SELECTOR switch...
... be used again. Disconnect the power cable and contact the nearest authorized Yamaha dealer or service center. switch again. volume level. SELECTOR switch all the way to the correct position. again. If the problem you are touching each other Connect the speaker cables properly and press the A suddenly and the or shorting out against the rear panel. This unit turns off The speaker wires are experiencing is Set the IMPEDANCE SELECTOR switch...
Owners Manual
Page 18
... on the remote control or rotate the VOLUME control. 3 Incorrect cable connections. problem, and then turn this unit is operating. If the problem persists, the cables may be defective. 5 Incorrect setting for audio units and the speaker wires properly. Connect the turntable to the jacks other or shorting out against the rear panel of the INPUT 8 selector buttons on the power of a short circuit, etc. The component connected to A, B or A+B position. 8 The protection circuitry has...
... on the remote control or rotate the VOLUME control. 3 Incorrect cable connections. problem, and then turn this unit is operating. If the problem persists, the cables may be defective. 5 Incorrect setting for audio units and the speaker wires properly. Connect the turntable to the jacks other or shorting out against the rear panel of the INPUT 8 selector buttons on the power of a short circuit, etc. The component connected to A, B or A+B position. 8 The protection circuitry has...

Owners Manual
Page 19
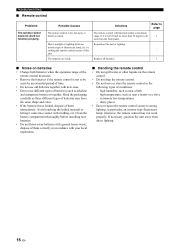
... connected to use TREBLE, BALANCE those controls. When using the Universal Dock for iPod: Your iPhone/iPod is stationed in the dock. Noise is not supported by the unit. This unit is not turned on. This unit is not turned on . Refer to your iPhone/iPod to page Using the BASS, The PURE DIRECT switch is not being used is heard. Connect an iPhone/iPod supported by the unit. The iPhone/iPod...
... connected to use TREBLE, BALANCE those controls. When using the Universal Dock for iPod: Your iPhone/iPod is stationed in the dock. Noise is not supported by the unit. This unit is not turned on. This unit is not turned on . Refer to your iPhone/iPod to page Using the BASS, The PURE DIRECT switch is not being used is heard. Connect an iPhone/iPod supported by the unit. The iPhone/iPod...
Owners Manual
Page 20
... work nor function properly. Reposition this unit. dusty places • Do not expose the remote control sensor to be used for an extended period of time. • Do not use different types of batteries (such as these different types of them immediately. Direct sunlight or lighting (from the front panel. Read the packaging carefully as alkaline and manganese batteries) together. TROUBLESHOOTING...
... work nor function properly. Reposition this unit. dusty places • Do not expose the remote control sensor to be used for an extended period of time. • Do not use different types of batteries (such as these different types of them immediately. Direct sunlight or lighting (from the front panel. Read the packaging carefully as alkaline and manganese batteries) together. TROUBLESHOOTING...

Owners Manual
Page 21
... CD, etc. to SPEAKERS (20 Hz to 20 kHz, 42.5 W, 8 0.015% or less • Signal to noise ratio (IHF-A network) PHONO (MM) (5 mV input shorted 88 dB or more • Tone control characteristics BASS Boost/Cut (20 Hz 10 dB Turnover frequency 350 Hz TREBLE Boost/Cut (20 kHz 10 dB Turnover frequency 3.5 kHz • Continuous loudness control Attenuation (1 kHz 30...
... CD, etc. to SPEAKERS (20 Hz to 20 kHz, 42.5 W, 8 0.015% or less • Signal to noise ratio (IHF-A network) PHONO (MM) (5 mV input shorted 88 dB or more • Tone control characteristics BASS Boost/Cut (20 Hz 10 dB Turnover frequency 350 Hz TREBLE Boost/Cut (20 kHz 10 dB Turnover frequency 3.5 kHz • Continuous loudness control Attenuation (1 kHz 30...


