

Owner's Manual
Page 2
... MAINTENANCE * When connecting or disconnecting cables, turn off the amplifier and other equipment or reduce the volume. * After playing, wipe the entire guitar down, including strings, with a good polishing cloth. With reasonable care, your purchase of the YAMAHA electric guitar. Congratulations on your YAMAHA electric guitar will remove corrosive skin oils and acids, and protect the plating, finish, and strings. * Avoid exposing the guitar to direct...
... MAINTENANCE * When connecting or disconnecting cables, turn off the amplifier and other equipment or reduce the volume. * After playing, wipe the entire guitar down, including strings, with a good polishing cloth. With reasonable care, your purchase of the YAMAHA electric guitar. Congratulations on your YAMAHA electric guitar will remove corrosive skin oils and acids, and protect the plating, finish, and strings. * Avoid exposing the guitar to direct...
Owner's Manual
Page 3
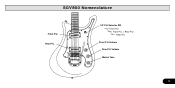
Rear P.U. SGV800 Nomenclature Front P.U. Front P.U. + Rear P.U. Front P.U. Front P.U. Volume Master Tone 3 Volume Rear P.U. Rear P.U. 3-P P.U. Selector SW.
Rear P.U. SGV800 Nomenclature Front P.U. Front P.U. + Rear P.U. Front P.U. Front P.U. Volume Master Tone 3 Volume Rear P.U. Rear P.U. 3-P P.U. Selector SW.
Owner's Manual
Page 4
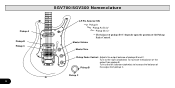
Pickup A Pickup A+(B+C)* Pickup (B+C)* * The balance of pickup (B+C) depends upon the position of Pickup B the output from pickup B. Turn to the left (counter-clockwise) to increase the balance of pickups B and C. Pickup C Master Volume Master Tone Pickup Fader Control: Adjusts the output balance of the output from pickup C. Selector SW. Turn to the right (clockwise) to increase the balance of the Pickup Fader Control. Pickup A Pickup B Pickup C 4 SGV700/SGV300 Nomenclature 3-P P.U.
Pickup A Pickup A+(B+C)* Pickup (B+C)* * The balance of pickup (B+C) depends upon the position of Pickup B the output from pickup B. Turn to the left (counter-clockwise) to increase the balance of pickups B and C. Pickup C Master Volume Master Tone Pickup Fader Control: Adjusts the output balance of the output from pickup C. Selector SW. Turn to the right (clockwise) to increase the balance of the Pickup Fader Control. Pickup A Pickup B Pickup C 4 SGV700/SGV300 Nomenclature 3-P P.U.

Owner's Manual
Page 5
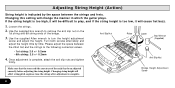
Truss Rod Adjustment Procedure Make sure guitar is unreliable, and even experienced bass technicians can be misted by optical illusions. concave convex Increases mentioned space Truss rod Decreases mentioned space 5 Step 3: Measure the mentioned space at opposite ends of the fingerboard acts as follows: Step 1: Tune strings to proper pitch, and depress the strings by inserting the appropriate feeler...
Truss Rod Adjustment Procedure Make sure guitar is unreliable, and even experienced bass technicians can be misted by optical illusions. concave convex Increases mentioned space Truss rod Decreases mentioned space 5 Step 3: Measure the mentioned space at opposite ends of the fingerboard acts as follows: Step 1: Tune strings to proper pitch, and depress the strings by inserting the appropriate feeler...
Owner's Manual
Page 6
... Adjustment Screw 6 Use the supplied box wrench to play, and if the string height is complete, attach the anti slip nuts and tighten firmly. Turn both screws alternately and adjust the height little by the space between the 22nd fret and the strings to turn the height adjustment screw and adjust the height. Loosen the strings. 2. Changing this setting will affect string pitch so please tune the strings...
... Adjustment Screw 6 Use the supplied box wrench to play, and if the string height is complete, attach the anti slip nuts and tighten firmly. Turn both screws alternately and adjust the height little by the space between the 22nd fret and the strings to turn the height adjustment screw and adjust the height. Loosen the strings. 2. Changing this setting will affect string pitch so please tune the strings...
Owner's Manual
Page 7
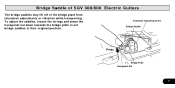
Bridge Saddle of SGV 300/800 Electric Guitars The bridge saddles may lift off of the bridge plate from intonation adjustments or vibration while transporting. Intonation Adjusting Screw Bridge Saddle Press Bridge Plate Hexagonal Nut 7 To adjust the saddles, loosen the strings and press the hexagonal nut down towards the bridge plate to set bridge saddles in their original position.
Bridge Saddle of SGV 300/800 Electric Guitars The bridge saddles may lift off of the bridge plate from intonation adjustments or vibration while transporting. Intonation Adjusting Screw Bridge Saddle Press Bridge Plate Hexagonal Nut 7 To adjust the saddles, loosen the strings and press the hexagonal nut down towards the bridge plate to set bridge saddles in their original position.
Owner's Manual
Page 8
... sharp compared to the harmonic tone → Turn to the right (clock- Tune so that you use good quality strobe tuning scope for this function. * Please use the supplied Allen wrench to adjust the octave adjustment screw. • If the pitch of the note played on the 12th fret is sharp compared to the harmonic tone → Turn the octave adjustment screw to the right (clockwise...
... sharp compared to the harmonic tone → Turn to the right (clock- Tune so that you use good quality strobe tuning scope for this function. * Please use the supplied Allen wrench to adjust the octave adjustment screw. • If the pitch of the note played on the 12th fret is sharp compared to the harmonic tone → Turn the octave adjustment screw to the right (clockwise...
Owner's Manual
Page 9
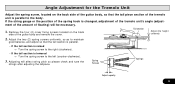
... of the tremolo unit is changed, adjustment of the tremolo unit's angle (adjustment of the amount of floating) will affect string pitch so please check and tune the strings after adjusting the tailpiece. Tail section Adjust the height uniformly 2. Angle Adjustment for the Tremolo Unit Adjust the spring screw, located on the back side of the guitar body and remove the cover...
... of the tremolo unit is changed, adjustment of the tremolo unit's angle (adjustment of the amount of floating) will affect string pitch so please check and tune the strings after adjusting the tailpiece. Tail section Adjust the height uniformly 2. Angle Adjustment for the Tremolo Unit Adjust the spring screw, located on the back side of the guitar body and remove the cover...
Owner's Manual
Page 10
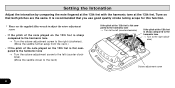
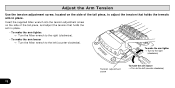
... supplied Allen wrench into the tension adjustment screw on the side of the tail piece, and adjust the tension that holds the tremolo arm in place. • To make the arm tighter. → Turn the Allen wrench to the right (clockwise). • To make the arm looser → Turn to the left (counter-clockwise). Adjust the Arm Tension Use...
... supplied Allen wrench into the tension adjustment screw on the side of the tail piece, and adjust the tension that holds the tremolo arm in place. • To make the arm tighter. → Turn the Allen wrench to the right (clockwise). • To make the arm looser → Turn to the left (counter-clockwise). Adjust the Arm Tension Use...


