
Ri8-D/Ro8-D Owners Manual [English]
Page 3
...-axial type cable. Utilize power outlets that are coloured in accordance with the following measures: Relocate either this product or the device that your FCC authorization to use of this mains lead are on different branch (circuit breaker or fuse) circuits or install AC line filter/s. See user manual instructions if interference to radio reception is being affected by Yamaha Corporation of...
...-axial type cable. Utilize power outlets that are coloured in accordance with the following measures: Relocate either this product or the device that your FCC authorization to use of this mains lead are on different branch (circuit breaker or fuse) circuits or install AC line filter/s. See user manual instructions if interference to radio reception is being affected by Yamaha Corporation of...
Ri8-D/Ro8-D Owners Manual [English]
Page 5
... Head Amp Control 16 Control from an Ri8-D-native Device 16 Control from a Device That Does Not Feature Ri8-D-Native Support 16 Head Amplifier Parameters That Can be Monitored and Controlled 16 Troubleshooting 17 Troubleshooting 17 Messages 18 Specifications 153 General Specifications 153 Analog Input Characteristics (Ri8-D only) .......154 Analog Output Characteristics (Ro8-D only)...154 Digital I/O Characteristics 154 Dimensions 155 Accessories (Please check the package contents.) • Owner's Manual • AC power cable Owner's Manual 5
... Head Amp Control 16 Control from an Ri8-D-native Device 16 Control from a Device That Does Not Feature Ri8-D-Native Support 16 Head Amplifier Parameters That Can be Monitored and Controlled 16 Troubleshooting 17 Troubleshooting 17 Messages 18 Specifications 153 General Specifications 153 Analog Input Characteristics (Ri8-D only) .......154 Analog Output Characteristics (Ro8-D only)...154 Digital I/O Characteristics 154 Dimensions 155 Accessories (Please check the package contents.) • Owner's Manual • AC power cable Owner's Manual 5
Ri8-D/Ro8-D Owners Manual [English]
Page 6
... EIA standard rack, carefully read the section "Precautions for a long period of the device. • Use only the supplied power cord/plug. If it should be used for all devices, set all connected cables. • When setting up the device, make sure to an appropriate outlet with wet hands. Then have the device inspected by qualified Yamaha service personnel. • Never insert or remove...
... EIA standard rack, carefully read the section "Precautions for a long period of the device. • Use only the supplied power cord/plug. If it should be used for all devices, set all connected cables. • When setting up the device, make sure to an appropriate outlet with wet hands. Then have the device inspected by qualified Yamaha service personnel. • Never insert or remove...

Ri8-D/Ro8-D Owners Manual [English]
Page 7
... negative effects on Disposal in the European Union] If you wish to discard these products correctly, you purchased the items. [For business users in other electric devices. English Yamaha cannot be held responsible for damage caused by improper use . NOTICE To avoid the possibility of the commercially available musical data including but not limited to MIDI data and/or audio data...
... negative effects on Disposal in the European Union] If you wish to discard these products correctly, you purchased the items. [For business users in other electric devices. English Yamaha cannot be held responsible for damage caused by improper use . NOTICE To avoid the possibility of the commercially available musical data including but not limited to MIDI data and/or audio data...
Ri8-D/Ro8-D Owners Manual [English]
Page 8
... with gain compensation capability such as power amplifiers that has a Dante Virtual Soundcard installed enables you for output. Gain Compensation Function (Ri8-D only) Enabling Gain Compensation feature of the Ri8-D for supporting equipment with the Rio3224-D/Rio1608-D (input/output rack) is rated for Rack Mounting This unit is enabled to improve operations, add functions, and correct possible malfunctions. Direct Audio In/Out With a Connected Computer Connecting the Ri8-D/Ro8-D with a standard Ethernet cable to...
... with gain compensation capability such as power amplifiers that has a Dante Virtual Soundcard installed enables you for output. Gain Compensation Function (Ri8-D only) Enabling Gain Compensation feature of the Ri8-D for supporting equipment with the Rio3224-D/Rio1608-D (input/output rack) is rated for Rack Mounting This unit is enabled to improve operations, add functions, and correct possible malfunctions. Direct Audio In/Out With a Connected Computer Connecting the Ri8-D/Ro8-D with a standard Ethernet cable to...
Ri8-D/Ro8-D Owners Manual [English]
Page 9
... to directly input or output audio signals without using any audio interface devices. Dante is disabled on the Ri8-D/Ro8-D: 0.25 msec, 0.5 msec, 1.0 msec, 2.0 msec, and 5.0 msec. • Dante supports redundant connections via primary and secondary networks to defend against unforeseen difficulties. • Connecting a computer to Dante network over Ethernet enables you use the EEE function (*) of Dante-enabled devices, remotely control I/O racks or amplifiers from a mixing console...
... to directly input or output audio signals without using any audio interface devices. Dante is disabled on the Ri8-D/Ro8-D: 0.25 msec, 0.5 msec, 1.0 msec, 2.0 msec, and 5.0 msec. • Dante supports redundant connections via primary and secondary networks to defend against unforeseen difficulties. • Connecting a computer to Dante network over Ethernet enables you use the EEE function (*) of Dante-enabled devices, remotely control I/O racks or amplifiers from a mixing console...

Ri8-D/Ro8-D Owners Manual [English]
Page 10
... light red when the signal level of the external device connected to the INPUT connector when using phantom power. 2 OUTPUT +4 dBu Connectors 1-8 (Ro8-D only) These XLR-3-32 type balanced connectors deliver analog output from a connected digital mixing console. Use the rotary switch while the power to the corresponding channel reaches or exceeds -34 dBFS. Controls and Functions Controls and Functions 1 1 Front Panel 12 1 2 3 4 5 6 7 8 4 3 5 78 0 69 AB ON 1 2 3 4 5 6 7 8 ON 1 [INPUT] Connectors 1-8 (Ri8-D only) These are turned OFF when switching phantom power...
... light red when the signal level of the external device connected to the INPUT connector when using phantom power. 2 OUTPUT +4 dBu Connectors 1-8 (Ro8-D only) These XLR-3-32 type balanced connectors deliver analog output from a connected digital mixing console. Use the rotary switch while the power to the corresponding channel reaches or exceeds -34 dBFS. Controls and Functions Controls and Functions 1 1 Front Panel 12 1 2 3 4 5 6 7 8 4 3 5 78 0 69 AB ON 1 2 3 4 5 6 7 8 ON 1 [INPUT] Connectors 1-8 (Ri8-D only) These are turned OFF when switching phantom power...
Ri8-D/Ro8-D Owners Manual [English]
Page 11
... ID] rotary switch will be effective. English 8 [SYNC] Indicators These indicators show the operating status of the next device. Otherwise, the setting will automatically assign the IP address. When connecting the R series to the "Messages" section (see page 14) for secondary (backup) connections. It will function as the word clock master. Refer to the following for the first time immediately after purchase, set this case, refer...
... ID] rotary switch will be effective. English 8 [SYNC] Indicators These indicators show the operating status of the next device. Otherwise, the setting will automatically assign the IP address. When connecting the R series to the "Messages" section (see page 14) for secondary (backup) connections. It will function as the word clock master. Refer to the following for the first time immediately after purchase, set this case, refer...
Ri8-D/Ro8-D Owners Manual [English]
Page 12
... settings. Switch 78 Setting Description REFRESH The Ri8-D/Ro8-D starts up with any other UNIT ID numbers will flash on channels for about 6 seconds before turning it to malfunction. The unit with part of the internal memory is initialized when the unit starts up using the product for the unit's +48V phantom power supply. If you plan to connect an Ri8-D/Ro8-D-native device, such as a CL series product, set the switches...
... settings. Switch 78 Setting Description REFRESH The Ri8-D/Ro8-D starts up with any other UNIT ID numbers will flash on channels for about 6 seconds before turning it to malfunction. The unit with part of the internal memory is initialized when the unit starts up using the product for the unit's +48V phantom power supply. If you plan to connect an Ri8-D/Ro8-D-native device, such as a CL series product, set the switches...

Ri8-D/Ro8-D Owners Manual [English]
Page 13
... Grounding of the plugs are connected properly. English Rear Panel C D EF Rear Panel G C AC IN Connector Connect the supplied AC power cord here. Refer to the device, then insert the power cord plug into one of the [PRIMARY] and [SECONDARY] connectors. D [PRIMARY]/[SECONDARY] Connectors The Ri8-D/Ro8-D can be used for primary connection, and the [SECONDARY] connector will be output from being accidentally disconnected. First, connect the power cord to "Daisy Chain...
... Grounding of the plugs are connected properly. English Rear Panel C D EF Rear Panel G C AC IN Connector Connect the supplied AC power cord here. Refer to the device, then insert the power cord plug into one of the [PRIMARY] and [SECONDARY] connectors. D [PRIMARY]/[SECONDARY] Connectors The Ri8-D/Ro8-D can be used for primary connection, and the [SECONDARY] connector will be output from being accidentally disconnected. First, connect the power cord to "Daisy Chain...
Ri8-D/Ro8-D Owners Manual [English]
Page 15
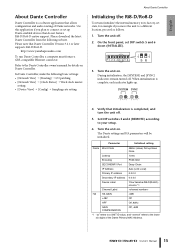
... completed, and turn the unit off. 5. Owner's Manual 15 Please download the latest Dante Controller from the following basic settings: • [Network View] → [Routing] → I/O patching • [Network View] → [Clock Status] → Word clock master setting • [Device View] → [Config] → Sampling rate setting About Dante Controller Initializing the Ri8-D/Ro8-D To return (initialize) the internal memory to your setup. 6. On the front panel, set up . 4.
... completed, and turn the unit off. 5. Owner's Manual 15 Please download the latest Dante Controller from the following basic settings: • [Network View] → [Routing] → I/O patching • [Network View] → [Clock Status] → Word clock master setting • [Device View] → [Config] → Sampling rate setting About Dante Controller Initializing the Ri8-D/Ro8-D To return (initialize) the internal memory to your setup. 6. On the front panel, set up . 4.
Ri8-D/Ro8-D Owners Manual [English]
Page 16
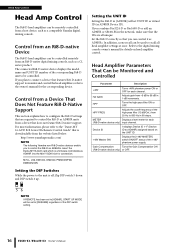
... amplifiers, refer to the owner's manual for connection. Head Amplifier Parameters That Can be Monitored and Controlled Parameter Description +48V Turns +48V phantom power ON or OFF for details on the UNIT ID. +48V Master SW Displays the [+48V MASTER] switch ON/OFF status of the corresponding Ri8-D unit to be used to recall all unique. The connected Ri8-D-native device displays the model name and UNIT ID number of the +48V phantom power supply...
... amplifiers, refer to the owner's manual for connection. Head Amplifier Parameters That Can be Monitored and Controlled Parameter Description +48V Turns +48V phantom power ON or OFF for details on the UNIT ID. +48V Master SW Displays the [+48V MASTER] switch ON/OFF status of the corresponding Ri8-D unit to be used to recall all unique. The connected Ri8-D-native device displays the model name and UNIT ID number of the +48V phantom power supply...
Ri8-D/Ro8-D Owners Manual [English]
Page 17
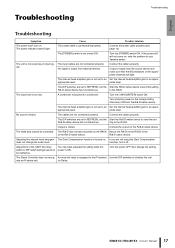
... the Start the Ri8-D-native device to send the setting Ri8-D-native device has not started up . nize an R-series unit. English Troubleshooting Troubleshooting Troubleshooting Symptom Cause Possible Solution The power won't turn it off. Turn the power OFF, then change the audio level. The unit is connected. nal. A condenser microphone is not receiving an input sig- The internal head amplifier gain is assigned to the IP address Use the DIP switches to the Ri8-D. Connect the cables properly. function, turn on...
... the Start the Ri8-D-native device to send the setting Ri8-D-native device has not started up . nize an R-series unit. English Troubleshooting Troubleshooting Troubleshooting Symptom Cause Possible Solution The power won't turn it off. Turn the power OFF, then change the audio level. The unit is connected. nal. A condenser microphone is not receiving an input sig- The internal head amplifier gain is assigned to the IP address Use the DIP switches to the Ri8-D. Connect the cables properly. function, turn on...
Ri8-D/Ro8-D Owners Manual [English]
Page 18
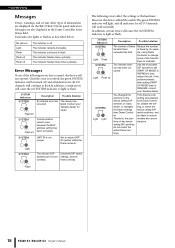
.... The indicator flashes twice cyclically. Set a unique UNIT ID number within the Dante network. Use the front-panel DIP switches to set them correctly. If the problem persists after setting START UP MODE back to REFRESH, then restart the unit. The indicator continues to accommodate the current situation. 18 Owner's Manual Error Messages If one of information are displayed via the Ri8-D/Ro8-D front panel indicators. Contact...
.... The indicator flashes twice cyclically. Set a unique UNIT ID number within the Dante network. Use the front-panel DIP switches to set them correctly. If the problem persists after setting START UP MODE back to REFRESH, then restart the unit. The indicator continues to accommodate the current situation. 18 Owner's Manual Error Messages If one of information are displayed via the Ri8-D/Ro8-D front panel indicators. Contact...
Ri8-D/Ro8-D Owners Manual [English]
Page 19
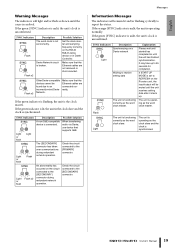
... transferring audio via Dante, use device that supports GbE. Explanation Please wait until started has completed or until the unit has finished synchronization. SYNC Indicators Description The word clock is unconfirmed. English Warning Messages The indicators will light and/or flash as shown until the cause is operating as the word clock master. Flash x3 Other Dante-compatible devices cannot be muted until the unit receives setting data...
... transferring audio via Dante, use device that supports GbE. Explanation Please wait until started has completed or until the unit has finished synchronization. SYNC Indicators Description The word clock is unconfirmed. English Warning Messages The indicators will light and/or flash as shown until the cause is operating as the word clock master. Flash x3 Other Dante-compatible devices cannot be muted until the unit receives setting data...

Ri8-D/Ro8-D Owners Manual [English]
Page 21
...Ω, Fs= 88.2kHz, 96kHz INPUT to OUTPUT*1, Input Gain= Min. -128dBu typ., Equivalent Input Noise, Input Gain= Max. -88dBu Residual output noise, ST master off. 112dB typ., DA Converter, 108dB typ., INPUT to OUTPUT*1, Input Gain= Min. -100dB*4, adjacent INPUT/OUTPUT channels, Input Gain= Min. INPUT to OUTPUT means Ri8-D INPUT to Ro8-D OUTPUT *2. Hum & Noise are measured with a 30dB/octave filter @22kHz Español Português Italiano Ё᭛ Owner's Manual 153 Ri8-D: Ro8-D: 480mm x 44mm x 362mm...
...Ω, Fs= 88.2kHz, 96kHz INPUT to OUTPUT*1, Input Gain= Min. -128dBu typ., Equivalent Input Noise, Input Gain= Max. -88dBu Residual output noise, ST master off. 112dB typ., DA Converter, 108dB typ., INPUT to OUTPUT*1, Input Gain= Min. -100dB*4, adjacent INPUT/OUTPUT channels, Input Gain= Min. INPUT to OUTPUT means Ri8-D INPUT to Ro8-D OUTPUT *2. Hum & Noise are measured with a 30dB/octave filter @22kHz Español Português Italiano Ё᭛ Owner's Manual 153 Ri8-D: Ro8-D: 480mm x 44mm x 362mm...
Ri8-D/Ro8-D Firmware Update Guide V3.10 or older
Page 3
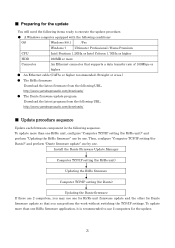
... following URL. Install the Dante Firmware Update Manager Computer TCP/IP setting (for Ri/Ro unit) Updating the Ri/Ro firmware Computer TCP/IP setting (for Dante) Updating the Dante firmware If there are 2 computers, you can perform the work without switching the TCP/IP settings. Straight or cross.) ● The Ri/Ro firmware Download the latest firmware from the following conditions: OS Windows 8/8.1 /Pro Windows 7 Ultimate / Professional...
... following URL. Install the Dante Firmware Update Manager Computer TCP/IP setting (for Ri/Ro unit) Updating the Ri/Ro firmware Computer TCP/IP setting (for Dante) Updating the Dante firmware If there are 2 computers, you can perform the work without switching the TCP/IP settings. Straight or cross.) ● The Ri/Ro firmware Download the latest firmware from the following conditions: OS Windows 8/8.1 /Pro Windows 7 Ultimate / Professional...
Ri8-D/Ro8-D Firmware Update Guide V3.10 or older
Page 5
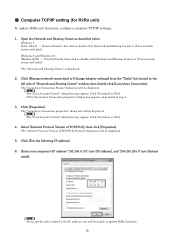
... "Network and Sharing Center" window, then double-click [Local Area Connection]. ■ Computer TCP/IP setting (for the IP address, you will be displayed. ・The "User Account Control" dialog box may appear. Click [Continue] or [Yes]. ・If the "Local Area Connection properties" dialog box appears, skip ahead to update Ri/Ro firmware. 5 Click [Use the following IP address]. 6.
... "Network and Sharing Center" window, then double-click [Local Area Connection]. ■ Computer TCP/IP setting (for the IP address, you will be displayed. ・The "User Account Control" dialog box may appear. Click [Continue] or [Yes]. ・If the "Local Area Connection properties" dialog box appears, skip ahead to update Ri/Ro firmware. 5 Click [Use the following IP address]. 6.
Ri8-D/Ro8-D Firmware Update Guide V3.10 or older
Page 7
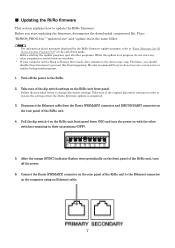
.../Ro firmware update program, refer to "Error Message List (R Series Update Program V2)" at the end of this from the Dante [PRIMARY] connector and [SECONDARY] connector on the rear panel of the original dip switch settings in order to restore the settings when the Dante firmware update is in progress, do not use any other programs or switch between windows. ・ If your computer enters Sleep or Energy Save mode, data...
.../Ro firmware update program, refer to "Error Message List (R Series Update Program V2)" at the end of this from the Dante [PRIMARY] connector and [SECONDARY] connector on the rear panel of the original dip switch settings in order to restore the settings when the Dante firmware update is in progress, do not use any other programs or switch between windows. ・ If your computer enters Sleep or Energy Save mode, data...
Ri8-D/Ro8-D Firmware Update Guide V3.10 or older
Page 13
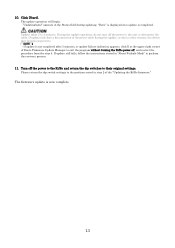
... process. 11. If update fails due to other reasons, the device may become inoperative. ・If update is now complete. 13 Please return the dip switch settings to the positions noted in "About Failsafe Mode" to 4 minutes. "Done" is displayed once update is completed. 10. Click [Start]. If update still fails, follow the instructions stated in step 2 of the power cable during updating.
... process. 11. If update fails due to other reasons, the device may become inoperative. ・If update is now complete. 13 Please return the dip switch settings to the positions noted in "About Failsafe Mode" to 4 minutes. "Done" is displayed once update is completed. 10. Click [Start]. If update still fails, follow the instructions stated in step 2 of the power cable during updating.


