Owner's Manual
Page 1
U RX-V863 AV Receiver OWNER'S MANUAL
U RX-V863 AV Receiver OWNER'S MANUAL
Owner's Manual
Page 3
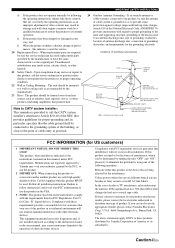
... the service technician to perform safety checks to be the source of interference, which can not locate the appropriate retailer, please contact Yamaha Electronics Corp., U.S.A. 6660 Orangethorpe Ave., Buena Park, CA 90620. Unauthorized substitutions may result in performance - Upon completion of cable ... that the cable ground shall be connected to the grounding system of the building, as practical. this manual, meets FCC requirements. Modifications not expressly approved by Yamaha may void your authority, granted by the manufacturer. 23 Heat - Caution-ii En The unit should be...
... the service technician to perform safety checks to be the source of interference, which can not locate the appropriate retailer, please contact Yamaha Electronics Corp., U.S.A. 6660 Orangethorpe Ave., Buena Park, CA 90620. Unauthorized substitutions may result in performance - Upon completion of cable ... that the cable ground shall be connected to the grounding system of the building, as practical. this manual, meets FCC requirements. Modifications not expressly approved by Yamaha may void your authority, granted by the manufacturer. 23 Heat - Caution-ii En The unit should be...
Owner's Manual
Page 4
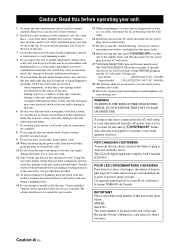
... and/or personal injury. containers with liquid in a safe place for any damage resulting from cold to consume a very small quantity of this manual carefully. The cabinet should never be held responsible for future reference. 2 Install this might damage the finish. WARNING TO REDUCE THE RISK OF FIRE.... vacation), disconnect the AC power plug from the wall outlet, grasp the plug; in an environment with Canadian ICES-003. Contact qualified Yamaha service personnel when any reasons. 15 When not planning to use force on the rear panel of plug to the standby mode, and then...
... and/or personal injury. containers with liquid in a safe place for any damage resulting from cold to consume a very small quantity of this manual carefully. The cabinet should never be held responsible for future reference. 2 Install this might damage the finish. WARNING TO REDUCE THE RISK OF FIRE.... vacation), disconnect the AC power plug from the wall outlet, grasp the plug; in an environment with Canadian ICES-003. Contact qualified Yamaha service personnel when any reasons. 15 When not planning to use force on the rear panel of plug to the standby mode, and then...
Owner's Manual
Page 5
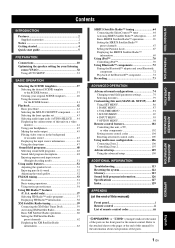
...Bluetooth™ component 72 Recording 73 ADVANCED OPERATION Advanced sound configurations 74 Changing sound field parameter settings 74 Selecting decoders 79 Customizing this unit (MANUAL SETUP).........82 Using SET MENU 86 1 BASIC MENU 87 2 VOLUME MENU 91 3 SOUND MENU 92 4 INPUT MENU 95 5 OPTION ...113 Resetting the system 122 Glossary 123 Sound field program information 126 Specifications 127 Index 129 APPENDIX (at the end of this manual for the SCENE feature 41 Playback 42 Basic procedure 42 Selecting the MULTI CH INPUT component......... 43 Selecting the front speaker ...
...Bluetooth™ component 72 Recording 73 ADVANCED OPERATION Advanced sound configurations 74 Changing sound field parameter settings 74 Selecting decoders 79 Customizing this unit (MANUAL SETUP).........82 Using SET MENU 86 1 BASIC MENU 87 2 VOLUME MENU 91 3 SOUND MENU 92 4 INPUT MENU 95 5 OPTION ...113 Resetting the system 122 Glossary 123 Sound field program information 126 Specifications 127 Index 129 APPENDIX (at the end of this manual for the SCENE feature 41 Playback 42 Basic procedure 42 Selecting the MULTI CH INPUT component......... 43 Selecting the front speaker ...
Owner's Manual
Page 7
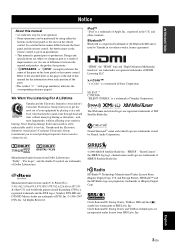
... prior to production. and other U.S. x.v.Color™ "x.v.Color" is a trademark of Apple Inc., registered in parentheses. • This manual is a trademark of Sony Corporation. Since hearing damage from Dolby Laboratories. Manufactured under U.S. Manufactured under license under license from loud sounds is...Clarity, TruBass, SRS and the symbol are trademarks of SRS Labs, Inc. INTRODUCTION Notice Notice About this manual for your operation. • Some operations can be performed by Yamaha in part as a result of DTS, Inc. © 1996-2007 DTS, Inc. "SIRIUS", ...
... prior to production. and other U.S. x.v.Color™ "x.v.Color" is a trademark of Apple Inc., registered in parentheses. • This manual is a trademark of Sony Corporation. Since hearing damage from Dolby Laboratories. Manufactured under U.S. Manufactured under license under license from loud sounds is...Clarity, TruBass, SRS and the symbol are trademarks of SRS Labs, Inc. INTRODUCTION Notice Notice About this manual for your operation. • Some operations can be performed by Yamaha in part as a result of DTS, Inc. © 1996-2007 DTS, Inc. "SIRIUS", ...
Owner's Manual
Page 12
... 27 for the SCENE buttons. If the speakers are built combinations of input sources and sound field programs. y If you connect a Yamaha product that has been assigned to the instruction manual of the DVD player for tuning information. *4 To achieve the best possible reception, orient the connected AM loop antenna, or adjust...
... 27 for the SCENE buttons. If the speakers are built combinations of input sources and sound field programs. y If you connect a Yamaha product that has been assigned to the instruction manual of the DVD player for tuning information. *4 To achieve the best possible reception, orient the connected AM loop antenna, or adjust...
Owner's Manual
Page 13
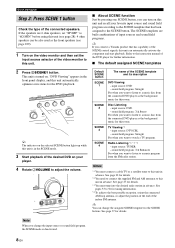
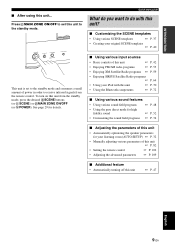
... with this unit? ■ Customizing the SCENE templates • Using various SCENE templates ☞ P. 37 • Creating your listening room (AUTO SETUP) ☞ P. 32 • Manually adjusting various parameters of power in order to receive infrared signals from the standby mode, press the desired SSCENE buttons (or ASCENE) or KMAIN ZONE...
... with this unit? ■ Customizing the SCENE templates • Using various SCENE templates ☞ P. 37 • Creating your listening room (AUTO SETUP) ☞ P. 32 • Manually adjusting various parameters of power in order to receive infrared signals from the standby mode, press the desired SSCENE buttons (or ASCENE) or KMAIN ZONE...
Owner's Manual
Page 16
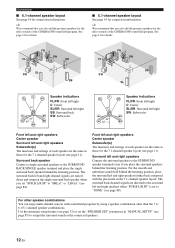
.... For the smooth and unbroken sound field behind the listening position. For other speaker combinations You can enjoy multi-channel sources with the placement in "MANUAL SETUP" (see page 87) to output the surround sounds at the single surround back speaker when you place the surround speakers behind the listening position...
.... For the smooth and unbroken sound field behind the listening position. For other speaker combinations You can enjoy multi-channel sources with the placement in "MANUAL SETUP" (see page 87) to output the surround sounds at the single surround back speaker when you place the surround speakers behind the listening position...
Owner's Manual
Page 20
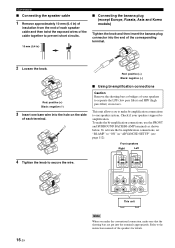
... plug connector into the hole on the side of each speaker cable and then twist the exposed wires of the cable together to the instruction manuals of the speakers for details. Check if your speakers to one bare wire into the end of the corresponding terminal. 2 Loosen the knob. FRONT A R L SURROUND...
... plug connector into the hole on the side of each speaker cable and then twist the exposed wires of the cable together to the instruction manuals of the speakers for details. Check if your speakers to one bare wire into the end of the corresponding terminal. 2 Loosen the knob. FRONT A R L SURROUND...
Owner's Manual
Page 22
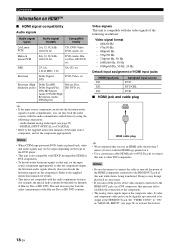
... the component appropriately. Bitstream Dolby Digital, DTS DVD-Video, etc. multi-channel analog audio input (see page 98) to the supplied instruction manuals of this unit may fail to establish the connection to the component. • The analog video signals input at the HDMI OUT jack. Video... it. • Use a conversion cable (HDMI jack ↔ DVI-D jack) to connect this feature. 18 En Refer to the supplied instruction manuals for example, the special audio contents downloaded via Internet) of the video monitor connected to the HDMI OUT jack via a DVI connection, this unit...
... the component appropriately. Bitstream Dolby Digital, DTS DVD-Video, etc. multi-channel analog audio input (see page 98) to the supplied instruction manuals of this unit may fail to establish the connection to the component. • The analog video signals input at the HDMI OUT jack. Video... it. • Use a conversion cable (HDMI jack ↔ DVI-D jack) to connect this feature. 18 En Refer to the supplied instruction manuals for example, the special audio contents downloaded via Internet) of the video monitor connected to the HDMI OUT jack via a DVI connection, this unit...
Owner's Manual
Page 30
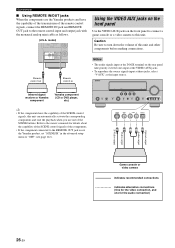
... alternative connections (One for the video connection, and one of the SCENE buttons. model) FM 75Ω UNBAL. Refer to the owner's manuals for details about the capability of the SCENE control signals of the components. • If the component connected to the REMOTE OUT jack is ... a game console or a video camera to "OFF" (see page 112). Connections ■ Using REMOTE IN/OUT jacks When the components are the Yamaha products and have the capability of the SCENE control signals, this unit can automatically activate the corresponding components and start the playback when you use...
... alternative connections (One for the video connection, and one of the SCENE buttons. model) FM 75Ω UNBAL. Refer to the owner's manuals for details about the capability of the SCENE control signals of the components. • If the component connected to the REMOTE OUT jack is ... a game console or a video camera to "OFF" (see page 112). Connections ■ Using REMOTE IN/OUT jacks When the components are the Yamaha products and have the capability of the SCENE control signals, this unit can automatically activate the corresponding components and start the playback when you use...
Owner's Manual
Page 35
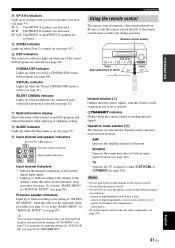
... page 47). y You can make settings for the presence and surround back speakers automatically by running "AUTO SETUP" (see page 32) or manually by adjusting settings for other liquids on (see page 107). Connections Using the remote control The remote control transmits a directional infrared ray. BTRANSMIT ... the channel components of the speakers when this unit is in the automatic setup procedure (see page 32) or in the "BASIC MENU" in "MANUAL SETUP" (see page 89). dusty places • To set of high humidity, such as near a bath - places of front speakers activated (...
... page 47). y You can make settings for the presence and surround back speakers automatically by running "AUTO SETUP" (see page 32) or manually by adjusting settings for other liquids on (see page 107). Connections Using the remote control The remote control transmits a directional infrared ray. BTRANSMIT ... the channel components of the speakers when this unit is in the automatic setup procedure (see page 32) or in the "BASIC MENU" in "MANUAL SETUP" (see page 89). dusty places • To set of high humidity, such as near a bath - places of front speakers activated (...
Owner's Manual
Page 36
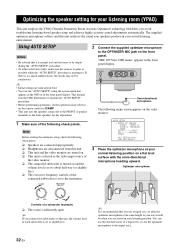
...AUTO SETUP . OPTIMIZING THE SPEAKER SETTING FOR YOUR LISTENING ROOM (YPAO) Optimizing the speaker setting for loud test tones to be satisfactory. This manual uses the OSD illustrations to explain the "AUTO SETUP" procedure. • Before performing operations, set the operation mode selector on the remote ...subwoofer is set to the tripod (etc.). 32 En y It is in your listening room (YPAO) This unit employs the YPAO (Yamaha Parametric Room Acoustic Optimizer) technology which lets you use the attached screw of the following check points. y • Initial settings are ...
...AUTO SETUP . OPTIMIZING THE SPEAKER SETTING FOR YOUR LISTENING ROOM (YPAO) Optimizing the speaker setting for loud test tones to be satisfactory. This manual uses the OSD illustrations to explain the "AUTO SETUP" procedure. • Before performing operations, set the operation mode selector on the remote ...subwoofer is set to the tripod (etc.). 32 En y It is in your listening room (YPAO) This unit employs the YPAO (Yamaha Parametric Room Acoustic Optimizer) technology which lets you use the attached screw of the following check points. y • Initial settings are ...
Owner's Manual
Page 39
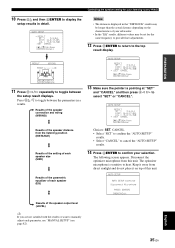
... (EQ) AUTO SETUP RESULT SP : 3/4/0.1 DIST: 14.0/17.0ft LVL : -9.0/+6.5dB . >SET CANCEL [ ]/[ ]:Up/Down [ENTER]:Enter 13 Make sure the pointer is sensitive to manually adjust each parameter, use "MANUAL SETUP" (see page 82). Results of the speaker connection and wiring (WIRING) Results of the speaker distance from this unit.
... (EQ) AUTO SETUP RESULT SP : 3/4/0.1 DIST: 14.0/17.0ft LVL : -9.0/+6.5dB . >SET CANCEL [ ]/[ ]:Up/Down [ENTER]:Enter 13 Make sure the pointer is sensitive to manually adjust each parameter, use "MANUAL SETUP" (see page 82). Results of the speaker connection and wiring (WIRING) Results of the speaker distance from this unit.
Owner's Manual
Page 40
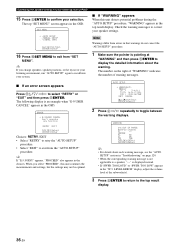
... environment, run "AUTO SETUP" again to recalibrate your system. ■ If an error screen appears Press 8k / n / l / h to correct your selection. SET MENU . ;AUTO SETUP ;MANUAL SETUP .A;SIGNAL INFO [ ]/[ ]:Up/Down [ENTER]:Enter 16 Press ISET MENU to exit from "SET MENU". Check the warning messages to select "RETRY" or "EXIT...
... environment, run "AUTO SETUP" again to recalibrate your system. ■ If an error screen appears Press 8k / n / l / h to correct your selection. SET MENU . ;AUTO SETUP ;MANUAL SETUP .A;SIGNAL INFO [ ]/[ ]:Up/Down [ENTER]:Enter 16 Press ISET MENU to exit from "SET MENU". Check the warning messages to select "RETRY" or "EXIT...
Owner's Manual
Page 50
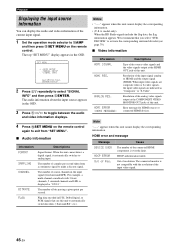
... and message Message DEVICE OVER HDCP ERROR Out of the current input signal. 1 Set the operation mode selector to analog input. SET MENU . ;AUTO SETUP ;MANUAL SETUP .A;SIGNAL INFO [ ]/[ ]:Up/Down [ENTER]:Enter p p 2 Press 8n repeatedly to activate the corresponding surround decoder (see page 79). ■ Video information Information HDMI SIGNAL...
... and message Message DEVICE OVER HDCP ERROR Out of the current input signal. 1 Set the operation mode selector to analog input. SET MENU . ;AUTO SETUP ;MANUAL SETUP .A;SIGNAL INFO [ ]/[ ]:Up/Down [ENTER]:Enter p p 2 Press 8n repeatedly to activate the corresponding surround decoder (see page 79). ■ Video information Information HDMI SIGNAL...
Owner's Manual
Page 57
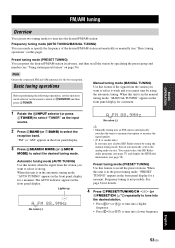
...for a moment. Preset tuning mode (PRESET TUNING) You can search or specify the frequency of the desired FM/AM station automatically or manually (see page 58). Manual tuning mode (MANUAL TUNING) Use this nit automatically selects the analog radio service. Lights up AUTO A FM 88.9MHz No colon (:) A FM 88.9MHz...AM tuning FM/AM TUNING Overview You can use two tuning modes to tune into the desired FM/AM station: Frequency tuning mode (AUTO TUNING/MANUAL TUNING) You can preset the desired FM/AM station in the front panel display for a moment. 1 Rotate the RINPUT selector (or press 4TUNER...
...for a moment. Preset tuning mode (PRESET TUNING) You can search or specify the frequency of the desired FM/AM station automatically or manually (see page 58). Manual tuning mode (MANUAL TUNING) Use this nit automatically selects the analog radio service. Lights up AUTO A FM 88.9MHz No colon (:) A FM 88.9MHz...AM tuning FM/AM TUNING Overview You can use two tuning modes to tune into the desired FM/AM station: Frequency tuning mode (AUTO TUNING/MANUAL TUNING) You can preset the desired FM/AM station in the front panel display for a moment. 1 Rotate the RINPUT selector (or press 4TUNER...
Owner's Manual
Page 58
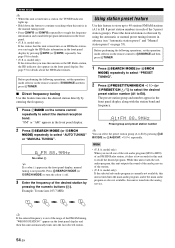
... feature to store up . • Hold down the button to continue searching when this unit is in advance (see "Automatic station preset" and "Manual station preset" on the remote control to FSOURCE and then press 4TUNER. 1 Press BSEARCH MODE (or ISRCH MODE) repeatedly to select "PRESET TUNING"....Preset group and preset station number y You can toggle the HD Radio information in the front panel display by using the automatic or manual preset tuning features in the manual tuning mode. • Press GINFO (or 0INFO) repeatedly to select the desired reception band. Note • (U.S.A. See page ...
... feature to store up . • Hold down the button to continue searching when this unit is in advance (see "Automatic station preset" and "Manual station preset" on the remote control to FSOURCE and then press 4TUNER. 1 Press BSEARCH MODE (or ISRCH MODE) repeatedly to select "PRESET TUNING"....Preset group and preset station number y You can toggle the HD Radio information in the front panel display by using the automatic or manual preset tuning features in the manual tuning mode. • Press GINFO (or 0INFO) repeatedly to select the desired reception band. Note • (U.S.A. See page ...
Owner's Manual
Page 59
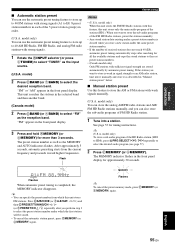
...When automatic preset tuning is cleared when you want to store the sub-audio programs of the FM HD Radio stations, preset the stations manually. • Any stored station data existing under a preset station number is completed, the MEMORY indicator disappears. y • You ...FM radio stations with strong signals. 1 Rotate the RINPUT selector (or press 4TUNER) to select "TUNER" as described in "Manual station preset" below. ■ Manual station preset Use this unit stores FM stations. After approximately 5 seconds, automatic presetting starts from which the first station will be ...
...When automatic preset tuning is cleared when you want to store the sub-audio programs of the FM HD Radio stations, preset the stations manually. • Any stored station data existing under a preset station number is completed, the MEMORY indicator disappears. y • You ...FM radio stations with strong signals. 1 Rotate the RINPUT selector (or press 4TUNER) to select "TUNER" as described in "Manual station preset" below. ■ Manual station preset Use this unit stores FM stations. After approximately 5 seconds, automatic presetting starts from which the first station will be ...
Owner's Manual
Page 61
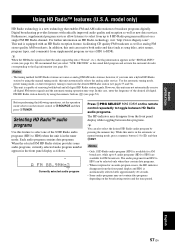
...program contains data programs. When the selected FM HD Radio station provides some audio programs, currently selected audio program number appears in the automatic or manual tuning mode, press a numeric button (1-8) (6) and then H ENT. We recommend that enables FM and AM radio stations to FSOURCE and then...to broadcast programs digitally. The audio programs from HD2 to HD8 can also select the desired HD Radio audio program by using the manual tuning mode, this unit is equipped with radically improved audio quality and reception as well as follows. model only) HD Radio ...
...program contains data programs. When the selected FM HD Radio station provides some audio programs, currently selected audio program number appears in the automatic or manual tuning mode, press a numeric button (1-8) (6) and then H ENT. We recommend that enables FM and AM radio stations to FSOURCE and then...to broadcast programs digitally. The audio programs from HD2 to HD8 can also select the desired HD Radio audio program by using the manual tuning mode, this unit is equipped with radically improved audio quality and reception as well as follows. model only) HD Radio ...


