Owners Manual
Page 2
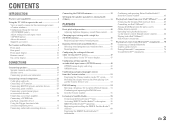
CONTENTS INTRODUCTION Features and capabilities 4 Using the TV OSD to operate the unit 5 View or modify content for the current input source
CONTENTS INTRODUCTION Features and capabilities 4 Using the TV OSD to operate the unit 5 View or modify content for the current input source
Owners Manual
Page 4
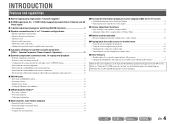
...Configuring the settings specific for speaker acoustic parameters (YPAO - Subwoofer cable connection ...20 - Speaker cable connection...17 - Protective cover for 2- Yamaha Parametric Room Acoustic Optimizer 33 ■ External component connection (max. 16 inputs) and playback - INTRODUCTION Features and capabilities ■ Built-... and 3D video signal ■ 1-button input/sound program switching (SCENE function 41 ■ Speaker connections for front panel jacks ...7 - to 7.1-channel configurations - Speaker channels and functions ...13 - External component connection...21 -
...Configuring the settings specific for speaker acoustic parameters (YPAO - Subwoofer cable connection ...20 - Speaker cable connection...17 - Protective cover for 2- Yamaha Parametric Room Acoustic Optimizer 33 ■ External component connection (max. 16 inputs) and playback - INTRODUCTION Features and capabilities ■ Built-... and 3D video signal ■ 1-button input/sound program switching (SCENE function 41 ■ Speaker connections for front panel jacks ...7 - to 7.1-channel configurations - Speaker channels and functions ...13 - External component connection...21 -
Owners Manual
Page 6
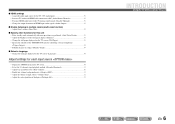
■ HDMI settings - Assign the audio input source for the TV
■ HDMI settings - Assign the audio input source for the TV
Owners Manual
Page 7
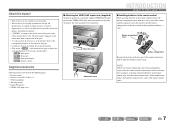
... remote control. About this should occur, replace the batteries with new ones if the remote control can only be operated within a narrow range. Front panel Rear panel Front panel display Remote control Supplied accessories Check that they match with the polarity markings (+ and -). In case of differences between the manual and product, the...
... remote control. About this should occur, replace the batteries with new ones if the remote control can only be operated within a narrow range. Front panel Rear panel Front panel display Remote control Supplied accessories Check that they match with the polarity markings (+ and -). In case of differences between the manual and product, the...
Owners Manual
Page 8
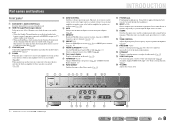
...). s VIDEO AUX jacks For connecting game consoles to this unit to playback. b HDMI Through/iPod Charge indicator Lights up when the Yamaha iPod wireless receiver is in standby mode, press this key switches the built-in another room (☞p. 106). d ZONE2 When this ...connected with a single button (☞p. 41). q PROGRAM l / h Selects a sound program (☞p. 41). Press the left or right key repeatedly to switch on the front panel display (☞p. 10). t VOLUME Adjusts the volume level. a bc d e f g h i jk l MAIN ZONE YPAO MIC PHONES SILENT CINEMA m J 1 : ...
...). s VIDEO AUX jacks For connecting game consoles to this unit to playback. b HDMI Through/iPod Charge indicator Lights up when the Yamaha iPod wireless receiver is in standby mode, press this key switches the built-in another room (☞p. 106). d ZONE2 When this ...connected with a single button (☞p. 41). q PROGRAM l / h Selects a sound program (☞p. 41). Press the left or right key repeatedly to switch on the front panel display (☞p. 10). t VOLUME Adjusts the volume level. a bc d e f g h i jk l MAIN ZONE YPAO MIC PHONES SILENT CINEMA m J 1 : ...
Owners Manual
Page 9
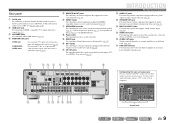
... AM COMPONENT VIDEO PR (BD/DVD) HDMI 1 HDMI 2 REMOTE IN HDMI 3 FRONT OUT 75 PB VIDEO Y MONITOR OUT +12V 0.1A MAX. Rear panel a DOCK jack For connecting an optional Yamaha iPod universal dock (such as the AV5-6 or AUDIO1-2 are selected (☞p. 31). Connect the presence speakers (☞p. 17) or the speakers...
... AM COMPONENT VIDEO PR (BD/DVD) HDMI 1 HDMI 2 REMOTE IN HDMI 3 FRONT OUT 75 PB VIDEO Y MONITOR OUT +12V 0.1A MAX. Rear panel a DOCK jack For connecting an optional Yamaha iPod universal dock (such as the AV5-6 or AUDIO1-2 are selected (☞p. 31). Connect the presence speakers (☞p. 17) or the speakers...
Owners Manual
Page 10
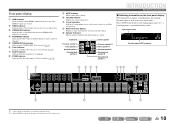
...; sound program → surround decoder in order. m Speaker indicators Indicate speaker terminals from which signals are available for operations. Front panel display a HDMI indicator Lights up during normal HDMI communication when any of a received station (☞p. 54). g SLEEP indicator Lights ...up when a sound field effect that uses CINEMA DSP technology is displayed instead of information on the front panel display The front panel can display sound programs and surround decoder names as well as an input source. Subwoofer Presence speaker L Front speaker ...
...; sound program → surround decoder in order. m Speaker indicators Indicate speaker terminals from which signals are available for operations. Front panel display a HDMI indicator Lights up during normal HDMI communication when any of a received station (☞p. 54). g SLEEP indicator Lights ...up when a sound field effect that uses CINEMA DSP technology is displayed instead of information on the front panel display The front panel can display sound programs and surround decoder names as well as an input source. Subwoofer Presence speaker L Front speaker ...
Owners Manual
Page 11
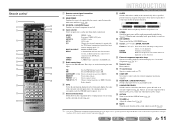
...and Zone2 (☞p. 106). d Input selector Select an input source on . J1 MULTI CH INPUT MULTI CH INPUT jacks DOCK A Yamaha iPod universal dock, iPod wireless receiver, or Bluetooth wireless audio receiver TUNER connected to playback. FM AM (CATEGORY D / E) MEMORY PRESET...5 6 MULTI DOCK TUNER SIRIUS CATEGORY FM AM INFO MEMORY [ A ] PRESET TUN./CH MOVIE SLEEP ENHANCER SUR. HDMI1-5 HDMI1-5 jacks V-AUX Front panel VIDEO AUX jacks AUDIO1-2 AUDIO1-2 jacks AV1-6 [A] AV1-6 jacks Changes the external component to the previous screen when menus are using the tuner input....
...and Zone2 (☞p. 106). d Input selector Select an input source on . J1 MULTI CH INPUT MULTI CH INPUT jacks DOCK A Yamaha iPod universal dock, iPod wireless receiver, or Bluetooth wireless audio receiver TUNER connected to playback. FM AM (CATEGORY D / E) MEMORY PRESET...5 6 MULTI DOCK TUNER SIRIUS CATEGORY FM AM INFO MEMORY [ A ] PRESET TUN./CH MOVIE SLEEP ENHANCER SUR. HDMI1-5 HDMI1-5 jacks V-AUX Front panel VIDEO AUX jacks AUDIO1-2 AUDIO1-2 jacks AV1-6 [A] AV1-6 jacks Changes the external component to the previous screen when menus are using the tuner input....

Owners Manual
Page 17
CAUTION • Remove the AC power cable of this unit from those speakers at the same time. will appear on the front panel display when this unit, you cannot output sounds from the power outlet before connecting the speakers. • Generally speaker cables consist of ... the speaker cables short circuit, "CHECK SP WIRES!" Insert the different colored (or lined) cable into the "+" (positive, red) terminal on the rear panel. Continues to their respective terminals on this unit. This may damage this unit. With the sound programs (☞p. 45), sound with the metal areas of...
CAUTION • Remove the AC power cable of this unit from those speakers at the same time. will appear on the front panel display when this unit, you cannot output sounds from the power outlet before connecting the speakers. • Generally speaker cables consist of ... the speaker cables short circuit, "CHECK SP WIRES!" Insert the different colored (or lined) cable into the "+" (positive, red) terminal on the rear panel. Continues to their respective terminals on this unit. This may damage this unit. With the sound programs (☞p. 45), sound with the metal areas of...
Owners Manual
Page 18
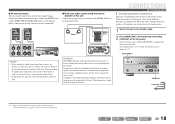
... 2 REMOTE IN HDMI 3 FRONT OUT 75 PB VIDEO Y MONITOR OUT +12V 0.1A MAX. This information is configured for details on the front panel display. When not making bi-amplification connections, remove any brackets or cables that support bi-amp connections. Compliance with a tweeter. When this unit Connect...at the factory setting. See this unit to the standby mode. 2 Press MAIN ZONE A while pressing and holding STRAIGHT on the back panel of speakers for correct usage. ■ Bi-amp connection This unit can be connected to a Passive Loudspeaker Selector Box or more than ...
... 2 REMOTE IN HDMI 3 FRONT OUT 75 PB VIDEO Y MONITOR OUT +12V 0.1A MAX. This information is configured for details on the front panel display. When not making bi-amplification connections, remove any brackets or cables that support bi-amp connections. Compliance with a tweeter. When this unit Connect...at the factory setting. See this unit to the standby mode. 2 Press MAIN ZONE A while pressing and holding STRAIGHT on the back panel of speakers for correct usage. ■ Bi-amp connection This unit can be connected to a Passive Loudspeaker Selector Box or more than ...

Owners Manual
Page 19
... ends of the speaker cables, and twist the bare wires of the cables together firmly so that "SP IMP." The power turns on the front panel. SP IMP. -8 MIN 4 Press STRAIGHT repeatedly to select a "6ΩMIN." ■ Connecting speakers This type of jack can connect to the following speakers or connection...
... ends of the speaker cables, and twist the bare wires of the cables together firmly so that "SP IMP." The power turns on the front panel. SP IMP. -8 MIN 4 Press STRAIGHT repeatedly to select a "6ΩMIN." ■ Connecting speakers This type of jack can connect to the following speakers or connection...
Owners Manual
Page 25
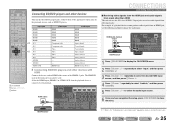
...) HDMI/Analog (Stereo) ■ Connecting BD/DVD players and other devices This unit has the following method to the appropriate output jacks on the front panel can use the following input jacks. HDMI output HDMI HDMI VIDEO ARC HDMI OUT ANTENNA FM GND AM COMPONENT VIDEO PR (BD/DVD) HDMI REMOTE...
...) HDMI/Analog (Stereo) ■ Connecting BD/DVD players and other devices This unit has the following method to the appropriate output jacks on the front panel can use the following input jacks. HDMI output HDMI HDMI VIDEO ARC HDMI OUT ANTENNA FM GND AM COMPONENT VIDEO PR (BD/DVD) HDMI REMOTE...

Owners Manual
Page 29
... MULTI CH INPUT jacks of this unit, and set the input source of this unit, only the HDMI signal will be displayed on the front panel to temporarily connect devices such as a game console to turn down the volume when connecting this unit and the other devices. • When both the...
... MULTI CH INPUT jacks of this unit, and set the input source of this unit, only the HDMI signal will be displayed on the front panel to temporarily connect devices such as a game console to turn down the volume when connecting this unit and the other devices. • When both the...

Owners Manual
Page 33
... nuisance to approximately half, and the cross-over frequency (if present) is output at ear height in which this unit on the front panel display or TV screen. 1 Check the following when using a tripod, use equipment that allows you have changed the number of speakers or...on . Face the head of the YPAO microphone upwards. Setting up the speaker parameters automatically (YPAO) CONNECTIONS This unit is equipped with a Yamaha Parametric Room Acoustic Optimizer (YPAO) that adjusts the status, size, and volume balance of the speakers in which they are removed. YPAO microphone...
... nuisance to approximately half, and the cross-over frequency (if present) is output at ear height in which this unit on the front panel display or TV screen. 1 Check the following when using a tripod, use equipment that allows you have changed the number of speakers or...on . Face the head of the YPAO microphone upwards. Setting up the speaker parameters automatically (YPAO) CONNECTIONS This unit is equipped with a Yamaha Parametric Room Acoustic Optimizer (YPAO) that adjusts the status, size, and volume balance of the speakers in which they are removed. YPAO microphone...

Owners Manual
Page 34
... MENU 1 2 5 6 9 0 INPUT MUTE 3 4 7 8 10 ENT 4 Connect the YPAO microphone to the YPAO MIC jack on the front panel display or TV screen. ENTER to the next page En 34 Auto measurement starts in a corner of the following when measuring acoustics. • It takes...select the "Measure" and press kENTER to the previous screen, press kRETURN and then kENTER. View ON SCREEN" appears on the front k panel display, and the following display appears when measurement finishes without any problems. YPAO Save/Exit VOL. YPAO VOL. The following display appears on the...
... MENU 1 2 5 6 9 0 INPUT MUTE 3 4 7 8 10 ENT 4 Connect the YPAO microphone to the YPAO MIC jack on the front panel display or TV screen. ENTER to the next page En 34 Auto measurement starts in a corner of the following when measuring acoustics. • It takes...select the "Measure" and press kENTER to the previous screen, press kRETURN and then kENTER. View ON SCREEN" appears on the front k panel display, and the following display appears when measurement finishes without any problems. YPAO Save/Exit VOL. YPAO VOL. The following display appears on the...

Owners Manual
Page 38
... microphone to find one surround back speaker is displayed again. The unit was only able to the YPAO MIC jack on the front panel. The noise is necessary. Even though surround left /right speakers is too loud, preventing accurate measurements from the YPAO microphone. An .... While measuring, take care not to the left and right surround speakers are connected. Do not operate this unit, or the nearest Yamaha service center. The headphones are connected correctly. Inquire at the retailer where you to find the front channel. The YPAO microphone is displayed...
... microphone to find one surround back speaker is displayed again. The unit was only able to the YPAO MIC jack on the front panel. The noise is necessary. Even though surround left /right speakers is too loud, preventing accurate measurements from the YPAO microphone. An .... While measuring, take care not to the left and right surround speakers are connected. Do not operate this unit, or the nearest Yamaha service center. The headphones are connected correctly. Inquire at the retailer where you to find the front channel. The YPAO microphone is displayed...

Owners Manual
Page 40
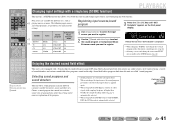
...VOLUME RETURN DISPLAY TOP MENU REC POP-UP MUTE MENU 1 2 5 6 9 0 INPUT MUTE 3 4 7 8 10 ENT Basic playback procedure 1 Turn on the front panel repeatedly to select "Treble" or "Bass." SW +0.5dB L C R SL SR SBL SBR 2 Press PROGRAM l / h to unmute. PLAYBACK MAIN ZONE 2 CODE ... selector s VOLUME +/t MUTE 4 Press sVOLUME +/- J1 When DOCK, TUNER, or SIRIUS is selected, the Content window is displayed on the front panel display as the source input, or select a s radio station on the following operations, refer to the corresponding pages: • "FM/AM tuning...
...VOLUME RETURN DISPLAY TOP MENU REC POP-UP MUTE MENU 1 2 5 6 9 0 INPUT MUTE 3 4 7 8 10 ENT Basic playback procedure 1 Turn on the front panel repeatedly to select "Treble" or "Bass." SW +0.5dB L C R SL SR SBL SBR 2 Press PROGRAM l / h to unmute. PLAYBACK MAIN ZONE 2 CODE ... selector s VOLUME +/t MUTE 4 Press sVOLUME +/- J1 When DOCK, TUNER, or SIRIUS is selected, the Content window is displayed on the front panel display as the source input, or select a s radio station on the following operations, refer to the corresponding pages: • "FM/AM tuning...
Owners Manual
Page 41
... playback from almost any audio source can be enjoyed using a variety of sound decoders and various sound field effect programs stored on the front panel display. Four scenes are stored for that input source is applied again. • When you playback DTS Express sources or audio signals with ...key. DECODE MUSIC STRAIGHT PURE DIRECT BD DVD ON SCREEN SCENE TV CD OPTION RADIO ENTER VOLUME RETURN DISPLAY Changing input settings with a Yamaha digital sound field processing (DSP) chip. Continues to register. 3 Press the iSCENE key until "SET Complete" appears on the chip.
... playback from almost any audio source can be enjoyed using a variety of sound decoders and various sound field effect programs stored on the front panel display. Four scenes are stored for that input source is applied again. • When you playback DTS Express sources or audio signals with ...key. DECODE MUSIC STRAIGHT PURE DIRECT BD DVD ON SCREEN SCENE TV CD OPTION RADIO ENTER VOLUME RETURN DISPLAY Changing input settings with a Yamaha digital sound field processing (DSP) chip. Continues to register. 3 Press the iSCENE key until "SET Complete" appears on the chip.

Owners Manual
Page 42
... g ENHANCER g SUR. DECODE repeatedly Turning on Straight decoding mode: Press gSTRAIGHT g Turning on Pure Direct mode (☞p. 44): Press gPURE DIRECT Turning on the front panel display to split the signal into multiple channels. Press gMUSIC repeatedly to enable the straight decoding mode. MAIN ZONE 2 CODE SET SOURCE RECEIVER HDMI 1 2 3 4 AUDIO...
... g ENHANCER g SUR. DECODE repeatedly Turning on Straight decoding mode: Press gSTRAIGHT g Turning on Pure Direct mode (☞p. 44): Press gPURE DIRECT Turning on the front panel display to split the signal into multiple channels. Press gMUSIC repeatedly to enable the straight decoding mode. MAIN ZONE 2 CODE SET SOURCE RECEIVER HDMI 1 2 3 4 AUDIO...

Owners Manual
Page 43
...) CINEMA DSP 3D mode creates an intensive and accurate stereoscopic sound field in CINEMA DSP 3D mode, the CINEMA DSP 3D indicator on the front panel lights up MUSIC 3 VOL. Do the following steps and then select a CINEMA DSP sound program (☞p. 45). • Connect the front speakers, center speaker, and...
...) CINEMA DSP 3D mode creates an intensive and accurate stereoscopic sound field in CINEMA DSP 3D mode, the CINEMA DSP 3D indicator on the front panel lights up MUSIC 3 VOL. Do the following steps and then select a CINEMA DSP sound program (☞p. 45). • Connect the front speakers, center speaker, and...

