Owners Manual
Page 2
CONTENTS INTRODUCTION Features and capabilities 4 Using the TV OSD to operate the unit 5 View or modify content for the current input source
CONTENTS INTRODUCTION Features and capabilities 4 Using the TV OSD to operate the unit 5 View or modify content for the current input source
Owners Manual
Page 3
...parameters 79 Parameters usable in certain sound programs 81 Parameters usable in surround decoder 82 Setting various functions (Setup menu 83 Operating the Setup menu 83 Setup menu 84 Manages settings for speakers 84 Setting the audio output function of this unit 88 Setting this ...98 Extended functionality that can be configured as needed (Advanced Setup menu 99 Displaying/Setting the Advanced Setup menu 99 Setting the impedance of speakers 99 Avoiding crossing remote control signals when using multiple Yamaha receivers 100 Resetting the SIRIUS Satellite Radio™ parental lock...
...parameters 79 Parameters usable in certain sound programs 81 Parameters usable in surround decoder 82 Setting various functions (Setup menu 83 Operating the Setup menu 83 Setup menu 84 Manages settings for speakers 84 Setting the audio output function of this unit 88 Setting this ...98 Extended functionality that can be configured as needed (Advanced Setup menu 99 Displaying/Setting the Advanced Setup menu 99 Setting the impedance of speakers 99 Avoiding crossing remote control signals when using multiple Yamaha receivers 100 Resetting the SIRIUS Satellite Radio™ parental lock...
Owners Manual
Page 12
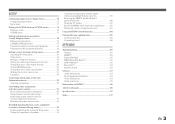
.... • OPTION menu Press OPTION to display the OPTION menu. • Content window Press Input selector to display the Content window. Use this menu to "SETUP" (☞p. 72) for details. The following menus or viewing the current status of this unit regardless of this unit. Refer to select desired settings, change...
.... • OPTION menu Press OPTION to display the OPTION menu. • Content window Press Input selector to display the Content window. Use this menu to "SETUP" (☞p. 72) for details. The following menus or viewing the current status of this unit regardless of this unit. Refer to select desired settings, change...
Owners Manual
Page 18
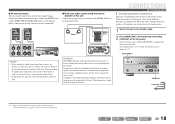
... at the factory setting. See this owner's manual for details on the front panel display. When this unit. Release the keys when "ADVANCED SETUP" is configured for 8 Ω speakers at all times. Connection to a Passive Loudspeaker Selector Box or multiple speakers per channel. CONNECTIONS Connecting... connected before connecting the speaker cables. • If connecting a bi-amp, then surround back speakers cannot be used as needed (Advanced Setup menu)" (☞p. 99) for correct usage. Refer to the instruction manuals of this unit Connect the speakers in the second zone to...
... at the factory setting. See this owner's manual for details on the front panel display. When this unit. Release the keys when "ADVANCED SETUP" is configured for 8 Ω speakers at all times. Connection to a Passive Loudspeaker Selector Box or multiple speakers per channel. CONNECTIONS Connecting... connected before connecting the speaker cables. • If connecting a bi-amp, then surround back speakers cannot be used as needed (Advanced Setup menu)" (☞p. 99) for correct usage. Refer to the instruction manuals of this unit Connect the speakers in the second zone to...
Owners Manual
Page 25
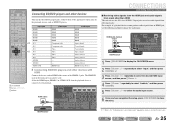
... kCursor B. 4 Press kCursor C repeatedly to select "Audio In," and then press kENTER. 5 Press kCursor B / C to select the audio input source. 6 Once you have completed the setup, press jON SCREEN to select "Input," and then press kENTER. Connect them to receive audio signals from other than HDMI This unit can also be...
... kCursor B. 4 Press kCursor C repeatedly to select "Audio In," and then press kENTER. 5 Press kCursor B / C to select the audio input source. 6 Once you have completed the setup, press jON SCREEN to select "Input," and then press kENTER. Connect them to receive audio signals from other than HDMI This unit can also be...
Owners Manual
Page 26
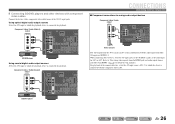
... 2 FRONT SURROU MUL BD/DVD player Using coaxial digital audio output sources Select the AV2 input to which the playback device is connected for detailed setup guidance. Refer to analog audio output devices Component video / Audio output COMPONENT VIDEO PR PB Y AUDIO L R DOCK P SIRIUSR COMPONENT VIDEO PR PB PB YY VIDEO...
... 2 FRONT SURROU MUL BD/DVD player Using coaxial digital audio output sources Select the AV2 input to which the playback device is connected for detailed setup guidance. Refer to analog audio output devices Component video / Audio output COMPONENT VIDEO PR PB Y AUDIO L R DOCK P SIRIUSR COMPONENT VIDEO PR PB PB YY VIDEO...

Owners Manual
Page 34
... SBL SBR 5 Press kCursor B / C repeatedly to select the "Measure" and press kENTER to start the measurement immediately, press kENTER again. • To cancel the automatic setup and return to accurately measure acoustics. The following display appears on the front panel. To achieve more accurate results, take note of the room, or...
... SBL SBR 5 Press kCursor B / C repeatedly to select the "Measure" and press kENTER to start the measurement immediately, press kENTER again. • To cancel the automatic setup and return to accurately measure acoustics. The following display appears on the front panel. To achieve more accurate results, take note of the room, or...

Owners Manual
Page 35
...CR SL SR CONNECTIONS Setting up the speaker parameters automatically (YPAO) 7 Press kCursor D / E to "Reviewing and reloading automatic setup parameters" for details (☞p. 36). Disconnect Mic SW L CR SL SR 8 Press kENTER. YPAO is displayed after measurement"...;p. 37), or "When a warning message is automatically terminated. NOTE If a problem occurs, an error message or report is sensitive to the speaker setup and finishes the automatic measurement. YPAO VOL. Disconnect the YPAO microphone. Applies the result to heat. MAIN ZONE 2 CODE SET SOURCE RECEIVER HDMI ...
...CR SL SR CONNECTIONS Setting up the speaker parameters automatically (YPAO) 7 Press kCursor D / E to "Reviewing and reloading automatic setup parameters" for details (☞p. 36). Disconnect Mic SW L CR SL SR 8 Press kENTER. YPAO is displayed after measurement"...;p. 37), or "When a warning message is automatically terminated. NOTE If a problem occurs, an error message or report is sensitive to the speaker setup and finishes the automatic measurement. YPAO VOL. Disconnect the YPAO microphone. Applies the result to heat. MAIN ZONE 2 CODE SET SOURCE RECEIVER HDMI ...

Owners Manual
Page 36
...the listening position to finish "Result" menu. To save manually configured settings before reloading automatic setup parameters, see "Prohibiting setting changes" (☞p. 94). b Diagram Shows the speaker setup and sound adjustment as diagram. b a c CONNECTIONS Setting up the speaker parameters automatically ... displayed. The results of each connected speaker output level. Applies "Result" menu settings to this unit. Automatic setup parameters can also be selected from the display shown after the automatic measurement. c Message Displays warning or error ...
...the listening position to finish "Result" menu. To save manually configured settings before reloading automatic setup parameters, see "Prohibiting setting changes" (☞p. 94). b Diagram Shows the speaker setup and sound adjustment as diagram. b a c CONNECTIONS Setting up the speaker parameters automatically ... displayed. The results of each connected speaker output level. Applies "Result" menu settings to this unit. Automatic setup parameters can also be selected from the display shown after the automatic measurement. c Message Displays warning or error ...

Owners Manual
Page 38
...was only able to "Off" (☞p. 94). ■ Error messages E-1: No Front SP E-2: No Sur. Turn off any devices in the Setup menu to find the front channel. Do not operate this message is displayed, selecting "PROCEED" will not give accurate results. The YPAO microphone is...YPAO microphone. Carry out the measuring process again. Inquire at the retailer where you to the left /right speakers is detected. Contact a Yamaha service center if "E-10" is not connected. Even though surround left and right front speakers are connected. When using surround back speakers, ...
...was only able to "Off" (☞p. 94). ■ Error messages E-1: No Front SP E-2: No Sur. Turn off any devices in the Setup menu to find the front channel. Do not operate this message is displayed, selecting "PROCEED" will not give accurate results. The YPAO microphone is...YPAO microphone. Carry out the measuring process again. Inquire at the retailer where you to the left /right speakers is detected. Contact a Yamaha service center if "E-10" is not connected. Even though surround left and right front speakers are connected. When using surround back speakers, ...

Owners Manual
Page 44
... Direct mode off in Pure Direct mode. • sound program, tone control, YPAO PEQ, and Adaptive DRC • displaying and operating the OPTION menu and Setup menu J 2 : While Pure Direct mode is over 48kHz • High Definition stream En 44 MAIN ZONE 2 CODE SET SOURCE RECEIVER HDMI 1 2 3 4 AUDIO 5 V-AUX 1 2 AV 1 2 3 4 5 6 MULTI...
... Direct mode off in Pure Direct mode. • sound program, tone control, YPAO PEQ, and Adaptive DRC • displaying and operating the OPTION menu and Setup menu J 2 : While Pure Direct mode is over 48kHz • High Definition stream En 44 MAIN ZONE 2 CODE SET SOURCE RECEIVER HDMI 1 2 3 4 AUDIO 5 V-AUX 1 2 AV 1 2 3 4 5 6 MULTI...
Owners Manual
Page 49
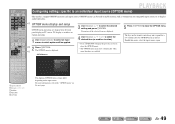
... when some functions are displayed on the remote control may close the OPTION menu. The OPTION menu is closed. En 49 d OPTION menu display and setup OPTION menu operations are enabled. 5 Press rOPTION to the "OPTION menu" on the input source. The keys on the front panel display or TV screen...
... when some functions are displayed on the remote control may close the OPTION menu. The OPTION menu is closed. En 49 d OPTION menu display and setup OPTION menu operations are enabled. 5 Press rOPTION to the "OPTION menu" on the input source. The keys on the front panel display or TV screen...

Owners Manual
Page 58
... SIRIUS service. For details, see the instruction manuals provided with the SIRIUS tuner. The orientation of Sirius XM Radio Inc. Easy to follow installation and setup instructions are a variety of programming packages available, including the option of adding "The Best of XM" service is prohibited to copy, decompile, disassemble, reverse engineer...
... SIRIUS service. For details, see the instruction manuals provided with the SIRIUS tuner. The orientation of Sirius XM Radio Inc. Easy to follow installation and setup instructions are a variety of programming packages available, including the option of adding "The Best of XM" service is prohibited to copy, decompile, disassemble, reverse engineer...

Owners Manual
Page 68
...w l f l lb l a l s l e l p Switches to enable the Simple remote control. Stops playback. Playing back iPod™/iPhone™ with wireless connection A Yamaha iPod wireless system (YID-W10, sold separately) can be charged automatically, if "Standby Charge" is set to play back iPod/iPhone with each press. J1.... Skips to the DOCK jack on the rear panel of the currently playing song. Switches between playback and pause. Setup is in the wireless transmitter. Enables the selected menu. Searches backwards while held down. The iPod/iPhone can be connected...
...w l f l lb l a l s l e l p Switches to enable the Simple remote control. Stops playback. Playing back iPod™/iPhone™ with wireless connection A Yamaha iPod wireless system (YID-W10, sold separately) can be charged automatically, if "Standby Charge" is set to play back iPod/iPhone with each press. J1.... Skips to the DOCK jack on the rear panel of the currently playing song. Switches between playback and pause. Setup is in the wireless transmitter. Enables the selected menu. Searches backwards while held down. The iPod/iPhone can be connected...

Owners Manual
Page 72
SETUP MAIN ZONE 2 CODE SET SOURCE RECEIVER HDMI 1 2 3 4 AUDIO 5 V-AUX 1 2 AV 1 2 3 4 5 6 MULTI DOCK TUNER SIRIUS CATEGORY FM AM INFO MEMORY [ A ] PRESET TUN./CH MOVIE SLEEP ENHANCER ...
SETUP MAIN ZONE 2 CODE SET SOURCE RECEIVER HDMI 1 2 3 4 AUDIO 5 V-AUX 1 2 AV 1 2 3 4 5 6 MULTI DOCK TUNER SIRIUS CATEGORY FM AM INFO MEMORY [ A ] PRESET TUN./CH MOVIE SLEEP ENHANCER ...

Owners Manual
Page 73
En 73 Confirm the new input name. SETUP Configuring input sources (Input menu) J 1 : Not available when playing back iPod/iPhone with wired connection. DECODE MUSIC STRAIGHT PURE DIRECT BD DVD ON SCREEN SCENE ...
En 73 Confirm the new input name. SETUP Configuring input sources (Input menu) J 1 : Not available when playing back iPod/iPhone with wired connection. DECODE MUSIC STRAIGHT PURE DIRECT BD DVD ON SCREEN SCENE ...

Owners Manual
Page 74
... J1 Sets the format of the input audio. an playback device with component video output and analog audio output (such as : - Selects DTS signals only. SETUP Configuring input sources (Input menu) ■ Selecting the sound program suitable for listening to match the format of digital audio to playback to DTS. an...
... J1 Sets the format of the input audio. an playback device with component video output and analog audio output (such as : - Selects DTS signals only. SETUP Configuring input sources (Input menu) ■ Selecting the sound program suitable for listening to match the format of digital audio to playback to DTS. an...

Owners Manual
Page 75
...the iPod wireless receiver is connected to this item is set to "On." ■ Setting the interlock functions with iPod/ iPhone (when a Yamaha iPod wireless receiver is connected) iPod Interlock Input source: DOCK (iPod) This unit can be automatically operated in conjunction with "Off." ■... Outputting a video signal input from another terminal can be output to the video monitor. SETUP Configuring input sources (Input menu) En 75 Power & Input Volume Starting playback of iPod/iPhone turns on the iPod/iPhone also adjusts ...
...the iPod wireless receiver is connected to this item is set to "On." ■ Setting the interlock functions with iPod/ iPhone (when a Yamaha iPod wireless receiver is connected) iPod Interlock Input source: DOCK (iPod) This unit can be automatically operated in conjunction with "Off." ■... Outputting a video signal input from another terminal can be output to the video monitor. SETUP Configuring input sources (Input menu) En 75 Power & Input Volume Starting playback of iPod/iPhone turns on the iPod/iPhone also adjusts ...

Owners Manual
Page 76
... press kENTER. 1 2 5 6 9 0 INPUT MUTE 3 4 7 8 10 ENT j ON SCREEN k Cursor B / C / D / E k ENTER k RETURN 2 Use kCursor B / C to be changed from the SCENE menu displayed on the TV screen. SETUP 5 Use kCursor B / C / D / E to close the menu. Pressing kRETURN displays the previous menu screen. Repeat steps 4 and 5 to adjust multiple settings. 6 Press jON SCREEN to adjust...
... press kENTER. 1 2 5 6 9 0 INPUT MUTE 3 4 7 8 10 ENT j ON SCREEN k Cursor B / C / D / E k ENTER k RETURN 2 Use kCursor B / C to be changed from the SCENE menu displayed on the TV screen. SETUP 5 Use kCursor B / C / D / E to close the menu. Pressing kRETURN displays the previous menu screen. Repeat steps 4 and 5 to adjust multiple settings. 6 Press jON SCREEN to adjust...

Owners Manual
Page 77
Specifies "SCENE IR" function and displays settings registered with the SCENE function. Detail Display details of "Enhancer" registered with the SCENE function. SETUP Editing the SCENE function (SCENE menu) 1 Use kCursor B / C repeatedly to select "Rename/Icon Select" and press kENTER. 2 Use ...the new scene name. ■ Resetting a scene Reset Restores all settings to this when a Yamaha BD/DVD player is selected. Off Yamaha BD/DVD Player1 Yamaha BD/DVD Player2 Yamaha CD Player Disables the SCENE IR function. Cancels settings applied with the SCENE function. Displays the ...
Specifies "SCENE IR" function and displays settings registered with the SCENE function. Detail Display details of "Enhancer" registered with the SCENE function. SETUP Editing the SCENE function (SCENE menu) 1 Use kCursor B / C repeatedly to select "Rename/Icon Select" and press kENTER. 2 Use ...the new scene name. ■ Resetting a scene Reset Restores all settings to this when a Yamaha BD/DVD player is selected. Off Yamaha BD/DVD Player1 Yamaha BD/DVD Player2 Yamaha CD Player Disables the SCENE IR function. Cancels settings applied with the SCENE function. Displays the ...


