Quick Reference Guide
Page 3
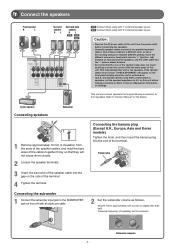
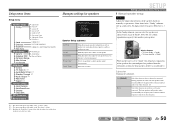
... 2 Loosen the speaker terminals. 3 Insert the bare wire of the speaker cable into contact with 6.1-channel speaker layout. Refer to "Owner's Manual" for information on the front panel display when this unit from the power outlet before making connections. Crossover frequency (if available): Set to approximately...gap on this unit with an audio pin cable. and Canada models only) When connecting 6 Ω speakers, set the speaker impedance to Owner's Manual for the details. Caution: • Remove the AC power cable of this unit is a different color, or has a line running along it,...
... 2 Loosen the speaker terminals. 3 Insert the bare wire of the speaker cable into contact with 6.1-channel speaker layout. Refer to "Owner's Manual" for information on the front panel display when this unit from the power outlet before making connections. Crossover frequency (if available): Set to approximately...gap on this unit with an audio pin cable. and Canada models only) When connecting 6 Ω speakers, set the speaker impedance to Owner's Manual for the details. Caution: • Remove the AC power cable of this unit is a different color, or has a line running along it,...
Quick Reference Guide
Page 4
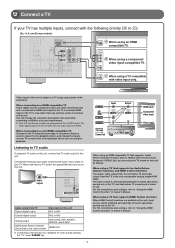
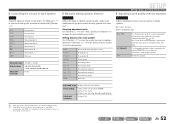
...the audio output jacks on this unit AV1 or AV4 Coaxial digital output AV2 or AV3 Analog output HDMI Audio Return Channel (Described in Owner's Manual. - 4 - Input HDMI COMPONENT VIDEO S VIDEO VIDEO Through Converted Output HDMI COMPONENT VIDEO VIDEO HDMI input Component video input Video input When ... ratio used when converting to HDMI to the TV. For the connections and settings, refer to "Using the HDMI Control function" in Owner's Manual. When connecting to a HDMI compatible TV Video signal such as follows: When using a TV that supports the Audio Return Channel functions and HDMI...
...the audio output jacks on this unit AV1 or AV4 Coaxial digital output AV2 or AV3 Analog output HDMI Audio Return Channel (Described in Owner's Manual. - 4 - Input HDMI COMPONENT VIDEO S VIDEO VIDEO Through Converted Output HDMI COMPONENT VIDEO VIDEO HDMI input Component video input Video input When ... ratio used when converting to HDMI to the TV. For the connections and settings, refer to "Using the HDMI Control function" in Owner's Manual. When connecting to a HDMI compatible TV Video signal such as follows: When using a TV that supports the Audio Return Channel functions and HDMI...
Quick Reference Guide
Page 5
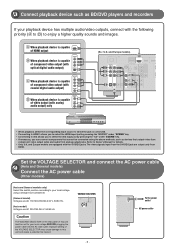
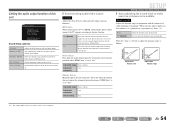
... power cable 4 (Asia and General models) Connect the AC power cable (Other models) (Asia and General models only) Select the switch position according to Owner's Manual for your playback device has multiple audio/video outputs, connect with the following priority (A to D) to enjoy a higher quality sounds and images. Caution The VOLTAGE...
... power cable 4 (Asia and General models) Connect the AC power cable (Other models) (Asia and General models only) Select the switch position according to Owner's Manual for your playback device has multiple audio/video outputs, connect with the following priority (A to D) to enjoy a higher quality sounds and images. Caution The VOLTAGE...
Quick Reference Guide
Page 7
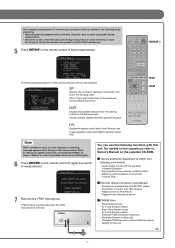
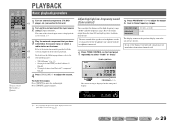
...of Front and Center/Total of the following order: Closest speaker distance/Farthest speaker distance LVL Displays the speaker output levels in Owner's Manual to solve the problem, and carry out YPAO again. 6 Press ENTER on the supplied CD-ROM. ˙ Various parameter adjustment ... bb.bb>SetbbbbCancel bbbb[p]/[[]:Select bbbb[ENTER]:Finish SP Displays the number of measurement. For details on the operations, refer to Owner's Manual on the remote control to match your listening environment - and Europe models) Automatic traffic information reception - (Asia and General models only...
...of Front and Center/Total of the following order: Closest speaker distance/Farthest speaker distance LVL Displays the speaker output levels in Owner's Manual to solve the problem, and carry out YPAO again. 6 Press ENTER on the supplied CD-ROM. ˙ Various parameter adjustment ... bb.bb>SetbbbbCancel bbbb[p]/[[]:Select bbbb[ENTER]:Finish SP Displays the number of measurement. For details on the operations, refer to Owner's Manual on the remote control to match your listening environment - and Europe models) Automatic traffic information reception - (Asia and General models only...
Owners Manual
Page 2
... stations 38 Radio Data System tuning (U.K. and Canada models only 66 Avoiding crossing remote control signals when using multiple Yamaha receivers 66 High quality playback using bi-amplification connections 67 Removing HDMI video output up the speaker parameters automatically (YPAO...antennas 23 Set up -scaling limits .......... 67 Changing FM/AM frequency steps (Asia and General models only 67 Initializing various settings for this manual 4 Supplied accessories 4 Part names and functions 5 Front panel 5 Rear panel 6 Front panel display 7 Remote control 8 CONNECTIONS Connecting ...
... stations 38 Radio Data System tuning (U.K. and Canada models only 66 Avoiding crossing remote control signals when using multiple Yamaha receivers 66 High quality playback using bi-amplification connections 67 Removing HDMI video output up the speaker parameters automatically (YPAO...antennas 23 Set up -scaling limits .......... 67 Changing FM/AM frequency steps (Asia and General models only 67 Initializing various settings for this manual 4 Supplied accessories 4 Part names and functions 5 Front panel 5 Rear panel 6 Front panel display 7 Remote control 8 CONNECTIONS Connecting ...
Owners Manual
Page 4
...; ☞ indicates the page describing the related information. • Click on the remote control. En 4 In case of differences between the manual and product, the product has priority. • "dHDMI1" (example) indicates the name of it. Front panel Rear panel Front panel display ...Battery compartment Replace the batteries with new ones, and set the remote control codes. If this manual • Some features are not available in certain regions. • This manual is in the footnote. Design and specifications are subject to production. Attach the cover PUSH ...
...; ☞ indicates the page describing the related information. • Click on the remote control. En 4 In case of differences between the manual and product, the product has priority. • "dHDMI1" (example) indicates the name of it. Front panel Rear panel Front panel display ...Battery compartment Replace the batteries with new ones, and set the remote control codes. If this manual • Some features are not available in certain regions. • This manual is in the footnote. Design and specifications are subject to production. Attach the cover PUSH ...
Owners Manual
Page 13
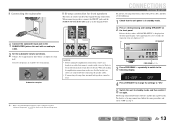
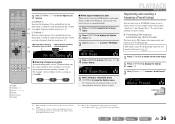
... INFO MEMORY PRESET FM AM INPUT BD DVD SCENE TV CD TONE CONTROL PROGRAM RADIO STRAIGHT PROGRAM l / h 3 Press PROGRAM h repeatedly to switch to the instruction manuals of speakers for front speakers This unit can be used. To deactive a bi-amp connection, follow the same procedure and select "OFF" in the diagram...
... INFO MEMORY PRESET FM AM INPUT BD DVD SCENE TV CD TONE CONTROL PROGRAM RADIO STRAIGHT PROGRAM l / h 3 Press PROGRAM h repeatedly to switch to the instruction manuals of speakers for front speakers This unit can be used. To deactive a bi-amp connection, follow the same procedure and select "OFF" in the diagram...
Owners Manual
Page 29
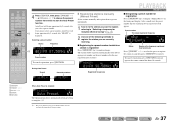
... the high-frequency range (Treble) and low-frequency range (Bass) of the selected input source is displayed on the following operations, refer to the instruction manuals provided with the headphones connected. 1 Press TONE CONTROL on playback. TONE CONTROL YPAO MIC PHONES SILENT CINEMA INFO MEMORY PRESET FM AM INPUT BD DVD...
... the high-frequency range (Treble) and low-frequency range (Bass) of the selected input source is displayed on the following operations, refer to the instruction manuals provided with the headphones connected. 1 Press TONE CONTROL on playback. TONE CONTROL YPAO MIC PHONES SILENT CINEMA INFO MEMORY PRESET FM AM INPUT BD DVD...
Owners Manual
Page 36
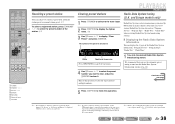
... search has started. J3 3 Use jCursor B / C to display the Option menu. Use one . AM stations cannot be automatically registered. Use manual station preset (☞p. 37). 1 Press dTUNER to switch to the tuner input. 2 Press qOPTION to select "Auto Preset." Make sure that is... out of presetting stations, "Auto Preset" and "Manual Preset." En 36 Press and hold this unit to receive. To return this key for a station on 98.50MHz. 9 8 5 d TUNER e TUNING H / I j Cursor B / C ...
... search has started. J3 3 Use jCursor B / C to display the Option menu. Use one . AM stations cannot be automatically registered. Use manual station preset (☞p. 37). 1 Press dTUNER to switch to the tuner input. 2 Press qOPTION to select "Auto Preset." Make sure that is... out of presetting stations, "Auto Preset" and "Manual Preset." En 36 Press and hold this unit to receive. To return this key for a station on 98.50MHz. 9 8 5 d TUNER e TUNING H / I j Cursor B / C ...
Owners Manual
Page 37
... Preset number To cancel registration, press jRETURN. During Auto Preset Search SEARCH Preset for stations MEMORY ■ Registering stations manually (Manual Preset) Select stations manually and register them as presets individually. 1 Tune in to the station you want to register, referring to "Selecting a...small wait, the preset number that the station has been registered to will begin approximately 5 seconds after the one of the following methods to display "Manual Preset" on the front panel display. e MEMORY e PRESET F / G j Cursor B / C j ENTER j RETURN When Auto Preset is...
... Preset number To cancel registration, press jRETURN. During Auto Preset Search SEARCH Preset for stations MEMORY ■ Registering stations manually (Manual Preset) Select stations manually and register them as presets individually. 1 Tune in to the station you want to register, referring to "Selecting a...small wait, the preset number that the station has been registered to will begin approximately 5 seconds after the one of the following methods to display "Manual Preset" on the front panel display. e MEMORY e PRESET F / G j Cursor B / C j ENTER j RETURN When Auto Preset is...
Owners Manual
Page 38
...;p. 45) for details on the front panel display. and Europe models only) Radio Data System is a data transmission system used by automatic station preset or manual station preset. When an invalid number is displayed when there are no stations are registered. SOURCE 1 1 5 TRANSMIT CODE SET SLEEP RECEIVER HDMI 2 3 4 AV 2 3 4 AUDIO 6 1 2 V-AUX...
...;p. 45) for details on the front panel display. and Europe models only) Radio Data System is a data transmission system used by automatic station preset or manual station preset. When an invalid number is displayed when there are no stations are registered. SOURCE 1 1 5 TRANSMIT CODE SET SLEEP RECEIVER HDMI 2 3 4 AV 2 3 4 AUDIO 6 1 2 V-AUX...
Owners Manual
Page 50
... Function Setup Input Rename AutoPowerDown Dimmer OSD Shift DSP Parameter Memory Guard J 1 : This menu item appears depending on manually set to the listening point. J 3 : Enabling the "Extra Bass" setting allows both the subwoofer and the front... for speakers ;Speaker Setup . ;;;;;ETLCDqeeoiusvnsateftlliaiTgnzocenere [ ]/[ ]:Up/Down [ENTER]:Enter [ p Speaker Setup submenu Config Level Distance Equalizer Test Tone Manually manages speaker configuration, such as speaker size (sound production capacity), and bass audio processing. To display other items press jCursor B / C. ...
... Function Setup Input Rename AutoPowerDown Dimmer OSD Shift DSP Parameter Memory Guard J 1 : This menu item appears depending on manually set to the listening point. J 3 : Enabling the "Extra Bass" setting allows both the subwoofer and the front... for speakers ;Speaker Setup . ;;;;;ETLCDqeeoiusvnsateftlliaiTgnzocenere [ ]/[ ]:Up/Down [ENTER]:Enter [ p Speaker Setup submenu Config Level Distance Equalizer Test Tone Manually manages speaker configuration, such as speaker size (sound production capacity), and bass audio processing. To display other items press jCursor B / C. ...
Owners Manual
Page 52
... Subwoofer Adjustable range -10.0 dB to +10.0 dB Default setting 0 dB (FR.L/FR.R/SWFR) -1.0 dB (CNTR/SL/SR/SBL/SBR/SB) Adjustment increments 0.5 dB ■ Manually setting speaker distance Distance Adjusts the timing at which the speakers produce audio so that sounds from the speaker to select the speaker you can...
... Subwoofer Adjustable range -10.0 dB to +10.0 dB Default setting 0 dB (FR.L/FR.R/SWFR) -1.0 dB (CNTR/SL/SR/SBL/SBR/SB) Adjustment increments 0.5 dB ■ Manually setting speaker distance Distance Adjusts the timing at which the speakers produce audio so that sounds from the speaker to select the speaker you can...
Owners Manual
Page 54
...the maximum volume for Dolby Digital and DTS playback. HDMI Auto When connecting to 240 ms Adjustment 1 ms increments Manual Delay Manually adjusts the correction time. Auto Delay Fine-adjust the audio output timing by entering the correction time provided when "...to a TV via HDMI, automatically adjusts output timing if the TV supports an automatic lipsync function. Fine-adjust the correction time in "Manual Delay." Select this unit ;Sound Setup . ;;;;;MIALDandiyxiapntpsaV.tymoVinilovcculemuRemDaeRnCge [ ]/[ ]:Up/Down [ENTER]:Enter [ p Sound Setup submenu Lipsync Adaptive...
...the maximum volume for Dolby Digital and DTS playback. HDMI Auto When connecting to 240 ms Adjustment 1 ms increments Manual Delay Manually adjusts the correction time. Auto Delay Fine-adjust the audio output timing by entering the correction time provided when "...to a TV via HDMI, automatically adjusts output timing if the TV supports an automatic lipsync function. Fine-adjust the correction time in "Manual Delay." Select this unit ;Sound Setup . ;;;;;MIALDandiyxiapntpsaV.tymoVinilovcculemuRemDaeRnCge [ ]/[ ]:Up/Down [ENTER]:Enter [ p Sound Setup submenu Lipsync Adaptive...
Owners Manual
Page 68
... operations, check that the HDMI Control function is "Off." Operations 1-7 will not properly synchronize, unplugging and replugging the devices and turning them on manually. 6 Change the TV's input setting to this unit (ex. If they are turned off with the TV through the following operations by the... has turned on . Confirm that supports the HDMI Control function are connected to the input jack that "Control" in your TV and DVD recorder manuals, as well as volume control) HDMI connection HDMI Remote control of those devices. 4 Turn the TV off may solve the problem. J 1 ...
... operations, check that the HDMI Control function is "Off." Operations 1-7 will not properly synchronize, unplugging and replugging the devices and turning them on manually. 6 Change the TV's input setting to this unit (ex. If they are turned off with the TV through the following operations by the... has turned on . Confirm that supports the HDMI Control function are connected to the input jack that "Control" in your TV and DVD recorder manuals, as well as volume control) HDMI connection HDMI Remote control of those devices. 4 Turn the TV off may solve the problem. J 1 ...
Owners Manual
Page 73
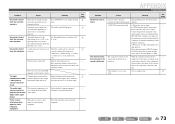
... function, then lower the Auto Power Off sensitivity settings. Set "Extended Surround" other digital or radio frequency equipment. Connect the playback component to its instruction manual. Set the playback component properly referring to this unit. The source does not contain LFE (☞p. 78) or low frequency signals. See page 31 30...
... function, then lower the Auto Power Off sensitivity settings. Set "Extended Surround" other digital or radio frequency equipment. Connect the playback component to its instruction manual. Set the playback component properly referring to this unit. The source does not contain LFE (☞p. 78) or low frequency signals. See page 31 30...

Owners Manual
Page 74
... sure that supports - You are in a different location. See page 23 36 - - - 35 36 - "No Presets" is displayed. Set the Audio Return Channel function to manually select the station. Tuner (FM/AM) APPENDIX Troubleshooting FM Problem FM stereo reception is not working. Register stations you want to listen to monaural mode...
... sure that supports - You are in a different location. See page 23 36 - - - 35 36 - "No Presets" is displayed. Set the Audio Return Channel function to manually select the station. Tuner (FM/AM) APPENDIX Troubleshooting FM Problem FM stereo reception is not working. Register stations you want to listen to monaural mode...
Owners Manual
Page 75
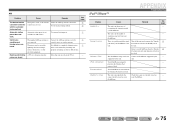
...™/iPhone™ APPENDIX Troubleshooting Display Loading... Turn off the unit and reconnect the Yamaha iPod universal dock to the unit. Use the manual tuning method. 35 with the signal path from the Yamaha iPod universal dock and then place it can be caused by lightning, fluorescent lamps, ... the TV set is being used nearby. Connect error Unknown iPod iPod connected Disconnected Unable to completely eliminate noise, 23 but it back in the Yamaha iPod universal dock. Your iPod/iPhone is Connect the AM loop antenna correctly 23 not connected. See page - - 40 40 - - - ...
...™/iPhone™ APPENDIX Troubleshooting Display Loading... Turn off the unit and reconnect the Yamaha iPod universal dock to the unit. Use the manual tuning method. 35 with the signal path from the Yamaha iPod universal dock and then place it can be caused by lightning, fluorescent lamps, ... the TV set is being used nearby. Connect error Unknown iPod iPod connected Disconnected Unable to completely eliminate noise, 23 but it back in the Yamaha iPod universal dock. Your iPod/iPhone is Connect the AM loop antenna correctly 23 not connected. See page - - 40 40 - - - ...
Owners Manual
Page 79
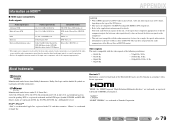
...iPhone™ "iPod" is used by using the digital audio input (optical or coaxial) connections. • Refer to the supplied instruction manuals for example, the special audio contents downloaded via Internet) of the DVD player. • This unit is not compatible with the audio ...commentaries mixed down by Yamaha in the U.S. and worldwide patents issued & pending. En 79 Information on HDMI™ APPENDIX ■ HDMI signal compatibility Audio signals ...
...iPhone™ "iPod" is used by using the digital audio input (optical or coaxial) connections. • Refer to the supplied instruction manuals for example, the special audio contents downloaded via Internet) of the DVD player. • This unit is not compatible with the audio ...commentaries mixed down by Yamaha in the U.S. and worldwide patents issued & pending. En 79 Information on HDMI™ APPENDIX ■ HDMI signal compatibility Audio signals ...


