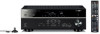

Owners Manual
Page 2
... 4 FEATURES 5 What you can do with the unit 5 Part names and functions 7 Front panel 7 Front display (indicators 8 Rear panel 9 Remote control 10 PREPARATIONS 11 General setup procedure 11 1 Placing speakers 12 2 Connecting speakers 15 5.1-channel system 15 7.1-channel system 15 Connecting front speakers that support bi-amp connections 16 Connecting Zone...
... 4 FEATURES 5 What you can do with the unit 5 Part names and functions 7 Front panel 7 Front display (indicators 8 Rear panel 9 Remote control 10 PREPARATIONS 11 General setup procedure 11 1 Placing speakers 12 2 Connecting speakers 15 5.1-channel system 15 7.1-channel system 15 Connecting front speakers that support bi-amp connections 16 Connecting Zone...
Owners Manual
Page 3
... (AirPlay 58 Playback of iTunes/iPod music contents 58 Playing back music in multiple rooms (RX-V573 only 60 Preparing Zone B 60 Configuring playback settings for different playback sources (Option menu... ECO 75 Function 76 Network 77 Language 79 Configuring the system settings (ADVANCED SETUP menu 80 ADVANCED SETUP menu items 80 Changing the speaker impedance setting (SP IMP 80 Selecting the ...on the front display 92 Glossary 93 Audio information 93 HDMI and video information 94 Yamaha technologies 95 Video signal flow 96 Information on HDMI 96 HDMI Control 96 HDMI signal ...
... (AirPlay 58 Playback of iTunes/iPod music contents 58 Playing back music in multiple rooms (RX-V573 only 60 Preparing Zone B 60 Configuring playback settings for different playback sources (Option menu... ECO 75 Function 76 Network 77 Language 79 Configuring the system settings (ADVANCED SETUP menu 80 ADVANCED SETUP menu items 80 Changing the speaker impedance setting (SP IMP 80 Selecting the ...on the front display 92 Glossary 93 Audio information 93 HDMI and video information 94 Yamaha technologies 95 Video signal flow 96 Information on HDMI 96 HDMI Control 96 HDMI signal ...
Owners Manual
Page 4
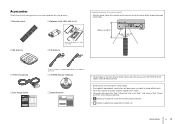
... "iPod", "iPhone" and "iPad" as the "iPod". Within 6 m (20 ft) 30° 30° … YPAO microphone … Easy Setup Guide *One of the above is supplied depending on the unit and remain within the operating range shown below. Accessories En 4 Accessories Check that the... following accessories are of the RX-V573 (U.S.A. model), unless otherwise specified. • Some features are not available in this manual are supplied with the product. … Remote...
... "iPod", "iPhone" and "iPad" as the "iPod". Within 6 m (20 ft) 30° 30° … YPAO microphone … Easy Setup Guide *One of the above is supplied depending on the unit and remain within the operating range shown below. Accessories En 4 Accessories Check that the... following accessories are of the RX-V573 (U.S.A. model), unless otherwise specified. • Some features are not available in this manual are supplied with the product. … Remote...
Owners Manual
Page 6
... a 3-dimensional sound field in your external device (p.24). Useful tips The combination of HDMI Control signals. Use "Audio Output" in the "Setup" menu to select the output destination of signals input into the unit (p.72). I want to update the firmware... Use "Language" in the...; Various function settings (p.67) • System settings (p.80) FEATURES ➤ What you to customize the unit. Use "Audio In" in the "Setup" menu to select a language from the TV speakers... Full of useful functions! ❑ Connecting various devices (p.23) A number of HDMI jacks and various...
... a 3-dimensional sound field in your external device (p.24). Useful tips The combination of HDMI Control signals. Use "Audio Output" in the "Setup" menu to select the output destination of signals input into the unit (p.72). I want to update the firmware... Use "Language" in the...; Various function settings (p.67) • System settings (p.80) FEATURES ➤ What you to customize the unit. Use "Audio In" in the "Setup" menu to select a language from the TV speakers... Full of useful functions! ❑ Connecting various devices (p.23) A number of HDMI jacks and various...
Owners Manual
Page 10
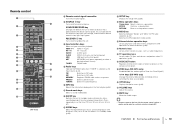
...time has elapsed (sleep timer). F ZONE keys (RX-V573 only) Enable/disable the audio output to Zone A or Zone B (p.61). ★/★★ keys (RX-V473 only) Change the external device to FM radio. I (RX-V573) 1 Remote control signal transmitter Transmits infrared ...signals. 2 SOURCE z key Turns on /off an external device. You can operate the unit when this key lights up in orange, and an external device when this key lights up in standby mode (p.35). 9 SETUP...
...time has elapsed (sleep timer). F ZONE keys (RX-V573 only) Enable/disable the audio output to Zone A or Zone B (p.61). ★/★★ keys (RX-V473 only) Change the external device to FM radio. I (RX-V573) 1 Remote control signal transmitter Transmits infrared ...signals. 2 SOURCE z key Turns on /off an external device. You can operate the unit when this key lights up in orange, and an external device when this key lights up in standby mode (p.35). 9 SETUP...
Owners Manual
Page 11
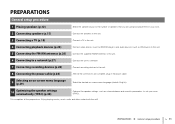
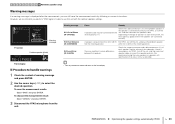
PREPARATIONS General setup procedure 1 Placing speakers (p.12) Select the speaker layout for the number of speakers that you are complete, plug in your room (YPAO). This completes all ... unit to a network. 7 Connecting recording devices (p.28) Connect recording devices to the unit. 8 Connecting the power cable (p.28) After all the preparations. PREPARATIONS ➤ General setup procedure En 11 Enjoy playing movies, music, radio and other content with the unit!
PREPARATIONS General setup procedure 1 Placing speakers (p.12) Select the speaker layout for the number of speakers that you are complete, plug in your room (YPAO). This completes all ... unit to a network. 7 Connecting recording devices (p.28) Connect recording devices to the unit. 8 Connecting the power cable (p.28) After all the preparations. PREPARATIONS ➤ General setup procedure En 11 Enjoy playing movies, music, radio and other content with the unit!
Owners Manual
Page 16
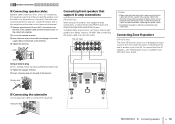
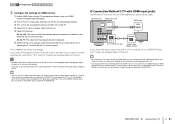
... wire to the positive terminal. Audio pin cable Y MONITOR OUT AV6 AV OUT AUDIO SUBWOOFER Connecting front speakers that support bi-amp connections (RX-V573 only) When using front speakers that the brackets or cables are connected before connecting the speaker cables. • Surround back speakers cannot ...that support bi-amp connections, connect them to an AC wall outlet. To connect the Zone B speakers, see "Playing back music in the "Setup" menu to "BI-AMP" after connecting the power cable to the FRONT jacks and SURROUND BACK/BI-AMP/ZONE B jacks. Connecting Zone B speakers...
... wire to the positive terminal. Audio pin cable Y MONITOR OUT AV6 AV OUT AUDIO SUBWOOFER Connecting front speakers that support bi-amp connections (RX-V573 only) When using front speakers that the brackets or cables are connected before connecting the speaker cables. • Surround back speakers cannot ...that support bi-amp connections, connect them to an AC wall outlet. To connect the Zone B speakers, see "Playing back music in the "Setup" menu to "BI-AMP" after connecting the power cable to the FRONT jacks and SURROUND BACK/BI-AMP/ZONE B jacks. Connecting Zone B speakers...
Owners Manual
Page 18
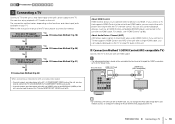
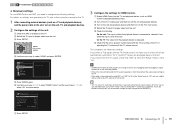
... unit, you can also enjoy playback of the unit with the menu displayed on your TV have not changed the "HDMI" parameters (p.72) in the "Setup" menu. For details, see "HDMI Control" (p.96). The unit (rear) HDMI OUT jack HDMI OUT ARC HDMI OUT HDMI 1 (BD/DVD) HDM ARC PR PB...
... unit, you can also enjoy playback of the unit with the menu displayed on your TV have not changed the "HDMI" parameters (p.72) in the "Setup" menu. For details, see "HDMI Control" (p.96). The unit (rear) HDMI OUT jack HDMI OUT ARC HDMI OUT HDMI 1 (BD/DVD) HDM ARC PR PB...
Owners Manual
Page 19
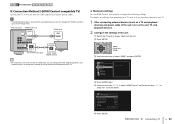
...RETURN 3 Configure the settings for SCENE(TV). c Turn on the unit and playback devices and then turn on (or unplugging and then plugging in the "Setup" menu to "Off" and use a digital optical cable to input TV audio to change the TV audio input assignment. f Check that ARC is displayed....as a TV and playback devices) and the power cable to change the input assignment for HDMI Control. PREPARATIONS ➤ Connecting a TV En 19 c Press SETUP. On the unit: The input to display video from the playback device is enabled on the TV. a Enable HDMI Control on the TV's main power...
...RETURN 3 Configure the settings for SCENE(TV). c Turn on the unit and playback devices and then turn on (or unplugging and then plugging in the "Setup" menu to "Off" and use a digital optical cable to input TV audio to change the TV audio input assignment. f Check that ARC is displayed....as a TV and playback devices) and the power cable to change the input assignment for HDMI Control. PREPARATIONS ➤ Connecting a TV En 19 c Press SETUP. On the unit: The input to display video from the playback device is enabled on the TV. a Enable HDMI Control on the TV's main power...
Owners Manual
Page 20
... and a digital optical cable. • The following explanation is based on the assumption that you need to configure the following settings. Setup Speaker HDMI Sound ECO Function Network Language Configuration d Press ENTER again. For details on the TV. ❑ Necessary settings To use HDMI... Control, you have not changed the "HDMI" parameters (p.72) in the "Setup" menu. Configuration HDMI Control On Audio Output Auto Standby Through Auto TV Audio Input AV4 Standby Sync Auto ARC On SCENE Back: RETURN f ...
... and a digital optical cable. • The following explanation is based on the assumption that you need to configure the following settings. Setup Speaker HDMI Sound ECO Function Network Language Configuration d Press ENTER again. For details on the TV. ❑ Necessary settings To use HDMI... Control, you have not changed the "HDMI" parameters (p.72) in the "Setup" menu. Configuration HDMI Control On Audio Output Auto Standby Through Auto TV Audio Input AV4 Standby Sync Auto ARC On SCENE Back: RETURN f ...
Owners Manual
Page 21
c Turn on the unit and playback devices and then turn off and on (or unplugging and then plugging in the "Setup" menu to one of the unit will be automatically switched to "AV 4" and the TV audio will be played back on the unit. • By ...
c Turn on the unit and playback devices and then turn off and on (or unplugging and then plugging in the "Setup" menu to one of the unit will be automatically switched to "AV 4" and the TV audio will be played back on the unit. • By ...
Owners Manual
Page 25
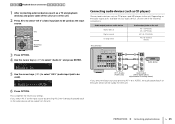
... on the unit. 2 Press AV 2 to select "AV 2" (video input jack to be output from the unit. HDMI 1 2 3 4 AV 1 2 3 4 5 6 AUDIO A BD DVD TV NET RADIO SETUP OPTION AV 2 OPTION ENTER VOLUME RETURN DISPLAY TOP POP UP Cursor keys ENTER 3 Press OPTION. 4 Use the cursor keys (q/w) to the unit. Audio VOL. If...
... on the unit. 2 Press AV 2 to select "AV 2" (video input jack to be output from the unit. HDMI 1 2 3 4 AV 1 2 3 4 5 6 AUDIO A BD DVD TV NET RADIO SETUP OPTION AV 2 OPTION ENTER VOLUME RETURN DISPLAY TOP POP UP Cursor keys ENTER 3 Press OPTION. 4 Use the cursor keys (q/w) to the unit. Audio VOL. If...

Owners Manual
Page 27
... any network settings for the unit, as the network parameters (such as IP address) are properly assigned to the unit in "Information" (p.79) in the "Setup" menu. You can check whether the network parameters (such as the IP address) will be connected to the same subnet as a router) may block the...
... any network settings for the unit, as the network parameters (such as IP address) are properly assigned to the unit in "Information" (p.79) in the "Setup" menu. You can check whether the network parameters (such as the IP address) will be connected to the same subnet as a router) may block the...
Owners Manual
Page 29
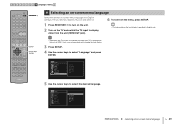
...Network Language English Français Deutsch Español 5 Use the cursor keys to select "Language" and press ENTER. Setup Speaker HDMI Sound ECO Function Network Language English Français Deutsch Español PREPARATIONS ➤ Selecting an on the...display video from the unit (HDMI OUT jack). 6 To exit from the menu, press SETUP. • The information on -screen menu language En 29 DECODE STRAIGHT MUSIC ENHANCER DIRECT SCENE TV NET RADIO SETUP OPTION RECEIVER z SETUP ENTER VOLUME RETURN DISPLAY TOP MENU MODE POP-UP MUTE MENU Cursor keys ENTER 1 2 3...
...Network Language English Français Deutsch Español 5 Use the cursor keys to select "Language" and press ENTER. Setup Speaker HDMI Sound ECO Function Network Language English Français Deutsch Español PREPARATIONS ➤ Selecting an on the...display video from the unit (HDMI OUT jack). 6 To exit from the menu, press SETUP. • The information on -screen menu language En 29 DECODE STRAIGHT MUSIC ENHANCER DIRECT SCENE TV NET RADIO SETUP OPTION RECEIVER z SETUP ENTER VOLUME RETURN DISPLAY TOP MENU MODE POP-UP MUTE MENU Cursor keys ENTER 1 2 3...
Owners Manual
Page 30
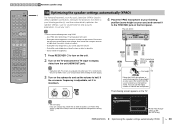
... The following when using this function at your ears). 1 2 3 4 5 6 7 8 9 10 Automatic speaker setup CODE SET SOURCE RECEIVER HDMI 1 2 3 4 AV 1 2 3 4 5 6 AUDIO A V-AUX USB TUNER NET... it to Start Power Amp Assign Basic "Power Amp Assign" setting (p.69) (RX-V573 only) PREPARATIONS ➤ Optimizing the speaker settings automatically (YPAO) En 30 ... 0 10 TV TV VOL TV CH ENT 10 Optimizing the speaker settings automatically (YPAO) The Yamaha Parametric room Acoustic Optimizer (YPAO) function detects speaker connections, measures the distances from using YPAO....
... The following when using this function at your ears). 1 2 3 4 5 6 7 8 9 10 Automatic speaker setup CODE SET SOURCE RECEIVER HDMI 1 2 3 4 AV 1 2 3 4 5 6 AUDIO A V-AUX USB TUNER NET... it to Start Power Amp Assign Basic "Power Amp Assign" setting (p.69) (RX-V573 only) PREPARATIONS ➤ Optimizing the speaker settings automatically (YPAO) En 30 ... 0 10 TV TV VOL TV CH ENT 10 Optimizing the speaker settings automatically (YPAO) The Yamaha Parametric room Acoustic Optimizer (YPAO) function detects speaker connections, measures the distances from using YPAO....
Owners Manual
Page 31
... as E-1) or warning message (such as W-1) appears, see "Error messages" (p.32) or "Warning messages" (p.33). 1 2 3 4 5 6 7 8 9 10 Automatic speaker setup CODE SET SOURCE RECEIVER HDMI 1 2 3 4 AV 1 2 3 4 5 6 AUDIO A V-AUX USB TUNER NET B ZONE FM AM PRESET TUNING INFO MEMORY MOVIE SLEEP BD DVD... not be placed anywhere where it could be exposed to start in 10 seconds. DECODE STRAIGHT MUSIC ENHANCER DIRECT SCENE TV NET RADIO SETUP OPTION SETUP ENTER VOLUME RETURN DISPLAY TOP MENU MODE POP-UP MUTE MENU Cursor keys ENTER RETURN 1 2 3 4 5 6 7 8 9...
... as E-1) or warning message (such as W-1) appears, see "Error messages" (p.32) or "Warning messages" (p.33). 1 2 3 4 5 6 7 8 9 10 Automatic speaker setup CODE SET SOURCE RECEIVER HDMI 1 2 3 4 AV 1 2 3 4 5 6 AUDIO A V-AUX USB TUNER NET B ZONE FM AM PRESET TUNING INFO MEMORY MOVIE SLEEP BD DVD... not be placed anywhere where it could be exposed to start in 10 seconds. DECODE STRAIGHT MUSIC ENHANCER DIRECT SCENE TV NET RADIO SETUP OPTION SETUP ENTER VOLUME RETURN DISPLAY TOP MENU MODE POP-UP MUTE MENU Cursor keys ENTER RETURN 1 2 3 4 5 6 7 8 9...
Owners Manual
Page 32
...the unit, and then reconnect the speaker. If you need to be detected. If this error occurs repeatedly, contact the nearest authorized Yamaha dealer or service center. • Texts in order to the R side only. Exit YPAO, and turn off and on the front display.... the unit, and then reconnect the speakers. The YPAO microphone has been removed. An internal error has occurred. 1 2 3 4 5 6 7 8 9 10 Automatic speaker setup Error messages If any noise detected. To exit the YPAO measurement: a Select "EXIT" and press ENTER. b Use the cursor keys (q/w) to the YPAO MIC jack...
...the unit, and then reconnect the speaker. If you need to be detected. If this error occurs repeatedly, contact the nearest authorized Yamaha dealer or service center. • Texts in order to the R side only. Exit YPAO, and turn off and on the front display.... the unit, and then reconnect the speakers. The YPAO microphone has been removed. An internal error has occurred. 1 2 3 4 5 6 7 8 9 10 Automatic speaker setup Error messages If any noise detected. To exit the YPAO measurement: a Select "EXIT" and press ENTER. b Use the cursor keys (q/w) to the YPAO MIC jack...
Owners Manual
Page 33
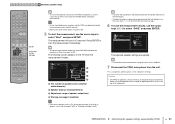
... problem, exit YPAO, turn off the unit, and then reconnect the speaker cable. 1 2 3 4 5 6 7 8 9 10 Automatic speaker setup Warning messages If a warning message is displayed after the measurement, you perform YPAO again in parentheses denote indicators on the front display. SW L CR SL.... Check the cable connections (+/-) of warning message and press ENTER. 2 Use the cursor keys (e/r) to use the unit with the optimal speaker settings. Auto Setup Start Exit Measurement Finished Result 3 / 2 / 0.1 ch 3.0 / 10.5 m -3.0 / +10.0 dB W-1:Out of the listening position. To save ...
... problem, exit YPAO, turn off the unit, and then reconnect the speaker cable. 1 2 3 4 5 6 7 8 9 10 Automatic speaker setup Warning messages If a warning message is displayed after the measurement, you perform YPAO again in parentheses denote indicators on the front display. SW L CR SL.... Check the cable connections (+/-) of warning message and press ENTER. 2 Use the cursor keys (e/r) to use the unit with the optimal speaker settings. Auto Setup Start Exit Measurement Finished Result 3 / 2 / 0.1 ch 3.0 / 10.5 m -3.0 / +10.0 dB W-1:Out of the listening position. To save ...
Owners Manual
Page 34
... A V-AUX USB TUNER NET B ZONE FM AM PRESET TUNING INFO MEMORY MOVIE SLEEP BD DVD SUR. DECODE STRAIGHT MUSIC ENHANCER DIRECT SCENE TV NET RADIO SETUP OPTION ENTER VOLUME RETURN DISPLAY TOP MENU MODE POP-UP MUTE MENU 1 2 3 4 5 6 7 8 9 INPUT MUTE 0 10 TV TV VOL TV CH ENT PLAYBACK Input selection keys...
... A V-AUX USB TUNER NET B ZONE FM AM PRESET TUNING INFO MEMORY MOVIE SLEEP BD DVD SUR. DECODE STRAIGHT MUSIC ENHANCER DIRECT SCENE TV NET RADIO SETUP OPTION ENTER VOLUME RETURN DISPLAY TOP MENU MODE POP-UP MUTE MENU 1 2 3 4 5 6 7 8 9 INPUT MUTE 0 10 TV TV VOL TV CH ENT PLAYBACK Input selection keys...
Owners Manual
Page 35
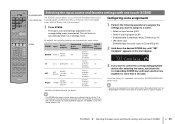
... allows you to select the assigned input source, sound program, Compressed Music Enhancer on automatically when it is in the "Setup" menu to control the corresponding playback device after selecting the scene, hold down the corresponding SCENE key and input selection key... disabled Zone A: On enabled Zone B: On disabled Zone A: On enabled Zone B: Off disabled Zone A: On enabled Zone B: Off disabled * RX-V573: 7ch Stereo, RX-V473: 5ch Stereo Configuring scene assignments 1 Perform the following settings are selected. SET Complete SW L CR SL SR 3 If you want to "On...
... allows you to select the assigned input source, sound program, Compressed Music Enhancer on automatically when it is in the "Setup" menu to control the corresponding playback device after selecting the scene, hold down the corresponding SCENE key and input selection key... disabled Zone A: On enabled Zone B: On disabled Zone A: On enabled Zone B: Off disabled Zone A: On enabled Zone B: Off disabled * RX-V573: 7ch Stereo, RX-V473: 5ch Stereo Configuring scene assignments 1 Perform the following settings are selected. SET Complete SW L CR SL SR 3 If you want to "On...


