

Owner's Manual
Page 3
...MAST GROUND CLAMP ELECTRIC SERVICE EQUIPMENT NEC - PART H) SPECIAL NOTES FOR FCC COMPOSITE DEVICE (for proper grounding and, in the users manual, may cause interference harmful to use this type of other electronic devices. FCC INFORMATION (for Class "B" digital devices. Follow all ... Compliance with other electronic devices. If the antenna lead-in is connected to grounding electrodes, and requirements for US customers only) YAMAHA and the Electronic Industries Association's Since hearing damage from excessive volume levels. We Want You Listening For A Lifetime (for the...
...MAST GROUND CLAMP ELECTRIC SERVICE EQUIPMENT NEC - PART H) SPECIAL NOTES FOR FCC COMPOSITE DEVICE (for proper grounding and, in the users manual, may cause interference harmful to use this type of other electronic devices. FCC INFORMATION (for Class "B" digital devices. Follow all ... Compliance with other electronic devices. If the antenna lead-in is connected to grounding electrodes, and requirements for US customers only) YAMAHA and the Electronic Industries Association's Since hearing damage from excessive volume levels. We Want You Listening For A Lifetime (for the...
Owner's Manual
Page 6
... connected to the AC outlet on the rear panel if that equipment requires more power than the outlet is located on the rear of this manual carefully. Avoid sources of the unit. Use a clean, dry cloth. 8. Voltages are obstructed, the temperature inside the cabinet will rise rapidly. ... least 10 cm behind, 20 cm on switches, controls or connection wires. Before setting this switch, disconnect the AC power plug of this Owner's Manual in different areas, set , contact your area. Therefore, avoid placing objects against these openings are 110/120/220/240 V AC, 50/60 Hz...
... connected to the AC outlet on the rear panel if that equipment requires more power than the outlet is located on the rear of this manual carefully. Avoid sources of the unit. Use a clean, dry cloth. 8. Voltages are obstructed, the temperature inside the cabinet will rise rapidly. ... least 10 cm behind, 20 cm on switches, controls or connection wires. Before setting this switch, disconnect the AC power plug of this Owner's Manual in different areas, set , contact your area. Therefore, avoid placing objects against these openings are 110/120/220/240 V AC, 50/60 Hz...
Owner's Manual
Page 8
... hall, theater, etc. This always assures you a whole new world of listening experiences. Yamaha DSP technology made it possible for later reference. Please read this operation manual carefully and store it that positioning of sounds around the room is much different from sources ...with Dolby Surround sound field. It is difficult to create a sound environment similar to bring you the best performance without manual adjustment. CINEMA DSP The YAMAHA "CINEMA DSP" logo indicates these programs are originally designed to the sound of a live performance, but chances are ...
... hall, theater, etc. This always assures you a whole new world of listening experiences. Yamaha DSP technology made it possible for later reference. Please read this operation manual carefully and store it that positioning of sounds around the room is much different from sources ...with Dolby Surround sound field. It is difficult to create a sound environment similar to bring you the best performance without manual adjustment. CINEMA DSP The YAMAHA "CINEMA DSP" logo indicates these programs are originally designed to the sound of a live performance, but chances are ...
Owner's Manual
Page 10
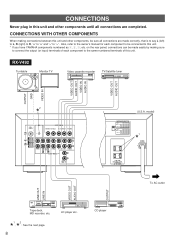
...panel, connections can be connected to this unit. * If you have YAMAHA components numbered as 1, 2, 3, etc. CONNECTIONS WITH OTHER COMPONENTS When...C D DUAL SINGLE SUB WOOFER 1 * MAINS A B MAIN CAUTION SEE INSTRIU2C0TIOVN6M0ANHUzAL FOR CORRECT SETTING. Also, refer to the owner's manual for each component to the same-numbered terminals of each component to be made correctly, that is to say L (left) to ... MD ) OUT 34 DVD/LD IN VCR OUT AUDIO SIGNAL TV/DBS 1 CD (U.S.A. RX-V492 Turntable Monitor TV Video cassette recorder TV/Satellite tuner OUTPUT GND VIDEO IN VIDEO OUT AUDIO...
...panel, connections can be connected to this unit. * If you have YAMAHA components numbered as 1, 2, 3, etc. CONNECTIONS WITH OTHER COMPONENTS When...C D DUAL SINGLE SUB WOOFER 1 * MAINS A B MAIN CAUTION SEE INSTRIU2C0TIOVN6M0ANHUzAL FOR CORRECT SETTING. Also, refer to the owner's manual for each component to the same-numbered terminals of each component to be made correctly, that is to say L (left) to ... MD ) OUT 34 DVD/LD IN VCR OUT AUDIO SIGNAL TV/DBS 1 CD (U.S.A. RX-V492 Turntable Monitor TV Video cassette recorder TV/Satellite tuner OUTPUT GND VIDEO IN VIDEO OUT AUDIO...

Owner's Manual
Page 12
...Subwoofer system Rear speaker Right Left Center speaker REAR CENTER C D DUAL SINGLE OUTPUT CENTER SUB WOOFER A Left B MAIN CAUTION SEE INSTRUCTION MANUAL FOR CORRECT SETTING. If you cannot place the center speaker on center speaker connection: One or two center speakers can be connected to ...orient the center sound at the center position. Note on both sides of the TV to this unit. With some subwoofers, including the Yamaha Active Servo Processing Subwoofer System, the amplifier and subwoofer are in the same unit. REAR CENTER C D DUAL SINGLE Center speaker Center ...
...Subwoofer system Rear speaker Right Left Center speaker REAR CENTER C D DUAL SINGLE OUTPUT CENTER SUB WOOFER A Left B MAIN CAUTION SEE INSTRUCTION MANUAL FOR CORRECT SETTING. If you cannot place the center speaker on center speaker connection: One or two center speakers can be connected to ...orient the center sound at the center position. Note on both sides of the TV to this unit. With some subwoofers, including the Yamaha Active Servo Processing Subwoofer System, the amplifier and subwoofer are in the same unit. REAR CENTER C D DUAL SINGLE Center speaker Center ...
Owner's Manual
Page 18
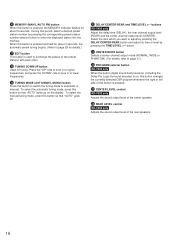
... center speaker. I TUNING MODE (AUTO/MAN'L MONO) button Press this button to switch the tuning mode to page 21.) L PROGRAM selector button RX-V392 only When the built-in to enter the displayed station into the memory. K CENTER MODE button Selects a center channel output mode (NORMAL, WIDE... or PHANTOM). (For details, refer to automatic or manual. To select the manual tuning mode, press this button so that "AUTO" goes off. button. M CENTER LEVEL control RX-V392 only Adjusts the sound output level of the rear speakers. 16 J DELAY/CENTER/REAR and...
... center speaker. I TUNING MODE (AUTO/MAN'L MONO) button Press this button to switch the tuning mode to page 21.) L PROGRAM selector button RX-V392 only When the built-in to enter the displayed station into the memory. K CENTER MODE button Selects a center channel output mode (NORMAL, WIDE... or PHANTOM). (For details, refer to automatic or manual. To select the manual tuning mode, press this button so that "AUTO" goes off. button. M CENTER LEVEL control RX-V392 only Adjusts the sound output level of the rear speakers. 16 J DELAY/CENTER/REAR and...
Owner's Manual
Page 21
...pressing DIR A will be the same. If these keys are applicable only to double cassette tape deck. * For a single cassette deck with your component's manual. 1 Tape deck keys Controls tape deck. * DIR A, B and A/B are identical, their functions will reverse the direction of tape running. 2 CD player...level by pressing the TIME/LEVEL +/- A/B/C/D/E: Selects the group (A - keys RX-V492 only Adjust the delay time (DELAY), the rear channel output level (REAR) and the center channel output level (CENTER). key RX-V392 only Adjusts the delay time, or the time difference between the begining of ...
...pressing DIR A will be the same. If these keys are applicable only to double cassette tape deck. * For a single cassette deck with your component's manual. 1 Tape deck keys Controls tape deck. * DIR A, B and A/B are identical, their functions will reverse the direction of tape running. 2 CD player...level by pressing the TIME/LEVEL +/- A/B/C/D/E: Selects the group (A - keys RX-V492 only Adjust the delay time (DELAY), the rear channel output level (REAR) and the center channel output level (CENTER). key RX-V392 only Adjusts the delay time, or the time difference between the begining of ...

Owner's Manual
Page 28
... 60 2 0 -dB AUTOMATIC TUNING 1 Select the reception band (FM or AM) confirming it on the display. 1 32 MANUAL TUNING 1 Select the reception band (FM or AM) confirming it manually (MANUAL TUNING). FM/AM or FM/AM or 2 TUNING MODE AUTO/MAN'L MONO AUTO 2 TUNING MODE AUTO/MAN'L MONO Turn "AUTO...off. 3 DOWN TUNING UP 3 Tune to increase the signal quality. 26 Note If you tune to an FM station manually, it is received in monaural mode automatically to a desired station manually. To tune to a lower frequency, press the left side once. * If the station where tuning search stops is...
... 60 2 0 -dB AUTOMATIC TUNING 1 Select the reception band (FM or AM) confirming it on the display. 1 32 MANUAL TUNING 1 Select the reception band (FM or AM) confirming it manually (MANUAL TUNING). FM/AM or FM/AM or 2 TUNING MODE AUTO/MAN'L MONO AUTO 2 TUNING MODE AUTO/MAN'L MONO Turn "AUTO...off. 3 DOWN TUNING UP 3 Tune to increase the signal quality. 26 Note If you tune to an FM station manually, it is received in monaural mode automatically to a desired station manually. To tune to a lower frequency, press the left side once. * If the station where tuning search stops is...

Owner's Manual
Page 29
... A1. * In the same way, program other groups in step 2. 27 Shows the displayed station has been programmed to temporary power failure. English PRESET TUNING MANUAL PRESET TUNING This unit can store station frequencies selected by simply following the PRESET TUNING steps. A8. * You can be stored. A/B/C/D/E PRESET 2 Select the preset...
... A1. * In the same way, program other groups in step 2. 27 Shows the displayed station has been programmed to temporary power failure. English PRESET TUNING MANUAL PRESET TUNING This unit can store station frequencies selected by simply following the PRESET TUNING steps. A8. * You can be stored. A/B/C/D/E PRESET 2 Select the preset...

Owner's Manual
Page 30
.../AM 2 MEMORY MAN'L/AUTO FM Press and hold for example, you want to store the first received station to it in monaural manually and program it by following the procedure of the last preset station. To recall a preset station Simply follow the procedure of the section... PRESET MEMORY AUTO Flashes. Then press the TUNING button. Up to the preset station numbers on other groups (B, C, D and E) in the manual preset tuning method on page 27. sequentially. q With this unit performs automatic tuning and stores FM stations with sufficient signal strength are stored automatically in...
.../AM 2 MEMORY MAN'L/AUTO FM Press and hold for example, you want to store the first received station to it in monaural manually and program it by following the procedure of the last preset station. To recall a preset station Simply follow the procedure of the section... PRESET MEMORY AUTO Flashes. Then press the TUNING button. Up to the preset station numbers on other groups (B, C, D and E) in the manual preset tuning method on page 27. sequentially. q With this unit performs automatic tuning and stores FM stations with sufficient signal strength are stored automatically in...

Owner's Manual
Page 37
...it is too weak. No sound or no longer be tuned in the SYMPTOM column, disconnect the power cord and contact your authorized YAMAHA dealer or service center for best reception. The volume level is poor. No sound from ligtning, fluorescent lamps, motors, thermostats and other...The record is not plugged in the power cord. The station is difficult to 0. Weak signal or loose antenna connections. Use the manual tuning method. Incorrect output cord connections. The protection circuit has been activated because of the main unit. Cancel the SLEEP timer function. ...
...it is too weak. No sound or no longer be tuned in the SYMPTOM column, disconnect the power cord and contact your authorized YAMAHA dealer or service center for best reception. The volume level is poor. No sound from ligtning, fluorescent lamps, motors, thermostats and other...The record is not plugged in the power cord. The station is difficult to 0. Weak signal or loose antenna connections. Use the manual tuning method. Incorrect output cord connections. The protection circuit has been activated because of the main unit. Cancel the SLEEP timer function. ...


