
Owner's Manual
Page 5
... the power supply cord 22 Speaker impedance setting 23 Turning on the power 23 AUTO SETUP 24 Introduction 24 Optimizer microphone setup 24 Starting the setup 25 BASIC SETUP 28 Using BASIC setup 28 BASIC OPERATION PLAYBACK 30 Basic operations 30 Selecting sound field programs 32 Selecting input ... 44 Manually adjusting speaker levels 45 Using the test tone 46 SET MENU 47 Using SET MENU 48 Manual setup: SOUND 49 Manual setup: INPUT 54 Manual setup: OPTION 56 REMOTE CONTROL FEATURES 59 Control area 59 Setting manufacturer codes 60 Programming codes from other remote controls...
... the power supply cord 22 Speaker impedance setting 23 Turning on the power 23 AUTO SETUP 24 Introduction 24 Optimizer microphone setup 24 Starting the setup 25 BASIC SETUP 28 Using BASIC setup 28 BASIC OPERATION PLAYBACK 30 Basic operations 30 Selecting sound field programs 32 Selecting input ... 44 Manually adjusting speaker levels 45 Using the test tone 46 SET MENU 47 Using SET MENU 48 Manual setup: SOUND 49 Manual setup: INPUT 54 Manual setup: OPTION 56 REMOTE CONTROL FEATURES 59 Control area 59 Setting manufacturer codes 60 Programming codes from other remote controls...
Owner's Manual
Page 6
...Preset Tuning ◆ Automatic Preset Tuning ◆ Preset Station Shifting Capability (Preset Editing) Other features ◆ YPAO: YAMAHA Parametric Room Acoustic Optimizer for Automatic Speaker Setup ◆ 192-kHz/24-bit D/A Converter ◆ "SET MENU" which Provides You with Preset Manufacturer Codes and...between the main unit and the remote control, the button name on the remote control. SILENT CINEMA is a jointly developed technology of YAMAHA CORPORATION. Surround EX is a trademark of THX and Dolby Laboratories, Inc. "DTS" and "DTS-ES Digital Surround" and "...
...Preset Tuning ◆ Automatic Preset Tuning ◆ Preset Station Shifting Capability (Preset Editing) Other features ◆ YPAO: YAMAHA Parametric Room Acoustic Optimizer for Automatic Speaker Setup ◆ 192-kHz/24-bit D/A Converter ◆ "SET MENU" which Provides You with Preset Manufacturer Codes and...between the main unit and the remote control, the button name on the remote control. SILENT CINEMA is a jointly developed technology of YAMAHA CORPORATION. Surround EX is a trademark of THX and Dolby Laboratories, Inc. "DTS" and "DTS-ES Digital Surround" and "...
Owner's Manual
Page 9
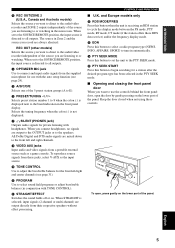
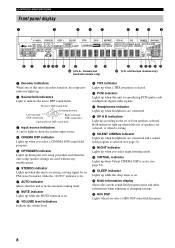
... front panel door, open , press gently on . H VIDEO AUX jacks Input audio and video signals from the supplied microphone for private listening with the auto setup function (see page 31). N PTY SEEK MODE Press this button to select a radio program type (NEWS, INFO, AFFAIRS, SPORT) to the PTY SEEK mode. When...
... front panel door, open , press gently on . H VIDEO AUX jacks Input audio and video signals from the supplied microphone for private listening with the auto setup function (see page 31). N PTY SEEK MODE Press this button to select a radio program type (NEWS, INFO, AFFAIRS, SPORT) to the PTY SEEK mode. When...
Owner's Manual
Page 11
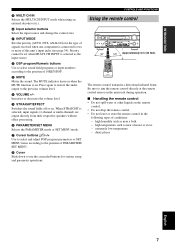
... as near a bath - J Input selector buttons Select the input source and change the control area. K INPUT MODE Sets the priority (AUTO, DTS, ANALOG) for various setup and parameter operations. Q Cursor buttons k/n/-/+ Use to select and adjust DSP program parameters or SET MENU items according to two or more of signals received...
... as near a bath - J Input selector buttons Select the input source and change the control area. K INPUT MODE Sets the priority (AUTO, DTS, ANALOG) for various setup and parameter operations. Q Cursor buttons k/n/-/+ Use to select and adjust DSP program parameters or SET MENU items according to two or more of signals received...
Owner's Manual
Page 12
E NIGHT indicator Lights up during the auto setup procedure and when the auto setup speaker settings are connected. I HiFi DSP Lights when you select night listening mode. CONTROLS AND FUNCTIONS Front panel display 1 2 3 4 5 67 8 9 V-AUX DVR/VCR2 VCR 1 CBL/...
E NIGHT indicator Lights up during the auto setup procedure and when the auto setup speaker settings are connected. I HiFi DSP Lights when you select night listening mode. CONTROLS AND FUNCTIONS Front panel display 1 2 3 4 5 67 8 9 V-AUX DVR/VCR2 VCR 1 CBL/...

Owner's Manual
Page 15
SPEAKER SETUP + SPEAKER SETUP PREPARATION Speaker placement PL PR FL C FR 30˚ SL 60˚ SL 80˚ SBL SR SR SBR more theater-like ambience. Align the ..., vocals, etc.). But it is not so critical, because low bass sounds are used for THX surround. Subwoofer The use of a subwoofer, such as the YAMAHA Active Servo Processing Subwoofer System, is effective not only for reinforcing bass frequencies from each speaker from any or all channels, but also for some...
SPEAKER SETUP + SPEAKER SETUP PREPARATION Speaker placement PL PR FL C FR 30˚ SL 60˚ SL 80˚ SBL SR SR SBR more theater-like ambience. Align the ..., vocals, etc.). But it is not so critical, because low bass sounds are used for THX surround. Subwoofer The use of a subwoofer, such as the YAMAHA Active Servo Processing Subwoofer System, is effective not only for reinforcing bass frequencies from each speaker from any or all channels, but also for some...

Owner's Manual
Page 16
... of U.K., Europe and Asia models) 12 CAUTION • If you will be sure to set this unit's speaker impedance setting to secure the wire. SPEAKER SETUP Speaker connections Be sure to prevent short circuits. 3 Unscrew the knob. This could damage this unit.
... of U.K., Europe and Asia models) 12 CAUTION • If you will be sure to set this unit's speaker impedance setting to secure the wire. SPEAKER SETUP Speaker connections Be sure to prevent short circuits. 3 Unscrew the knob. This could damage this unit.

Owner's Manual
Page 17
... ES decoder is turned on. • The presence speakers output ambient effects created by the DSP sound fields. English 13 PREPARATION 9 10 4 3 2 1 7 8 5 6 Speaker layout SPEAKER SETUP Subwoofer system Front speakers (A) Right Left 1 2 3 Center speaker Front speakers (B) 4 (U.S.A. SURROUND BACK SINGLE SPEAKERS PRESENCE/ ZONE 2 AC OUTLETS 7 85 69 10 Right Left Surround speakers...
... ES decoder is turned on. • The presence speakers output ambient effects created by the DSP sound fields. English 13 PREPARATION 9 10 4 3 2 1 7 8 5 6 Speaker layout SPEAKER SETUP Subwoofer system Front speakers (A) Right Left 1 2 3 Center speaker Front speakers (B) 4 (U.S.A. SURROUND BACK SINGLE SPEAKERS PRESENCE/ ZONE 2 AC OUTLETS 7 85 69 10 Right Left Surround speakers...

Owner's Manual
Page 18
... FRONT A or B terminals. Note The Canada model cannot output to these terminals. R+ -A - +L FRONT + -B - + This unit 14 SPEAKER SETUP ■ FRONT terminals Connect one or two speaker systems to two separate speaker systems simultaneously. Bi-wired connection The unit also allows you can also... Connect a center speaker to these terminals. ■ SURROUND terminals Connect surround speakers to these speakers as the YAMAHA Active Servo Processing Subwoofer System, to this jack. ■ SURROUND BACK terminals Connect surround back speakers to one speaker system.
... FRONT A or B terminals. Note The Canada model cannot output to these terminals. R+ -A - +L FRONT + -B - + This unit 14 SPEAKER SETUP ■ FRONT terminals Connect one or two speaker systems to two separate speaker systems simultaneously. Bi-wired connection The unit also allows you can also... Connect a center speaker to these terminals. ■ SURROUND terminals Connect surround speakers to these speakers as the YAMAHA Active Servo Processing Subwoofer System, to this jack. ■ SURROUND BACK terminals Connect surround back speakers to one speaker system.

Owner's Manual
Page 28
...possible, use different brands or sizes of each speaker. AUTO SETUP AUTO SETUP Introduction This receiver employs YAMAHA Parametric Room Acoustic Optimizer (YPAO) technology which speakers are output during the auto setup procedure. This is useful if you are seated in your system.... Optimizer microphone setup 1 Connect the supplied optimizer microphone to reduce coloration ...
...possible, use different brands or sizes of each speaker. AUTO SETUP AUTO SETUP Introduction This receiver employs YAMAHA Parametric Room Acoustic Optimizer (YPAO) technology which speakers are output during the auto setup procedure. This is useful if you are seated in your system.... Optimizer microphone setup 1 Connect the supplied optimizer microphone to reduce coloration ...

Owner's Manual
Page 29
... from each check in accordance with the sound of much ambient noise, the results may not be output from step 3. To restore the last auto setup setting. 7 Press n to select WIRING, DISTANCE, SIZE, EQUALIZING or LEVEL. 1 AUTO:MENU . p 4 Press k/n repeatedly to select START PUSH +,...to the accuracy of similar quality. When EQUALIZING is selected, press -/+ to select: AUTO STEP RELOAD To automatically perform the entire auto setup procedure. Recommended if your other speakers. To average the frequency response of all speakers. To skip the selected item and perform no ...
... from each check in accordance with the sound of much ambient noise, the results may not be output from step 3. To restore the last auto setup setting. 7 Press n to select WIRING, DISTANCE, SIZE, EQUALIZING or LEVEL. 1 AUTO:MENU . p 4 Press k/n repeatedly to select START PUSH +,...to the accuracy of similar quality. When EQUALIZING is selected, press -/+ to select: AUTO STEP RELOAD To automatically perform the entire auto setup procedure. Recommended if your other speakers. To average the frequency response of all speakers. To skip the selected item and perform no ...

Owner's Manual
Page 30
... before exiting. Pressing n returns to the RESULT:EXIT display. 8 To apply the changes, press -/+ to select SET, then press n to exit the auto setup. Pressing n returns to the RESULT:EXIT display. 8 Press -/+ to select SET, then press n to exit. p p p p RESULT:WIRING FRONT L;;;;;;;OK.../Down -/+ : Back/Next RESULT:DISTANCE1 . Notes • If you selected AUTO in step 6 The RESULT:EXIT display appears. To cancel the auto setup procedure, press -/ + to select CANCEL, then press n to exit. FRONT L;;;;3.20m CENTER;;;;;3.30m FRONT R;;;;2.90m PRES L;;;;;1.70m PRES R;;;;;1.50m / : ...
... before exiting. Pressing n returns to the RESULT:EXIT display. 8 To apply the changes, press -/+ to select SET, then press n to exit the auto setup. Pressing n returns to the RESULT:EXIT display. 8 Press -/+ to select SET, then press n to exit. p p p p RESULT:WIRING FRONT L;;;;;;;OK.../Down -/+ : Back/Next RESULT:DISTANCE1 . Notes • If you selected AUTO in step 6 The RESULT:EXIT display appears. To cancel the auto setup procedure, press -/ + to select CANCEL, then press n to exit. FRONT L;;;;3.20m CENTER;;;;;3.30m FRONT R;;;;2.90m PRES L;;;;;1.70m PRES R;;;;;1.50m / : ...

Owner's Manual
Page 31
... level correction is too loud. • Connect the surround back speaker to display the detailed information about the individual error. During auto setup Press -/+ to the LEFT SURROUND BACK SPEAKERS terminal if you select the opposite phase on the subwoofer if the subwoofer has a phase ...does not detect test tones. • Connect the supplied optimizer microphone to the listening position. The optimizer microphone was changed during the auto setup procedure. • If the warning message W-2 or W-3 appears on the relevant setting items. English 27 The result may not be ...
... level correction is too loud. • Connect the surround back speaker to display the detailed information about the individual error. During auto setup Press -/+ to the LEFT SURROUND BACK SPEAKERS terminal if you select the opposite phase on the subwoofer if the subwoofer has a phase ...does not detect test tones. • Connect the supplied optimizer microphone to the listening position. The optimizer microphone was changed during the auto setup procedure. • If the warning message W-2 or W-3 appears on the relevant setting items. English 27 The result may not be ...
Owner's Manual
Page 32
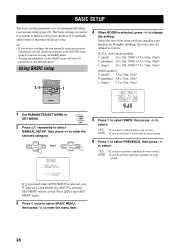
... the selected category. Press k/n to open SET MENU again. 3 Press n once to select BASIC MENU, then press -/+ to SET MENU. BASIC SETUP BASIC SETUP The basic system parameters are defined as follows: [U.S.A. y • If you do not have presence speakers in your speakers in. Roughly speaking, the... automatically when you have installed your system. If you have a subwoofer in your system. The basic settings are useful if you want to quickly setup your speakers or to select: YES NONE If you have a subwoofer in your system. 6 Press n to select PRESENCE, then press -/+ to...
... the selected category. Press k/n to open SET MENU again. 3 Press n once to select BASIC MENU, then press -/+ to SET MENU. BASIC SETUP BASIC SETUP The basic system parameters are defined as follows: [U.S.A. y • If you do not have presence speakers in your speakers in. Roughly speaking, the... automatically when you have installed your system. If you have a subwoofer in your system. The basic settings are useful if you want to quickly setup your speakers or to select: YES NONE If you have a subwoofer in your system. 6 Press n to select PRESENCE, then press -/+ to...

Owner's Manual
Page 33
...level (see page 50). 1 BASIC MENU 2/2 . English 29 Surround back L/R 9 Press n to select CHECK OK?, then press -/+ to the unit. PREPARATION BASIC SETUP 7 Press n to select SPEAKERS, then press -/+ to select the number of speakers connected to select: YES NO To exit the... setup if the test tones were satisfactory. Front L/R, - To cancel the setup. 1 BASIC MENU 2/2 . [SET CANCEL ROOM SIZE=SMALL If you select SET, you have finished the settings, press n, then ...
...level (see page 50). 1 BASIC MENU 2/2 . English 29 Surround back L/R 9 Press n to select CHECK OK?, then press -/+ to the unit. PREPARATION BASIC SETUP 7 Press n to select SPEAKERS, then press -/+ to select the number of speakers connected to select: YES NO To exit the... setup if the test tones were satisfactory. Front L/R, - To cancel the setup. 1 BASIC MENU 2/2 . [SET CANCEL ROOM SIZE=SMALL If you select SET, you have finished the settings, press n, then ...

Owner's Manual
Page 49
... speaker levels You can be canceled by using LEVEL when PARAMETER/SET MENU is set this operation will override the level adjustments made in "AUTO SETUP" (page 24), "Speaker level" (page 50) and "Using the test tone" (page 46). 2 3 A/B/C/D/E PRESET TV INPUT TV VOL CH TV MUTE MUTE STEREO VOLUME DISC...
... speaker levels You can be canceled by using LEVEL when PARAMETER/SET MENU is set this operation will override the level adjustments made in "AUTO SETUP" (page 24), "Speaker level" (page 50) and "Using the test tone" (page 46). 2 3 A/B/C/D/E PRESET TV INPUT TV VOL CH TV MUTE MUTE STEREO VOLUME DISC...

Owner's Manual
Page 50
... will override the level adjustments made in the listening position. With the meter set the output volume to C SLOW, calibrate each speaker is in "AUTO SETUP" (page 24), "Speaker level" (page 50) and "Manually adjusting speaker levels" (page 45). TEST SUBWOOFER Front left speaker Center speaker Front right speaker Right surround...
... will override the level adjustments made in the listening position. With the meter set the output volume to C SLOW, calibrate each speaker is in "AUTO SETUP" (page 24), "Speaker level" (page 50) and "Manually adjusting speaker levels" (page 45). TEST SUBWOOFER Front left speaker Center speaker Front right speaker Right surround...
Owner's Manual
Page 51
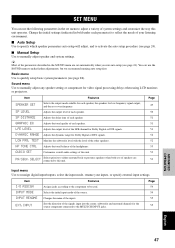
... the following parameters in bold under each speaker. You can use the SOUND menu to make further adjustments, but we recommend running auto setup first. GRAPHIC EQ Adjusts the tonal quality of the inputs. TEST Matches the subwoofer level with the level of each speaker, the speakers... for the source component connected to quickly setup basic system parameters (see page 24). Basic menu Use to the MULTI CH INPUT jacks. 55 ADVANCED OPERATION English 47 SP LEVEL Adjusts...
... the following parameters in bold under each speaker. You can use the SOUND menu to make further adjustments, but we recommend running auto setup first. GRAPHIC EQ Adjusts the tonal quality of the inputs. TEST Matches the subwoofer level with the level of each speaker, the speakers... for the source component connected to quickly setup basic system parameters (see page 24). Basic menu Use to the MULTI CH INPUT jacks. 55 ADVANCED OPERATION English 47 SP LEVEL Adjusts...

Owner's Manual
Page 52
Selects the Zone 2 mode. p p SET MENU . ;AUTO SETUP ;MANUAL SETUP / : Up/Down -/+ : Select If k is pressed when AUTO SETUP is selected, or if n is pressed when MANUAL SETUP is cut for more than one of the item you want to adjust. 4 Press -/+ repeatedly to adjust. 5 To exit, press k/n repeatedly until...MENU will be closed. However, if the power cord is disconnected from being lost even if this operation to navigate to and enter the setup mode of the item you want to change the setting of the sound field program group buttons. Locks sound field program parameters and other...
Selects the Zone 2 mode. p p SET MENU . ;AUTO SETUP ;MANUAL SETUP / : Up/Down -/+ : Select If k is pressed when AUTO SETUP is selected, or if n is pressed when MANUAL SETUP is cut for more than one of the item you want to adjust. 4 Press -/+ repeatedly to adjust. 5 To exit, press k/n repeatedly until...MENU will be closed. However, if the power cord is disconnected from being lost even if this operation to navigate to and enter the setup mode of the item you want to change the setting of the sound field program group buttons. Locks sound field program parameters and other...
Owner's Manual
Page 53
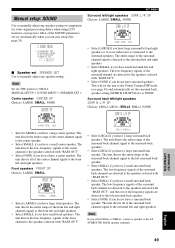
... have a center speaker. The unit directs the entire range of the surround back channels are set SPEAKER SET Use to NONE. p p Manual setup: SOUND Use to manually adjust any THX speakers to SMALL. Note Set any speaker setting or compensate for video signal processing delays when using LCD... The low-frequency signals of the frequency signals are directed to the speakers selected with "BASS OUT". • Select SMLx1 if you run auto setup (See page 24). 2 SOUND MENU . The low-frequency signals of the surround back channel are directed to the speakers selected with "BASS OUT",...
... have a center speaker. The unit directs the entire range of the surround back channels are set SPEAKER SET Use to NONE. p p Manual setup: SOUND Use to manually adjust any THX speakers to SMALL. Note Set any speaker setting or compensate for video signal processing delays when using LCD... The low-frequency signals of the frequency signals are directed to the speakers selected with "BASS OUT". • Select SMLx1 if you run auto setup (See page 24). 2 SOUND MENU . The low-frequency signals of the surround back channel are directed to the speakers selected with "BASS OUT",...


